@(文章目錄) 前言 上一篇和大家一起分享瞭如何使用LabVIEW OpenCV dnn實現手寫數字識別,今天我們一起來看一下如何使用LabVIEW OpenCV dnn實現圖像分類。 一、什麼是圖像分類? 1、圖像分類的概念 圖像分類,核心是從給定的分類集合中給圖像分配一個標簽的任務。實際上,這意 ...
@
目錄- 前言
- 一、什麼是圖像分類?
- 二、使用python實現圖像分類(py_to_py_ssd_mobilenet.py)
- 三、使用LabVIEW dnn實現圖像分類(callpb_photo.vi)
- 四、源碼下載
- 總結
前言
上一篇和大家一起分享瞭如何使用LabVIEW OpenCV dnn實現手寫數字識別,今天我們一起來看一下如何使用LabVIEW OpenCV dnn實現圖像分類。
一、什麼是圖像分類?
1、圖像分類的概念
圖像分類,核心是從給定的分類集合中給圖像分配一個標簽的任務。實際上,這意味著我們的任務是分析一個輸入圖像並返回一個將圖像分類的標簽。標簽總是來自預定義的可能類別集。
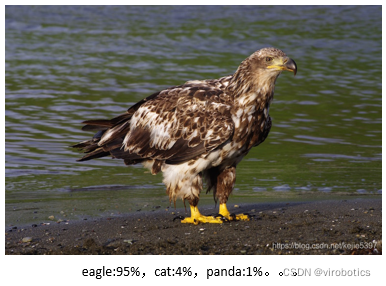
示例:我們假定一個可能的類別集categories = {dog, cat, eagle},之後我們提供一張圖片(下圖)給分類系統。這裡的目標是根據輸入圖像,從類別集中分配一個類別,這裡為eagle,我們的分類系統也可以根據概率給圖像分配多個標簽,如eagle:95%,cat:4%,panda:1%
2、MobileNet簡介
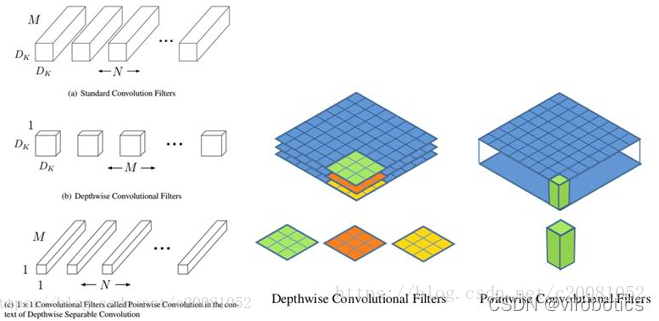
MobileNet:基本單元是深度級可分離捲積(depthwise separable convolution),其實這種結構之前已經被使用在Inception模型中。深度級可分離捲積其實是一種可分解捲積操作(factorized convolutions),其可以分解為兩個更小的操作:depthwise convolution和pointwise convolution,如圖1所示。Depthwise convolution和標準捲積不同,對於標準捲積其捲積核是用在所有的輸入通道上(input channels),而depthwise convolution針對每個輸入通道採用不同的捲積核,就是說一個捲積核對應一個輸入通道,所以說depthwise convolution是depth級別的操作。而pointwise convolution其實就是普通的捲積,只不過其採用1x1的捲積核。圖2中更清晰地展示了兩種操作。對於depthwise separable convolution,其首先是採用depthwise convolution對不同輸入通道分別進行捲積,然後採用pointwise convolution將上面的輸出再進行結合,這樣其實整體效果和一個標準捲積是差不多的,但是會大大減少計算量和模型參數量。
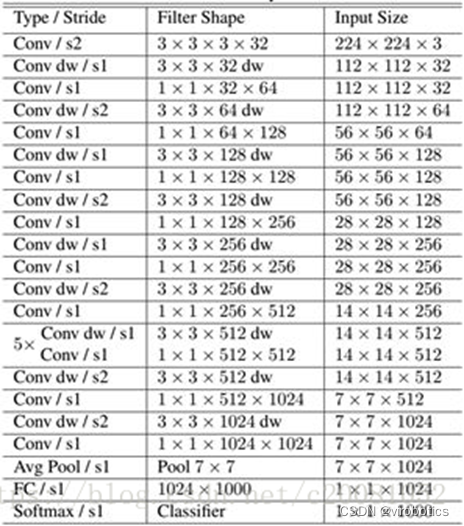
MobileNet的網路結構如表所示。首先是一個3x3的標準捲積,然後後面就是堆積depthwise separable convolution,並且可以看到其中的部分depthwise convolution會通過strides=2進行down sampling。然後採用average pooling將feature變成1x1,根據預測類別大小加上全連接層,最後是一個softmax層。如果單獨計算depthwise convolution和pointwise convolution,整個網路有28層(這裡Avg Pool和Softmax不計算在內)。
二、使用python實現圖像分類(py_to_py_ssd_mobilenet.py)
1、獲取預訓練模型
- 使用tensorflow.keras.applications獲取模型(以mobilenet為例);
from tensorflow.keras.applications import MobileNet
    original_tf_model = MobileNet(
        include_top=True,
        weights="imagenet"
    )
- 把original_tf_model打包成pb
def get_tf_model_proto(tf_model):
    # define the directory for .pb model
    pb_model_path = "models"

    # define the name of .pb model
    pb_model_name = "mobilenet.pb"

    # create directory for further converted model
    os.makedirs(pb_model_path, exist_ok=True)

    # get model TF graph
    tf_model_graph = tf.function(lambda x: tf_model(x))

    # get concrete function
    tf_model_graph = tf_model_graph.get_concrete_function(
        tf.TensorSpec(tf_model.inputs[0].shape, tf_model.inputs[0].dtype))

    # obtain frozen concrete function
    frozen_tf_func = convert_variables_to_constants_v2(tf_model_graph)
    # get frozen graph
    frozen_tf_func.graph.as_graph_def()

    # save full tf model
    tf.io.write_graph(graph_or_graph_def=frozen_tf_func.graph,
                      logdir=pb_model_path,
                      name=pb_model_name,
                      as_text=False)

    return os.path.join(pb_model_path, pb_model_name)
2、使用opencv_dnn進行推理
- 圖像預處理(blob)
def get_preprocessed_img(img_path):
    # read the image
    input_img = cv2.imread(img_path, cv2.IMREAD_COLOR)
    input_img = input_img.astype(np.float32)

    # define preprocess parameters
    mean = np.array([1.0, 1.0, 1.0]) * 127.5
    scale = 1 / 127.5

    # prepare input blob to fit the model input:
    # 1. subtract mean
    # 2. scale to set pixel values from 0 to 1
    input_blob = cv2.dnn.blobFromImage(
        image=input_img,
        scalefactor=scale,
        size=(224, 224),  # img target size
        mean=mean,
        swapRB=True,  # BGR -> RGB
        crop=True  # center crop
    )
    print("Input blob shape: {}\n".format(input_blob.shape))

    return input_blob
- 調用pb模型進行推理
def get_tf_dnn_prediction(original_net, preproc_img, imagenet_labels):
    # inference
    preproc_img = preproc_img.transpose(0, 2, 3, 1)
    print("TF input blob shape: {}\n".format(preproc_img.shape))

    out = original_net(preproc_img)

    print("\nTensorFlow model prediction: \n")
    print("* shape: ", out.shape)

    # get the predicted class ID
    imagenet_class_id = np.argmax(out)
    print("* class ID: {}, label: {}".format(imagenet_class_id, imagenet_labels[imagenet_class_id]))

    # get confidence
    confidence = out[0][imagenet_class_id]
    print("* confidence: {:.4f}".format(confidence))
3、實現圖像分類 (代碼彙總)
import os

import cv2
import numpy as np
import tensorflow as tf
from tensorflow.keras.applications import MobileNet
from tensorflow.python.framework.convert_to_constants import convert_variables_to_constants_v2


def get_tf_model_proto(tf_model):
    # define the directory for .pb model
    pb_model_path = "models"

    # define the name of .pb model
    pb_model_name = "mobilenet.pb"

    # create directory for further converted model
    os.makedirs(pb_model_path, exist_ok=True)

    # get model TF graph
    tf_model_graph = tf.function(lambda x: tf_model(x))

    # get concrete function
    tf_model_graph = tf_model_graph.get_concrete_function(
        tf.TensorSpec(tf_model.inputs[0].shape, tf_model.inputs[0].dtype))

    # obtain frozen concrete function
    frozen_tf_func = convert_variables_to_constants_v2(tf_model_graph)
    # get frozen graph
    frozen_tf_func.graph.as_graph_def()

    # save full tf model
    tf.io.write_graph(graph_or_graph_def=frozen_tf_func.graph,
                      logdir=pb_model_path,
                      name=pb_model_name,
                      as_text=False)

    return os.path.join(pb_model_path, pb_model_name)


def get_preprocessed_img(img_path):
    # read the image
    input_img = cv2.imread(img_path, cv2.IMREAD_COLOR)
    input_img = input_img.astype(np.float32)

    # define preprocess parameters
    mean = np.array([1.0, 1.0, 1.0]) * 127.5
    scale = 1 / 127.5

    # prepare input blob to fit the model input:
    # 1. subtract mean
    # 2. scale to set pixel values from 0 to 1
    input_blob = cv2.dnn.blobFromImage(
        image=input_img,
        scalefactor=scale,
        size=(224, 224),  # img target size
        mean=mean,
        swapRB=True,  # BGR -> RGB
        crop=True  # center crop
    )
    print("Input blob shape: {}\n".format(input_blob.shape))

    return input_blob


def get_imagenet_labels(labels_path):
    with open(labels_path) as f:
        imagenet_labels = [line.strip() for line in f.readlines()]
    return imagenet_labels


def get_opencv_dnn_prediction(opencv_net, preproc_img, imagenet_labels):
    # set OpenCV DNN input
    opencv_net.setInput(preproc_img)

    # OpenCV DNN inference
    out = opencv_net.forward()
    print("OpenCV DNN prediction: \n")
    print("* shape: ", out.shape)

    # get the predicted class ID
    imagenet_class_id = np.argmax(out)

    # get confidence
    confidence = out[0][imagenet_class_id]
    print("* class ID: {}, label: {}".format(imagenet_class_id, imagenet_labels[imagenet_class_id]))
    print("* confidence: {:.4f}\n".format(confidence))


def get_tf_dnn_prediction(original_net, preproc_img, imagenet_labels):
    # inference
    preproc_img = preproc_img.transpose(0, 2, 3, 1)
    print("TF input blob shape: {}\n".format(preproc_img.shape))

    out = original_net(preproc_img)

    print("\nTensorFlow model prediction: \n")
    print("* shape: ", out.shape)

    # get the predicted class ID
    imagenet_class_id = np.argmax(out)
    print("* class ID: {}, label: {}".format(imagenet_class_id, imagenet_labels[imagenet_class_id]))

    # get confidence
    confidence = out[0][imagenet_class_id]
    print("* confidence: {:.4f}".format(confidence))


def main():
    # configure TF launching
    #set_tf_env()

    # initialize TF MobileNet model
    original_tf_model = MobileNet(
        include_top=True,
        weights="imagenet"
    )

    # get TF frozen graph path
    full_pb_path = get_tf_model_proto(original_tf_model)
    print(full_pb_path)

    # read frozen graph with OpenCV API
    opencv_net = cv2.dnn.readNetFromTensorflow(full_pb_path)
    print("OpenCV model was successfully read. Model layers: \n", opencv_net.getLayerNames())

    # get preprocessed image
    input_img = get_preprocessed_img("yaopin.png")

    # get ImageNet labels
    imagenet_labels = get_imagenet_labels("classification_classes.txt")

    # obtain OpenCV DNN predictions
    get_opencv_dnn_prediction(opencv_net, input_img, imagenet_labels)

    # obtain TF model predictions
    get_tf_dnn_prediction(original_tf_model, input_img, imagenet_labels)


if __name__ == "__main__":
    main()
三、使用LabVIEW dnn實現圖像分類(callpb_photo.vi)
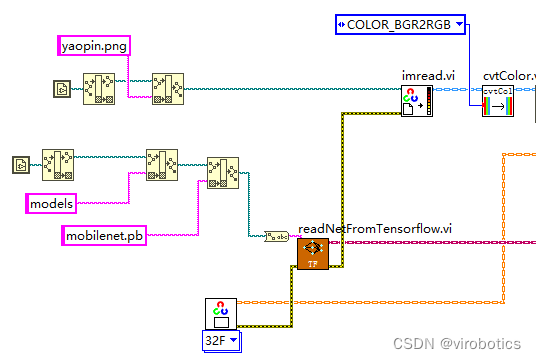
本博客中所用實例基於LabVIEW2018版本,調用mobilenet pb模型
1、讀取待分類的圖片和pb模型
2、將待分類的圖片進行預處理
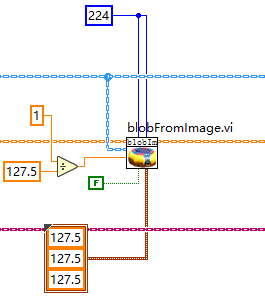
3、將圖像輸入至神經網路中併進行推理

4、實現圖像分類

5、總體程式源碼:
按照如下圖所示程式進行編碼,實現圖像分類,本範例中使用了一分類,分類出置信度最高的物體。

如下圖所示為載入藥瓶圖片得到的分類結果,在前面板可以看到圖片和label:

四、源碼下載
鏈接:https://pan.baidu.com/s/10yO72ewfGjxAg_f07wjx0A?pwd=8888
提取碼:8888
總結
更多關於LabVIEW與人工智慧技術,可添加技術交流群進一步探討。qq群號:705637299,請備註暗號:LabVIEW 機器學習


