JDBC和資料庫連接池 筆記目錄:(https://www.cnblogs.com/wenjie2000/p/16378441.html) 下載會使用到的包 JDBC概述 基本介紹 JDBC為訪問不同的資料庫提供了統一的介面,為使用者屏蔽了細節問題。 Java程式員使用JDBC,可以連接任何提供了J ...
JDBC和資料庫連接池
筆記目錄:(https://www.cnblogs.com/wenjie2000/p/16378441.html)
JDBC概述
基本介紹
-
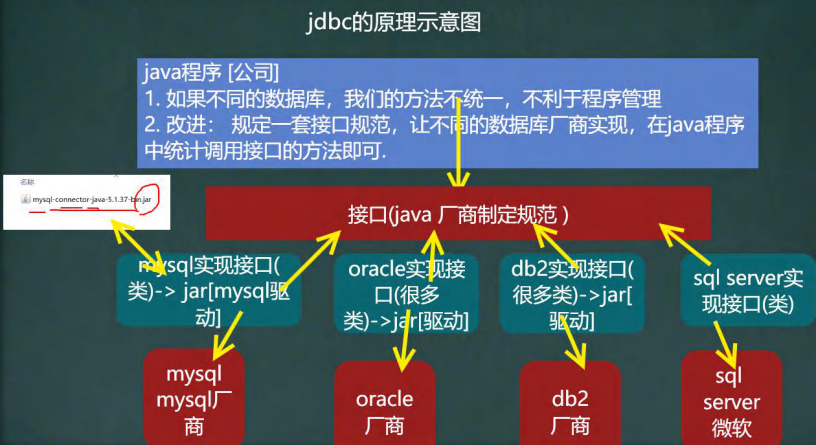
JDBC為訪問不同的資料庫提供了統一的介面,為使用者屏蔽了細節問題。
-
Java程式員使用JDBC,可以連接任何提供了JDBC驅動程式的資料庫系統,從而完成對資料庫的各種操作。
-
JDBC的基本原理圖
-
模擬JDBC
/*java規定的jdbc介面*/
public interface JdbcInterface {
//連接
public Object getConnection() ;
//crud
public void crud();
//關閉連接
public void close();
}
//mysql 資料庫實現了 jdbc 介面 [模擬] 【mysql 廠商開發】 public class MysqlJdbcImpl implements JdbcInterface{ @Override public Object getConnection() { System.out.println("得到 mysql 的連接"); return null; } @Override public void crud() { System.out.println("完成 mysql 增刪改查"); } @Override public void close() { System.out.println("關閉 mysql 的連接"); } }//模擬 oracle 資料庫實現 jdbc public class OracleJdbcImpl implements JdbcInterface { @Override public Object getConnection() { System.out.println("得到 oracle 的連接 升級"); return null; } @Override public void crud() { System.out.println("完成 對 oracle 的增刪改查"); } @Override public void close() { System.out.println("關閉 oracle 的連接"); } }//我們的操作--通過介面調用實現功能 public class TestJDBC { public static void main(String[] args) throws Exception { //完成對 mysql 的操作 JdbcInterface jdbcInterface = new MysqlJdbcImpl(); jdbcInterface.getConnection(); //通過介面來調用實現類[動態綁定] jdbcInterface.crud(); jdbcInterface.close(); //完成對 oracle 的操作 System.out.println("=============================="); jdbcInterface = new OracleJdbcImpl(); jdbcInterface.getConnection(); //通過介面來調用實現類[動態綁定] jdbcInterface.crud(); jdbcInterface.close(); } }
JDBC 帶來的好處
-
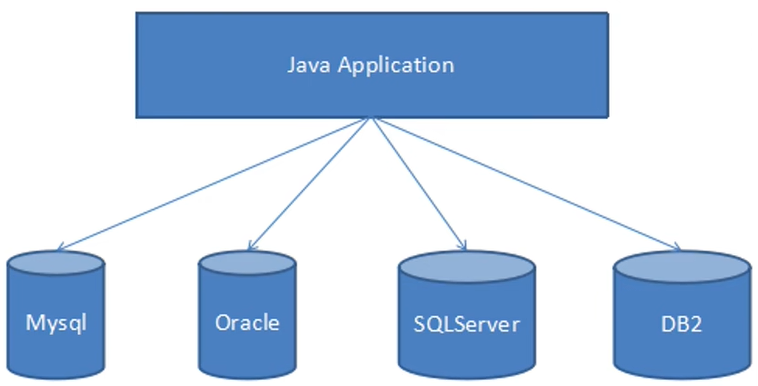
如果Java直接訪問資料庫(示意圖)
-
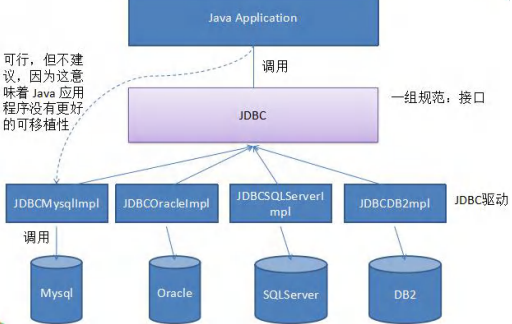
JDBC帶來的好處(示意圖)
-
說明:JDBC是Java提供一套用於資料庫操作的介面API,Java程式員只需要面向這套介面編程即可。不同的資料庫廠商,需要針對這套介面,提供不同實現。
JDBC API
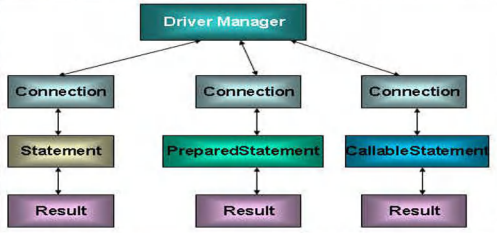
JDBC API是一系列的介面,它統一和規範了應用程式與資料庫的連接、執行SQL語句,併到得到返回結果等各類操作,相關類和介面在java.sql與javax.sql包中
JDBC快速入門
JDBC程式編寫步驟
- 註冊驅動---載入Driver 類
- 獲取連接---得到Connection
- 執行增刪改查---發送SQL給mysql執行
- 釋放資源---關閉相關連接
JDBC第一個程式
誦討jdbc對錶actor講行添加,刪除和修改操作
use db02;
create table actor (-- 演員表
id int primary key auto_increment,
name varchar(32) not null default '',
sex char(1) not null default '女',
borndate datetime,
phone varchar(12));
JDBC 第一個程式
先引入mysql的驅動文件()註意:驅動程式與mysql的版本號不同是正常狀況,驅動文件版本號命名不是以mysql版本為準。
以下為驅動版本相容的的mysql和java的版本信息。

把下載好的驅動文件複製到代碼文件夾中
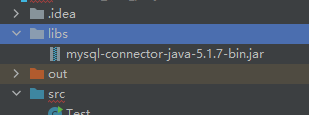
將其加入到項目中(對該文件右鍵,選擇Add as Library...)
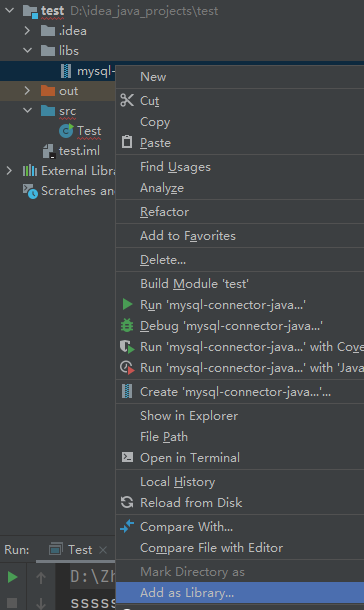
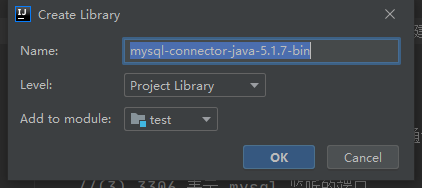
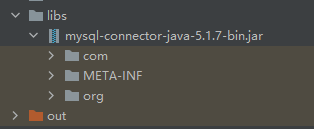
如果看到jar文件中的結構那麼就添加成功
import com.mysql.jdbc.Driver;

import java.sql.Connection;
import java.sql.SQLException;
import java.sql.Statement;
import java.util.Properties;

public class Jdbc01 {
    public static void main(String[] args) throws SQLException {
        //前置工作: 在項目下創建一個文件夾比如 libs
        // 將 mysql.jar 拷貝到該目錄下,點擊 add to project ..加入到項目中
        //1. 註冊驅動
        Driver driver = new Driver(); //創建 driver 對象

        //2. 得到連接
        // 老師解讀
        //(1) jdbc:mysql:// 規定好表示協議,通過 jdbc 的方式連接 mysql
        //(2) localhost 主機,可以是 ip 地址
        //(3) 3306 表示 mysql 監聽的埠
        //(4) hsp_db02 連接到 mysql dbms 的哪個資料庫
        //(5) mysql 的連接本質就是前面學過的 socket 連接
        String url = "jdbc:mysql://localhost:3306/db02";
        //將 用戶名和密碼放入到 Properties 對象
        Properties properties = new Properties();
        //說明 user 和 password 是規定好,後面的值根據實際情況寫
        properties.setProperty("user", "root");// 用戶
        properties.setProperty("password", "123456"); //密碼
        Connection connect = driver.connect(url, properties);

        //3. 執行 sql
        String sql = "insert into actor values(null, '劉德華', '男', '1970-11-11', '110')";
        //String sql = "update actor set name='周星馳' where id = 1";
        //String sql = "delete from actor where id = 1";
        //statement 用於執行靜態 SQL 語句並返回其生成的結果的對象
        Statement statement = connect.createStatement();
        int rows = statement.executeUpdate(sql); // 如果是 dml 語句,返回的就是影響行數System.out.println(rows > 0 ? "成功" : "失敗");

        //4. 關閉連接資源
        statement.close();
        connect.close();
    }
}
獲取資料庫連接 5 種方式
-
方式1
//獲取Driver實現類對象 Driver driver = new com.mysql.jdbc.Driver(); String url = "jdbc:mysql://localhost:3306/db02"; Properties info = new Properties(); info.setProperty("user", "root"); info.setProperty("password", "hsp"); Connection conn = driver.connect(url, info); System.out.println(conn); -
方式2
//方式1會直接使用com.mysql.jdbc.Driver(),屬於靜態載入,靈活性差,依賴強 //---推出--->方式2 Class clazz =Class.forName("com.mysql.jdbc.Driver"); Driver driver = (Driver) clazz.newInstance(); String url = "jdbc:mysql://localhost:3306/db02"; Properties info = new Properties(); info.setProperty("user", "root"); info.setProperty("password", "abc123"); Connection conn = driver.connect(url,info); System.out.printIn(conn); -
方式3
//不創建Properties,使用DriverManager替換Driver Class clazz = Class.forName("com.mysql.jdbc.Driver"); Driver driver = (Driver) clazz.newInstance(); String url = "jdbc:mysql://localhost:3306/jdbc_db"; String user = "root"; String password = "hsp"; DriverManager.registerDriver(driver); Connection conn = DriverManager.getConnection(url,user,password); System.out.println(conn); -
方式4(推薦使用,不太靈活)
//使用Class.forName自動完成註冊驅動,簡化代碼=>分析源碼
Class.forName("com.mysql.jdbc.Driver");
String url = "jdbc:mysql://localhost:3306/db02";
String user ="root";
String password = "123456";

Connection conn = DriverManager.getConnection(url,user,password);
System.out.println(conn);
提示:
- mysqL驅動5.1.6後可以無需CLass.forName("com.mysql.jdbc.Driver");
- 從jdk1.5以後使用了jdbc4,不再需要顯示調用class.forName()註冊驅動而是自動調用驅動jar包下META-INF\services\java.sqI.Driver文本中的類名稱去註冊
- 建議還是寫上 CLass.forName("com.mysql.jdbc.Driver"),更加明確,也預防驅動版本不夠導致的出錯的可能
-
方式5(最推薦使用)
在方式 4 的基礎上改進,增加配置文件,讓連接 mysql 更加靈活
埠,資料庫,用戶名,密碼為了方便,我們可以將信息寫入到.properties文件中,方便操作
jdbc.properties文件內容:
user=root
password=1
url=jdbc:mysql://localhost:3306/db02
driver=com.mysql.jdbc.Driver
//通過 Properties 對象獲取配置文件的信息 Properties properties = new Properties(); properties.load(new FileInputStream("src\\mysql.properties")); //獲取相關的值 String user = properties.getProperty("user"); String password = properties.getProperty("password"); String driver = properties.getProperty("driver"); String url = properties.getProperty("url"); Class.forName(driver);//建議寫上 Connection connection = DriverManager.getConnection(url, user, password); System.out.println("方式 5 " + connection);
課堂練習
以下全使用java實現(實現很簡單,我就不寫了)
- 創建news表
- 使用jdbc添加5條數據
- 修改id = 1的記錄,將content改成一個新的消息
- 刪除id =3的記錄
JDBC API
ResultSet[結果集]
基本介紹
-
表示資料庫結果集的數據表,通常通過執行查詢資料庫的語句生成
-
ResultSet對象保持一個游標指向其當前的數據行。最初,游標位於第一行之前
-
next方法將游標移動到下一行,並且由於在ResultSet對象中沒有更多行時返回false ,因此可以在while迴圈中使用迴圈來遍歷結果集
應用實例
import java.io.FileInputStream;
import java.io.FileNotFoundException;
import java.io.IOException;
import java.sql.*;
import java.util.Properties;

//演示 select 語句返回 ResultSet ,並取出結果
public class ResultSet_ {
    public static void main(String[] args) throws Exception {
        //通過 Properties 對象獲取配置文件的信息
        Properties properties = new Properties();
        properties.load(new FileInputStream("src\\mysql.properties"));
        //獲取相關的值
        String user = properties.getProperty("user");
        String password = properties.getProperty("password");
        String driver = properties.getProperty("driver");
        String url = properties.getProperty("url");
        //1. 註冊驅動
        Class.forName(driver);//建議寫上
        //2. 得到連接
        Connection connection = DriverManager.getConnection(url, user, password);
        //3. 得到 Statement
        Statement statement = connection.createStatement();
        //4. 組織 SqL
        String sql = "select id, name , sex, borndate from actor";
        //執行給定的 SQL 語句,該語句返回單個 ResultSet 對象
        /*
        +----+-----------+-----+---------------------+
        | id | name | sex | borndate |
        +----+-----------+-----+---------------------+-------+
        | 4 | 劉德華 | 男 | 1970-12-12 00:00:00 |
        | 5 | jack | 男 | 1990-11-11 00:00:00 |
        +----+-----------+-----+---------------------+-------+
        */
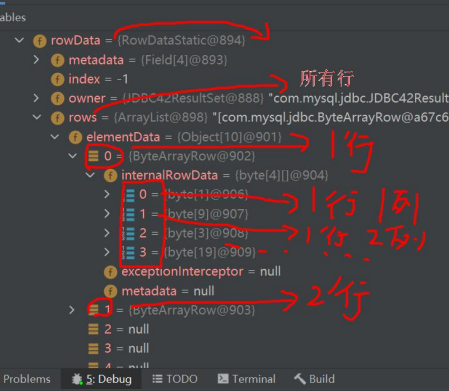
        /*
            閱讀 debug 代碼 resultSet 對象的結構
        */
        ResultSet resultSet = statement.executeQuery(sql);

        //5. 使用 while 取出數據
        while (resultSet.next()) { // 讓游標向後移動,如果沒有更多行,則返回 false
            int id = resultSet.getInt(1); //獲取該行的第 1 列
            //int id1 = resultSet.getInt("id"); 通過列名來獲取值, 推薦
            String name = resultSet.getString(2);//獲取該行的第 2 列
            String sex = resultSet.getString(3);
            Date date = resultSet.getDate(4);
            System.out.println(id + "\t" + name + "\t" + sex + "\t" + date);
        }
        //6. 關閉連接
        resultSet.close();
        statement.close();
        connection.close();
    }
}
Statement
基本介紹
-
Statement對象用於執行靜態SQL語句並返回其生成的結果的對象
-
在連接建立後,需要對資料庫進行訪問,執行命名或是SQL語句,可以通過
Statement [存在SQL註入,實際開發一定不要用]
PreparedStatement [預處理]
CallableStatement [存儲過程]
-
Statement對象執行SQL語句,存在SQL註入風險
-
SQL註入是利用某些系統沒有對用戶輸入的數據進行充分的檢查,而在用戶輸入數據中註入非法的SQL語句段或命令,惡意攻擊資料庫。以下為SQL註入的例子:
-- 演示 sql 註入 -- 創建一張表 CREATE TABLE admin ( -- 管理員表 NAME VARCHAR(32) NOT NULL UNIQUE, pwd VARCHAR(32) NOT NULL DEFAULT '') CHARACTER SET utf8; -- 添加數據 INSERT INTO admin VALUES('tom', '123'),('tom2', '1234'); -- 查找某個管理是否存在 -- 正常語句 SELECT * FROM admin WHERE NAME = 'tom' AND pwd = '123' -- SQL註入 -- 輸入用戶名 為 1' or -- 輸入密碼 為 or '1'= '1 -- 就出現以下語句 SELECT * FROM admin WHERE NAME = '1' OR' AND pwd = 'OR '1'= '1' -- 這個必定會查到數據,因而導致系統誤判,認為賬號和密碼正確 -
要防範SQL註入,只要用 PreparedStatement(從Statement擴展而來)取代 Statement就可以了
PreparedStatement
基本介紹
- PreparedStatement執行的SQL語句中的參數用問號(?)來表示,調用PreparedStatement對象的setXxx()方法來設置這些參數. setXxx()方法有兩個參數,第一個參數是要設置的SQL語句中的參數的索引(從1開始),第二個是設置的SQL語句中的參數的值
- 調用executeQuery(),返回ResultSet 對象
- 調用executeUpdate():執行更新,包括增、刪、修改
預處理好處
- 不再使用+拼接sql語句,減少語法錯誤
- 有效的解決了sql註入問題!
- 大大減少了編譯次數,效率較高
應用案例
import java.io.FileInputStream;
import java.io.FileNotFoundException;
import java.sql.*;
import java.util.Properties;
import java.util.Scanner;

//演示 PreparedStatement 使用 select 語句

public class PreparedStatement_ {
    public static void main(String[] args) throws Exception {
        //看 PreparedStatement 類圖
        Scanner scanner = new Scanner(System.in);
        //讓用戶輸入管理員名和密碼
        System.out.print("請輸入管理員的名字: "); //next(): 當接收到 空格或者 '就是表示結束
        String admin_name = scanner.nextLine(); // 說明,如果希望看到 SQL 註入,這裡需要用nextLine
        System.out.print("請輸入管理員的密碼: ");
        String admin_pwd = scanner.nextLine();
        //通過 Properties 對象獲取配置文件的信息
        Properties properties = new Properties();
        properties.load(new FileInputStream("src\\mysql.properties"));
        //獲取相關的值
        String user = properties.getProperty("user");
        String password = properties.getProperty("password");
        String driver = properties.getProperty("driver");
        String url = properties.getProperty("url");
        //1. 註冊驅動
        Class.forName(driver);//建議寫上
        //2. 得到連接
        Connection connection = DriverManager.getConnection(url, user, password);

        //3. 得到 PreparedStatement
        //3.1 組織 SqL , Sql 語句的 ? 就相當於占位符
        String sql = "select name , pwd from admin where name =? and pwd = ?";
        //3.2 preparedStatement 對象實現了 PreparedStatement 介面的實現類的對象
        PreparedStatement preparedStatement = connection.prepareStatement(sql);
        //3.3 給 ? 賦值
        preparedStatement.setString(1, admin_name);
        preparedStatement.setString(2, admin_pwd);
        //4. 執行 select 語句使用 executeQuery
        // 如果執行的是 dml(update, insert ,delete) executeUpdate()
        // 這裡執行 executeQuery ,不要再寫 sql
        ResultSet resultSet = preparedStatement.executeQuery();
        if (resultSet.next()) { //如果查詢到一條記錄,則說明該管理存在
            System.out.println("恭喜, 登錄成功");
        } else {
            System.out.println("對不起,登錄失敗");
        }
        //關閉連接
        resultSet.close();
        preparedStatement.close();
        connection.close();
    }
}
import java.io.FileInputStream;
import java.sql.Connection;
import java.sql.DriverManager;
import java.sql.PreparedStatement;
import java.sql.ResultSet;
import java.util.Properties;
import java.util.Scanner;

//演示 PreparedStatement 使用 delete/insert/update 語句

public class PreparedStatementDML_ {
    public static void main(String[] args) throws Exception {
        //看 PreparedStatement 類圖
        Scanner scanner = new Scanner(System.in);
        //讓用戶輸入管理員名和密碼
        System.out.print("請輸刪除管理員的名字: "); //next(): 當接收到 空格或者 '就是表示結束
        String admin_name = scanner.nextLine(); // 說明,如果希望看到 SQL 註入,這裡需要用nextLine
        // System.out.print("請輸入管理員的新密碼: ");
        // String admin_pwd = scanner.nextLine();
        //通過 Properties 對象獲取配置文件的信息
        Properties properties = new Properties();
        properties.load(new FileInputStream("src\\mysql.properties"));
        //獲取相關的值
        String user = properties.getProperty("user");
        String password = properties.getProperty("password");
        String driver = properties.getProperty("driver");
        String url = properties.getProperty("url");
        //1. 註冊驅動
        Class.forName(driver);//建議寫上
        //2. 得到連接
        Connection connection = DriverManager.getConnection(url, user, password);

        //3. 得到 PreparedStatement
        //3.1 組織 SqL , Sql 語句的 ? 就相當於占位符
        //添加記錄
        //String sql = "insert into admin values(?, ?)";
        //String sql = "update admin set pwd = ? where name = ?";
        String sql = "delete from admin where name = ?";
        //3.2 preparedStatement 對象實現了 PreparedStatement 介面的實現類的對象
        PreparedStatement preparedStatement = connection.prepareStatement(sql);
        //3.3 給 ? 賦值
        preparedStatement.setString(1, admin_name);
        //preparedStatement.setString(2, admin_name);
        //4. 執行 dml 語句使用 executeUpdate
        int rows = preparedStatement.executeUpdate();
        System.out.println(rows > 0 ? "執行成功" : "執行失敗");
        //關閉連接
        preparedStatement.close();
        connection.close();
    }
}
課堂練習
參考上面代碼,代碼沒難度,我就不寫了
- 創建admin表
- 使用PreparedStatement 添加5條數據
- 修改tom的記錄,將name改成 king
- 刪除一條的記錄
- 查詢全部記錄,並顯示在控制台
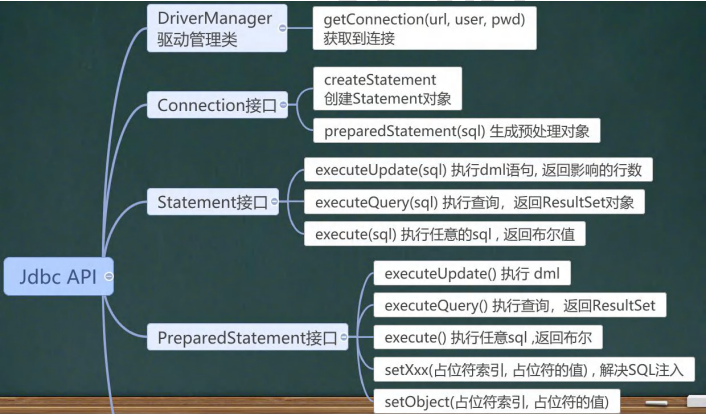
JDBC 的相關 API 小結

封裝 JDBCUtils
說明
在jdbc操作中,獲取連接和釋放資源是經常使用到,可以將其封裝JDBC連接的工具類JDBCUtils
實際使用使用工具類 JDBCUtils
import java.io.FileInputStream;
import java.io.IOException;
import java.sql.*;
import java.util.Properties;

/**
 * 這是一個工具類,完成 mysql 的連接和關閉資源
 */
public class JDBCUtils {
    //定義相關的屬性(4 個), 因為只需要一份,因此,我們做出 static
    private static String user; //用戶名
    private static String password; //密碼
    private static String url; //url
    private static String driver; //驅動名
    //在 static 代碼塊去初始化
    static {
        try {
            Properties properties = new Properties();
            properties.load(new FileInputStream("src\\jdbc.properties"));
            //讀取相關的屬性值
            user = properties.getProperty("user");
            password = properties.getProperty("password");
            url = properties.getProperty("url");
            driver = properties.getProperty("driver");
        } catch (IOException e) {
            //在實際開發中,我們可以這樣處理
            //1. 將編譯異常轉成 運行異常
            //2. 調用者,可以選擇捕獲該異常,也可以選擇預設處理該異常,比較方便.
            throw new RuntimeException(e);
        }
    }
    //連接資料庫, 返回 Connection
    public static Connection getConnection() {
        try {
            return DriverManager.getConnection(url, user, password);
        } catch (SQLException e) {
            //1. 將編譯異常轉成 運行異常
            //2. 調用者,可以選擇捕獲該異常,也可以選擇預設處理該異常,比較方便.
            throw new RuntimeException(e);
        }
    }
    //關閉相關資源
    /*
    1. ResultSet 結果集
    2. Statement 或者 PreparedStatement
    3. Connection
    4. 如果需要關閉資源,就傳入對象,否則傳入 null
    */
    public static void close(ResultSet set, Statement statement, Connection connection) {
        //判斷是否為 null
        try {
            if (set != null) {
                set.close();
            }
            if (statement != null) {
                statement.close();
            }
            if (connection != null) {
                connection.close();
            }
        } catch (SQLException e) {
            //將編譯異常轉成運行異常拋出
            throw new RuntimeException(e);
        }
    }
}
import org.junit.Test;

import java.sql.*;

/**
 * 該類演示如何使用 JDBCUtils 工具類,完成 dml 和 select
 */
public class JDBCUtils_Use {
    @Test
    public void testSelect() {
        //1. 得到連接
        Connection connection = null;
        //2. 組織一個 sql
        String sql = "select * from actor where id = ?";
        PreparedStatement preparedStatement = null;
        ResultSet set = null;
        //3. 創建 PreparedStatement 對象
        try {
            connection = JDBCUtils.getConnection();
            System.out.println(connection.getClass()); //com.mysql.jdbc.JDBC4Connection
            preparedStatement = connection.prepareStatement(sql);
            preparedStatement.setInt(1, 5);//給?號賦值
            //執行, 得到結果集
            set = preparedStatement.executeQuery();
            //遍歷該結果集
            while (set.next()) {
                int id = set.getInt("id");
                String name = set.getString("name");
                String sex = set.getString("sex");
                Date borndate = set.getDate("borndate");
                String phone = set.getString("phone");
                System.out.println(id + "\t" + name + "\t" + sex + "\t" + borndate + "\t" + phone);
            }
        } catch (SQLException e) {
            e.printStackTrace();
        } finally {
            //關閉資源
            JDBCUtils.close(set, preparedStatement, connection);
        }
    }

    @Test
    public void testDML() {//insert , update, delete
        //1. 得到連接
        Connection connection = null;
        //2. 組織一個 sql
        String sql = "update actor set name = ? where id = ?";
        // 測試 delete 和 insert ,自己玩.
        PreparedStatement preparedStatement = null;
        //3. 創建 PreparedStatement 對象
        try {
            connection = JDBCUtils.getConnection();
            preparedStatement = connection.prepareStatement(sql);
            //給占位符賦值
            preparedStatement.setString(1, "周星馳");
            preparedStatement.setInt(2, 4);
            //執行
            preparedStatement.executeUpdate();
        } catch (SQLException e) {
            e.printStackTrace();
        } finally {
            //關閉資源
            JDBCUtils.close(null, preparedStatement, connection);//註意,因為PreparedStatement繼承了Statement,所以可以用來關閉preparedStatement
        }
    }
}
事務
基本介紹
- JDBC程式中當一個Connection對象創建時,預設情況下是自動提交事務:每次執行一個SQL語句時,如果執行成功,就會向資料庫自動提交,而不能回滾。
- JDBC程式中為了讓多個SQL語句作為一個整體執行,需要使用事務
- 調用 Connection的setAutoCommit(false)可以取消自動提交事務
- 在所有的SQL語句都成功執行後,調用Collection的commit();方法提交事務
- 在其中某個操作失敗或出現異常時,調用rollback();方法回滾事務
應用實例
模擬經典的轉賬業務
先創建表:
create table account(
    id int primary key auto_increment,
    name varchar(32) not null default '',
    balance double not null default 0) character set utf8;

insert into account values(null,'馬雲',3000);
insert into account values(null,'馬化騰',10000);
//沒有使用事務.
@Test
public void noTransaction() {
    //操作轉賬的業務
    //1. 得到連接
    Connection connection = null;
    //2. 組織一個 sql
    String sql = "update account set balance = balance - 100 where id = 1";
    String sql2 = "update account set balance = balance + 100 where id = 2";
    PreparedStatement preparedStatement = null;
    //3. 創建 PreparedStatement 對象
    try {
        connection = JDBCUtils.getConnection(); // 在預設情況下,connection 是預設自動提交
        preparedStatement = connection.prepareStatement(sql);
        preparedStatement.executeUpdate(); // 執行第 1 條 sql
        int i = 1 / 0; //模擬拋出異常
        preparedStatement = connection.prepareStatement(sql2);
        preparedStatement.executeUpdate(); // 執行第 3 條 sql
    } catch (SQLException e) {
        e.printStackTrace();
    } finally {
        //關閉資源
        JDBCUtils.close(null, preparedStatement, connection);
    }
}
//使用事務來解決
@Test
public void useTransaction() {
    //操作轉賬的業務
    //1. 得到連接
    Connection connection = null;
    //2. 組織一個 sql
    String sql = "update account set balance = balance - 100 where id = 1";
    String sql2 = "update account set balance = balance + 100 where id = 2";
    PreparedStatement preparedStatement = null;
    //3. 創建 PreparedStatement 對象
    try {
        connection = JDBCUtils.getConnection(); // 在預設情況下,connection 是預設自動提交

        //將 connection 設置為不自動提交
        connection.setAutoCommit(false); //開啟了事務
        preparedStatement = connection.prepareStatement(sql);
        preparedStatement.executeUpdate(); // 執行第 1 條 sql
        int i = 1 / 0; //拋出異常
        preparedStatement = connection.prepareStatement(sql2);
        preparedStatement.executeUpdate(); // 執行第 3 條 sql

        //這裡提交事務
        connection.commit();
    } catch (SQLException e) {
        //這裡我們可以進行回滾,即撤銷執行的 SQL
        //預設回滾到事務開始的狀態.
        System.out.println("執行發生了異常,撤銷執行的 sql");
        try {
            connection.rollback();
        } catch (SQLException throwables) {
            throwables.printStackTrace();
        }
        e.printStackTrace();
    } finally {
        //關閉資源
        JDBCUtils.close(null, preparedStatement, connection);
    }
}
批處理
基本介紹
-
當需要成批插入或者更新記錄時。可以採用Java的批量更新機制,這一機制允許多條語句一次性提交給資料庫批量處理。通常情況下比單獨提交處理更有效率。
-
JDBC的批量處理語句包括下麵方法:
addBatch():添加需要批量處理的SQL語句或參數
executeBatch(): 執行批量處理語句;
clearBatch():清空批處理包的語句
-
JDBC連接MySQL時,如果要使用批處理功能,必須在url中原先的末尾添加參數:
?rewriteBatchedStatements=true(如果不添加,底層就還是使用之前的方式添加)
-
批處理往往和PreparedStatement一起搭配使用,可以既減少編譯次數,又減少運行次數,效率大大提高
應用實例
- 演示向admin2表中添加5000條數據,看著使用批處理耗時多久
- 註意:需要修改配置
文件jdbc.properties中 url=jdbc:mysql://localhost:3306/資料庫名?rewriteBatchedStatements=true
create table admin2(
    id int primary key auto_increment,
    username varchar(32) not null,
    password varchar(32) not null);
//使用批量方式添加數據
@Test
public void batch() throws Exception {
    Connection connection = JDBCUtils.getConnection();
    String sql = "insert into admin2 values(null, ?, ?)";
    PreparedStatement preparedStatement = connection.prepareStatement(sql);
    System.out.println("開始執行");
    long start = System.currentTimeMillis();//開始時間
    for (int i = 0; i < 5000; i++) {//5000 執行
        preparedStatement.setString(1, "jack" + i);
        preparedStatement.setString(2, "666");
        //將 sql 語句加入到批處理包中 -> 看源碼
        /*
        //1. //第一就創建 ArrayList - elementData => Object[]
        //2. elementData => Object[] 就會存放我們預處理的 sql 語句
        //3. 當 elementData 滿後,就按照 1.5 擴容
        //4. 當添加到指定的值後,就 executeBatch
        //5. 批量處理會減少我們發送 sql 語句的網路開銷,而且減少編譯次數,因此效率提高
        public void addBatch() throws SQLException {
            synchronized(this.checkClosed().getConnectionMutex()) {
                if (this.batchedArgs == null) {
                    this.batchedArgs = new ArrayList();
                }
                for(int i = 0; i < this.parameterValues.length; ++i) {
                    this.checkAllParametersSet(this.parameterValues[i], this.parameterStreams[i], i);
                }
                this.batchedArgs.add(new PreparedStatement.BatchParams(this.parameterValues, this.parameterStreams, this.isStream, this.streamLengths, this.isNull));
            }
        }
        */
        preparedStatement.addBatch();
        //當有 1000 條記錄時,在批量執行
        if ((i + 1) % 1000 == 0) {//滿 1000 條 sql
            preparedStatement.executeBatch();
            //清空一把
            preparedStatement.clearBatch();
        }
    }
    long end = System.currentTimeMillis();
    System.out.println("批量方式 耗時=" + (end - start));//批量方式 耗時=108
    //關閉連接
    JDBCUtils.close(null, preparedStatement, connection);
}
資料庫連接池
傳統獲取Connection問題分析
- 傳統的JDBC資料庫連接使用 DriverManager 來獲取,每次向資料庫建立連接的時候都要將 Connection 載入到記憶體中,再驗證IP地址,用戶名和密碼(0.05s ~1s時間)。需要資料庫連接的時候,就向資料庫要求一個,頻繁的進行資料庫連接操作將占用很多的系統資源,容易造成伺服器崩潰。
- 每一次資料庫連接,使用完後都得斷開,如果程式出現異常而未能關閉,將導致資料庫記憶體泄漏,最終將導致重啟資料庫。
- 傳統獲取連接的方式,不能控制創建的連接數量,如連接過多,也可能導致記憶體泄漏,MySQL崩潰。
- 解決傳統開發中的資料庫連接問題,可以採用資料庫連接池技術(connection pool)。
資料庫連接池種類
-
JDBC的資料庫連接池使用javax.sql.DataSource來表示,DataSource只是一個介面,該介面通常由第三方提供實現[提供.jar]
-
C3P0資料庫連接池,速度相對較慢(只是相較於其他連接池而言,但本身依然很快),穩定性不錯(hibernate, spring)
-
DBCP資料庫連接池,速度相對c3p0較快,但不穩定
-
Proxool資料庫連接池,有監控連接池狀態的功能,穩定性較c3p0差一點
-
BoneCP資料庫連接池,速度快
-
Druid(德魯伊)是阿裡提供的資料庫連接池,集DBCP、C3PO、Proxool優點於一身的資料庫連接池
-
實際開發推薦使用Druid,但是由於C3P0出來時間早,也有許多公司在用。其它連接池不推薦使用。
C3P0的使用
c3p0 資料庫連接池,驅動文件放src目錄下(使用方法和之前的mysql驅動包一樣)(下載)
使用方式一:
//方式 1: 相關參數,在程式中指定 user, url , password 等
@Test
public void testC3P0_01() throws Exception {
    //1. 創建一個數據源對象
    ComboPooledDataSource comboPooledDataSource = new ComboPooledDataSource();
    //2. 通過配置文件 mysql.properties 獲取相關連接的信息
    Properties properties = new Properties();
    properties.load(new FileInputStream("src\\jdbc.properties"));
    //讀取相關的屬性值
    String user = properties.getProperty("user");
    String password = properties.getProperty("password");
    String url = properties.getProperty("url");
    String driver = properties.getProperty("driver");

    //給數據源 comboPooledDataSource 設置相關的參數
    //註意:連接管理是由 comboPooledDataSource 來管理
    comboPooledDataSource.setDriverClass(driver);
    comboPooledDataSource.setJdbcUrl(url);
    comboPooledDataSource.setUser(user);
    comboPooledDataSource.setPassword(password);

    //設置初始化連接數
    comboPooledDataSource.setInitialPoolSize(10);
    //最大連接數
    comboPooledDataSource.setMaxPoolSize(50);
    //測試連接池的效率, 測試對 mysql 500000 次操作
    long start = System.currentTimeMillis();
    for (int i = 0; i < 500000; i++) {
        Connection connection = comboPooledDataSource.getConnection(); //這個方法就是從DataSource介面實現的
        //System.out.println("連接 OK");
        connection.close();
    }
    long end = System.currentTimeMillis();
    //c3p0 500000 連接 mysql 耗時=2291
    System.out.println("c3p0 500000 連接 mysql 耗時=" + (end - start));//2291s
}
使用方式二:
c3p0配置文件"c3p0-config.xml"放到src自錄下
<!-- c3p0-config.xml -->
<c3p0-config>
    <!-- 數據源名稱代表連接池 -->
  <named-config name="hsp_edu">
<!-- 驅動類 -->
  <property name="driverClass">com.mysql.jdbc.Driver</property>
  <!-- url-->
  	<property name="jdbcUrl">jdbc:mysql://127.0.0.1:3306/db02</property>
  <!-- 用戶名 -->
  		<property name="user">root</property>
  		<!-- 密碼 -->
  	<property name="password">123456</property>
  	<!-- 每次增長的連接數-->
    <property name="acquireIncrement">5</property>
    <!-- 初始的連接數 -->
    <property name="initialPoolSize">10</property>
    <!-- 最小連接數 -->
    <property name="minPoolSize">5</property>
   <!-- 最大連接數 -->
    <property name="maxPoolSize">50</property>

	<!-- 可連接的最多的命令對象數 -->
    <property name="maxStatements">5</property>

    <!-- 每個連接對象可連接的最多的命令對象數 -->
    <property name="maxStatementsPerConnection">2</property>
  </named-config>
</c3p0-config>
//第二種方式 使用配置文件模板來完成
//1. 將 c3p0 提供的 c3p0.config.xml 拷貝到 src 目錄下
//2. 該文件指定了連接資料庫和連接池的相關參數,註意需要根據自己的實際情況進行更改該文件
@Test
public void testC3P0_02() throws SQLException {
    ComboPooledDataSource comboPooledDataSource = new ComboPooledDataSource("hsp_edu");//"hsp_edu"為配置文件中named-config處的name,可自己設置
    //測試 5000 次連接 mysql
    long start = System.currentTimeMillis();
    System.out.println("開始執行....");
    for (int i = 0; i < 500000; i++) {
        Connection connection = comboPooledDataSource.getConnection();
        //System.out.println("連接 OK~");
        connection.close();
    }
    long end = System.currentTimeMillis();
    //c3p0 的第二種方式 耗時=2138
    System.out.println("c3p0 的第二種方式(500000) 耗時=" + (end - start));//2138s
}
Druid的使用
druid資料庫連接池,驅動文件放src目錄下(使用方法和之前的mysql驅動包一樣)(下載)
druid配置文件"druid.properties"放src自錄下
# druid.properties
#key=value
driverClassName=com.mysql.jdbc.Driver
url=jdbc:mysql://localhost:3306/db02?rewriteBatchedStatements=true
username=root
password=123456
#initial connection Size
initialSize=10
#min idle connecton size
minIdle=5
#max active connection size
maxActive=50
#max wait time (5000 mil seconds)
maxWait=5000
//測試 druid 的使用
@Test
public void testDruid() throws Exception {
    //1. 加入 Druid jar 包
    //2. 加入 配置文件 druid.properties , 將該文件拷貝項目的 src 目錄
    //3. 創建 Properties 對象, 讀取配置文件
    Properties properties = new Properties();
    properties.load(new FileInputStream("src\\druid.properties"));

    //4. 創建一個指定參數的資料庫連接池, Druid 連接池
    DataSource dataSource = DruidDataSourceFactory.createDataSource(properties);
    long start = System.currentTimeMillis();
    for (int i = 0; i < 500000; i++) {
        Connection connection = dataSource.getConnection();
        //System.out.println(connection.getClass());
        //System.out.println("連接成功!");
        connection.close();
    }
    long end = System.currentTimeMillis();
    //druid 連接池 操作 500000 耗時=807
    System.out.println("druid 連接池 操作 500000 耗時=" + (end - start));//807s
}
將 JDBCUtils 工具類改成 Druid(德魯伊)實現
import com.alibaba.druid.pool.DruidDataSourceFactory;

import javax.sql.DataSource;
import java.io.FileInputStream;
import java.sql.Connection;
import java.sql.ResultSet;
import java.sql.SQLException;
import java.sql.Statement;
import java.util.Properties;

/**
 * 基於 druid 資料庫連接池的工具類
 */
public class JDBCUtilsByDruid {
    private static DataSource ds;

    //在靜態代碼塊完成 ds 初始化
    static {
        Properties properties = new Properties();
        try {
            properties.load(new FileInputStream("src\\druid.properties"));
            ds = DruidDataSourceFactory.createDataSource(properties);
        } catch (Exception e) {
            e.printStackTrace();
        }
    }

    //編寫 getConnection 方法
    public static Connection getConnection() throws SQLException {
        return ds.getConnection();
    }

    //關閉連接, 再次強調: 在資料庫連接池技術中,close 不是真的斷掉連接,而是把使用的 Connection 對象放回連接池
    public static void close(ResultSet resultSet, Statement statement, Connection connection) {
        try {
            if (resultSet != null) {
                resultSet.close();
            }
            if (statement != null) {
                statement.close();
            }
            if (connection != null) {
                connection.close();
            }
        } catch (SQLException e) {
            throw new RuntimeException(e);
        }
    }
}
Apache-DBUtils
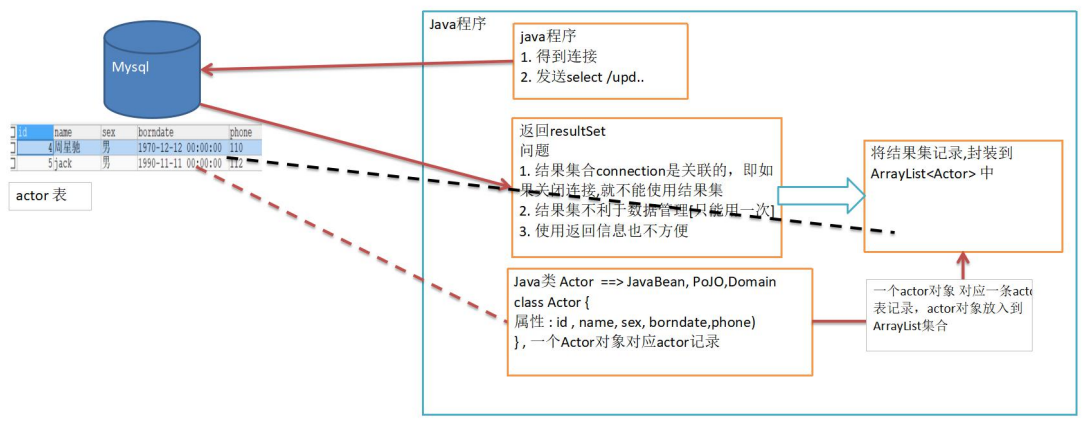
先分析一個問題
-
關閉connection後,resultSet結果集無法使用
-
resultSet不利於數據的管理
-
示意圖
DBUtils基本介紹
- commons-dbutils是 Apache組織提供的一個開源 JDBC工具類庫,它是對JDBC的封裝,使用dbutils能極大簡化jdbc編碼的工作量。
DbUtils類
- QueryRunner類:該類封裝了SQL的執行,是線程安全的。可以實現增、刪、改、查、批處理
- 使用QueryRunner類實現查詢
- ResultSetHandler介面:該介面用於處理java.sql.ResultSet,將數據按要求轉換為另一種形式,
ArrayHandler:把結果集中的第一行數據轉成對象數組。
ArrayListHandler:把結果集中的每一行數據都轉成一個數組,再存放到List中。
BeanHandler:將結果集中的第一行數據封裝到一個對應的JavaBean實例中。
BeanListHandler: 將結果集中的每一行數據都封裝到一個對應的JavaBean實例中,存放到List里。
ColumnListHandler:將結果集中某一列的數據存放到List中。
KeyedHandler(name):將結果集中的每行數據都封裝到Map里,再把這些map再存到一個map里,其key為指定的key.
MapHandler:將結果集中的第一行數據封裝到一個Map里,key是列名,value就是對應的值。
MapListHandler:將結果集中的每一行數據都封裝到一個Map里,然後再存放到List
應用實例
使用DBUtils+數據連接池(德魯伊)方式,完成對錶actor的增刪改查
先將”commons-dbutils-1.3.jar“放到項目中,和之前的mysql驅動方法一樣
先創建資料庫中表對應的類
import java.util.Date;

/**
 * Actor 對象和 actor 表的記錄對應
 */
public class Actor { //Javabean, POJO, Domain 對象
    private Integer id;
    private String name;
    private String sex;
    private Date borndate;
    private String phone;
    public Actor() { //一定要給一個無參構造器[反射需要]
    }
    public Actor(Integer id, String name, String sex, Date borndate, String phone) {
        this.id = id;
        this.name = name;
        this.sex = sex;
        this.borndate = borndate;
        this.phone = phone;
    }
    public Integer getId() {return id;}
    public void setId(Integer id) {this.id = id;}
    public String getName() {return name;}
    public void setName(String name) {this.name = name;}
    public String getSex() {return sex;}
    public void setSex(String sex) {this.sex = sex;}
    public Date getBorndate() {return borndate;}
    public void setBorndate(Date borndate) {this.borndate = borndate;}
    public String getPhone() {return phone;}
    public void setPhone(String phone) {this.phone = phone;}
    @Override
    public String toString() {
        return "\nActor{" +
                "id=" + id +
                ", name='" + name + '\'' +
                ", sex='" + sex + '\'' +
                ", borndate=" + borndate +
                ", phone='" + phone + '\'' +
                '}';
    }
}
import org.apache.commons.dbutils.QueryRunner;
import org.apache.commons.dbutils.handlers.BeanHandler;
import org.apache.commons.dbutils.handlers.BeanListHandler;
import org.apache.commons.dbutils.handlers.ScalarHandler;
import org.junit.Test;


import java.sql.*;
import java.util.ArrayList;
import java.util.List;

@SuppressWarnings({"all"})
public class DBUtils_USE {
    //使用 apache-DBUtils 工具類 + druid 完成對錶的 crud 操作
    @Test
    public void testQueryMany() throws SQLException { //返回結果是多行的情況
        //1. 得到 連接 (druid)
        Connection connection = JDBCUtilsByDruid.getConnection();
        //2. 使用 DBUtils 類和介面 , 先引入 DBUtils 相關的 jar , 加入到本 Project
        //3. 創建 QueryRunner
        QueryRunner queryRunner = new QueryRunner();
        //4. 就可以執行相關的方法,返回 ArrayList 結果集
        //String sql = "select * from actor where id >= ?";
        // 註意: sql 語句也可以查詢部分列
        String sql = "select id, name from actor where id >= ?";
        // 解讀
        //(1) query 方法就是執行 sql 語句,得到 resultset ---封裝到 --> ArrayList 集合中
        //(2) 返回集合
        //(3) connection: 連接
        //(4) sql : 執行的 sql 語句
        //(5) new BeanListHandler<>(Actor.class): 在將 resultset -> Actor 對象 -> 封裝到ArrayList
        // 底層使用反射機制 去獲取 Actor 類的屬性,然後進行封裝
        //(6) 1 就是給 sql 語句中的? 賦值,可以有多個值,因為是可變參數 Object... params
        //(7) 底層得到的 resultset ,會在 query 關閉, 關閉 PreparedStatment
        /**
         *分析 queryRunner.query 方法:
         *public <T > T query(Connection conn, String sql, ResultSetHandler < T > rsh, Object...params)throwsSQLException {
         *     PreparedStatement stmt = null;//定義 PreparedStatement
         *     ResultSet rs = null;//接收返回的 ResultSet
         *     Object result = null;//返回 ArrayList
         *
         *     try {
         *         stmt = this.prepareStatement(conn, sql);//創建 PreparedStatement
         *         this.fillStatement(stmt, params);//對 sql 進行 ? 賦值
         *         rs = this.wrap(stmt.executeQuery());//執行 sql,返回 resultset
         *         result = rsh.handle(rs);//返回的 resultset --> arrayList[result] [使用到反射,對傳入class 對象處理]
         *     } catch (SQLException var33) {
         *         this.rethrow(var33, sql, params);
         *     } finally {
         *         try {
         *             this.close(rs);//關閉 resultset
         *         } finally {
         *             this.close((Statement) stmt);//關閉 preparedstatement 對象* }
         *         }
         *
         *         return result;
         *     }
         *
         *     List<Actor> list =
         *             queryRunner.query(connection, sql, new BeanListHandler<>(Actor.class), 1);
         *     System.out.println("輸出集合的信息");
         *     for (Actor actor : list) {
         *         System.out.print(actor);
         *     }
         *     //釋放資源
         *     JDBCUtilsByDruid.close(null, null, connection);
         * }
         */
        List<Actor> list =
                queryRunner.query(connection, sql, new BeanListHandler<>(Actor.class), 1);
        System.out.println("輸出集合的信息");
        for (Actor actor : list) {
            System.out.print(actor);
        }
        //釋放資源
        JDBCUtilsByDruid.close(null, null, connection);
    }

    //演示 apache-dbutils + druid 完成 返回的結果是單行記錄(單個對象)
    @Test
    public void testQuerySingle() throws SQLException {
        //1. 得到 連接 (druid)
        Connection connection = JDBCUtilsByDruid.getConnection();
        //2. 使用 DBUtils 類和介面 , 先引入 DBUtils 相關的 jar , 加入到本 Project
        //3. 創建 QueryRunner
        QueryRunner queryRunner = new QueryRunner();
        //4. 就可以執行相關的方法,返回單個對象
        String sql = "select * from actor where id = ?";
        // 老韓解讀
        // 因為我們返回的單行記錄<--->單個對象 , 使用的 Hander 是 BeanHandler
        Actor actor = queryRunner.query(connection, sql, new BeanHandler<>(Actor.class), 10);
        System.out.println(actor);
        // 釋放資源
        JDBCUtilsByDruid.close(null, null, connection);
    }

    //演示 apache-dbutils + druid 完成查詢結果是單行單列-返回的就是 object
    @Test
    public void testScalar() throws SQLException {
        //1. 得到 連接 (druid)
        Connection connection = JDBCUtilsByDruid.getConnection();
        //2. 使用 DBUtils 類和介面 , 先引入 DBUtils 相關的 jar , 加入到本 Project
        //3. 創建 QueryRunner
        QueryRunner queryRunner = new QueryRunner();
        //4. 就可以執行相關的方法,返回單行單列 , 返回的就是 Object
        String sql = "select name from actor where id = ?";
        //老師解讀: 因為返回的是一個對象, 使用的 handler 就是 ScalarHandler
        Object obj = queryRunner.query(connection, sql, new ScalarHandler(), 4);
        System.out.println(obj);
        // 釋放資源
        JDBCUtilsByDruid.close(null, null, connection);
    }

    //演示 apache-dbutils + druid 完成 dml (update, insert ,delete)
    @Test
    public void testDML() throws SQLException {
        //1. 得到 連接 (druid)
        Connection connection = JDBCUtilsByDruid.getConnection();
        //2. 使用 DBUtils 類和介面 , 先引入 DBUtils 相關的 jar , 加入到本 Project
        //3. 創建 QueryRunner
        QueryRunner queryRunner = new QueryRunner();
        //4. 這裡組織 sql 完成 update, insert delete
        //String sql = "update actor set name = ? where id = ?";
        //String sql = "insert into actor values(null, ?, ?, ?, ?)";
        String sql = "delete from actor where id = ?";
        // 解讀
        //(1) 執行 dml 操作是 queryRunner.update()
        //(2) 返回的值是受影響的行數 (affected: 受影響)
        //int affectedRow = queryRunner.update(connection, sql, "林青霞", "女", "1966-10-10", "116");
        int affectedRow = queryRunner.update(connection, sql, 1000);
        System.out.println(affectedRow > 0 ? "執行成功" : "執行沒有影響到表");
        // 釋放資源
        JDBCUtilsByDruid.close(null, null, connection);
    }
}
DAO增刪改查-BasicDao
先分析一個問題
apache-dbutils+ Druid 簡化了JDBC開發,但還有不足:
-
SQL語句是固定,不能通過參數傳入,通用性不好,需要進行改進,更方便執行增刪改查
-
對於select 操作,如果有返回值,返回類型不能固定,需要使用泛型
-
將來的表很多,業務需求複雜,不可能只靠一個Java類完成
-
引出=》 BasicDAO畫出示意圖
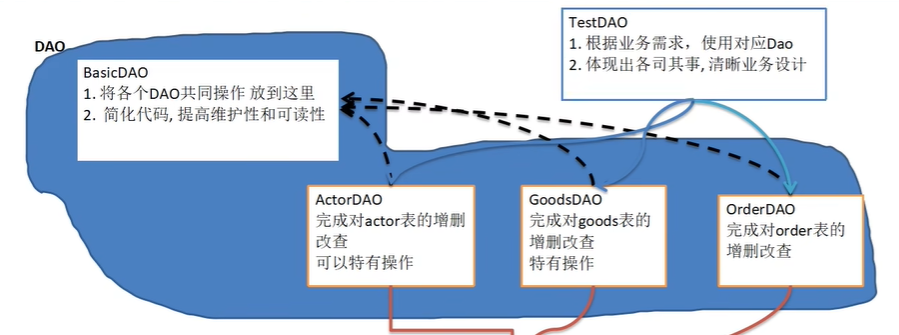

基本說明
- DAO: data access object數據訪問對象
- 這樣的通用類,稱為 BasicDao,是專門和資料庫交互的,即完成對資料庫(表)的crud操作。
- 在BaiscDao的基礎上,實現一張表對應一個Dao,更好的完成功能,比如 Customer表-Customer.java類(javabean)-CustomerDao.java
BasicDAO 應用實例
完成一個簡單設計
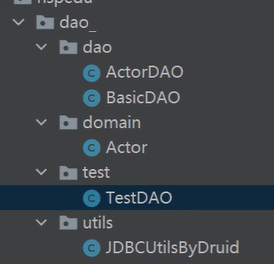
-
com.zwj.dao_.utils //工具類
-
com.zwj.dao_.domain //javabean
-
com.zwj.dao_.dao //存放XxxDAO和BasicDAO_
-
com.zwj.dao_.test //寫測試類
package com.zwj.dao_.dao;
/**
 * 開發BasicDAO , 是其他DAO的父類
 */
public class BasicDAO<T> { //泛型指定具體類型

    private QueryRunner qr =  new QueryRunner();

    //開發通用的dml方法, 針對任意的表
    public int update(String sql, Object... parameters) {

        Connection connection = null;

        try {
            connection = JDBCUtilsByDruid.getConnection();
            int update = qr.update(connection, sql, parameters);
            return  update;
        } catch (SQLException e) {
           throw  new RuntimeException(e); //將編譯異常->運行異常 ,拋出
        } finally {
            JDBCUtilsByDruid.close(null, null, connection);
        }

    }

    //返回多個對象(即查詢的結果是多行), 針對任意表

    /**
     *
     * @param sql sql 語句,可以有 ?
     * @param clazz 傳入一個類的Class對象 比如 Actor.class
     * @param parameters 傳入 ? 的具體的值,可以是多個
     * @return 根據Actor.class 返回對應的 ArrayList 集合
     */
    public List<T> queryMulti(String sql, Class<T> clazz, Object... parameters) {

        Connection connection = null;
        try {
            connection = JDBCUtilsByDruid.getConnection();
            return qr.query(connection, sql, new BeanListHandler<T>(clazz), parameters);

        } catch (SQLException e) {
            throw  new RuntimeException(e); //將編譯異常->運行異常 ,拋出
        } finally {
            JDBCUtilsByDruid.close(null, null, connection);
        }

    }

    //查詢單行結果 的通用方法
    public T querySingle(String sql, Class<T> clazz, Object... parameters) {

        Connection connection = null;
        try {
            connection = JDBCUtilsByDruid.getConnection();
            return  qr.query(connection, sql, new BeanHandler<T>(clazz), parameters);

        } catch (SQLException e) {
            throw  new RuntimeException(e); //將編譯異常->運行異常 ,拋出
        } finally {
            JDBCUtilsByDruid.close(null, null, connection);
        }
    }

    //查詢單行單列的方法,即返回單值的方法

    public Object queryScalar(String sql, Object... parameters) {

        Connection connection = null;
        try {
            connection = JDBCUtilsByDruid.getConnection();
            return  qr.query(connection, sql, new ScalarHandler(), parameters);

        } catch (SQLException e) {
            throw  new RuntimeException(e); //將編譯異常->運行異常 ,拋出
        } finally {
            JDBCUtilsByDruid.close(null, null, connection);
        }
    }
}
package com.zwj.dao_.dao;

import com.zwj.dao_.domain.Actor;

public class ActorDAO extends BasicDAO<Actor> {
    //1. 就有 BasicDAO 的方法
    //2. 根據業務需求,可以編寫特有的方法.
}
package com.zwj.dao_.test;

import com.zwj.dao_.dao.ActorDAO;
import com.zwj.dao_.domain.Actor;
import org.junit.jupiter.api.Test;

import java.util.List;

public class TestDAO {

    //測試ActorDAO 對actor表crud操作
    @Test
    public void testActorDAO() {

        ActorDAO actorDAO = new ActorDAO();
        //1. 查詢
        List<Actor> actors = actorDAO.queryMulti("select * from actor where id >= ?", Actor.class, 1);
        System.out.println("===查詢結果===");
        for (Actor actor : actors) {
            System.out.println(actor);
        }

        //2. 查詢單行記錄
        Actor actor = actorDAO.querySingle("select * from actor where id = ?", Actor.class, 6);
        System.out.println("====查詢單行結果====");
        System.out.println(actor);

        //3. 查詢單行單列
        Object o = actorDAO.queryScalar("select name from actor where id = ?", 6);
        System.out.println("====查詢單行單列值===");
        System.out.println(o);

        //4. dml操作  insert ,update, delete
        int update = actorDAO.update("insert into actor values(null, ?, ?, ?, ?)", "張無忌", "男", "2000-11-11", "999");

        System.out.println(update > 0 ? "執行成功" : "執行沒有影響表");
    }
}


