三、SpringAMQP SpringAMQP是基於RabbitMQ封裝的一套模板,並且還利用SpringBoot對其實現了自動裝配,使用起來非常方便 SpringAMQP的官方地址 https://spring.io/projects/spring-amqp AMQP Spring AMQP Sp ...
三、SpringAMQP
SpringAMQP是基於RabbitMQ封裝的一套模板,並且還利用SpringBoot對其實現了自動裝配,使用起來非常方便
SpringAMQP的官方地址
AMQP
Spring AMQP
SpringAMQP提供了三個功能
- 自動聲明隊列、交換機及其綁定關係
- 基於註解的監聽模式,非同步接收消息
- 封裝了RabbitTemplate工具,用於發送消息
3.1、Basic Queue 簡單隊列模型
在父工程引入依賴
<!--AMQP依賴,包含RabbitMQ-->
<dependency>
    <groupId>org.springframework.boot</groupId>
    <artifactId>spring-boot-starter-amqp</artifactId>
</dependency>
3.1.1、消息發送
-
①、配置MQ地址,在publisher服務的application.yml中添加配置
-
spring:
  rabbitmq:
    host: 192.168.222.135 # 主機名
    port: 5672  # 埠號
    virtual-host: /coolman # 虛擬主機
    username: root  # 用戶名
    password: root  # 密碼
-
-
②、在publisher服務中編寫測試類,並利用RabbitTemplate實現消息發送
-
package cn.coolman.mq.springamqptest;

import org.junit.jupiter.api.Test;
import org.springframework.amqp.rabbit.core.RabbitTemplate;
import org.springframework.beans.factory.annotation.Autowired;
import org.springframework.boot.test.context.SpringBootTest;

@SpringBootTest
public class SimpleProducerTest {

    @Autowired
    private RabbitTemplate rabbitTemplate;

    @Test
    public void test01() {
        String queueName = "simpleQueue";
        String message = "革命尚未完成,同志仍需努力";

        rabbitTemplate.convertAndSend(queueName, message);
        System.out.println("發送簡單消息:【" + message + "】完畢");
    }
}
-
3.1.2、消息接收
-
①、配置MQ地址,在consumer服務的application.yml中添加配置
-
spring:
  rabbitmq:
    host: 192.168.222.135 # 主機名
    port: 5672  # 埠號
    virtual-host: /coolman # 虛擬主機
    username: root  # 用戶名
    password: root  # 密碼
-
-
②、在consumer服務中定義隊列
-
package cn.coolman.mq.config;

import org.springframework.amqp.core.Queue;
import org.springframework.context.annotation.Bean;
import org.springframework.context.annotation.Configuration;

@Configuration
public class RabbitQueueConfig{

    /**
     * 定義隊列,隊列名稱為:simpleQueue
     * @return
     */
    @Bean
    public Queue simpleQueue(){
        return new Queue("simpleQueue");
    }
}
-
-
③、在consumer服務中創建一個SpringRabbitListener類
-
package cn.coolman.mq.listener;

import org.springframework.amqp.rabbit.annotation.RabbitListener;
import org.springframework.stereotype.Component;


@Component
public class SimpleListener {

    /**
     * 方法的調用時機:如果隊列中一旦出現了消息,馬上就會調用這個方法去處理,並且會把這個消息傳遞給message參數
     *  @RabbitListener 指定監聽的隊列的名稱
     * @param message
     */
    @RabbitListener(queues = "simpleQueue")
    public void listener1(String message) {
        System.out.println("監聽器聽到的消息:【"+ message + "】");
    }
}
-
3.1.3、測試
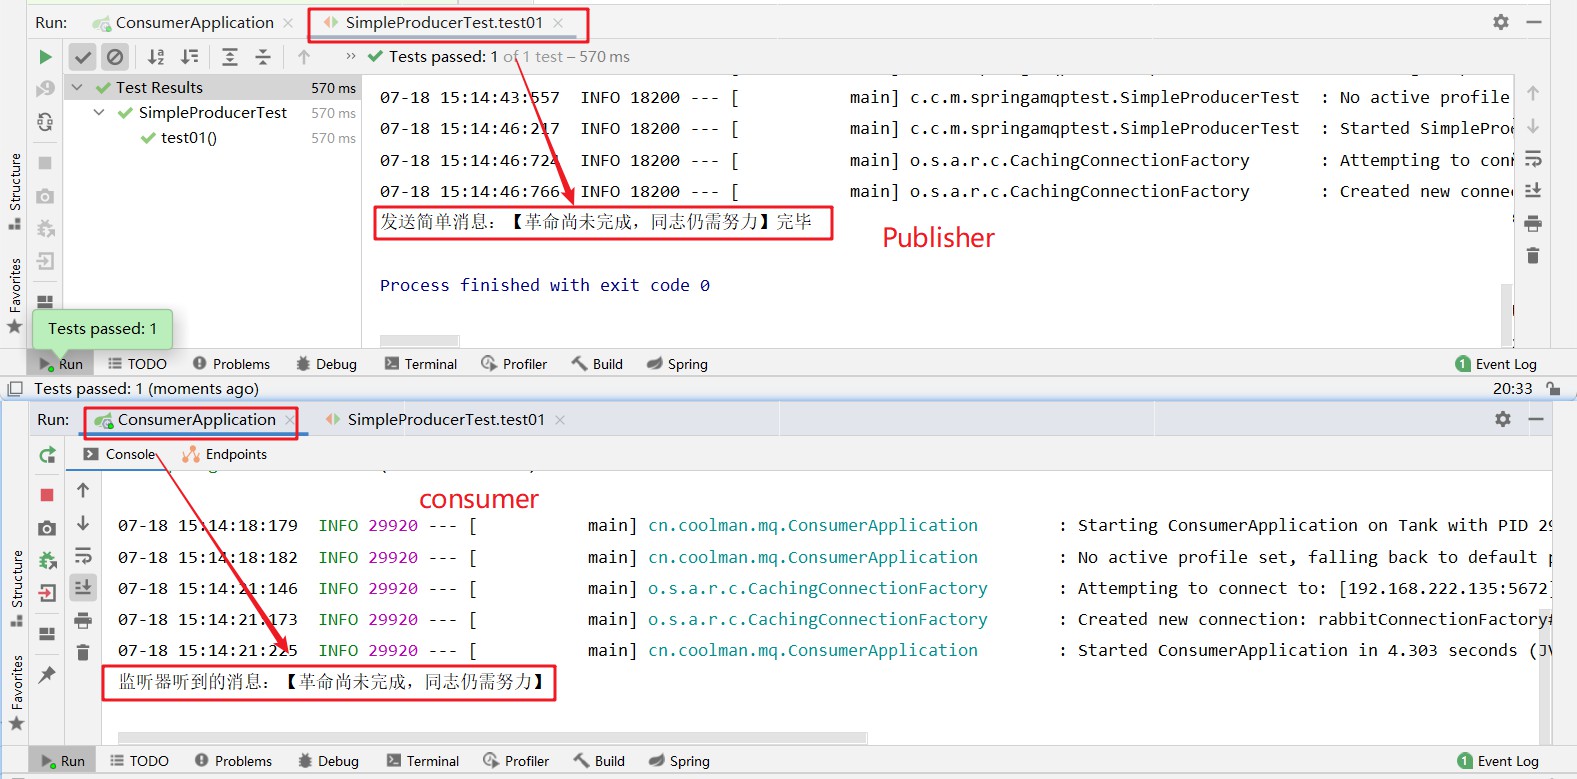
- 啟動consumer服務,然後在publisher服務中運行測試代碼,發送MQ消息
3.2、Work Queue 工作隊列模型
Work Queues,也杯稱為(Task Queues),任務模型
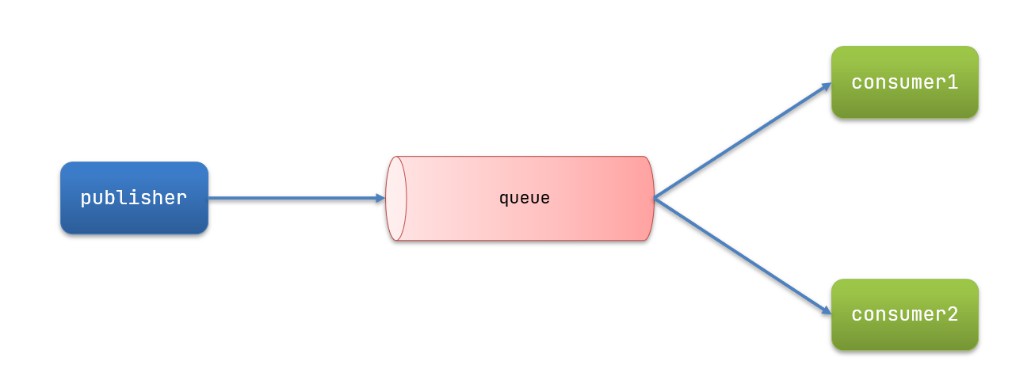
- 簡單來說就是讓多個消費者綁定到一個隊列,共同消費隊列中的消息
當消息處理比較耗時的時候,可能生產消息的速度會遠遠大於消費的速度。
長此以往,消息就會堆積越來越多,無法及時處理。
此時就可以使用work模型,多個消費者共同處理消息,速度就能大大提高
3.2.1、消息發送
-
這次我們迴圈發送,模擬大量消息堆積現象
-
在publisher服務中的SpringAmqpTest類中添加一個測試方法
-
    @Test
    public void testWorkQueue() {
        String queueName = "workQueue";
        String message = "good news";

        for (int i = 1; i < 11; i++) {
            rabbitTemplate.convertAndSend(queueName, message + "\t" + i);
            System.out.println("發送簡單消息:【" + message + "\t" + i + "】完畢");
        }
    }
-
3.2.2、消息接收
-
修改RabbitQueueConfig類,將隊列名稱改為workQueue
-
package cn.coolman.mq.config;

import org.springframework.amqp.core.Queue;
import org.springframework.context.annotation.Bean;
import org.springframework.context.annotation.Configuration;

@Configuration
public class RabbitQueueConfig{

    /**
     * 定義隊列,隊列名稱為:simpleQueue
     * @return
     */
//    @Bean
//    public Queue simpleQueue(){
//        return new Queue("simpleQueue");
//    }

    /**
     * 定義隊列,隊列名稱為:workQueue
     * @return
     */
    @Bean
    public Queue workQueue(){
        return new Queue("workQueue");
    }
}
-
-
要模擬多個消費者綁定同一個隊列,我們在consumer服務的SpringRabbitListener中添加1個新的方法,這兩個方法綁定同一個隊列
-
package cn.coolman.mq.listener; import org.springframework.amqp.rabbit.annotation.RabbitListener; import org.springframework.stereotype.Component; @Component public class SimpleListener { /** * 方法的調用時機:如果隊列中一旦出現了消息,馬上就會調用這個方法去處理,並且會把這個消息傳遞給message參數 * @RabbitListener 指定監聽的隊列的名稱 * @param message */ @RabbitListener(queues = "workQueue") public void listener01(String message) { System.out.println("監聽器01聽到的消息:【"+ message + "】"); } @RabbitListener(queues = "workQueue") public void listener02(String message) throws InterruptedException { System.out.println("監聽器02聽到的消息:【"+ message + "】"); Thread.sleep(10000); } } -
Listener02這個消費者sleep了10秒,模擬任務耗時
-
3.2.3、測試
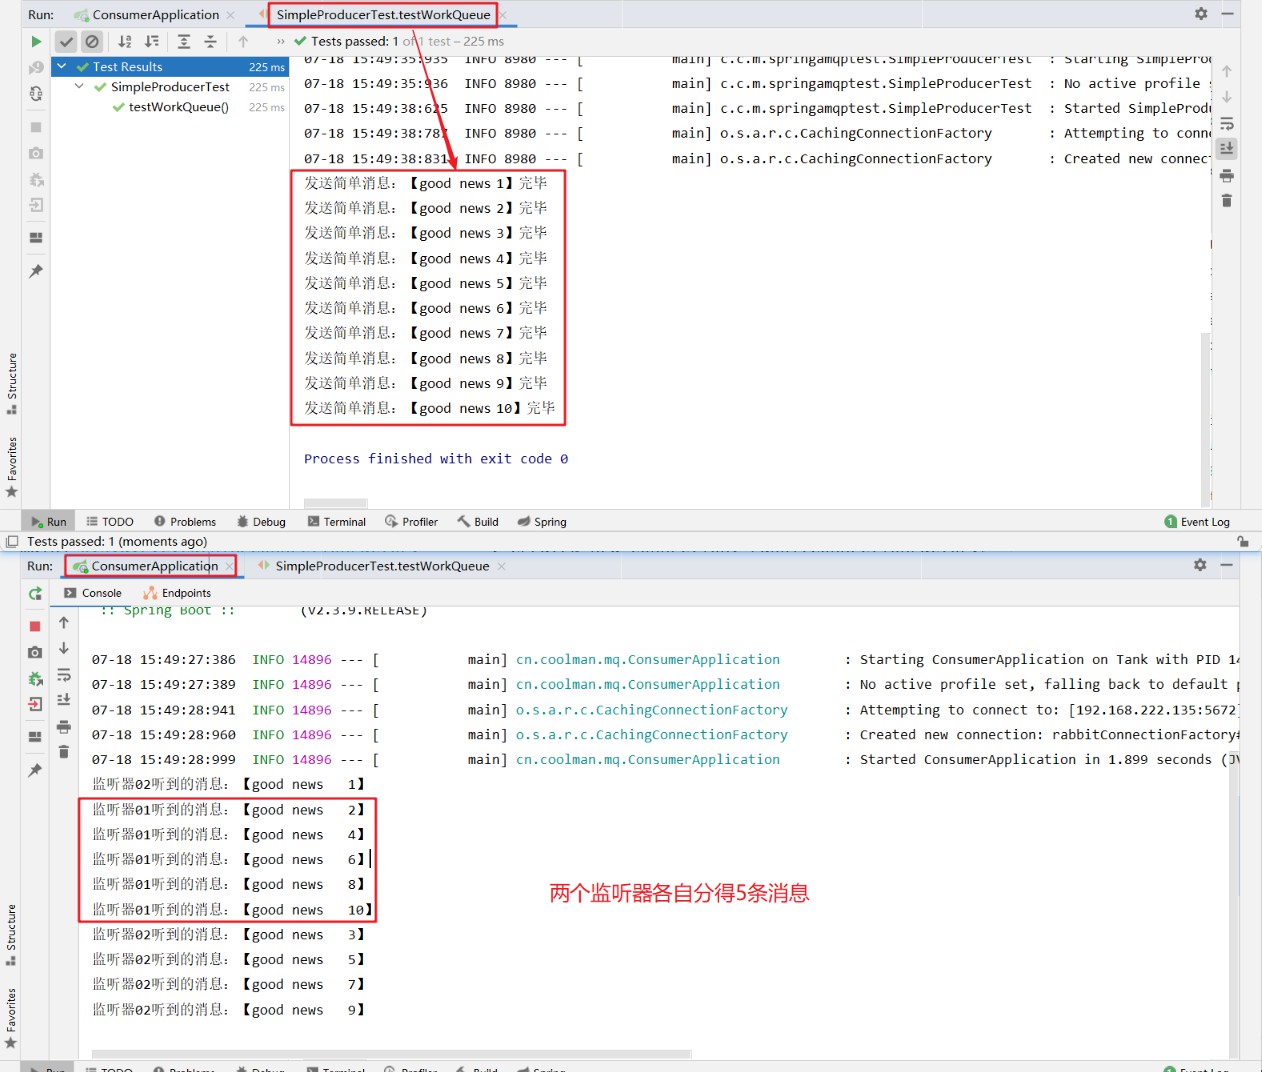
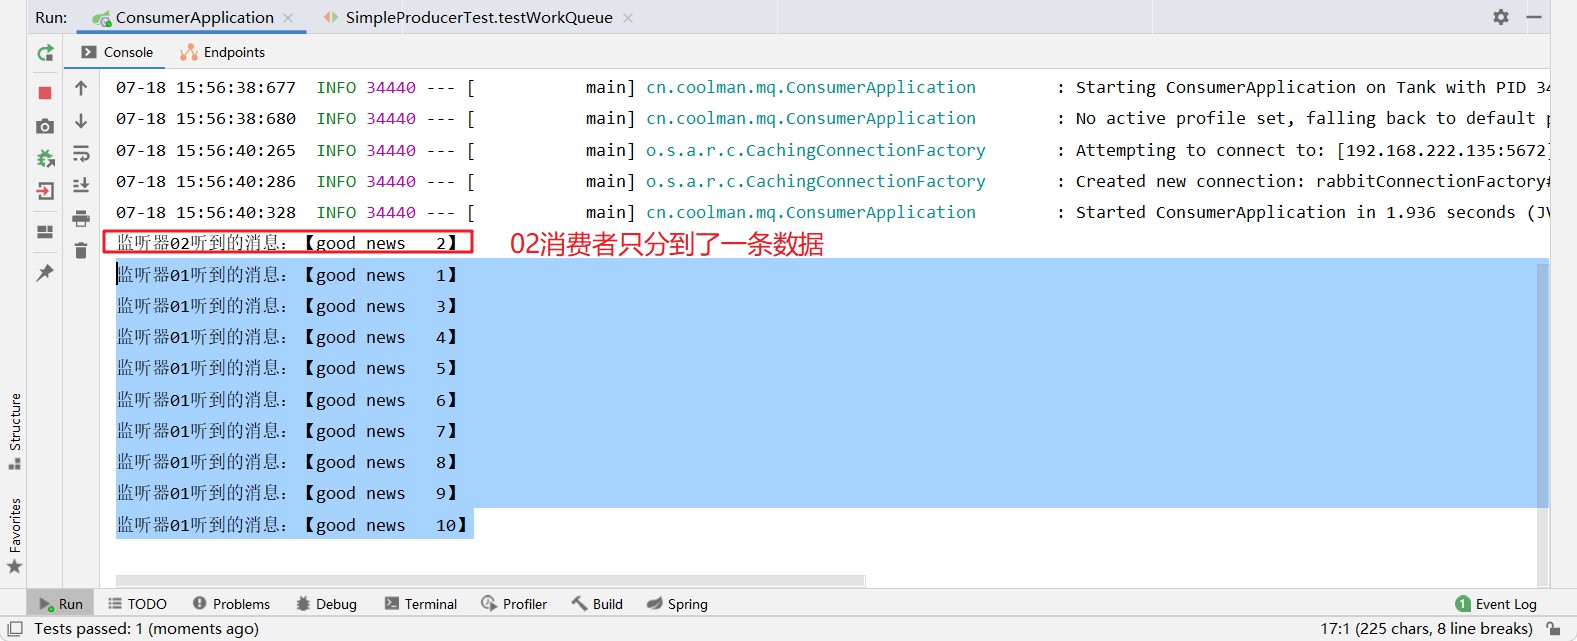
- 啟動ConsumerApplication後,執行publisher服務中剛編寫的發送測試方法testWorkQueue
- 可以看到,我們發佈的10條消息,居然平均分配給了兩個消費者,要知道我們其中一個消費者可是每次都睡眠了10秒鐘
- 這並沒有考慮到消費者的處理能力,顯然是有問題的
3.2.4、任務策略
能者多勞
-
在Spring中有個簡單的配置,可以解決這個問題
-
修改consumer服務的application.yml文件,添加配置
-
spring: rabbitmq: listener: simple: prefetch: 1 # 每次只能獲取一條消息,處理完成才能後去下一個消息 -
再進行測試
3.2.5、小結
- Work Queue模型的使用
- 多個消費者綁定到一個隊列,同一條消息只會被一個消費者處理
- 通過設置prefetch來控制消費者預取的消息數量
3.3、Publish/Subscribe 發佈/訂閱模型
- 發佈/訂閱的模型如圖所示
- 可以看到,在發佈/訂閱模型中,多了一個exchange角色,而且過程略有變化
- Publisher:生產者,也就是要發送消息的程式,但是不再發送到隊列中,而是發給exchange(交換機)
- Exchange:交換機。一方面,接收生產者發送的消息;另一方面,知道如何處理消息,例如遞交給某個特別隊列、遞交給所有隊列、或者是將消息丟棄
- 到底如何操作,取決與Exchange的類型;Exchange有以下3中類型
- Fanout:廣播,將消息交給所有綁定到交換機的隊列
- Direct:定向,把消息交給符合指定routing key的隊列
- Topic:通配符,把消息交給符合routing pattern(路由模式)的隊列
- Consumer:消費者,與以前一樣,訂閱隊列,沒有變化
- Queue:消息隊列也與以前一樣,接收消息、緩存消息
- PS:
- Exchange(交換機)只負責轉發消息,不具備存儲消息的能力
- 因此如果沒有任何隊列與Exchange綁定,或者沒有符合路由規則的隊列,那麼消息會丟失
3.3.1、Fanout 模型
- Fanout,中文意思是扇出,一般稱為廣播
- 在廣播模式下,消息發送流程如下所示
- 1)可以有很多個隊列
- 2)每個隊列都要綁定到Exchange(交換機)
- 3)生產者發送的消息,只能發送到交換機,交換機來決定要發給哪個隊列,生產者無法決定
- 4)交換機把消息發送給綁定過的所有隊列
- 5)訂閱隊列的消費者都能拿到消息
①、聲明隊列和交換機
-
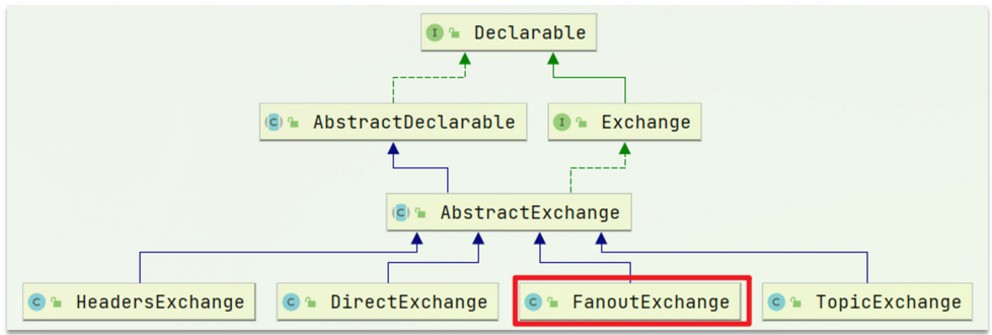
Spring提供了一個介面Exchange,來表示所有不同類型的交換機
-
在consumer中創建一個類,聲明隊列和交換機
-
package cn.coolman.mq.config;

import org.springframework.amqp.core.Binding;
import org.springframework.amqp.core.BindingBuilder;
import org.springframework.amqp.core.FanoutExchange;
import org.springframework.amqp.core.Queue;
import org.springframework.context.annotation.Bean;
import org.springframework.context.annotation.Configuration;

@Configuration
public class RabbitQueueConfig{

    //    ========================定義發佈訂閱模式的交換機與隊列,並且把隊列綁定到交換機上=================================

    /**
     * 定義fanout的交換機
     * @return
     */
    @Bean // 這裡的返回值對象已經存儲到spring的容器中。 key   方法名: new FanoutExchange("fanoutExchange")
    public FanoutExchange fanoutExchange() {
        return new FanoutExchange("fanoutExchange");
    }

    /**
     * 定義一個隊列
     */
    @Bean
    public Queue fanoutQueue01() {
        return new Queue("fanoutQueue01");
    }

    /**
     * 定義一個隊列
     */
    @Bean
    public Queue fanoutQueue02() {
        return new Queue("fanoutQueue02");
    }

    /**
     * 把隊列綁定到交換機上
     */
    @Bean
    public Binding bindingQueueToExchange01(FanoutExchange fanoutExchange, Queue fanoutQueue01) {
        return BindingBuilder.bind(fanoutQueue01).to(fanoutExchange);
    }

    /**
     * 把隊列綁定到交換機上
     */
    @Bean
    public Binding bindingQueueToExchange02(FanoutExchange fanoutExchange, Queue fanoutQueue02) {
        return BindingBuilder.bind(fanoutQueue02).to(fanoutExchange);
    }

}
-
②、消息發送
-
在publisher服務的SpringAMQPTest類中添加測試方法
-
    @Test
    public void testFanoutQueue() {
        String exchangeName = "fanoutExchange";
        String message = "嘿嘿嘿嘿嘿嘿,fanout,i am coming ";

        rabbitTemplate.convertAndSend(exchangeName, "", message);
        System.out.println("發送成功!");
    }
-
③、消息接收
-
在consumer服務的SpringRabbitListener中添加兩個方法,作為消費者
-
package cn.coolman.mq.listener;


import org.springframework.amqp.rabbit.annotation.RabbitListener;
import org.springframework.stereotype.Component;

@Component
public class FanoutListener {

    /**
     * 方法的調用時機:如果隊列中一旦出現了消息,馬上就會調用這個方法去處理,並且會把這個消息傳遞給message參數
     *  @RabbitListener 指定監聽的隊列的名稱
     * @param message
     */
    @RabbitListener(queues = "fanoutQueue01")
    public void listener01(String message) {
        System.out.println("監聽器01聽到的消息:【"+ message + "】");
    }

    @RabbitListener(queues = "fanoutQueue02")
    public void listener02(String message) throws InterruptedException {
        System.out.println("監聽器02聽到的消息:【"+ message + "】");
    }
}
-
-
運行結果如下所示
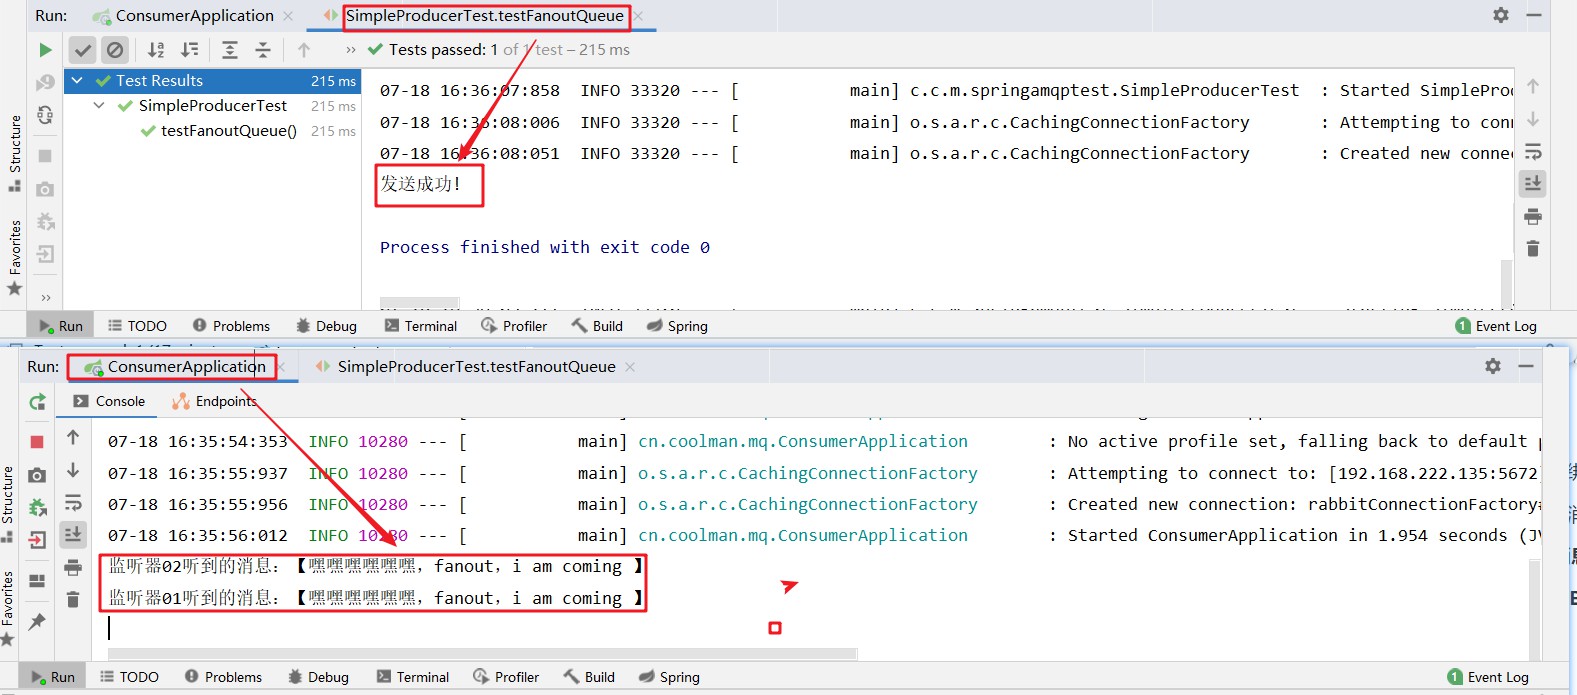
- 由此可見,FanoutExchange會將消息無條件轉發給每個綁定的隊列
- 即routekey為空:
rabbitTemplate.convertAndSend(exchangeName, "", message);
④、小結
- 交換機的作用
- 接收publisher發送的消息
- 將消息按照規則路由到與之綁定的隊列
- 不能緩存消息,路由失敗,消息丟失
- FanoutExchange的會將消息路由到每個綁定的隊列
- 聲明隊列、交換機、綁定關係的Bean是什麼
- Queue
- FanoutExchange
- Binding
3.3.2、Direct 模型
- 在Fanout模式中,一條消息,會被所有訂閱的隊列消費。但是,在某些場景下,我們希望不同的消息被不同的隊列消費。這時候就要用到Direct類型的Exchange
- 在Direct模型中
- 隊列與交換機的綁定,不能是任意綁定了,而是要指定一個
RoutingKey(路由Key)- Pulisher在向Excahnge發送消息的時候,也必須指定消息的
RoutingKey- Exchange不再把消息交給每一個綁定的隊列,而是根據消息的
RoutingKey在進行判斷,只有隊列的RoutingKey與消息的RoutingKey完全一致,才會接收到消息
①、基於註解聲明隊列和交換機
-
基於@Bean的方式聲明隊列和交換機比較麻煩,Spring還提供了基於註解的方式來聲明
-
在consumer的SpringRabbitListener中添加兩個消費者,同時基於註解來聲明隊列和交換機
-
package cn.coolman.mq.listener;

import org.springframework.amqp.core.ExchangeTypes;
import org.springframework.amqp.rabbit.annotation.Exchange;
import org.springframework.amqp.rabbit.annotation.Queue;
import org.springframework.amqp.rabbit.annotation.QueueBinding;
import org.springframework.amqp.rabbit.annotation.RabbitListener;
import org.springframework.stereotype.Component;

@Component
public class DirectListener {

    @RabbitListener(
            bindings = @QueueBinding(
                    exchange = @Exchange(
                            name = "directExchange", type = ExchangeTypes.DIRECT
                    ),
                    value = @Queue("directQueue01"),
                    key = "pig")
    )
    public void listener01(String message) {
        System.out.println("監聽器01聽到的消息:【"+ message + "】");
    }

    @RabbitListener(
            bindings = @QueueBinding(
                    exchange = @Exchange(
                            name = "directExchange", type = ExchangeTypes.DIRECT
                    ),
                    value = @Queue("directQueue02"),
                    key = "dog")
    )
    public void listener02(String message) {
        System.out.println("監聽器02聽到的消息:【"+ message + "】");
    }
}
-
②、消息發送
-
在publisher服務的SpringAMQPTest類中添加測試方法
-
@Test
    public void testDirectQueue() {
        String exchangeName = "directExchange";
        String key1 = "pig";
        String key2 = "dog";

        String message = "I am a ";

        rabbitTemplate.convertAndSend(exchangeName, key1, message + key1);
        System.out.println("向directExchange交換機發送了路由key為【" + key1 + "】的消息【" + message + key1 + "】完畢!");

        rabbitTemplate.convertAndSend(exchangeName, key2, message + key2);
        System.out.println("向directExchange交換機發送了路由key為【" + key2 + "】的消息【" + message + key2 + "】完畢!");

    }
-
-
運行結果如下所示
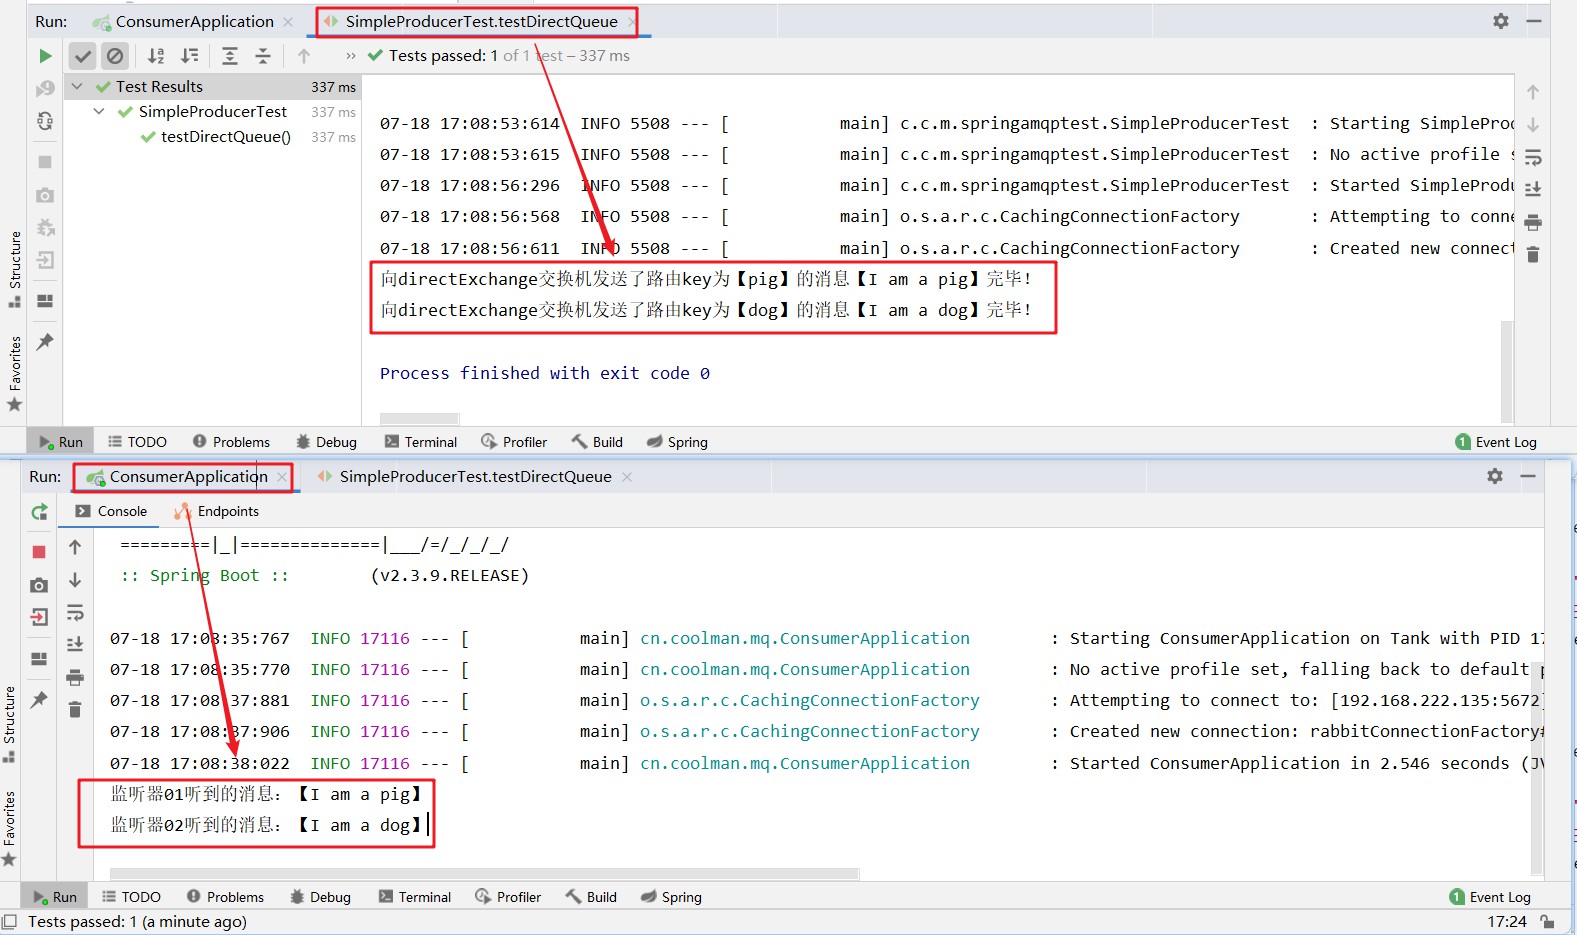
- 可以明顯看到,DirectExchange是根據
routekey來分發消息的
③、總結
- Direct交換機與Fanout交換機的差異
- Fanout交換機將消息路由給每一個與之綁定的隊列
- Direct交換機根據RoutingKey判斷路由給哪個隊列
- 如果多個隊列具有相同的RoutingKey,則與Fanout功能類似
- 基於@RabbitListener註解聲明隊列和交換機有那些常見的註解
- @Queue
- @Exchange
3.3.3、Topic 模型
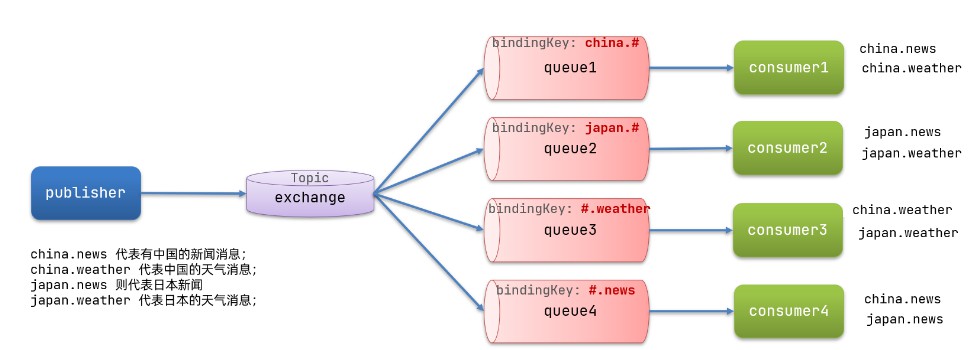
- Topic模型的Exchange與Direct模型相比,都是可以根據
RoutingKey把消息路由到不同的隊列- 只不過Topic模型的Exchange可以讓隊列在綁定
RoutingKey的時候使用通配符RoutingKey一般是由一個或多個單片語成,多個單詞之間以.號分割,例如item.insert- 通配符規則
#:匹配一個或多個詞*:匹配不多不少,恰好一個詞- 舉例
item.#:表示能夠匹配item.spu.insert或者item.spuitem.*:只能匹配item.spu- 再比如下圖所示
- Queue1:綁定的是
china.#,因此凡是以china.開頭的routing key都會被匹配到。包括china.news和china.weather- Queue2:綁定的是
#.news,因此凡是以.news結尾的routing key都會被匹配。包括china.news和japan.news
- 案例需求
- ①、利用@RabbitListener聲明Exchange、Queue、RoutingKey
- ②、在consumer服務中,編寫兩個消費者方法,分別監聽
topic.queue1和topic.queue2 - ③、在publisher中編寫測試方法,向topicExchange發送消息
-
①、消息發送
-
    @Test
    public void testTopicQueue() {
        String exchangeName = "topicExchange";
        String routeKey1 = "coolman.hand";
        String routeKey2 = "coolman.hand.hand.hand";
        String message1 = "世紀之握!!!!";
        String message2 = "究極無敵世紀之握!!!!";

        rabbitTemplate.convertAndSend(exchangeName, routeKey1, message1);
        System.out.println("向【topicExchange】交換機發送 routeKey = 【coolman.hand】類型消息:【" + message1 + "】");

        rabbitTemplate.convertAndSend(exchangeName, routeKey2, message2);
        System.out.println("向【topicExchange】交換機發送 routeKey = 【coolman.hand.hand.hand】類型消息:【" + message2 + "】");
    }
②、消息接收
-
package cn.coolman.mq.listener; import org.springframework.amqp.core.ExchangeTypes; import org.springframework.amqp.rabbit.annotation.Exchange; import org.springframework.amqp.rabbit.annotation.Queue; import org.springframework.amqp.rabbit.annotation.QueueBinding; import org.springframework.amqp.rabbit.annotation.RabbitListener; import org.springframework.stereotype.Component; @Component public class TopicListener { @RabbitListener( bindings = @QueueBinding( exchange = @Exchange(name = "topicExchange", type = ExchangeTypes.TOPIC), value = @Queue("topic.queue1"), key = "coolman.*" ) ) public void listener01(String message) { System.out.println("【routeKey = " + "coolman.*】的監聽器【topic.queue1】接收到消息:【" + message + "】"); } @RabbitListener( bindings = @QueueBinding( exchange = @Exchange(name = "topicExchange", type = ExchangeTypes.TOPIC), value = @Queue("topic.queue2"), key = "coolman.#" ) ) public void listener02(String message) { System.out.println("【routeKey = " + "coolman.#】的監聽器【topic.queue2】接收到消息:【" + message + "】"); } } -
運行結果如下所示
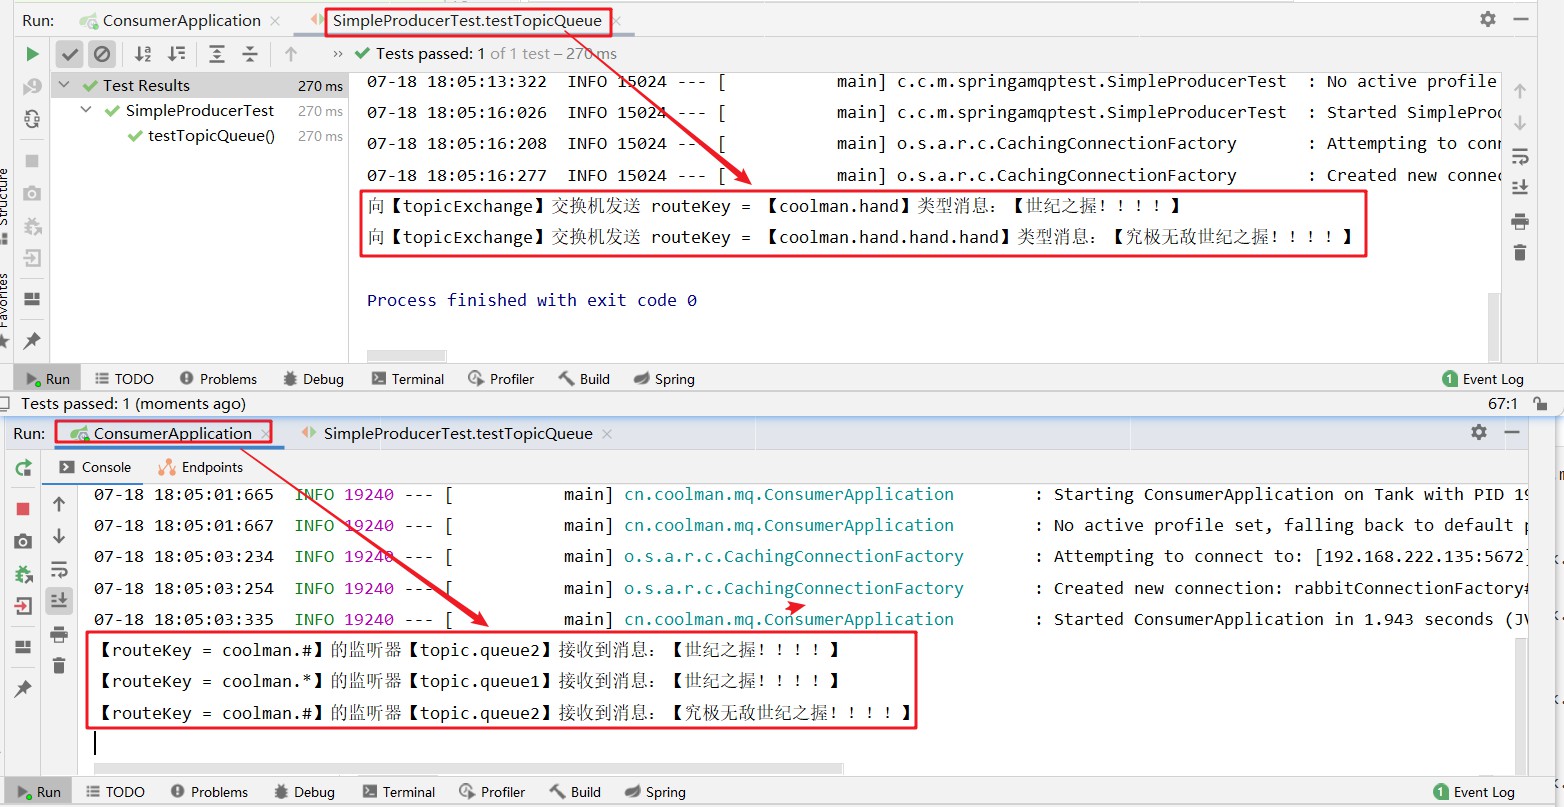
- 顯然,
#號可以匹配一個或多個詞;*號匹配不多不少,恰好一個詞
③、小結
- Direct交換機和Topic交換機的差別
- Topic交換機接收的消息RoutingKey必須是多個單詞,以
**.**分割 - Topic交換機與隊列綁定時的bingdingKey可以指定通配符
#:代表0個或多個詞*:代表1個詞
- Topic交換機接收的消息RoutingKey必須是多個單詞,以
3.4、消息轉換器
- 之前說過,Spring會把發送的消息序列化為位元組發送給MQ,接收消息的時候,還會把位元組反序列化為Java對象
- 只不過,預設情況下Spring採用的序列化方式是JDK序列化。眾所周知,JDK序列化存在下列問題
- 數據體積過大
- 有安全漏洞
- 可讀性差
- 接下來我們可以測試一下
3.4.1、測試預設轉換器
-
我們修改消息發送的代碼,發送一個Map對象
-
    @Test
    public void testDefaultConvert() {
        String queueName = "simple.queue";

        // 準備消息
        HashMap<String, Object> message = new HashMap<>();
        message.put("name", "coolman");
        message.put("age", 8);
        message.put("power", "SSS+");

        // 發送消息
        rabbitTemplate.convertAndSend(queueName, message);

    }
-
-
停止consumer服務
-
發送消息後查看RabbitMQ控制台,查看map數據
-

-
顯然,JDK序列化方式並不合適;我們希望消息體的體積更小、可讀性更高,因此可以使用JSON方式來做序列化和反序列化
3.4.2、配置JSON轉換器
-
在publisher和consumer兩個服務中都引入依賴
-
<dependency>
    <groupId>com.fasterxml.jackson.dataformat</groupId>
    <artifactId>jackson-dataformat-xml</artifactId>
    <version>2.9.10</version>
</dependency>
  <dependency>
            <groupId>com.fasterxml.jackson.core</groupId>
            <artifactId>jackson-databind</artifactId>
            <version>2.9.10.5</version>
</dependency>
-
-
配置消息轉換器,在啟動類中添加一個Bean即可,如下所示
-
    /**
     * 消息轉換器
     * @return
     */
    @Bean
    // amqp的MessageConverter
    public MessageConverter jsonMessageConverter() {
        return new Jackson2JsonMessageConverter();
    }
}
-
-
再次向
simple.queue發送消息,再在控制台查看,如下圖所示 -
顯然,使用JSON進行序列化,可以有效減小體積和提高可讀性

