容器的基本用法 熟悉 Spring 的朋友應該都很瞭解下段代碼: public void testBeanFactory() { BeanFactory bf = new XmlBeanFactory(new ClassPathResource("beanFactoryTest.xml")); Te ...
容器的基本用法
熟悉 Spring 的朋友應該都很瞭解下段代碼:
public void testBeanFactory() {
	BeanFactory bf = new XmlBeanFactory(new ClassPathResource("beanFactoryTest.xml"));
    TestBean testBean = bf.getBean("testBean");
}
一段簡單的通過容器獲取 Bean 的代碼,它所完成的功能無非就是以下幾點:
- 讀取配置文件 beanFactoryTest.xml
- 根據 beanFactoryTest.xml 中的配置找到對應類的配置,並實例化
- 獲取實例化後的實例
接下來我們來分析這段代碼的實現原理
Spring 核心類介紹
在開始正式的源碼分析之前,有必要先瞭解 Spring 核心的兩個類
1. DefaultListableBeanFactory
XmlBeanFactory 繼承自 DefaultListableBeanFactory,DefaultListableBeanFactory 是整個 bean 載入的核心部分,是 Spring 註冊及載入 bean 的預設實現。XmlBeanFactory 與 DefaultListableBeanFactory 的不同之處就在於 XmlBeanFactory 使用了自定義的 XML 讀取器 XmlBeanDefinitionReader
2. XmlBeanDefinitionReader
在 XmlBeanDefinitionReader 中主要包含以下幾步處理:
- 通過繼承自 AbstractBeanDefinitionReader 的方法,使用 ResourceLoader 將資源文件路徑轉換為對應的 Resoure 文件
- 通過 DocumentLoader 對 Resource 文件進行轉換,將 Resource 文件轉換為 Document 文件
- 通過實現 BeanDefinitionDocumentReader 的 DefaultBeanDefinitionDocumentReader 類對 Document 進行解析,並使用 BeanDefinitionParserDelegate 對 Element 進行解析
容器基礎 XmlBeanFactory
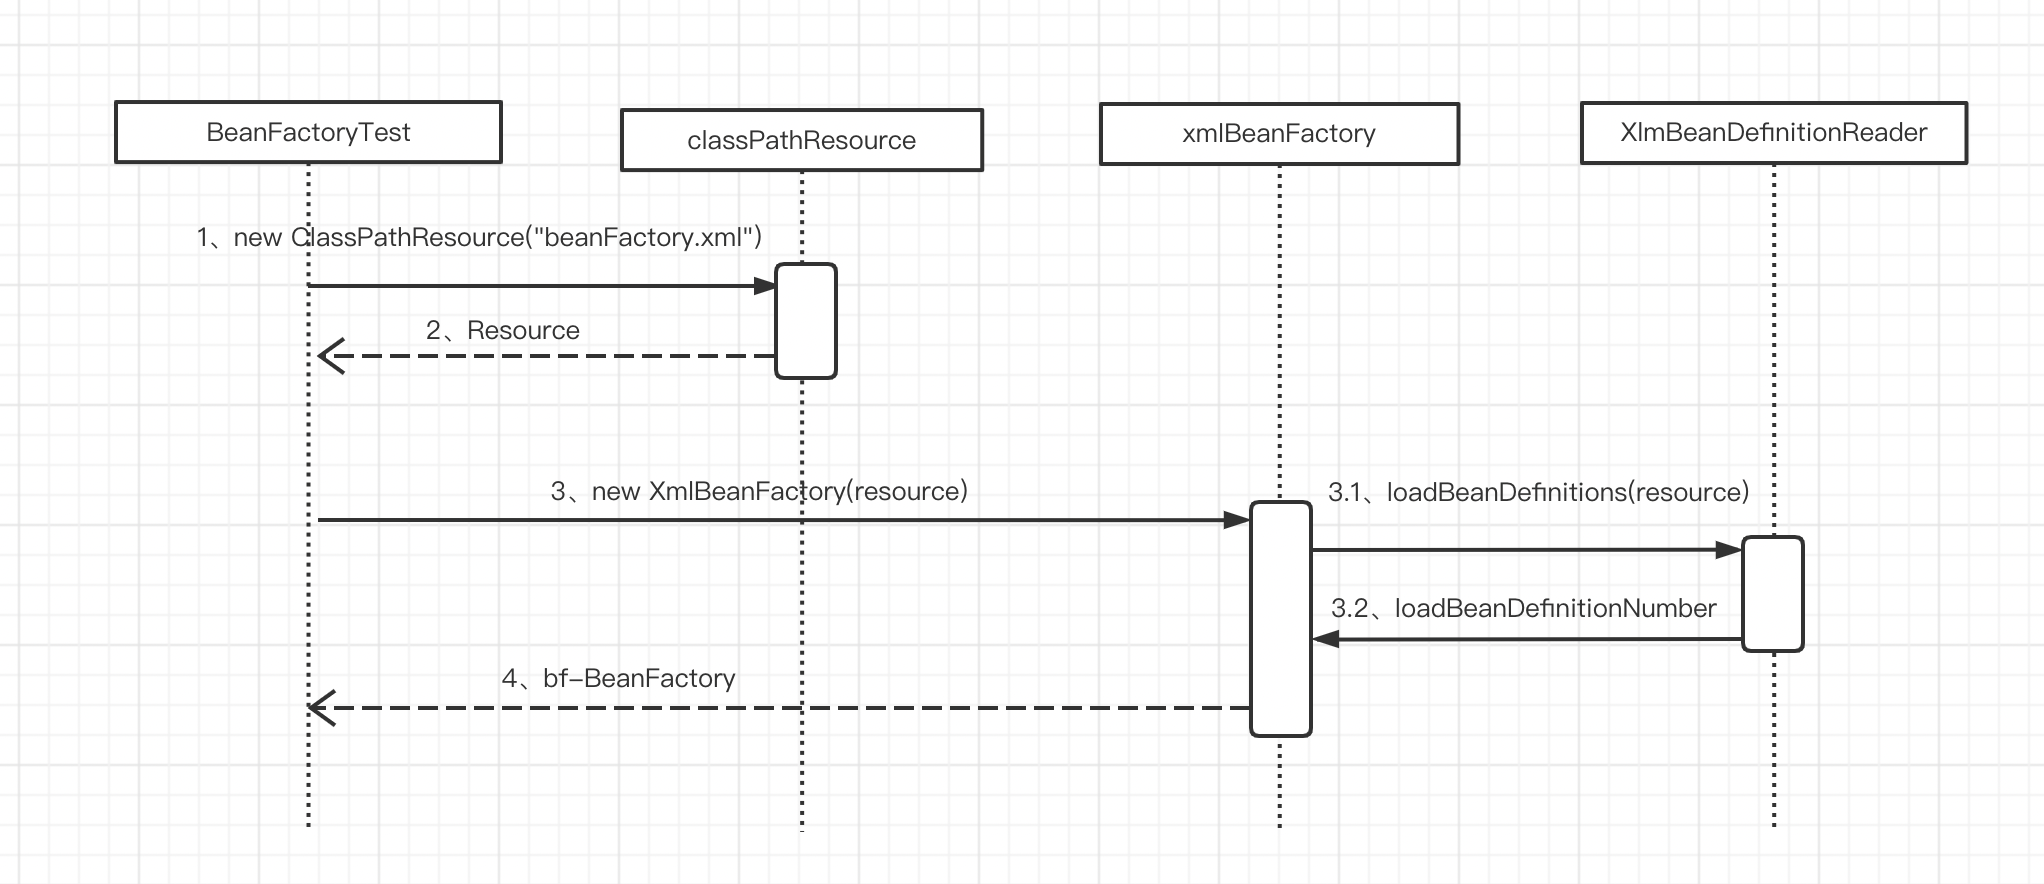
接下來我們將深入分析以下代碼的功能實現
BeanFactory bf = new XmlBeanFactory(new ClassPathResource("beanFactoryTest.xml"));
通過 XmlBeanFactory 初始化時序圖,我們來看一看上面代碼的執行邏輯

1. 封裝配置文件
Spring 的配置文件讀取是通過 ClassPathResource 封裝成 Resource,Resource 的結構如下:
public interface Resource extends InputStreamSource {
    boolean exists();
    default boolean isReadable() {
        return this.exists();
    }
    default boolean isOpen() {
        return false;
    }
    default boolean isFile() {
        return false;
    }
    URL getURL() throws IOException;
    URI getURI() throws IOException;
    File getFile() throws IOException;
    default ReadableByteChannel readableChannel() throws IOException {
        return Channels.newChannel(this.getInputStream());
    }
    long contentLength() throws IOException;
    long lastModified() throws IOException;
    Resource createRelative(String var1) throws IOException;
    @Nullable
    String getFilename();
    String getDescription();
}
Resource 介面抽象了所有 Spring 內部使用的底層資源:File、URL、Classpath 等等,並定義了有關資源操作的方法。對於不同來源的資源文件,都有對應的 Resource 實現:文件(FileSystemResource)、Classpath(ClasspathResource)、URL(UrlResource )、InputStream(InputStreamResource)、Byte(ByteResource)等等,有了 Resource 介面就可以對所有資源文件進行統一處理,至於處理的實現其實很簡單,以 ClasspathResource 為例,實現方式就是通過 class 或者 classLoader 提供的底層方式進行調用
2. 數據準備階段
通過 Resource 完成配置文件的封裝以後,就將 Resource 作為 XmlBeanFactory 的構造函數參數傳入,代碼如下:
public XmlBeanFactory(Resource resource) throws BeansException {
    this(resource, (BeanFactory)null);
}
構造函數內部再次調用內部構造函數:
public XmlBeanFactory(Resource resource, BeanFactory parentBeanFactory) throws BeansException {
    super(parentBeanFactory);
    this.reader = new XmlBeanDefinitionReader(this);
    this.reader.loadBeanDefinitions(resource);
}
this.reader.loadBeanDefinitions(resource); 是整個資源載入的切入點,這個方法的處理過程如下:
- 對參數 Resource 使用 EncodedResource 類進行封裝
- 從 Resource 獲取對應的 InputStream 並構造 InputSource
- 通過構造的 InputSource 實例和 Resource 實例繼續調用函數 doLoadBeanDefinitions
我們來看一下 loadBeanDefinitions 函數具體的實現過程:
public int loadBeanDefinitions(Resource resource) throws BeanDefinitionStoreException {
    return this.loadBeanDefinitions(new EncodedResource(resource));
}
EncodedResource 的作用是對資源文件的編碼進行處理,可以通過設置編碼屬性指定 Spring 使用響應的編碼進行處理
當構造好 EncodedResource 對象後,再次轉入到 loadBeanDefinitions(new EncodedResource(resource));
public int loadBeanDefinitions(EncodedResource encodedResource) throws BeanDefinitionStoreException {
    Assert.notNull(encodedResource, "EncodedResource must not be null");
    if (this.logger.isTraceEnabled()) {
        this.logger.trace("Loading XML bean definitions from " + encodedResource);
    }
	// 獲取已經載入的資源
    Set<EncodedResource> currentResources = (Set)this.resourcesCurrentlyBeingLoaded.get();
    if (!currentResources.add(encodedResource)) {
        throw new BeanDefinitionStoreException("Detected cyclic loading of " + encodedResource + " - check your import definitions!");
    } else {
        int var6;
        try {
            // 從已經封裝的 Resource 對象獲取 InputStream
            InputStream inputStream = encodedResource.getResource().getInputStream();
            Throwable var4 = null;

            try {
                InputSource inputSource = new InputSource(inputStream);
                if (encodedResource.getEncoding() != null) {
                    inputSource.setEncoding(encodedResource.getEncoding());
                }
				// 進入真正的邏輯核心部分
                var6 = this.doLoadBeanDefinitions(inputSource, encodedResource.getResource());
            } catch (Throwable var24) {
                var4 = var24;
                throw var24;
            } finally {
                if (inputStream != null) {
                    if (var4 != null) {
                        try {
                            inputStream.close();
                        } catch (Throwable var23) {
                            var4.addSuppressed(var23);
                        }
                    } else {
                        inputStream.close();
                    }
                }

            }
        } catch (IOException var26) {
            throw new BeanDefinitionStoreException("IOException parsing XML document from " + encodedResource.getResource(), var26);
        } finally {
            currentResources.remove(encodedResource);
            if (currentResources.isEmpty()) {
                this.resourcesCurrentlyBeingLoaded.remove();
            }

        }

        return var6;
    }
}
再次整理數據準備階段的邏輯,首先對傳入的 Resource 參數進行編碼處理,將準備的數據傳入到真正的核心處理部分 doLoadBeanDefinitions 方法
3. 獲取 Document
doLoadBeanDefinitions 方法的代碼如下:
protected int doLoadBeanDefinitions(InputSource inputSource, Resource resource) throws BeanDefinitionStoreException {
    try {
        Document doc = this.doLoadDocument(inputSource, resource);
        int count = this.registerBeanDefinitions(doc, resource);
        if (this.logger.isDebugEnabled()) {
            this.logger.debug("Loaded " + count + " bean definitions from " + resource);
        }

        return count;
    } catch (BeanDefinitionStoreException var5) {
        throw var5;
    } catch (SAXParseException var6) {
        throw new XmlBeanDefinitionStoreException(resource.getDescription(), "Line " + var6.getLineNumber() + " in XML document from " + resource + " is invalid", var6);
    } catch (SAXException var7) {
        throw new XmlBeanDefinitionStoreException(resource.getDescription(), "XML document from " + resource + " is invalid", var7);
    } catch (ParserConfigurationException var8) {
        throw new BeanDefinitionStoreException(resource.getDescription(), "Parser configuration exception parsing XML from " + resource, var8);
    } catch (IOException var9) {
        throw new BeanDefinitionStoreException(resource.getDescription(), "IOException parsing XML document from " + resource, var9);
    } catch (Throwable var10) {
        throw new BeanDefinitionStoreException(resource.getDescription(), "Unexpected exception parsing XML document from " + resource, var10);
    }
}

protected Document doLoadDocument(InputSource inputSource, Resource resource) throws Exception {
    return this.documentLoader.loadDocument(inputSource, this.getEntityResolver(), this.errorHandler, this.getValidationModeForResource(resource), this.isNamespaceAware());
}
不考慮處理異常的代碼,其實只做了三件事:
- 獲取對 XML 文件的驗證模式
- 載入 XML 文件,並得到對應的 Document
- 根據返回的 Document 註冊 Bean 信息
獲取 XML 驗證模式是為了保證 XML 文件的正確性,常用的驗證模式有 DTD 和 XSD 兩種。Spring 通過 getValidationModeForResource 方法獲取對應資源的驗證模式,這裡不再贅述
protected int getValidationModeForResource(Resource resource) {
    int validationModeToUse = this.getValidationMode();
    // 如果手動指定了驗證模式就使用指定的驗證模式
    if (validationModeToUse != 1) {
        return validationModeToUse;
    } else {
        // 如果未指定就使用自動檢測
        int detectedMode = this.detectValidationMode(resource);
        return detectedMode != 1 ? detectedMode : 3;
    }
}
XmlBeanDefinitionReader 將文檔讀取交由 DocumentLoader 去處理,DocumentLoader 是個介面,真正調用的是 DefaultDocumentLoader,解析代碼如下:
public Document loadDocument(InputSource inputSource, EntityResolver entityResolver, ErrorHandler errorHandler, int validationMode, boolean namespaceAware) throws Exception {
    DocumentBuilderFactory factory = this.createDocumentBuilderFactory(validationMode, namespaceAware);
    if (logger.isTraceEnabled()) {
        logger.trace("Using JAXP provider [" + factory.getClass().getName() + "]");
    }
    DocumentBuilder builder = this.createDocumentBuilder(factory, entityResolver, errorHandler);
    return builder.parse(inputSource);
}
對於這部分代碼沒有太多可以描述的,因為通過 SAX 解析 XML 文檔的套路大都相同,解析完成返回一個 Document 對象
4. 解析及註冊 BeanDefinitions
當程式擁有 Document 對象後,就會被引入下麵這個方法:
public int registerBeanDefinitions(Document doc, Resource resource) throws BeanDefinitionStoreException {
    // 使用 DefaultBeanDefinitionDocumentReader 實例化 BeanDefinitionDocumentReader
    BeanDefinitionDocumentReader documentReader = this.createBeanDefinitionDocumentReader();
    // 記錄統計前 BeanDefinition 的載入個數
    int countBefore = this.getRegistry().getBeanDefinitionCount();
    // 載入及註冊 bean
    documentReader.registerBeanDefinitions(doc, this.createReaderContext(resource));
    // 記錄本次載入的 BeanDefinition 個數
    return this.getRegistry().getBeanDefinitionCount() - countBefore;
}
BeanDefinitionDocumentReader 是一個介面,通過 createBeanDefinitionDocumentReader 方法完成實例化,實際類型是 DefaultBeanDefinitionDocumentReader,registerBeanDefinitions 方法代碼如下:
public void registerBeanDefinitions(Document doc, XmlReaderContext readerContext) {
    this.readerContext = readerContext;
    this.doRegisterBeanDefinitions(doc.getDocumentElement());
}
getDocumentElement 方法的重要目的之一是提取 root,以便於再次將 root 作為參數繼續 BeanDefinition 的註冊
再次進入 doRegisterBeanDefinitions 方法:
protected void doRegisterBeanDefinitions(Element root) {
    // 專門處理解析
    BeanDefinitionParserDelegate parent = this.delegate;
    this.delegate = this.createDelegate(this.getReaderContext(), root, parent);
    // 處理 profile 屬性
    if (this.delegate.isDefaultNamespace(root)) {
        String profileSpec = root.getAttribute("profile");
        if (StringUtils.hasText(profileSpec)) {
            String[] specifiedProfiles = StringUtils.tokenizeToStringArray(profileSpec, ",; ");
            if (!this.getReaderContext().getEnvironment().acceptsProfiles(specifiedProfiles)) {
                if (this.logger.isDebugEnabled()) {
                    this.logger.debug("Skipped XML bean definition file due to specified profiles [" + profileSpec + "] not matching: " + this.getReaderContext().getResource());
                }

                return;
            }
        }
    }
	// 解析前處理,留給子類實現
    this.preProcessXml(root);
    this.parseBeanDefinitions(root, this.delegate);
    // 解析後處理,留給子類實現
    this.postProcessXml(root);
    this.delegate = parent;
}
這裡使用了模板方法設計模式,如果繼承自 DefaultBeanDefinitionDocumentReader 的子類需要在 Bean 解析前後做一些處理的話,可以重寫 preProcessXml 和 postProcessXml 方法
在註冊 Bean 的最開始是先對 profile 屬性解析,profile 屬性可用於在配置文件中部署兩套配置分別適用生產環境和開發環境,做到方便的的切換環境
處理完 profile 屬性以後就可以進行 XML 的讀取,跟蹤代碼進入 parseBeanDefinitions 方法
protected void parseBeanDefinitions(Element root, BeanDefinitionParserDelegate delegate) {
    if (delegate.isDefaultNamespace(root)) {
        NodeList nl = root.getChildNodes();

        for(int i = 0; i < nl.getLength(); ++i) {
            Node node = nl.item(i);
            if (node instanceof Element) {
                Element ele = (Element)node;
                if (delegate.isDefaultNamespace(ele)) {
                    this.parseDefaultElement(ele, delegate);
                } else {
                    delegate.parseCustomElement(ele);
                }
            }
        }
    } else {
        delegate.parseCustomElement(root);
    }
}
根節點或者子節點是預設命名空間的話採用 parseDefaultElement 方法解析,否則使用 delegate.parseCustomElement 方法解析,而對於標簽的解析,我們放到下一篇文章作講解


