
首先請記住一點,在電腦中所有的二進位都是以補碼的形式存儲的,所以你最後取反之後只是這個數的補碼,你還需要轉換成源碼,才是我們最終的十進位數字 下麵是計算過程: 正數取反(123,結果是-124): (1)先將此數變為二進位數,全部位取反(0變1,1變0); (2)由於這個數是補碼,所以要進行再一次 ...
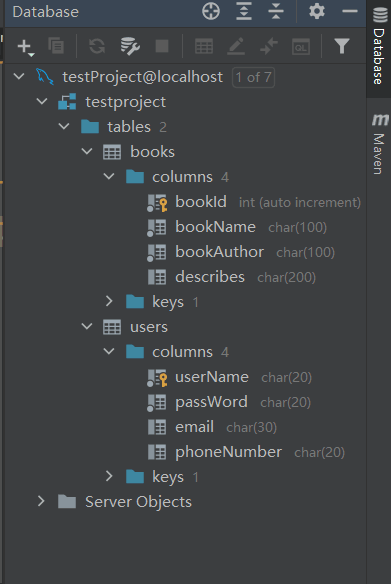
資料庫表
導入依賴
<dependencies>
        <dependency>
            <groupId>javax.servlet</groupId>
            <artifactId>javax.servlet-api</artifactId>
            <version>4.0.1</version>
            <scope>provided</scope>
        </dependency>
        <dependency>
            <groupId>org.junit.jupiter</groupId>
            <artifactId>junit-jupiter-api</artifactId>
            <version>${junit.version}</version>
            <scope>test</scope>
        </dependency>
        <dependency>
            <groupId>org.junit.jupiter</groupId>
            <artifactId>junit-jupiter-engine</artifactId>
            <version>${junit.version}</version>
            <scope>test</scope>
        </dependency>
        <!--Junit-->
        <dependency>
            <groupId>junit</groupId>
            <artifactId>junit</artifactId>
            <version>4.12</version>
        </dependency>
        <!--資料庫驅動-->
        <dependency>
            <groupId>mysql</groupId>
            <artifactId>mysql-connector-java</artifactId>
            <version>5.1.47</version>
        </dependency>
        <!-- 資料庫連接池 -->
        <dependency>
            <groupId>com.mchange</groupId>
            <artifactId>c3p0</artifactId>
            <version>0.9.5.2</version>
        </dependency>
        <!--Mybatis-->
        <dependency>
            <groupId>org.mybatis</groupId>
            <artifactId>mybatis</artifactId>
            <version>3.5.2</version>
        </dependency>
        <dependency>
            <groupId>org.mybatis</groupId>
            <artifactId>mybatis-spring</artifactId>
            <version>2.0.2</version>
        </dependency>
        <!--Spring-->
        <dependency>
            <groupId>org.springframework</groupId>
            <artifactId>spring-webmvc</artifactId>
            <version>5.1.9.RELEASE</version>
        </dependency>
        <dependency>
            <groupId>org.springframework</groupId>
            <artifactId>spring-jdbc</artifactId>
            <version>5.1.9.RELEASE</version>
        </dependency>
        <!-- https://mvnrepository.com/artifact/log4j/log4j -->
        <dependency>
            <groupId>log4j</groupId>
            <artifactId>log4j</artifactId>
            <version>1.2.17</version>
        </dependency>
        <dependency>
            <groupId>org.projectlombok</groupId>
            <artifactId>lombok</artifactId>
            <version>1.18.4</version>
            <scope>provided</scope>
        </dependency>
        <!--        事務支持-->
        <!--spring事務-->
        <dependency>
            <groupId>org.springframework</groupId>
            <artifactId>spring-tx</artifactId>
            <version>5.2.5.RELEASE</version>
        </dependency>
        <dependency>
            <groupId>org.aspectj</groupId>
            <artifactId>aspectjweaver</artifactId>
            <version>1.8.13</version>
        </dependency>
        <!--        使用forEach標簽-->
        <dependency>
            <groupId>org.apache.taglibs</groupId>
            <artifactId>taglibs-standard-spec</artifactId>
            <version>1.2.5</version>
        </dependency>
        <dependency>
            <groupId>com.github.demidenko05</groupId>
            <artifactId>taglibs-standard-impl</artifactId>
            <version>1.0.5</version>
        </dependency>
    </dependencies>
編寫mybatis-config.xml配置文件,這裡已經綁定了SQL的映射文件,所以在spring的配置中就不要再次引入mapperLocations
<?xml version="1.0" encoding="UTF-8" ?>
<!DOCTYPE configuration
        PUBLIC "-//mybatis.org//DTD Config 3.0//EN"
        "http://mybatis.org/dtd/mybatis-3-config.dtd">
<configuration>
    <typeAliases>
        <!--        配置別名,配置之後返回類型就不用寫全路徑了-->
        <package name="com.smu.pojo"/>
    </typeAliases>
    <mappers>
      <!--載入sql映射文件-->
<!--        <mapper resource="com/smu/mapper/BooksMapper.xml"/>-->
        <!--Mapper代理方式-->
        <package name="com.smu.mapper"/>
    </mappers>
</configuration>
寫jdbc.properties
jdbc.driver=com.mysql.jdbc.Driver
#????MySQL8.0+,???????????; &serverTimezone=Asia/Shanghai
#jdbc.url=jdbc:mysql://localhost:3306/testProject?useSSL=true&useUnicode=true&characterEncoding=utf8
jdbc.url=jdbc:mysql://localhost:3306/testproject?useSSL=false
jdbc.username=root
jdbc.password=889886hp
spring整合mybatis
編寫spring-dao.xml配置文件
<?xml version="1.0" encoding="UTF-8"?>
<beans xmlns="http://www.springframework.org/schema/beans"
       xmlns:xsi="http://www.w3.org/2001/XMLSchema-instance"
       xmlns:context="http://www.springframework.org/schema/context"
       xsi:schemaLocation="http://www.springframework.org/schema/beans
       http://www.springframework.org/schema/beans/spring-beans.xsd
       http://www.springframework.org/schema/context
       https://www.springframework.org/schema/context/spring-context.xsd">

    <!--    DataSource:使用Spring的數據源替換MyBatis的配置 c3p0/dbcp/druid-->
    <!--    1.關聯資料庫配置文件-->
    <context:property-placeholder location="classpath:jdbc.properties"/>

    <!--    2.連接池
            dbcp:半自動化操作,不能自動連接
            c3p0: 自動化操作(自動化的載入配置文件,並且可以自動設置到對象中!)
            druid:   hikari:
    -->
    <bean id="dataSource" class="com.mchange.v2.c3p0.ComboPooledDataSource">
        <property name="driverClass" value="${jdbc.driver}"/>
        <property name="jdbcUrl" value="${jdbc.url}"/>
        <property name="user" value="${jdbc.username}"/>
        <property name="password" value="${jdbc.password}"/>

        <!-- c3p0連接池的私有屬性    可預設不使用-->
        <property name="maxPoolSize" value="30"/>
        <property name="minPoolSize" value="10"/>
        <!-- 關閉連接後不自動commit -->
        <property name="autoCommitOnClose" value="false"/>
        <!-- 獲取連接超時時間 -->
        <property name="checkoutTimeout" value="10000"/>
        <!-- 當獲取連接失敗重試次數 -->
        <property name="acquireRetryAttempts" value="10"/>
    </bean>

    <!--    3.配置sqlSessionFactory對象-->
    <bean id="sqlSessionFactory" class="org.mybatis.spring.SqlSessionFactoryBean">
        <!--  註入資料庫連接池  -->
        <property name="dataSource" ref="dataSource"/>
        <!--       綁定MyBatis的全局配置文件 -->
        <property name="configLocation" value="classpath:mybatis-config.xml"/>
<!--        <property name="mapperLocations" value="classpath:com/smu/mapper/BooksMapper.xml"/>-->

    </bean>

    <!--    使用繼承SqlSessionDaoSupport的方式-->
    <bean id="booksMapperImpl" class="com.smu.mapper.BooksMapperImpl">
        <property name="sqlSessionFactory" ref="sqlSessionFactory"/>
    </bean>


    <!-- 4. 配置dao介面掃描包,動態的實現了Dao介面可以註入到Spring容器中! -->
    <bean id="mapperScannerConfigurer" class="org.mybatis.spring.mapper.MapperScannerConfigurer">
        <!--        註入sqlSessionFactory-->
        <property name="sqlSessionFactoryBeanName" value="sqlSessionFactory"/>
        <!--        給出需要掃描的Dao介面包  -->
        <property name="basePackage" value="com.smu.mapper"/>
    </bean>

</beans>
編寫spring-service.xml配置文件
<?xml version="1.0" encoding="UTF-8"?>
<beans xmlns="http://www.springframework.org/schema/beans"
       xmlns:xsi="http://www.w3.org/2001/XMLSchema-instance"
       xmlns:context="http://www.springframework.org/schema/context"
       xsi:schemaLocation="http://www.springframework.org/schema/beans
           http://www.springframework.org/schema/beans/spring-beans.xsd
           http://www.springframework.org/schema/context
           https://www.springframework.org/schema/context/spring-context.xsd">
    <!-- 用於掃描註解 -->
    <!--    <context:component-scan base-package="com.smu.service"/>-->
    <!--    使用掃描介面的方式註冊bean-->
    <bean id="booksServiceImpl" class="com.smu.service.BooksServiceImpl">
        <property name="booksMapper" ref="booksMapper"/>
    </bean>
    <bean id="usersServiceImpl" class="com.smu.service.UsersServiceImpl">
        <property name="usersMapper" ref="usersMapper"/>
    </bean>
</beans>
配置總的applicationContext.xml文件用於整合,引入的springmvc是表現層的,下麵配
<?xml version="1.0" encoding="UTF-8"?>
<beans xmlns="http://www.springframework.org/schema/beans"
       xmlns:xsi="http://www.w3.org/2001/XMLSchema-instance"
       xsi:schemaLocation="http://www.springframework.org/schema/beans
       http://www.springframework.org/schema/beans/spring-beans.xsd">

    <import resource="classpath:spring-dao.xml"/>
    <import resource="spring-service.xml"/>
    <import resource="springmvc.xml"/>
</beans>
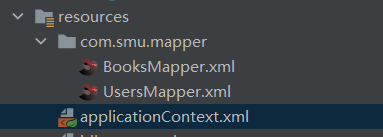
sql映射文件需要和mapper介面同一個目錄
service層寫一個業務需要的介面,然後寫一個實現類,實現類註入mapper介面
public class BooksServiceImpl implements BooksService{
    private BooksMapper booksMapper;

    public void setBooksMapper(BooksMapper booksMapper) {
        this.booksMapper = booksMapper;
    }

    @Override
    public List<Books> selectAll() {
        return booksMapper.selectAll();
    }

    public Books selectById(int id) {
        return booksMapper.selectById(id);
    }

    @Override
    public int add(Books books) {
        return booksMapper.add(books);
    }

    @Override
    public int deleteById(int id) {
        return booksMapper.deleteById(id);
    }

    @Override
    public int update(Books books) {
        return booksMapper.update(books);
    }

    @Override
    public List<Books> selectByName(String bookName) {
        return booksMapper.selectByName(bookName);
    }
}
此類已經在spring-service.xml中註冊過bean,代碼如下
<bean id="booksServiceImpl" class="com.smu.service.BooksServiceImpl">
        <property name="booksMapper" ref="booksMapper"/>
    </bean>
    <bean id="usersServiceImpl" class="com.smu.service.UsersServiceImpl">
        <property name="usersMapper" ref="usersMapper"/>
    </bean>
寫一個util包,將獲得bean的操作簡化
public class BooksServiceUtil {
    public static BooksServiceImpl getBooksServiceBean(){
        ApplicationContext context = new ClassPathXmlApplicationContext("applicationContext.xml");
        return context.getBean("booksServiceImpl", BooksServiceImpl.class);
    }
}
spring整合springMVC
在web.xml下部署dispatchSerclet
<?xml version="1.0" encoding="UTF-8"?>
<web-app xmlns="http://xmlns.jcp.org/xml/ns/javaee"
         xmlns:xsi="http://www.w3.org/2001/XMLSchema-instance"
         xsi:schemaLocation="http://xmlns.jcp.org/xml/ns/javaee
         http://xmlns.jcp.org/xml/ns/javaee/web-app_4_0.xsd"
         version="4.0">
    <!--    <display-name>springMVC</display-name>-->
    <!-- 部署 DispatcherServlet -->
    <servlet>
        <servlet-name>springmvc</servlet-name>
        <servlet-class>org.springframework.web.servlet.DispatcherServlet</servlet-class>

        <init-param>
            <param-name>contextConfigLocation</param-name>
            <param-value>classpath:applicationContext.xml</param-value>
        </init-param>

        <!-- 表示容器再啟動時立即載入servlet -->
        <load-on-startup>1</load-on-startup>
    </servlet>
    <servlet-mapping>
        <servlet-name>springmvc</servlet-name>
        <!-- 處理所有URL -->
        <url-pattern>/</url-pattern>
    </servlet-mapping>
    <!--    解決編碼問題-->
    <filter>
        <filter-name>encoding</filter-name>
        <filter-class>org.springframework.web.filter.CharacterEncodingFilter</filter-class>
        <init-param>
            <param-name>encoding</param-name>
            <param-value>utf-8</param-value>
        </init-param>
    </filter>
    <filter-mapping>
        <filter-name>encoding</filter-name>
        <url-pattern>/*</url-pattern>
    </filter-mapping>
</web-app>
編寫springmvc.xml配置文件
<?xml version="1.0" encoding="UTF-8"?> <beans xmlns="http://www.springframework.org/schema/beans" xmlns:xsi="http://www.w3.org/2001/XMLSchema-instance" xmlns:nvc="http://www.springframework.org/schema/mvc" xmlns:mvc="http://www.springframework.org/schema/mvc" xmlns:context="http://www.springframework.org/schema/context" xsi:schemaLocation="http://www.springframework.org/schema/beans http://www.springframework.org/schema/beans/spring-beans.xsd http://www.springframework.org/schema/mvc http://www.springframework.org/schema/mvc/spring-mvc.xsd http://www.springframework.org/schema/context https://www.springframework.org/schema/context/spring-context.xsd"> <!-- 配置SpringMVC --> <!-- 1.開啟SpringMVC註解驅動 --> <nvc:annotation-driven/> <!-- 2.靜態資源過濾預設servlet配置 --> <mvc:default-servlet-handler/> <!-- 3.掃描相關的controller--> <context:component-scan base-package="com.smu.controller"/> <!-- 處理器映射器--> <bean class="org.springframework.web.servlet.handler.BeanNameUrlHandlerMapping"/> <!-- 處理器適配器--> <bean class="org.springframework.web.servlet.mvc.SimpleControllerHandlerAdapter"/> <!-- 視圖解析器 以後可能會用到的模板引擎Thymeleaf Freemarker--> <bean id="internalResourceViewResolver" class="org.springframework.web.servlet.view.InternalResourceViewResolver"> <!-- 首碼--> <property name="prefix" value="/WEB-INF/jsp/"/> <!-- 尾碼--> <property name="suffix" value=".jsp"/> </bean> <!-- 攔截器配置--> <mvc:interceptors> <mvc:interceptor> <mvc:mapping path="/book/**"/> <bean class="com.smu.interceptor.LoginInterceptor"/> </mvc:interceptor> </mvc:interceptors> <!-- 文件上傳支持--> <!-- <bean id="multipartResolver" class="org.springframework.web.multipart.commons.CommonsMultipartResolver">--> <!-- <!– 請求表單的格式,需要和jsp的pageEncoding一樣,預設為ISO-8859-1–>--> <!-- <property name="defaultEncoding" value="utf-8"/>--> <!-- <!– 上傳文件的大小上限,單位為位元組10485760=10m–>--> <!-- <property name="maxUploadSize" value="10485760"/>--> <!-- <property name="maxInMemorySize" value="40960"/>--> <!-- </bean>--> </beans>
controller層的部分代碼截圖


