推薦文章: eclipse導入JDBC MySQL詳細安裝 菜鳥java MySQL連接教程 步驟: 找到MySQL的連接Java的jar文件; 如下圖: 在eclipse項目文件下找到lib文件夾,沒有的話就自己創建一個,然後將上面找到的jar文件複製粘貼到lib文件夾的下麵; 如下圖: 給這個j ...
推薦文章:
步驟:
- 找到MySQL的連接Java的jar文件;
如下圖:

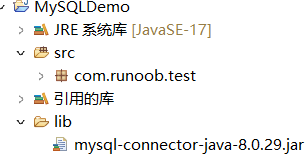
- 在eclipse項目文件下找到lib文件夾,沒有的話就自己創建一個,然後將上面找到的jar文件複製粘貼到lib文件夾的下麵;
如下圖:

- 給這個jar文件構建路徑;
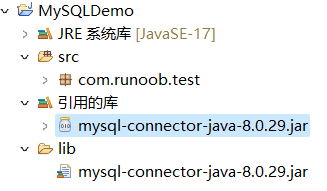
右鍵jar文件 -> 構建路徑(Build Path)-> 配置並構建路徑(Add to Build Path);
現在應該生成了一個引用的庫,如下圖:

- 進入eclipse類中編寫代碼:
- 導入sql:import java.sql.*;
- 載入驅動:
先定義常量:
MySQL 8.0以下版本:static final String JDBC_DRIVER = "com.mysql.jdbc.Driver";
MySQL 8.0及以上版本:static final String JDBC_DRIVER = "com.mysql.cj.jdbc.Driver";
再載入:
Class.forName(JDBC_DRIVER); - 連接資料庫:
Connection conn = DriverManager.getConnection(DB_URL,USER,PASS);
三個參數分別是資料庫url,用戶名,密碼
資料庫url示例:
MySQL 8.0以下版本:static final String DB_URL = "jdbc:mysql://localhost:3306/testdb";
MySQL 8.0及以上版本:static final String DB_URL = "jdbc:mysql://localhost:3306/testdb?useSSL=false&allowPublicKeyRetrieval=true&serverTimezone=UTC";
其中testdb為自己創建的資料庫的名稱;
用戶名和對應的密碼是自己創建資料庫時設置好的,如:
static final String USER = "root";
static final String PASS = "123321"; - 這樣資料庫就連接成功可以進行下一步操作了
完整代碼給出如下:
點擊查看代碼
package com.runoob.test;

import java.sql.*;

public class MySQLDemo {
	static final String JDBC_DRIVE = "com.mysql.cj.jdbc.Driver";
	static final String DB_URL = "jdbc:mysql://localhost:3306/testdb?useSSL=false&allowPublicKeyRetrieval=true&serverTimezone=UTC";
	static final String USER = "root";
	static final String PASS = "123321";

	public static void main(String[] args){
		Connection conn = null;
		try {
			Class.forName(JDBC_DRIVE);
			System.out.println("連接資料庫...");
			conn = DriverManager.getConnection(DB_URL,USER,PASS);
			System.out.println("實例化Statement對象...");
			conn.close();
			System.out.println("資料庫斷開連接");
		}catch(SQLException e) {
			e.printStackTrace();
		}catch(Exception e) {
			e.printStackTrace();
		}finally {
			try {
				if(conn!=null)conn.close();
			}catch(SQLException e) {
				e.printStackTrace();
			}
		}
		System.out.println("Goodbye!");
	}
}
本文來自博客園,作者:APiceland,轉載請註明原文鏈接:https://www.cnblogs.com/APiceland/p/16249915.html


