上一篇 https://www.cnblogs.com/redwinter/p/16196359.html 介紹了BeanFactoryPostProcessor的執行過程,這篇文章介紹Spring中配置的註解是如何通過ConfigurationClassPostProcessor解析的,另外分析下 ...
上一篇 https://www.cnblogs.com/redwinter/p/16196359.html 介紹了BeanFactoryPostProcessor的執行過程,這篇文章介紹Spring中配置的註解是如何通過ConfigurationClassPostProcessor解析的,另外分析下Spring Boot自動裝配是如何處理的。
ConfigurationClassPostProcessor 解析了哪些註解?
在上一篇文章https://www.cnblogs.com/redwinter/p/16196359.html 我們知道ConfigurationClassPostProcessor實際上是BeanFactoryPostProcessor的一個實現類,他特殊的地方是他還實現了BeanDefinitionRegisterPostProcessor介面,所以ConfigurationClassPostProcessor 既要實現BeanFactoryPostProcessor的介面方法postProcessBeanFactory也要實現BeanDefinitionRegisterPostProcessor的介面方法postProcessBeanDefinitionRegistry,並且在解析的時候先執行了postProcessBeanDefinitionRegistry方法,再執行了postProcessBeanDefinitionRegistry方法。
接下來我們看看postProcessBeanDefinitionRegistry做了什麼?
上源碼:
@Override
public void postProcessBeanDefinitionRegistry(BeanDefinitionRegistry registry) {
  int registryId = System.identityHashCode(registry);
  if (this.registriesPostProcessed.contains(registryId)) {
    throw new IllegalStateException(
      "postProcessBeanDefinitionRegistry already called on this post-processor against " + registry);
  }
  if (this.factoriesPostProcessed.contains(registryId)) {
    throw new IllegalStateException(
      "postProcessBeanFactory already called on this post-processor against " + registry);
  }
  this.registriesPostProcessed.add(registryId);
  // 處理配置的BeanDefinition
  processConfigBeanDefinitions(registry);
}
整個方法核心是執行了processConfigBeanDefinitions方法,這個方法非常的長並且邏輯也複雜,代碼我就不貼了,說一下大概的流程(較詳細):
- 先進行合格的
beanDefinition的檢查- 獲取到註解的元數據信息
- 判斷是包含
@Configuration註解,包含則合格,否則判斷是否包含了@Component、@ComponentScan、@Import、@ImportResource註解,包含則合格,如果都不包含則不合格
- 對合格的
BeanDefinition排序 - 創建一個解析
@Configuration註解的解析器 - 對合格的
BeanDefinition集合進行解析- 迴圈解析,最終調用
processConfigurationClass方法 - 判斷是否跳過解析,比如配置了
@Conditional註解的 - 調用
doProcessConfigurationClass方法開始解析(下麵的解析中可能會存在遞歸調用)- 解析
@Component註解- 判斷是否包含內部類標記了
@Component,比如在標有@Component註解的類裡面創建一個內部類也標記了@Component註解,如果有就會進行遞歸調用processConfigurationClass方法
- 判斷是否包含內部類標記了
- 解析
@PropertySources和@PropertySource註解- 比如標記
@PropertySource("classpath:jdbc.properties"),這樣就會把這個屬性的值全部解析到環境信息的propertySources屬性中
- 比如標記
- 解析
@ComponetScans和@ComponentScan註解- 比如配置了掃描的包,那麼就會掃描出合格的
BeanDefinition,然後遞歸解析
- 比如配置了掃描的包,那麼就會掃描出合格的
- 解析
@Import註解(Spring Boot自動裝配的實現)- 遞歸解析出標記了
@Import註解的類放在imports屬性中 - 解析
ImportSelector介面的實現類 - 調用
ImportSelector#selectImports方法解析需要註冊的類 - 遞歸調用
processImports方法,然後將需要註冊的類註冊到importBeanDefinitionRegistrars(這裡會在後面進行loadBeanDefinition)
- 遞歸解析出標記了
- 解析
@ImportResource註解- 比如解析配置的
Spring的xml配置文件,最終放到importedResources屬性中(後面會進行loadBeanDefinition)
- 比如解析配置的
- 解析
@Bean註解- 比如解析當前類標記了
@Bean的方法 - 然後放在
beanMethods屬性中(後面會進行loadBeanDefinition)
- 比如解析當前類標記了
- 解析
- 載入
BeanDefinition從上面解析出來的類中- 迴圈遍歷載入
BeanDefinition - 判斷是否跳過,比如實現了
Condition介面的類 - 載入標有
@Bean的BeanDefinition - 載入從
ImportResource中解析的BeanDefinition - 載入從
ImportSelector中配置的解析的BeanDefinition
- 迴圈遍歷載入
- 迴圈解析,最終調用
整個過程非常複雜,而且存在遞歸操作,讀者可以按照我寫的步驟進行debug調試,當然可能會出現到處跳轉不知所措的情況,多調幾遍就好了,只要知道大致的流程,應該還是不難的。
總的來說就是解析了這些註解:@Component、@PropertySource、@PropertySources、@ComponentScan、@ComponentScans、@Import、@ImportResource、@Bean,然後將標有這些註解的解析成BeanDefinition,如果加上了@Conditionnal註解,那麼按照條件進行解析。

自定義自動裝配
現在開發都是用SpringBoot,原因在於他非常的方便,引入即可使用,那麼他是做到的呢?眾所周知Spring Boot有幾個註解非常重要,比如:@SpringBootApplication、@EnableAutoConfiguration、@SpringBootConfiguration,其中最重要的是@EnableAutoConfiguration,這個註解裡面標記了@Import(AutoConfigurationImportSelector.class),當然還標記了其他的,我們現在只關心這個@Import,裡面放入了一個AutoConfigurationImportSelector類。
AutoConfigurationImportSelector類實現了DeferredImportSelector介面,這個DeferredImportSelector介面是ImportSelector的子介面,表示延遲導入的意思。在上面的分析中,其實最主要的是實現他的介面selectImports,直接源碼:
@Override
public String[] selectImports(AnnotationMetadata annotationMetadata) {
  if (!isEnabled(annotationMetadata)) {
    return NO_IMPORTS;
  }
  // 獲取自動裝配的實體
  AutoConfigurationEntry autoConfigurationEntry = getAutoConfigurationEntry(annotationMetadata);
  return StringUtils.toStringArray(autoConfigurationEntry.getConfigurations());
}

protected AutoConfigurationEntry getAutoConfigurationEntry(AnnotationMetadata annotationMetadata) {
  if (!isEnabled(annotationMetadata)) {
    return EMPTY_ENTRY;
  }
  AnnotationAttributes attributes = getAttributes(annotationMetadata);
  // 獲取合格(候選)的配置
  List<String> configurations = getCandidateConfigurations(annotationMetadata, attributes);
  configurations = removeDuplicates(configurations);
  Set<String> exclusions = getExclusions(annotationMetadata, attributes);
  checkExcludedClasses(configurations, exclusions);
  configurations.removeAll(exclusions);
  configurations = getConfigurationClassFilter().filter(configurations);
  fireAutoConfigurationImportEvents(configurations, exclusions);
  return new AutoConfigurationEntry(configurations, exclusions);
}

protected List<String> getCandidateConfigurations(AnnotationMetadata metadata, AnnotationAttributes attributes) {
  // 載入配置,根據factoryType,這裡的FactoryType就是@EnableAutoConfiguration註解
  List<String> configurations = SpringFactoriesLoader.loadFactoryNames(getSpringFactoriesLoaderFactoryClass(),
                                                                       getBeanClassLoader());
  Assert.notEmpty(configurations, "No auto configuration classes found in META-INF/spring.factories. If you "
                  + "are using a custom packaging, make sure that file is correct.");
  return configurations;
}

protected Class<?> getSpringFactoriesLoaderFactoryClass() {
  // 直接返回@EnableAutoConfiguration 註解
  return EnableAutoConfiguration.class;
}


public static List<String> loadFactoryNames(Class<?> factoryType, @Nullable ClassLoader classLoader) {
  String factoryTypeName = factoryType.getName();
  // 載入spring.factories文件並解析
  return loadSpringFactories(classLoader).getOrDefault(factoryTypeName, Collections.emptyList());
}

private static Map<String, List<String>> loadSpringFactories(@Nullable ClassLoader classLoader) {
  MultiValueMap<String, String> result = cache.get(classLoader);
  if (result != null) {
    return result;
  }

  try
    // 這裡獲取的url就是:
    // public static final String FACTORIES_RESOURCE_LOCATION = "META-INF/spring.factories";
    Enumeration<URL> urls = (classLoader != null ?
                             classLoader.getResources(FACTORIES_RESOURCE_LOCATION) :
                             ClassLoader.getSystemResources(FACTORIES_RESOURCE_LOCATION));
    result = new LinkedMultiValueMap<>();
    while (urls.hasMoreElements()) {
      URL url = urls.nextElement();
      UrlResource resource = new UrlResource(url);
      // 讀取屬性文件,獲取到key為EnableAutoConfiguration,value為需要載入的類
      Properties properties = PropertiesLoaderUtils.loadProperties(resource);
      for (Map.Entry<?, ?> entry : properties.entrySet()) {
        String factoryTypeName = ((String) entry.getKey()).trim();
        for (String factoryImplementationName : StringUtils.commaDelimitedListToStringArray((String) entry.getValue())) {
          result.add(factoryTypeName, factoryImplementationName.trim());
        }
      }
    }
    cache.put(classLoader, result);
    return result;
  }
  catch (IOException ex) {
    throw new IllegalArgumentException("Unable to load factories from location [" +
                                       FACTORIES_RESOURCE_LOCATION + "]", ex);
  }
}
所以我們也可以自己寫一個進行自動裝配,接下來實現一個簡單的自動裝配。
定義自動裝配註解
/**
 * @author <a href="https://www.cnblogs.com/redwinter/">redwinter</a>
 * @since 1.0
 **/
@Target(ElementType.TYPE)
@Retention(RetentionPolicy.RUNTIME)
@Import(MyImportSelector.class)
public @interface EnableRedwinterAutoConfiguration {
}
創建MyInportSelector類
/**
 * @author <a href="https://www.cnblogs.com/redwinter/">redwinter</a>
 * @since 1.0
 **/
public class MyImportSelector implements DeferredImportSelector {
  @Override
  public String[] selectImports(AnnotationMetadata importingClassMetadata) {
    ClassLoader classLoader = this.getClass().getClassLoader();
    // 載入需要裝配的類
    List<String> configurations = SpringFactoriesLoader.loadFactoryNames(getFactoryTypeClass(), classLoader);
    return configurations.toArray(new String[configurations.size()]);
  }

  private Class<?> getFactoryTypeClass() {
    return EnableRedwinterAutoConfiguration.class;
  }


}
創建啟動類
/**
 * @author <a href="https://www.cnblogs.com/redwinter/">redwinter</a>
 * @since 1.0
 **/
@Configuration
@EnableRedwinterAutoConfiguration
public class RedwinterApplication {
  	public static void main(String[] args) {
		AnnotationConfigApplicationContext context = new AnnotationConfigApplicationContext();
		context.scan("com.redwinter.test.config");
		context.refresh();
	}
}
創建需要裝配的類
/**
 * @author <a href=""https://www.cnblogs.com/redwinter/">redwinter</a>
 * @since 1.0
 **/
@Configuration
public class MyConfiguration {

	@Bean
	@Conditional(RedwinterStrCondition.class)
	public String myStr() {
		return "redwinter";
	}

	public static class RedwinterStrCondition implements ConfigurationCondition {

		@Override
		public ConfigurationPhase getConfigurationPhase() {
			return ConfigurationPhase.REGISTER_BEAN;
		}

		@Override
		public boolean matches(ConditionContext context, AnnotatedTypeMetadata metadata) {
			System.out.println("開始匹配。。。");
			return true;
		}
	}

}
創建spring.factories文件
com.redwinter.test.config.EnableRedwinterAutoConfiguration=\
  com.redwinter.test.config.MyConfiguration
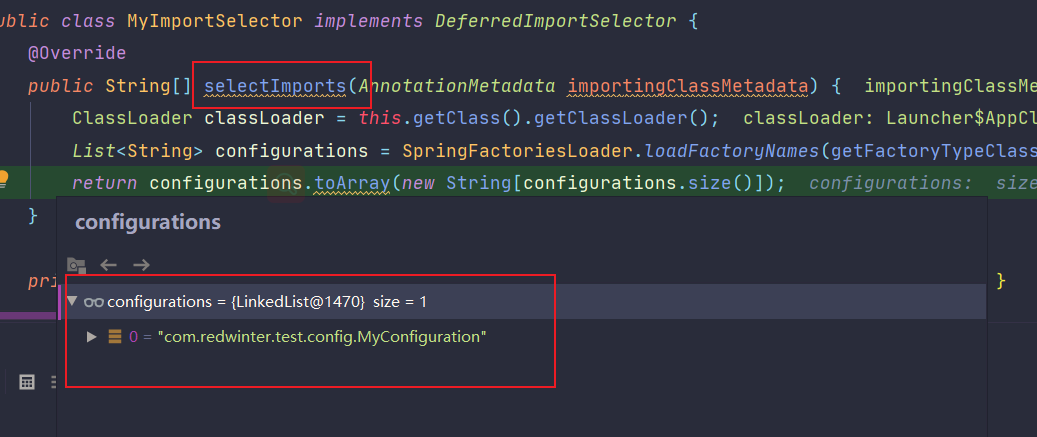
啟動驗證
debug斷點:

這就是Spring Boot自動裝配的簡化版,總得來說我們完成了Spring 對BeanFactoryPostProcessor的執行過程的解析,包括Spring是如何進行註解解析的,其實就是Spring在對BeanDefinition在正式初始化為Bean的前置處理,所以我們可以這個階段進行很多擴展,比如占位符的處理PropertySourcesPlaceholderConfigurer等。
接下來接續解讀AbstractApplicationContext#refresh方法對BeanPostProcessor的註冊。


