
一、在canvas畫布中如何載入圖片 用drawImage( )方法 drawImage用法的三種情況: 1、在畫布指定位置定義圖像 ctx.drawImage(img,x,y); 註:此時畫布上顯示的圖片大小是圖片的預設大小 2、在畫布上定點陣圖像,並規定圖像的寬度和高度: ctx.drawImag ...
一、在canvas畫布中如何載入圖片
---用drawImage( )方法
drawImage用法的三種情況:
1、在畫布指定位置定義圖像
ctx.drawImage(img,x,y);
註:此時畫布上顯示的圖片大小是圖片的預設大小
2、在畫布上定點陣圖像,並規定圖像的寬度和高度:
ctx.drawImage(img,x,y,width,height);
3、剪切圖像,併在畫布上定位被剪切的部分:
ctx.drawImage(img,sx,sy,swidth,sheight,x,y,width,height);
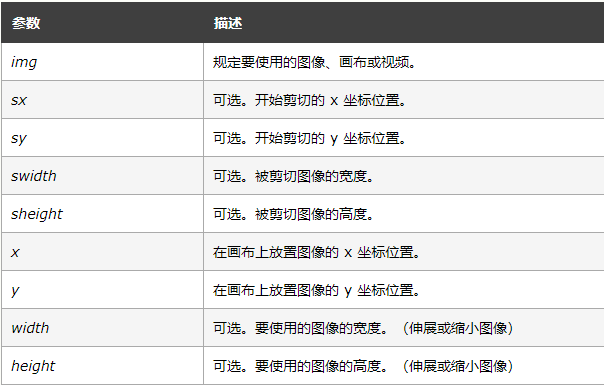
參數值
4、載入圖片的兩種方法
(1)、document.getElementById(' img ');
(2)、var image = new Image( ) ;
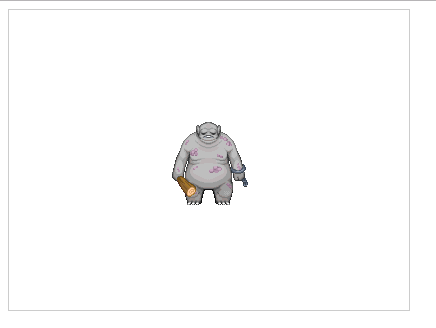
二、在畫布中心載入部分圖片
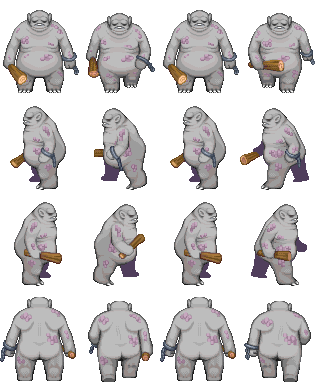
如上圖、載入第一行的第一個小怪獸
 <script>
        var Person = function(canvas){
          this.ctx = document.querySelector("canvas").getContext("2d");
          this.canvasWidth = this.ctx.canvas.width;
          this.canvasHeight = this.ctx.canvas.height;
          this.src = "image/04.png";
          this.init();
        }
        Person.prototype.init = function(){
          var that = this;
          this.loadImage(function(image){
            // 獲取圖片的寬高
            that.imageWidth = image.width;
            that.imageHeight = image.height;
            // 獲取單個小怪獸區域的寬高
            that.positionWidth = that.imageWidth / 4;
            that.positionHeight = that.imageHeight / 4;

            // 預設是從左上角顯示的
            that.x0 = that.canvasWidth / 2 - that.positionWidth / 2;
            that.y0 = that.canvasHeight / 2 - that.positionHeight / 2;

            // 繪製圖片
            that.ctx.drawImage(image, 0, 0, that.positionWidth, that.positionHeight, that.x0,
              that.y0, that.positionWidth, that.positionHeight);

          })
        }
        Person.prototype.loadImage = function(callback){
          var image = new Image();
          // 圖片載入完成後執行
          image.onload = function(){
            callback && callback(image);
          }
          image.src = this.src;
        }

        var person = new Person();
      </script>
三、繪製小人行走的幀動畫
<s<script>
        var Person = function(canvas){
          this.ctx = document.querySelector("canvas").getContext("2d");
          this.canvasWidth = this.ctx.canvas.width;
          this.canvasHeight = this.ctx.canvas.height;
          this.src = "image/04.png";
          this.init();
        }
        Person.prototype.init = function(){
          var that = this;
          this.loadImage(function(image){
            // 獲取圖片的寬高
            that.imageWidth = image.width;
            that.imageHeight = image.height;
            // 獲取單個小怪獸區域的寬高
            that.positionWidth = that.imageWidth / 4;
            that.positionHeight = that.imageHeight / 4;

            // 預設是從左上角顯示的
            that.x0 = that.canvasWidth / 2 - that.positionWidth / 2;
            that.y0 = that.canvasHeight / 2 - that.positionHeight / 2;

            // 繪製圖片
            that.ctx.drawImage(image, 0, 0, that.positionWidth, that.positionHeight, that.x0,
              that.y0, that.positionWidth, that.positionHeight);
            var index = 0;
            setInterval(function(){
              that.ctx.clearRect(0, 0, that.canvasWidth, that.canvasHeight);
              index++;
              that.ctx.drawImage(image, index * that.positionWidth, 0, that.positionWidth, that.positionHeight, that.x0, that.y0,
         that.positionWidth, that.positionHeight);
              if(index >= 3){
                index = 0;
              }
            }, 100);
          })
        }
        Person.prototype.loadImage = function(callback){
          var image = new Image();
          // 圖片載入完成後執行
          image.onload = function(){
            callback && callback(image);
          }
          image.src = this.src;
        }

        var person = new Person();
      </script>
四、繪製疾走的小怪獸
可以通過鍵盤上下左右鍵控制小人在畫布中任意行走
 <<script>
        var Person = function(canvas){
          this.ctx = document.querySelector("canvas").getContext("2d");
          this.canvasWidth = this.ctx.canvas.width;
          this.canvasHeight = this.ctx.canvas.height;
          this.stepX = 0;
          this.stepY = 0;
          this.stepSize = 10;
          this.index = 0;
          this.direction = 0;
          this.src = "image/04.png";
          this.init();
        }
        Person.prototype.init = function(){
          var that = this;
          this.loadImage(function(image){
            // 獲取圖片的寬高
            that.imageWidth = image.width;
            that.imageHeight = image.height;
            // 獲取單個小怪獸區域的寬高
            that.positionWidth = that.imageWidth / 4;
            that.positionHeight = that.imageHeight / 4;

            // 預設是從左上角顯示的
            that.x0 = that.canvasWidth / 2 - that.positionWidth / 2;
            that.y0 = that.canvasHeight / 2 - that.positionHeight / 2;

            // 繪製圖片
            that.ctx.drawImage(image, 0, 0, that.positionWidth, that.positionHeight, that.x0,
              that.y0, that.positionWidth, that.positionHeight);
            var index = 0;
            document.onkeydown = function(e){
              that.ctx.clearRect(0, 0, that.canvasWidth, that.canvasHeight);
              switch(e.keyCode){
                case 37 :
                  console.log('左');
                  that.direction = 1;
                  that.stepX--;
                  that.showImage(image);
                  break;
                case 38 :
                  console.log('上');
                  that.direction = 3;
                  that.stepY--;
                  that.showImage(image);
                  break;
                case 39 :
                  console.log('右');
                  that.direction = 2;
                  that.stepX++;
                  that.showImage(image);
                  break;
                case 40 :
                  console.log('下');
                  that.direction = 0;
                  that.stepY++;
                  that.showImage(image);
                  break;

              }
            }

          })
        }
        Person.prototype.loadImage = function(callback){
          var image = new Image();
          // 圖片載入完成後執行
          image.onload = function(){
            callback && callback(image);
          }
          image.src = this.src;
        }
        Person.prototype.showImage = function(image){
          this.index++;
          console.log(this.index);
           this.ctx.drawImage(image, this.index * this.positionWidth, this.direction * this.positionHeight, this.positionWidth, this.positionHeight, this.x0 + this.stepX * this.stepSize, this.y0 + this.stepY * this.stepSize, this.positionWidth, this.positionHeight);
           if(this.index >= 3){
             this.index = 0;
           }
        }
        var person = new Person();
      </script>

