出庫單的功能。能學習了出庫單管理之後,WMS的 主體功能算是完成了。當然一個成熟的WMS還包括了盤點,報表,策略規則,移庫功能及與其他系統(ERP、TMS等)的介面,實現無縫集成,打破信息孤島,讓數據實時、準確和同步。 ...
abp(net core)+easyui+efcore實現倉儲管理系統目錄
abp(net core)+easyui+efcore實現倉儲管理系統——ABP總體介紹(一) abp(net core)+easyui+efcore實現倉儲管理系統——解決方案介紹(二) abp(net core)+easyui+efcore實現倉儲管理系統——領域層創建實體(三) abp(net core)+easyui+efcore實現倉儲管理系統——定義倉儲並實現 (四) abp(net core)+easyui+efcore實現倉儲管理系統——創建應用服務(五) abp(net core)+easyui+efcore實現倉儲管理系統——展現層實現增刪改查之控制器(六) abp(net core)+easyui+efcore實現倉儲管理系統——展現層實現增刪改查之列表視圖(七) abp(net core)+easyui+efcore實現倉儲管理系統——展現層實現增刪改查之增刪改視圖(八) abp(net core)+easyui+efcore實現倉儲管理系統——展現層實現增刪改查之菜單與測試(九) abp(net core)+easyui+efcore實現倉儲管理系統——使用 WEBAPI實現CURD (十一)abp(net core)+easyui+efcore實現倉儲管理系統——EasyUI前端頁面框架 (十八)
abp(net core)+easyui+efcore實現倉儲管理系統——EasyUI之貨物管理一 (十九) abp(net core)+easyui+efcore實現倉儲管理系統——ABP WebAPI與EasyUI結合增刪改查之一(二十七) abp(net core)+easyui+efcore實現倉儲管理系統——ABP WebAPI與EasyUI結合增刪改查之三(二十九) abp(net core)+easyui+efcore實現倉儲管理系統——ABP WebAPI與EasyUI結合增刪改查之八(三十四) abp(net core)+easyui+efcore實現倉儲管理系統——ABP WebAPI與EasyUI結合增刪改查之十(三十六) abp(net core)+easyui+efcore實現倉儲管理系統——入庫管理之一(三十七) abp(net core)+easyui+efcore實現倉儲管理系統——入庫管理之二(三十八) abp(net core)+easyui+efcore實現倉儲管理系統——入庫管理之三存儲過程(三十九) abp(net core)+easyui+efcore實現倉儲管理系統——入庫管理之四(四十) abp(net core)+easyui+efcore實現倉儲管理系統——入庫管理之五(四十一) abp(net core)+easyui+efcore實現倉儲管理系統——入庫管理之六(四十二) abp(net core)+easyui+efcore實現倉儲管理系統——入庫管理之七(四十三) abp(net core)+easyui+efcore實現倉儲管理系統——入庫管理之八(四十四) abp(net core)+easyui+efcore實現倉儲管理系統——入庫管理之九(四十五) abp(net core)+easyui+efcore實現倉儲管理系統——入庫管理之十(四十六)abp(net core)+easyui+efcore實現倉儲管理系統——入庫管理之十一(四十七) abp(net core)+easyui+efcore實現倉儲管理系統——入庫管理之十二(四十八)
一.前言
出庫單的功能。能學習了出庫單管理之後,WMS的 最基本的功能算是完成了。當然一個成熟的WMS還包括了盤點,報表,策略規則,移庫功能及與其他系統(ERP、TMS等)的介面,實現無縫集成,打破信息孤島,讓數據實時、準確和同步。
二、出庫單的流程
1.一般情況下會有一個前置的OMS系統——即訂單管理系統。主要功能之一是由客戶填寫訂單。
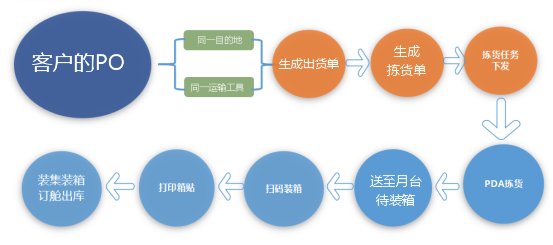
2.客戶把訂單下第三方物流公司時,第三方物流公司會生成出貨單推送到倉庫時,系統會自動生成揀貨單,理貨員根據揀貨單揀貨,並製作出庫單,然後列印標簽,粘貼條碼標簽,分配托盤,核驗條碼標簽,貨物裝箱,訂艙出庫,併在系統中對出庫單進行審核通過。整個流程如下圖。

當然我們接下來要實現的出庫單功能,沒有這麼複雜。
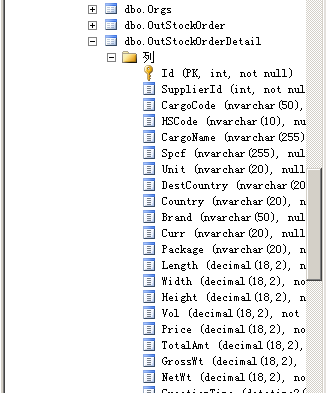
三、創建出庫單實體
1. 做為一個出庫單,在資料庫中一般存在兩張表,表頭OutStockOrder,表體OutStockDetail
2.在Visual Studio 2017的“解決方案資源管理器”中,右鍵單擊“ABP.TPLMS.Core”項目的“Entitys”文件夾,在彈出菜單中選擇“添加” >
> “類”。 將類命名為 OutStockOrder,然後選擇“添加”。
3.創建OutStockOrder類繼承自Entity<int>,通過實現審計模塊中的IHasCreationTime來實現保存創建時間。代碼如下:
using Abp.Domain.Entities;
using Abp.Domain.Entities.Auditing;

using System;
using System.Collections.Generic;
using System.ComponentModel.DataAnnotations;
using System.Text;

 namespace ABP.TPLMS.Entitys
{

    public class OutStockOrder: Entity<int>, IHasCreationTime
    {


        public const int MaxLength = 255;
        public OutStockOrder()
        {

            No = string.Empty;
            CustomerCode = string.Empty;
            CustomerName = string.Empty;
            WarehouseNo = string.Empty;


            DeliveryNo = string.Empty;
            TallyClerk = string.Empty;
            TallyTime = string.Empty;
            CreationTime = DateTime.Now;
            Oper = string.Empty;
            Checker = string.Empty;
            CheckTime = string.Empty;
            Gwt = 0;
            Nwt = 0;
            PackageQty = 0;
            OwnerCode = string.Empty;
            OwnerName = string.Empty;
            Remark = string.Empty;
            Status = 0;
            PreOutStockTime = string.Empty;
        }


        [StringLength(50)]
        [Required]
        public string No { get; set; }
        /// <summary>
        /// 客戶名稱
        /// </summary>
        [StringLength(MaxLength)]
        [Required]
        public string CustomerName { get; set; }

        /// <summary>
        /// 車牌號
        /// </summary>
        public string VehicleNo { get; set; }
        /// <summary>
        /// 客戶代碼
        /// </summary>
        [StringLength(50)]
        [Required]
        public string CustomerCode { get; set; }

        /// <summary>
        /// 收貨人代碼
        /// </summary>
        public string ConsigneeCode { get; set; }

        /// <summary>
        /// 收貨人
        /// </summary>
        public string Consignee{get ;set;}

        /// <summary>
        /// 收貨人社會信用代碼
        /// </summary>
        public string ConsigneeSCCD { get; set; }

        /// <summary>
        /// 托運人,發貨人
        /// </summary>
        public string Shipper { get; set; }


        /// <summary>
        /// 托運人,發貨人代碼
        /// </summary>
        public string ShipperCode { get; set; }


        /// <summary>
        /// 托運人,發貨人社會信用代碼
        /// </summary>
        public string ShipperSCCD { get; set; }

        /// <summary>
        /// 通知人
        /// </summary>
        public string Notify { get; set; }

        /// <summary>
        /// 通知人代碼
        /// </summary>
        public string NotifyCode { get; set; }

        /// <summary>
        /// 通知人社會信用代碼
        /// </summary>
        public string NotifySCCD { get; set; }

        /// <summary>
        /// 出貨單號
        /// </summary>
        public string DeliveryNo { get; set; }

        /// <summary>
        /// 倉庫號
        /// </summary>
        public string WarehouseNo { get; set; }

        /// <summary>
        /// 貨主
        /// </summary>
        [StringLength(MaxLength)]
        [Required]

        public string OwnerName { get; set; }


        public decimal Gwt { get; set; }
        public decimal Nwt { get; set; }
        public int PackageQty { get; set; }
        /// <summary>
        /// 理貨時間
        /// </summary>
        [StringLength(20)]

        public string TallyTime { get; set; }

        /// <summary>
        /// 理貨員
        /// </summary>
        [StringLength(50)]
        public string TallyClerk { get; set; }

        [StringLength(50)]

        public string Oper { get; set; }
        public int Status { get; set; }

        [StringLength(50)]

        public string OwnerCode { get; set; }
        /// <summary>
        /// 預計出庫時間
        /// </summary>
        [StringLength(20)]

        public string PreOutStockTime { get; set; }

        /// <summary>
        /// 審核人
        /// </summary>
        [StringLength(50)]

        public string Checker { get; set; }
        [StringLength(20)]

        public string CheckTime { get; set; }
        [StringLength(1000)]

        public string Remark { get; set; }
        public DateTime CreationTime { get; set; }

        [StringLength(20)]
        public string LastUpdateTime { get; set; }
        [StringLength(50)]
        public string LastOper { get; set; }

    }
}
4. 重得第2,3步,我們在“ABP.TPLMS.Core”項目的“Entitys”文件夾,創建OutStockOrderDetail類。代碼如下:using Abp.Domain.Entities;
using Abp.Domain.Entities.Auditing;
using System;
using System.Collections.Generic;
using System.ComponentModel.DataAnnotations;
using System.ComponentModel.DataAnnotations.Schema;
using System.Text;
namespace ABP.TPLMS.Entitys
{
public class OutStockOrderDetail : Entity<int>, IHasCreationTime
{
public const int MaxLength = 255;
public OutStockOrderDetail()
{
this.Qty = 0;
this.CargoCode = string.Empty;
this.CargoName = string.Empty;
this.Brand = string.Empty;
this.Country = string.Empty;
this.CreationTime = DateTime.Now;
this.Curr = string.Empty;
this.GrossWt = 0;
this.Height = 0;
this.HSCode = string.Empty;
this.Length = 0;
this.SecdLawfQty = 0;
this.LawfQty = 0;
this.NetWt = 0;
this.Package = string.Empty;
this.Price = 0;
this.Spcf = string.Empty;
this.Unit = string.Empty;
this.InStockNo = string.Empty;
this.LawfUnit = string.Empty;
this.Vol = 0;
this.Width = 0;
this.LawfUnit = string.Empty;
this.SecdLawfUnit = string.Empty;
this.Batch = string.Empty;
this.InStockOrderDetailId = 0;
}
public int SupplierId { get; set; }
[MaxLength(50)]
public string CargoCode { get; set; }
[MaxLength(10)]
public string HSCode { get; set; }
[MaxLength(MaxLength)]
public string CargoName { get; set; }
[MaxLength(MaxLength)]
public string Spcf { get; set; }
[MaxLength(20)]
public string Unit { get; set; }
/// <summary>
/// 目的國
/// </summary>
[MaxLength(20)]
public string DestCountry { get; set; }
/// <summary>
/// 原產國
/// </summary>
[MaxLength(20)]
public string Country { get; set; }
[MaxLength(50)]
public string Brand { get; set; }
[MaxLength(20)]
public string Curr { get; set; }
[MaxLength(20)]
public string Package { get; set; }
public decimal Length { get; set; }
public decimal Width { get; set; }
public decimal Height { get; set; }
public decimal Vol { get; set; }
public decimal Price { get; set; }
public decimal TotalAmt { get; set; }
public decimal GrossWt { get; set; }
public decimal NetWt { get; set; }
public DateTime CreationTime { get; set; }
[MaxLength(20)]
public string InStockNo { get; set; }
public int InStockOrderDetailId { get; set; }
public decimal Qty { get; set; }
public decimal LawfQty { get; set; }
public decimal SecdLawfQty { get; set; }
[MaxLength(20)]
public string LawfUnit { get; set; }
[MaxLength(20)]
public string SecdLawfUnit { get; set; }
[MaxLength(20)]
public string Batch { get; set; }
public string Loc { get; set; }
}
}
5.定義入庫單的實體之後,我們去“ABP.TPLMS.EntityFrameworkCore”項目中的“TPLMSDbContext”類中定義實體對應的DbSet,以應用Code First 數據遷移。添加以下代碼
using Microsoft.EntityFrameworkCore;
using Abp.Zero.EntityFrameworkCore;
using ABP.TPLMS.Authorization.Roles;
using ABP.TPLMS.Authorization.Users;
using ABP.TPLMS.MultiTenancy;
using ABP.TPLMS.Entitys;


namespace ABP.TPLMS.EntityFrameworkCore
{
    public class TPLMSDbContext : AbpZeroDbContext<Tenant, Role, User, TPLMSDbContext>
    {

        /* Define a DbSet for each entity of the application */


        public TPLMSDbContext(DbContextOptions<TPLMSDbContext> options)
            : base(options)
        {

        }

        public DbSet<Module> Modules { get; set; }
        public DbSet<Supplier> Suppliers { get; set; }
        public DbSet<Cargo> Cargos { get; set; }
        public DbSet<Org> Orgs { get; set; }

        public virtual DbSet<InStockOrder> InStockOrder { get; set; }
        public virtual DbSet<InStockOrderDetail> InStockOrderDetail { get; set; }

        public virtual DbSet<InStockOrderDetailLoc> InStockOrderDetailLoc { get; set; }


        public virtual DbSet<OutStockOrder> OutStockOrder { get; set; }
        public virtual DbSet<OutStockOrderDetail> OutStockOrderDetail { get; set; }

    }

}
6.從菜單中選擇“工具->NuGet包管理器器—>程式包管理器控制台”菜單。
7. 在PMC中,預設項目選擇EntityframeworkCore對應的項目後。輸入以下命令:Add-Migration AddEntityOutStock,創建遷移。如下圖。

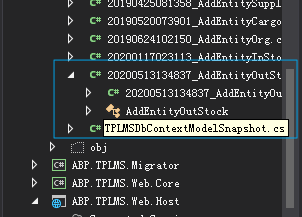
8. 在上面的命令執行完畢之後,創建成功後,會在Migrations文件夾下創建時間_AddEntityOutStock格式的類文件,這些代碼是基於DbContext指定的模型。如下圖。

9.在程式包管理器控制台,輸入Update-Database,回車執行遷移。執行成功後,如下圖。

10. 在SQL Server Management Studio中查看資料庫,OutStockOrder、OutStockOrderDetail兩張表創建成功。


