一、Swagger 1、什麼是 Swagger ? Swagger 是一個規範和完整的框架,用於生成、描述、調用以及可視化的 Restful 風格的 Web 服務。 簡單的理解:是一款 REST API 文檔生成工具,生成線上的介面文檔,方便介面測試。 2、為什麼使用 Swagger? 前後端分離開 ...
一、Swagger
1、什麼是 Swagger ?
Swagger 是一個規範和完整的框架,用於生成、描述、調用以及可視化的 Restful 風格的 Web 服務。
簡單的理解:是一款 REST API 文檔生成工具,生成線上的介面文檔,方便介面測試。
2、為什麼使用 Swagger?
前後端分離開發時,為了方便前後端介面調用規範,需要提供一個介面文檔,但是維護這個介面文檔是一個及其繁瑣的事情,可能一不小心就忘記更新該文檔從而導致前後端介面調用失敗。
Swagger 就是為瞭解決這個問題而出現的(線上介面文檔),其在介面方法上定義註解,並根據註解形成一個 html 頁面,每次介面修改,這個 html 頁面就會發生相應的改變,從而保證了介面文檔的正確性。通過該 html 頁面,可以很方便、清楚的知道這個介面的功能,並測試。
3、SpringBoot 整合 Swagger?
(1)Step1:
導入依賴 jar 包。
<!-- https://mvnrepository.com/artifact/io.springfox/springfox-swagger2 -->
<dependency>
    <groupId>io.springfox</groupId>
    <artifactId>springfox-swagger2</artifactId>
    <version>2.9.2</version>
</dependency>
<!-- https://mvnrepository.com/artifact/io.springfox/springfox-swagger-ui -->
<dependency>
    <groupId>io.springfox</groupId>
    <artifactId>springfox-swagger-ui</artifactId>
    <version>2.9.2</version>
</dependency>
(2)Step2:
配置 swagger 插件。
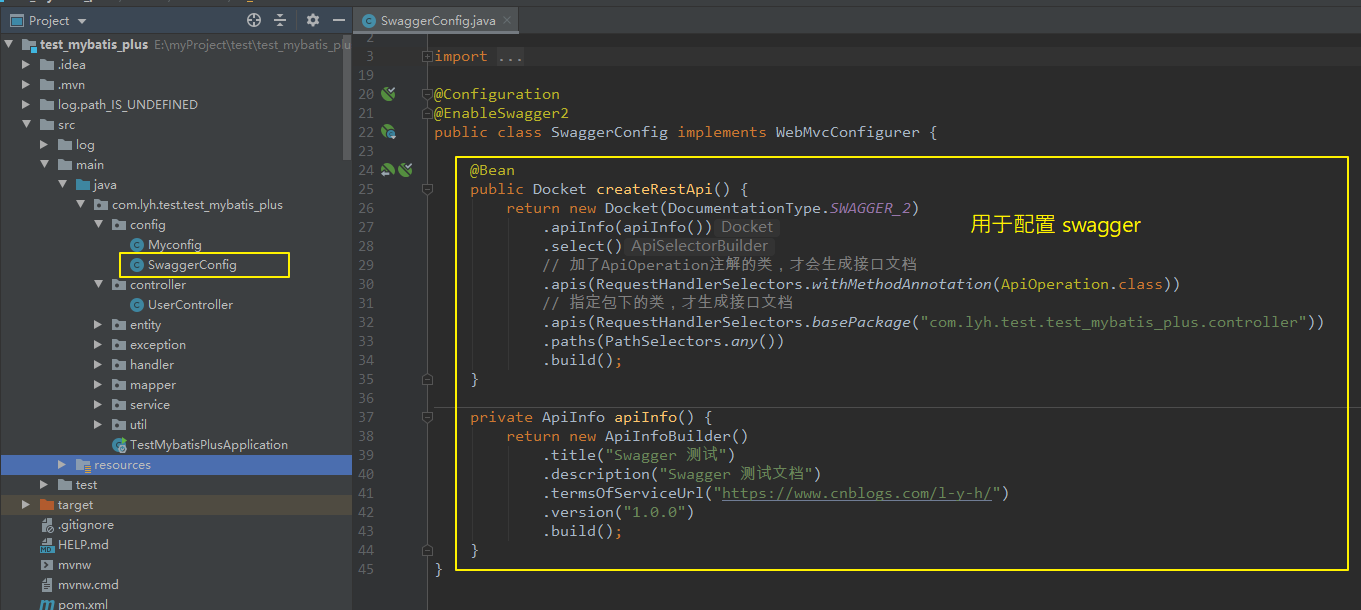
編寫一個配置類,實現 WebMvcConfigurer 介面(可以不實現該介面),用於配置 Swagger 相關信息。
@EnableSwagger2 用於開啟 Swagger。
package com.lyh.test.test_mybatis_plus.config;

import io.swagger.annotations.ApiOperation;
import org.springframework.context.annotation.Bean;
import org.springframework.context.annotation.Configuration;
import org.springframework.web.servlet.config.annotation.WebMvcConfigurer;
import springfox.documentation.builders.ApiInfoBuilder;
import springfox.documentation.builders.PathSelectors;
import springfox.documentation.builders.RequestHandlerSelectors;
import springfox.documentation.service.ApiInfo;
import springfox.documentation.spi.DocumentationType;
import springfox.documentation.spring.web.plugins.Docket;
import springfox.documentation.swagger2.annotations.EnableSwagger2;

@Configuration
@EnableSwagger2
public class SwaggerConfig implements WebMvcConfigurer {

    @Bean
    public Docket createRestApi() {
        return new Docket(DocumentationType.SWAGGER_2)
            .apiInfo(apiInfo())
            .select()
            // 加了ApiOperation註解的類,才會生成介面文檔
            .apis(RequestHandlerSelectors.withMethodAnnotation(ApiOperation.class))
            // 指定包下的類,才生成介面文檔
            .apis(RequestHandlerSelectors.basePackage("com.lyh.test.test_mybatis_plus.controller"))
            .paths(PathSelectors.any())
            .build();
    }

    private ApiInfo apiInfo() {
        return new ApiInfoBuilder()
            .title("Swagger 測試")
            .description("Swagger 測試文檔")
            .termsOfServiceUrl("https://www.cnblogs.com/l-y-h/")
            .version("1.0.0")
            .build();
    }
}
(3)啟動服務,並訪問 swagger-ui.html 頁面。
訪問 http://localhost:8080/swagger-ui.html,顯示如下,能夠進入線上介面文檔頁面,由於並沒有在方法上添加註解,所以介面方法都沒有顯示。

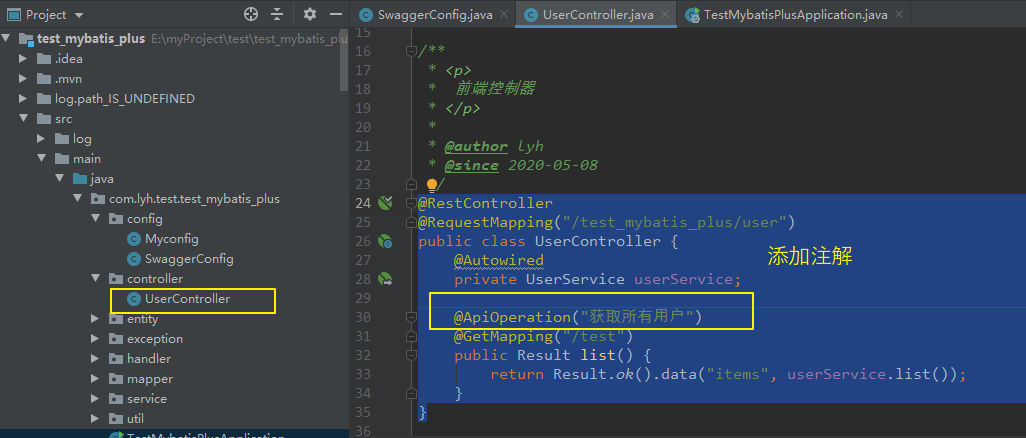
(4)給介面方法添加相關註解。
由於配置了 @ApiOperation 註解標註的方法才能被掃描到,所以在方法上添加該註解。
@RestController
@RequestMapping("/test_mybatis_plus/user")
public class UserController {
    @Autowired
    private UserService userService;

    @ApiOperation("獲取所有用戶")
    @GetMapping("/test")
    public Result list() {
        return Result.ok().data("items", userService.list());
    }
}
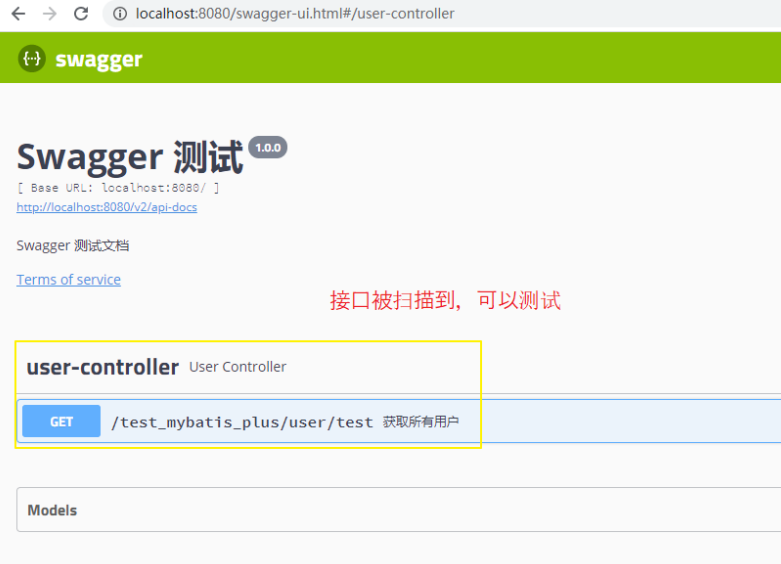
(5)重啟服務,再次訪問 swagger-ui.html 頁面。
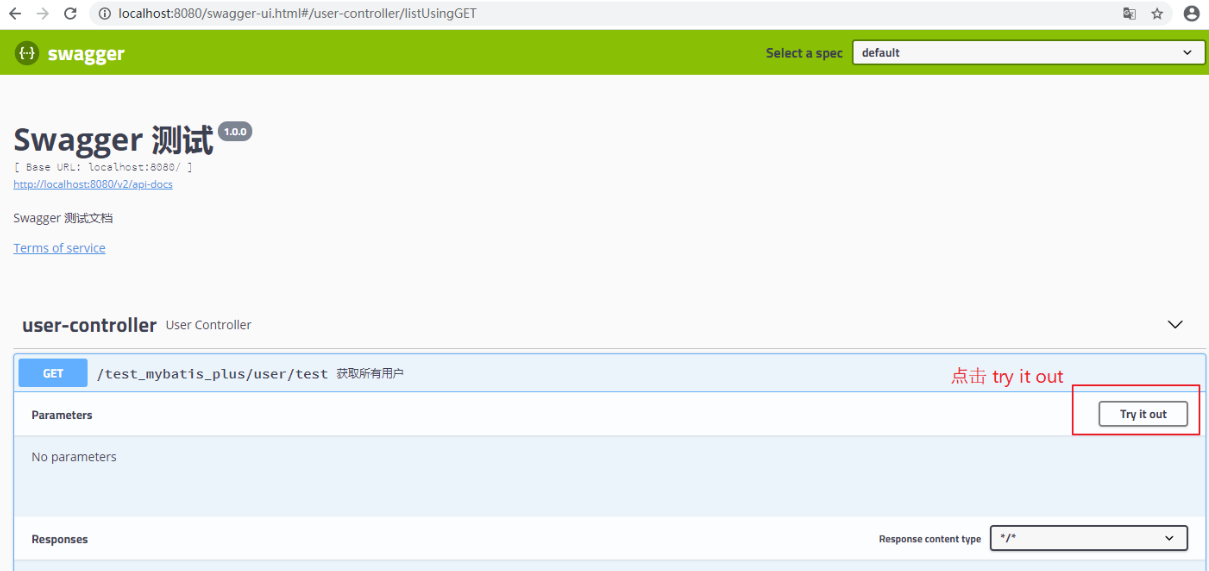
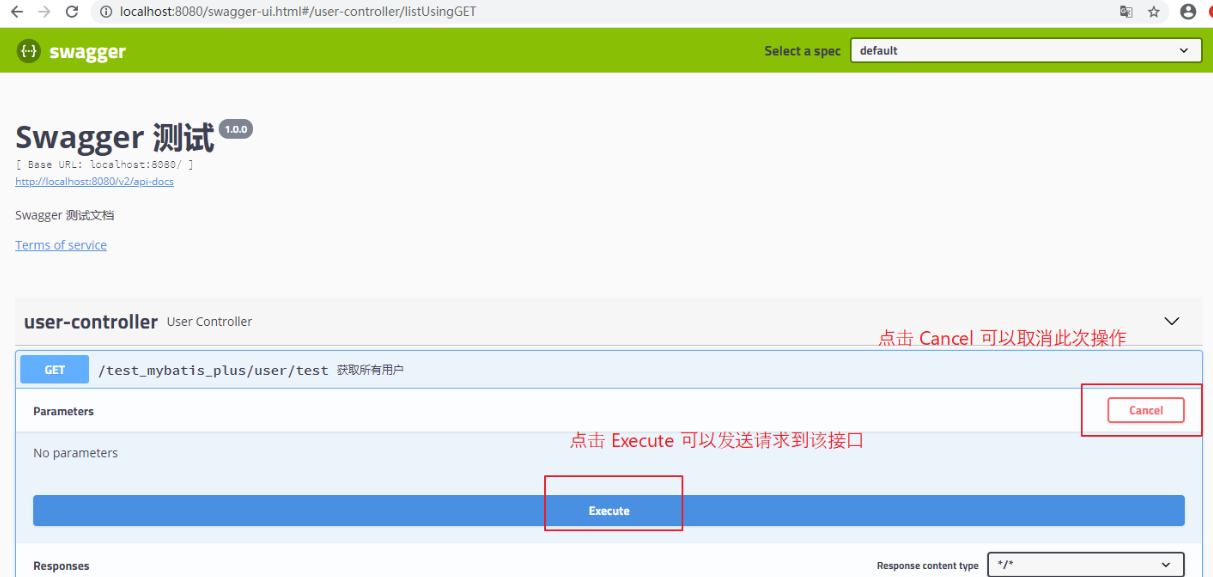
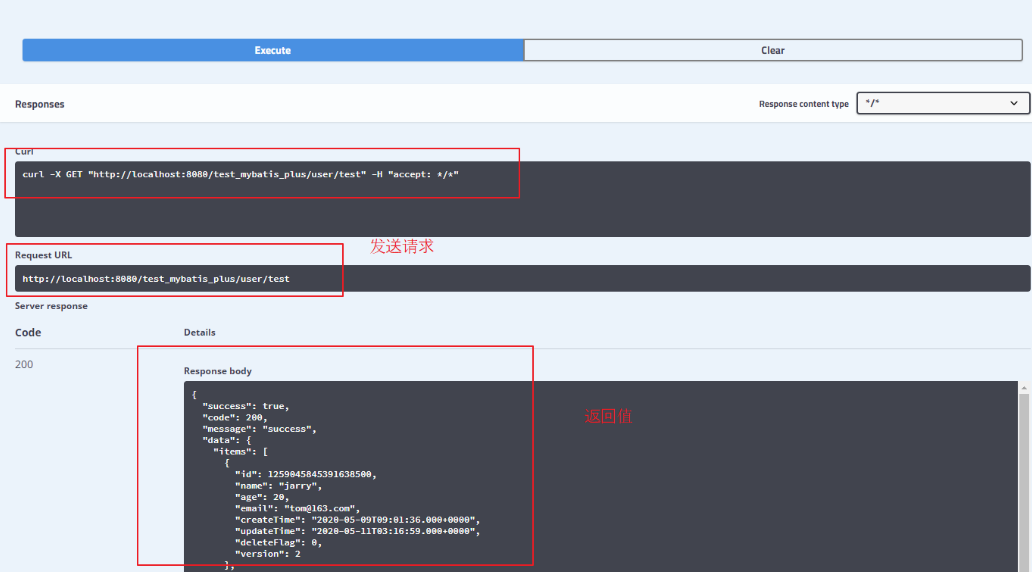
二、Swagger 註解、配置
1、Swagger 常用註解
(1)常用註解
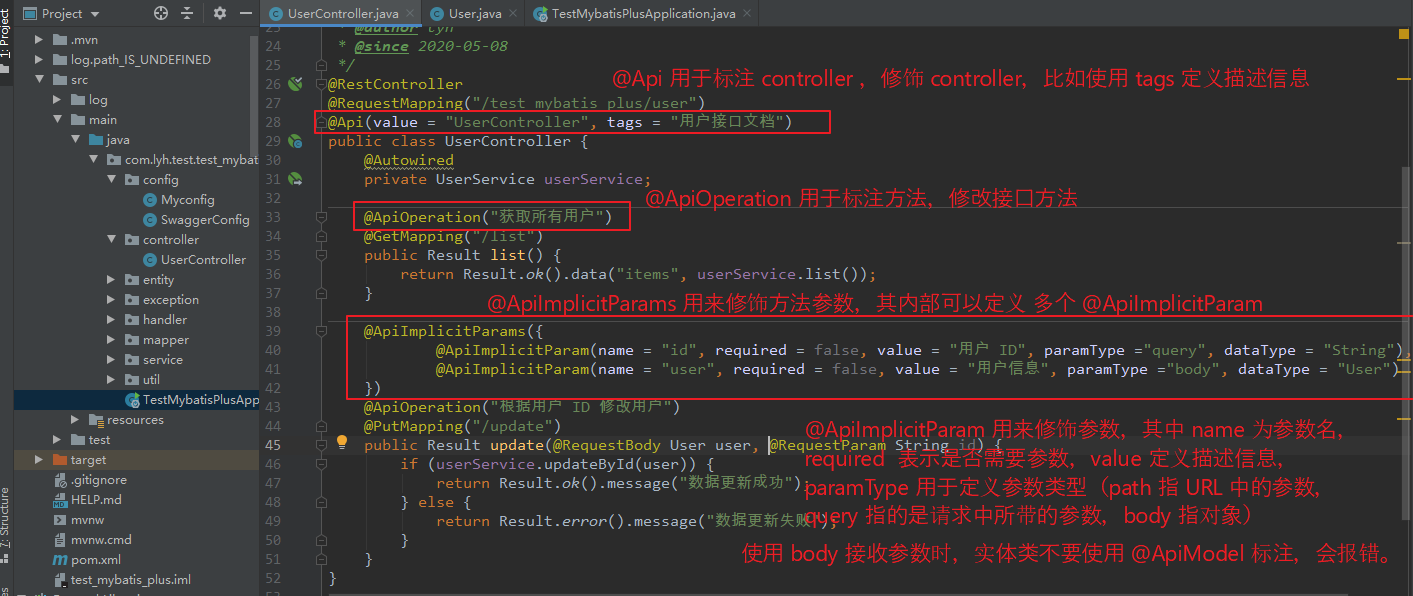
swagger 通過註解去實現介面文檔,這些註解可以標註介面名,請求方法,參數,返回信息等。
@Api                標註在 controller 類上,用於修飾 controller
@ApiOperation       標註在介面方法上,用於修飾 介面方法
@ApiParam           標註在介面參數上,用於修飾 參數
@ApiImplicitParam   標註在介面參數上,用於修飾 一個請求參數
@ApiImplicitParams   標註在介面參數上,用於修飾 多個請求參數(@ApiImplicitParam)
@ApiIgnore          標註在方法、參數上,表示忽略該方法、參數
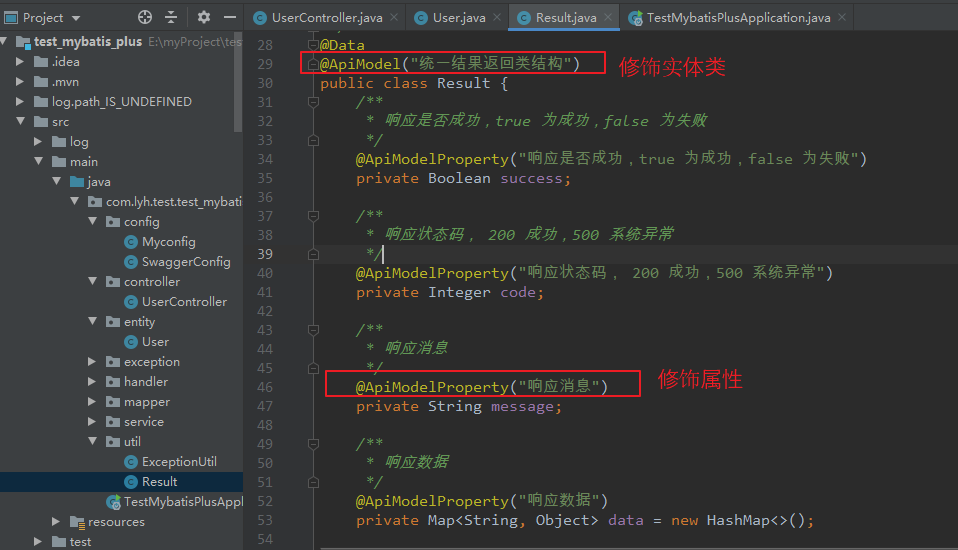
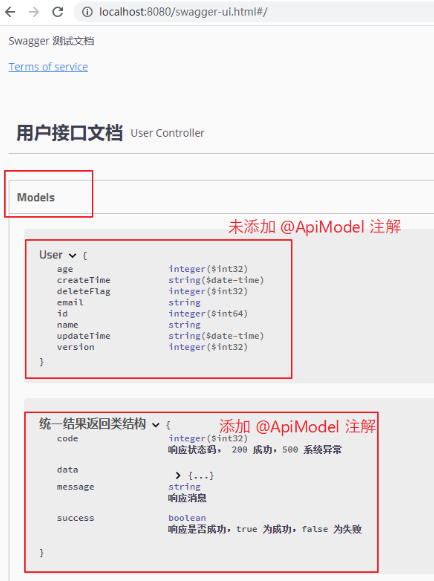
@ApiModel           標註在實體類上,用來修飾實體類
@ApiModelProperty   標註在實體類的屬性上,用於修飾實體類的屬性。
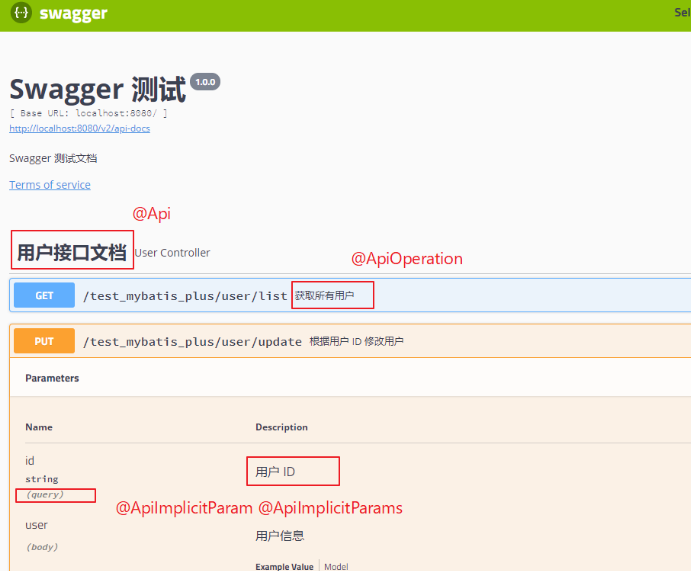
(2)@Api @ApiOperation @ApiImplicitParam @ApiImplicitParams 舉例:
import com.lyh.test.test_mybatis_plus.entity.User;
import com.lyh.test.test_mybatis_plus.service.UserService;
import com.lyh.test.test_mybatis_plus.util.Result;
import io.swagger.annotations.Api;
import io.swagger.annotations.ApiImplicitParam;
import io.swagger.annotations.ApiImplicitParams;
import io.swagger.annotations.ApiOperation;
import org.springframework.beans.factory.annotation.Autowired;
import org.springframework.web.bind.annotation.*;

/**
 * <p>
 *  前端控制器
 * </p>
 *
 * @author lyh
 * @since 2020-05-08
 */
@RestController
@RequestMapping("/test_mybatis_plus/user")
@Api(value = "UserController", tags = "用戶介面文檔")
public class UserController {
    @Autowired
    private UserService userService;

    @ApiOperation("獲取所有用戶")
    @GetMapping("/list")
    public Result list() {
        return Result.ok().data("items", userService.list());
    }

    // paramType ="query" 對應 @RequestParam
    // paramType ="path" 對應 @PathVariable
    // paramType ="body" 對應 @RequestBody 不經常用
    // paramType ="header" 對應 @RequestHeader
    @ApiImplicitParams({
            @ApiImplicitParam(name = "id", required = false, value = "用戶 ID", paramType ="query", dataType = "Long"),
            @ApiImplicitParam(name = "user", required = false, value = "用戶信息", paramType ="body", dataType = "User")
    })
    @ApiOperation("新增用戶")
    @PutMapping("/update")
    public Result update(@RequestBody User user, @RequestParam(required = false) Long id) {
        System.out.println("==================");
        System.out.println(id);
        if (userService.save(user)) {
            return Result.ok().message("數據更新成功");
        } else {
            return Result.error().message("數據更新失敗");
        }
    }
}
(3)@ApiModel 、@ApiModelProperty 舉例
@Data
@ApiModel("統一結果返回類結構")
public class Result {
    /**
     * 響應是否成功,true 為成功,false 為失敗
     */
    @ApiModelProperty("響應是否成功,true 為成功,false 為失敗")
    private Boolean success;

    /**
     * 響應狀態碼, 200 成功,500 系統異常
     */
    @ApiModelProperty("響應狀態碼, 200 成功,500 系統異常")
    private Integer code;

    /**
     * 響應消息
     */
    @ApiModelProperty("響應消息")
    private String message;

    /**
     * 響應數據
     */
    @ApiModelProperty("響應數據")
    private Map<String, Object> data = new HashMap<>();
}
2、Swagger 配置
(1)簡介
上面簡單瞭解了下 swagger 常用註解,此處簡單介紹一下 swagger 的配置類。
(2)配置類舉例
根據項目情況修改 apiInfo、apis、paths 等信息。
其中:
apiInfo 用於定義 介面文檔的基本信息。
apis 用於定義 介面掃描規則。
paths 用於定義 路徑過濾規則。
@Configuration
@EnableSwagger2
public class SwaggerConfig implements WebMvcConfigurer {

    @Bean
    public Docket createRestApi() {
        return new Docket(DocumentationType.SWAGGER_2)
            .apiInfo(apiInfo())
            .select()
            // 加了ApiOperation註解的類,才會生成介面文檔
            .apis(RequestHandlerSelectors.withMethodAnnotation(ApiOperation.class))
            // 指定包下的類,才生成介面文檔
            .apis(RequestHandlerSelectors.basePackage("com.lyh.test.test_mybatis_plus.controller"))
            .paths(PathSelectors.any())
            .build();
    }

    private ApiInfo apiInfo() {
        return new ApiInfoBuilder()
            .title("Swagger 測試")
            .description("Swagger 測試文檔")
            .termsOfServiceUrl("https://www.cnblogs.com/l-y-h/")
            .version("1.0.0")
            .build();
    }
}
(3)分析
Step1:簡單瞭解一下註解。
@EnableSwagger2 註解用於開啟 swagger。
@Bean 註解標註 createRestApi 方法用於實例 Docket 對象(文檔插件)並交給 Spring 容器進行管理。
Step2:簡單瞭解一下 apiInfo。
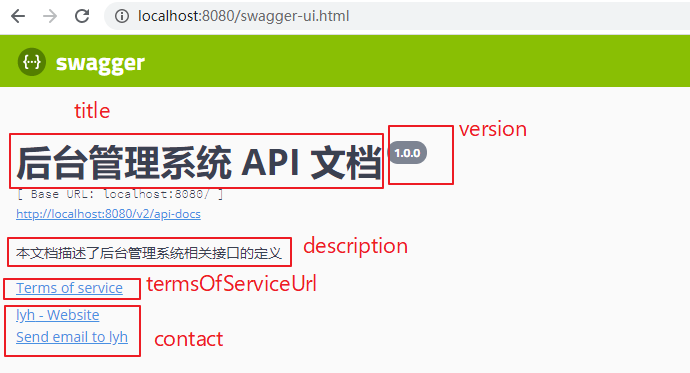
該方法用於定義 API 文檔的基本信息。
【屬性簡單介紹:】
    title                  標題,預設為 Api Documentation
    version                版本,預設為 1.0
    description            描述信息,預設為 Api Documentation
    termsOfServiceUrl      服務地址,預設為 urn:tos
    license                許可證,預設為 Apache 2.0
    licenseUrl             許可證地址,預設為 http://www.apache.org/licenses/LICENSE-2.0
    contact                定義作者信息

【舉例:】

private ApiInfo apiInfo() {
    return new ApiInfoBuilder()
        .title("後臺管理系統 API 文檔")
        .description("本文檔描述了後臺管理系統相關介面的定義")
        .termsOfServiceUrl("https://www.cnblogs.com/l-y-h/")
        .version("1.0.0")
        .contact(new Contact("lyh", "https://www.cnblogs.com/l-y-h/", "[email protected]"))
        .build();
}
Step3:簡單瞭解一下 Docket
Docket 實現了 DocumentationPlugin 介面,即文檔插件。
Docket 常用方法介紹。
【Docket 常用方法:】
    apiInfo()              用於定義介面文檔的基本信息。
    enabled()              用於定義 swagger 是否使用。
    select()               實例化一個 ApiSelectorBuilder,調用其 build 方法返回一個 Docket 對象。

【ApiSelectorBuilder 常用方法:】
    apis()                 用於定義介面掃描方式(可以使用 RequestHandlerSelectors 指定掃描規則)
    paths()                用於過濾路徑(可以使用 PathSelectors 去指定過濾規則)。
    build()                返回一個 Docket 對象
註:
    RequestHandlerSelectors 常用方法:
       any()                     掃描全部
       none()                    全部不掃描
       withMethodAnnotation()    根據方法上的註解掃描
       withClassAnnotation()     根據類上的註解掃描
       basePackage()              指定要掃描的包

   PathSelectors 常用方法:
       any()                      全部通過
       none()                     全部不通過
       regex()                    根據正則表達式匹配是否通過

【舉例:】

@Configuration
@EnableSwagger2
public class SwaggerConfig implements WebMvcConfigurer {
    @Value("${spring.profiles.active:#{null}}")
    private String env;

    @Bean
    public Docket createRestApi() {
        return new Docket(DocumentationType.SWAGGER_2)
            .apiInfo(apiInfo())
            // 指定是否開啟 swagger(如下,生產環境時不執行 swagger)
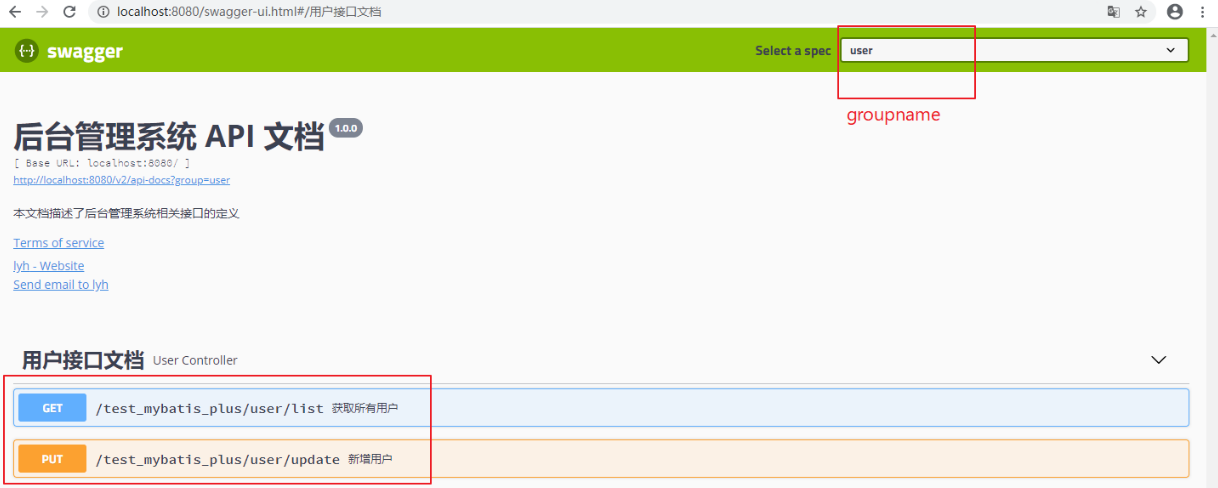
            .enable("prod".equals(env) ? false : true)
            // 指定分組名
            .groupName("user")
            .select()
            // 加了ApiOperation註解的類,才會生成介面文檔
            .apis(RequestHandlerSelectors.withMethodAnnotation(ApiOperation.class))
            // 指定包下的類,才生成介面文檔
            .apis(RequestHandlerSelectors.basePackage("com.lyh.test.test_mybatis_plus.controller"))
            // 不過濾介面
            .paths(PathSelectors.any())
            .build();
    }
}
