前言: 本文主要內容是docker部署netcore應用以及docker運行nginx實現負載均衡。到目前為止感覺微軟在跨平臺的方面雖然有較大的進步,但是和linux比還是有一定的差距,在學習docker,nginx以及Netcore 過程中網上能查找參考的資料還是比較有限的,所以在此記錄下遇到的問 ...
前言:
本文主要內容是docker部署netcore應用以及docker運行nginx實現負載均衡。到目前為止感覺微軟在跨平臺的方面雖然有較大的進步,但是和linux比還是有一定的差距,在學習docker,nginx以及Netcore 過程中網上能查找參考的資料還是比較有限的,所以在此記錄下遇到的問題以及踩到的各種坑,希望避免再次走彎路。
一.新建NET Core應用程式;
1.添加Docker支持,由於到目前為止,nginx還不支持windows容器,為了便於本機測試所以選用Linux容器,如下圖:

2.輸出請求處理,顯示當前請求IP以及埠號:

3.編輯Dockerfile文件
dockerfile文件指令說明:
FROM -指定基礎鏡像(FROM是必備的指令,並且必須為第一條指令)
WORKDIR-配置工作目錄
EXPOSE-聲明鏡像內服務監聽的埠
COPY-複製內容到鏡像
ENTRYPOINT-啟動鏡像的預設人口命令
ENV -設置環境變數
編輯後的dockerfile文件如下:
FROM microsoft/dotnet:2.2-aspnetcore-runtime AS base
WORKDIR /app
EXPOSE 8005
EXPOSE 443
ENV ASPNETCORE_URLS http://+:8005
COPY . .
ENTRYPOINT ["dotnet", "DockerDemo.dll"]
右鍵屬性,選擇“如果較新則複製”
4.Docker發佈,
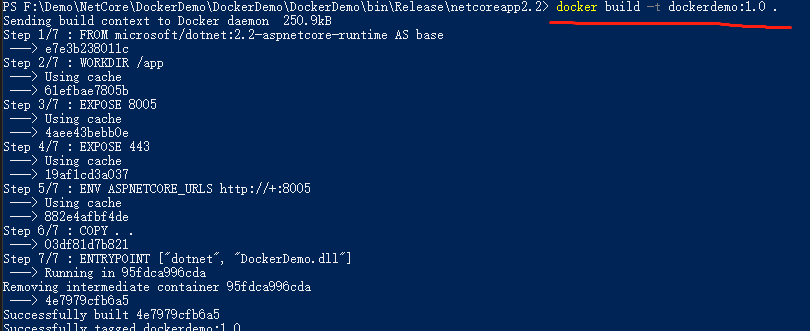
Release生成解決方案,定位到reliease文件夾,執行"docker build”指令,如下圖:

在執行過程中,有可能會碰到“no such host”問題,重試幾次或者設置鏡像代理即可
ps: 鏡像版本後面有個空格+“ .”需留意 註意最後有個點,代表使用當前路徑的 Dockerfile 進行構建
運行 docker images查看當前鏡像:

可以看到已經成功構建。
5.構建dockerdemo容器:
執行"docker run“指令,構建該鏡像的實例docker run -d -t -p 8006:8005 --name dockerdemo8006 dockerdemo:1.0,可以看到,容器已經構建成功:

瀏覽器輸入即可看到下列結果

同理構建該鏡像的其他容器,分別為8007,8008;至此docker構建netcore鏡像已經完成,我們可以在Kitematic查看已經構建的容器;

二.Docker構建nginx容器實現負載均衡
1.執行“docker pull nginx“指令獲取鏡像,docker images 查看當前鏡像;
2.構建nginx鏡像容器
執行docker run -d -p 8003:80 --name dockernginxdemo nginx,其中-d表示後臺運行,-p表示開放的埠,將80埠代理到宿主8003埠,這樣訪問ip:8003就可以訪問nginx 80埠,--name表示容器名字,最後為鏡像名:標簽。
docker ps查看當前容器:

可以看出已經實例化鏡像文件。在瀏覽器中輸入localhost:8003出現如下界面則表示成功:

3.修改nginx配置文件:
該頁面是鏡像文件中自帶的一個html文件,我們需要將我們自己nginx的配置文件複製替換容器自帶的配置文件,進入容器中
docker exec -it dockernginxdemo/bin/bash
cat /etc/nginx/nginx.conf
可以看到Nginx鏡像自帶的nginx配置文件信息
user  nginx;
worker_processes  1;

error_log  /var/log/nginx/error.log warn;
pid        /var/run/nginx.pid;


events {
    worker_connections  1024;
}


http {
    include       /etc/nginx/mime.types;
    default_type  application/octet-stream;

    log_format  main  '$remote_addr - $remote_user [$time_local] "$request" '
                      '$status $body_bytes_sent "$http_referer" '
                      '"$http_user_agent" "$http_x_forwarded_for"';

    access_log  /var/log/nginx/access.log  main;

    sendfile        on;
    #tcp_nopush     on;

    keepalive_timeout  65;

    #gzip  on;

    include /etc/nginx/conf.d/*.conf;
}
可以看到這和nginx教程中的配置文件有一定的區別的,我自己在這兒踩了幾個坑,nginx中的配置文件是作為一個整體的,而鏡像中是預設包括兩個文件:default.conf和nginx.conf文件,下圖是nginx教程中的配置文件

#定義Nginx運行的用戶和用戶組
#user  nobody;

#nginx進程數,建議設置為等於CPU總核心數。
worker_processes  1;

#全局錯誤日誌定義類型,[ debug | info | notice | warn | error | crit ]
#error_log  logs/error.log;
#error_log  logs/error.log  notice;
#error_log  logs/error.log  info;

#進程文件
#pid        logs/nginx.pid;

#工作模式與連接數上限
events {
    #單個進程最大連接數(最大連接數=連接數*進程數)
    worker_connections  1024;
}

#設定http伺服器
http {
    #文件擴展名與文件類型映射表
    include       mime.types;
    #預設文件類型
    default_type  application/octet-stream;

    #log_format  main  '$remote_addr - $remote_user [$time_local] "$request" '
    #                  '$status $body_bytes_sent "$http_referer" '
    #                  '"$http_user_agent" "$http_x_forwarded_for"';

    #access_log  logs/access.log  main;

    #開啟高效文件傳輸模式,sendfile指令指定nginx是否調用sendfile函數來輸出文件,對於普通應用設為 on,如果用來進行下載等應用磁碟IO重負載應用,可設置為off,以平衡磁碟與網路I/O處理速度,降低系統的負載。註意:如果圖片顯示不正常把這個改 成off。
    sendfile        on;

    #防止網路阻塞
    #tcp_nopush     on;


    #長連接超時時間,單位是秒
    #keepalive_timeout  0;
    keepalive_timeout  65;

    #開啟gzip壓縮輸出
    #gzip  on;

    #虛擬主機的配置
    server {

        #監聽埠
        listen       80;

        #功能變數名稱可以有多個,用空格隔開
        server_name  localhost;

        #預設編碼
        #charset utf-8;

        #定義本虛擬主機的訪問日誌
        #access_log  logs/host.access.log  main;

        location / {
            root   html;
            index  index.html index.htm;
        }

        #error_page  404              /404.html;

        # redirect server error pages to the static page /50x.html
        #
        error_page   500 502 503 504  /50x.html;
        location = /50x.html {
            root   html;
        }

        # proxy the PHP scripts to Apache listening on 127.0.0.1:80
        #
        #location ~ \.php$ {
        #    proxy_pass   http://127.0.0.1;
        #}

        # pass the PHP scripts to FastCGI server listening on 127.0.0.1:9000
        #
        #location ~ \.php$ {
        #    root           html;
        #    fastcgi_pass   127.0.0.1:9000;
        #    fastcgi_index  index.php;
        #    fastcgi_param  SCRIPT_FILENAME  /scripts$fastcgi_script_name;
        #    include        fastcgi_params;
        #}

        # deny access to .htaccess files, if Apache's document root
        # concurs with nginx's one
        #
        #location ~ /\.ht {
        #    deny  all;
        #}
    }


    # another virtual host using mix of IP-, name-, and port-based configuration
    #
    #server {
    #    listen       8000;
    #    listen       somename:8080;
    #    server_name  somename  alias  another.alias;

    #    location / {
    #        root   html;
    #        index  index.html index.htm;
    #    }
    #}


    # HTTPS server
    #
    #server {
    #    listen       443 ssl;
    #    server_name  localhost;

    #    ssl_certificate      cert.pem;
    #    ssl_certificate_key  cert.key;

    #    ssl_session_cache    shared:SSL:1m;
    #    ssl_session_timeout  5m;

    #    ssl_ciphers  HIGH:!aNULL:!MD5;
    #    ssl_prefer_server_ciphers  on;

    #    location / {
    #        root   html;
    #        index  index.html index.htm;
    #    }
    #}

}
View Code
如果直接將conf文件替換鏡像中的nginx文件的話,會出現“directive is not allowed here in /etc/nginx/conf.d/nginx.conf”這樣的問題,原因是在default.conf配置文件中,已經存在"server”節點,我們可以執行如下指令
docker cp f3d9ee01637a:/etc/nginx/conf.d/default.conf E:/ngingconf/default.conf
將conf.d/default.conf文件複製到 E:/ngingconf/default.conf文件中,default.conf文件如下:

server {
    listen       80;
    server_name  localhost;

    #charset koi8-r;
    #access_log  /var/log/nginx/host.access.log  main;

    location / {
        root   /usr/share/nginx/html;
        index  index.html index.htm;
    }

    #error_page  404              /404.html;

    # redirect server error pages to the static page /50x.html
    #
    error_page   500 502 503 504  /50x.html;
    location = /50x.html {
        root   /usr/share/nginx/html;
    }

    # proxy the PHP scripts to Apache listening on 127.0.0.1:80
    #
    #location ~ \.php$ {
    #    proxy_pass   http://127.0.0.1;
    #}

    # pass the PHP scripts to FastCGI server listening on 127.0.0.1:9000
    #
    #location ~ \.php$ {
    #    root           html;
    #    fastcgi_pass   127.0.0.1:9000;
    #    fastcgi_index  index.php;
    #    fastcgi_param  SCRIPT_FILENAME  /scripts$fastcgi_script_name;
    #    include        fastcgi_params;
    #}

    # deny access to .htaccess files, if Apache's document root
    # concurs with nginx's one
    #
    #location ~ /\.ht {
    #    deny  all;
    #}
}
View Code
可以看到,在default文件中已經存在server節點,所以不能直接複製自定義的nginx.conf文件到容器的nginx.conf文件中。有兩種解決方案,第一分別修改nginx.conf和default.conf文件;第二,將容器中的default.conf文件內容刪除,然後再複製自定義的conf文件覆蓋掉鏡像中nginx.conf的配置文件。這裡,我們採用第一種方法,修改鏡像中Nginx.conf以及default.conf的局部節點;
首先,執行
docker cp f3d9ee01637a:/etc/nginx/nginx.conf E:/ngingconf/nginx.conf
指令,將鏡像文件中的nginx.conf文件複製到本地,打開E:/ngingconf/nginx.conf,編輯配置文件如下:

 1 user  nginx;
 2 worker_processes  1;
 3
 4 error_log  /var/log/nginx/error.log warn;
 5 pid        /var/run/nginx.pid;
 6
 7
 8 events {
 9     worker_connections  1024;
10 }
11
12
13 http {
14
15     #集群站點配置
16     upstream nginxtest.com{
17         #server    127.0.0.1:8887 weight=1;#伺服器配置   WEIGHT是權重的意思,權重越大,分配的概率越大。
18         server    127.0.0.1:8006 weight=1;
19         server    127.0.0.1:8007 weight=1;
20         server    127.0.0.1:8008 weight=1;
21     }
22
23
24
25     include       /etc/nginx/mime.types;
26     default_type  application/octet-stream;
27
28     log_format  main  '$remote_addr - $remote_user [$time_local] "$request" '
29                       '$status $body_bytes_sent "$http_referer" '
30                       '"$http_user_agent" "$http_x_forwarded_for"';
31
32     access_log  /var/log/nginx/access.log  main;
33
34     sendfile        on;
35     #tcp_nopush     on;
36
37     keepalive_timeout  65;
38
39     #gzip  on;
40
41     include /etc/nginx/conf.d/*.conf;
42 }
View Code
nginx.conf文件中,我們添加了

節點指令,配置服務集群,對應之前的三個netcore應用的埠8006,8007,8008。然後執行
docker cp E:/ngingconf/nginx.conf f3d9ee01637a:/etc/nginx/nginx.conf
執行,將本地修改後的nginx.conf文件拷貝到鏡像文件中;同理,執行
docker cp f3d9ee01637a:/etc/nginx/conf.d/default.conf E:/ngingconf/default.conf
將鏡像文件中的default.conf文件複製到本地,打開E:/ngingconf/default.conf,編輯配置文件如下:

 1 server {
 2     listen       80;
 3     server_name  localhost;
 4
 5     #charset koi8-r;
 6     #access_log  /var/log/nginx/host.access.log  main;
 7
 8      #緩存文件路由
 9     location ~ .*(\.(js|css|jpg|svg)).* {
10
11         proxy_pass http://nginxtest.com;
12         proxy_cache_valid 200;
13         expires 3d;
14     }
15     #集群站點路由
16     location / {
17
18         proxy_pass http://nginxtest.com;  #http://nginxtest.com對應upstream後面的名稱加上http
19         proxy_http_version 1.1;
20     proxy_redirect default;
21
22         proxy_set_header Upgrade $http_upgrade;
23         proxy_set_header Connection keep-alive;
24         proxy_set_header Host $host;
25         proxy_cache_bypass $http_upgrade;
26
27         proxy_set_header X-Forwarded-For $proxy_add_x_forwarded_for;
28     }
29 }
View Code
註意 集群站點中“proxy_pass”後面參數名稱需要和nginf.conf文件中集群名稱一致。隨後執行cp指令覆蓋鏡像文件即可;
4.測試
至此docker 部署nginx反向代理已經完成,預期效果是在網站中輸入localhost:8003就會訪問不同的埠號實現負載均衡實際效果運行卻是。。。

不甘心,有試了幾遍,還是這個結果 後來查看了下Kitematic,日誌果然有其他問題:

大概就是無法連接到集群里的伺服器,推測了下應該是容器間的通信問題,於是驗證了下,用IIS而不是容器發佈了應用然後用docker部署nginx負載均衡,其他步驟一樣,果然可以直接訪問而不會出現該問題,於是開始著手解決這個問題


