上一章介紹的ColorPicker控制項,是控制項設計的最好示例。因為其行為和可視化外觀是精心分離的,所以其他設計人員可開發動態改變其外觀的新模板。 ColorPicker控制項如此簡單的一個原因是不涉及狀態。換句話說,不根據是否具有焦點、滑鼠是否在它上面懸停、是否禁用等狀態區分其可視化外觀。接下來本章介 ...
上一章介紹的ColorPicker控制項,是控制項設計的最好示例。因為其行為和可視化外觀是精心分離的,所以其他設計人員可開發動態改變其外觀的新模板。
ColorPicker控制項如此簡單的一個原因是不涉及狀態。換句話說,不根據是否具有焦點、滑鼠是否在它上面懸停、是否禁用等狀態區分其可視化外觀。接下來本章介紹的FlipPanel自定義控制項有些不同。
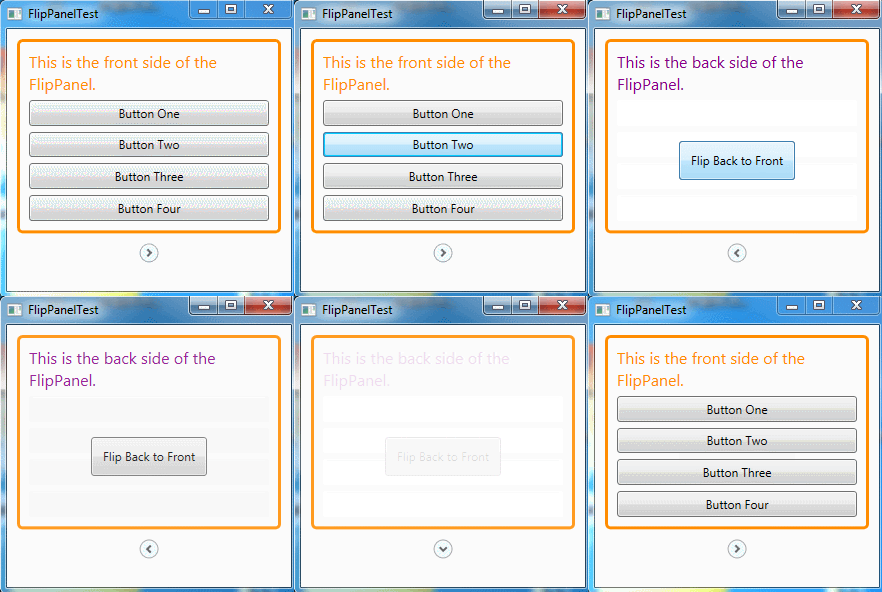
FlipPanel控制項背後的基本思想是,為駐留內容提供兩個錶面,但每次只有一個錶面是可見的。為看到其他內容,需要在兩個錶面之間進行“翻轉”。可通過控制項模板定製翻轉效果,但預設效果使用在前面和後面之間進行過渡的淡化效果。根據應用程式,可以使用FlipPanel控制項把數據條目表單與一些由幫助的文檔組合起來,以便為相同的數據提供一個簡單或較複雜的試圖,或在一個簡單游戲中將問題和答案融合在一起。

可通過代碼執行翻轉(通過設置名為IsFlipped的屬性),也可使用一個便捷的按鈕來翻轉面板(除非控制項使用這從模板中移除了該按鈕)。
顯然,控制項模板需要制定兩個獨立部分:FlipPanel控制項的前後內容區域。然而,還有一個細節——FlipPanel控制項需要一種方法在兩個狀態之間進行切換:翻轉過的狀態與未翻轉過的狀態。可通過為模板添加觸發器完成該工作。當單擊按鈕是,可使用一個觸發器隱藏前面的面板並顯示第二個面板,而使用另一個觸發器翻轉這些更改。這兩個觸發器都可以使用喜歡的任何動畫。但通過使用可視化狀態,可向控制項使用這清晰地指明這兩個狀態是模板的必須部分,不是為適當的屬性或事件編寫觸發器,控制項使用能管著只需要填充適當的狀態動畫。如果使用Expression Blend,該任務甚至變得更簡單。
一、開始編寫FlipPanel類
FlipPanel的基本骨架非常簡單。包含用戶可用單一元素(最有可能是包含各種元素的佈局容器)填充的兩個內容區域。從技術角度看,這意味著FlipPanel控制項不是真正的面板,因為不能使用佈局邏輯組織一組子元素。然而,這不會造成問題。因為FlipPanel控制項的結構是清晰直觀的。FlipPanel控制項還包含一個翻轉按鈕,用戶可使用該按鈕在兩個不同的內容區域之間進行切換。
儘管可通過繼承自ContentControl或Panel等控制項類來創建自定義控制項,但是FlipPanel直接繼承自Control基類。如果不需要特定控制項類的功能,這是最好的起點。不應該當繼承自更簡單的FrameworkElement類,除非希望創建不使用標準控制項和模板基礎框架的元素:
public class FlipPanel:Control
    {

    }
首先為FlipPanel類創建屬性。與WPF元素中的幾乎所有屬性一樣,應使用依賴項屬性。以下代碼演示了FlipPanel如何定義FrontContent屬性,該屬性保持在前錶面上顯示的元素。
public static readonly DependencyProperty FrontContentProperty =
            DependencyProperty.Register("FrontContent", typeof(object), typeof(FlipPanel), null);
接著需要調用基類的GetValue()和SetValue()方法的常規.NET屬性過程,以便修改依賴性屬性。下麵是FrontContent屬性的實現過程:
 /// <summary>
/// 前面內容
/// </summary>
public object FrontContent
{
   get { return GetValue(FrontContentProperty); }
   set { SetValue(FrontContentProperty, value); }
}
同理,還需要一個存儲背面的依賴項屬性。如下所示:
public static readonly DependencyProperty BackContentProperty =
            DependencyProperty.Register("BackContent", typeof(object), typeof(FlipPanel), null);

        /// <summary>
        /// 背面內容
        /// </summary>
        public object BackContent
        {
            get { return GetValue(BackContentProperty); }
            set { SetValue(BackContentProperty, value); }
        }
還需要添加一個重要屬性:IsFlipped。這個Boolean類型的屬性持續跟蹤FlipPanel控制項的當前狀態(面向前面還是面向後面),使控制項使用者能夠通過編程翻轉狀態:
public static readonly DependencyProperty IsFlippedProperty =
            DependencyProperty.Register("IsFlipped", typeof(bool), typeof(FlipPanel), null);

        /// <summary>
        /// 是否翻轉
        /// </summary>
        public bool IsFlipped
        {
            get { return (bool)GetValue(IsFlippedProperty); }
            set {
                SetValue(IsFlippedProperty, value);
                ChangeVisualState(true);
            }
        }
IsFlipped屬性設置器調用自定義方法ChangeVisualState()。該方法確保更新顯示以匹配當前的翻轉狀態。稍後介紹ChangeVisualState方法。
FlipPanel類不需要更多屬性,因為它實際上從Control類繼承了它所需要的幾乎所有內容。一個例外是CornerRadius屬性。儘管Control類包含了BorderBrush和BorderThickness屬性,可以使用這些屬性在FlipPanel控制項上繪製邊框,但缺少將方形邊緣變成光滑曲線的CornerRadius屬性,如Border元素所做的那樣。在FlipPanel控制項中實現類似的效果很容易,前提是添加CornerRadius依賴性屬性並使用該屬性配置FlipPanel控制項的預設控制項模板中的Border元素:
public static readonly DependencyProperty CornerRadiusProperty =
            DependencyProperty.Register("CornerRadius", typeof(CornerRadius), typeof(FlipPanel), null);

        /// <summary>
        /// 控制項邊框圓角
        /// </summary>
        public CornerRadius CornerRadius
        {
            get
            {
                return (CornerRadius)GetValue(CornerRadiusProperty);
            }
            set
            {
                SetValue(CornerRadiusProperty, value);
            }
        }
還需要為FlipPanel控制項添加一個應用預設模板的樣式。將該樣式放在generic.xaml資源字典中,正如在開發ColorPicker控制項時所做的那樣。下麵是需要的基本骨架:
<ResourceDictionary xmlns="http://schemas.microsoft.com/winfx/2006/xaml/presentation"
                    xmlns:x="http://schemas.microsoft.com/winfx/2006/xaml"
                    xmlns:local="clr-namespace:CustomControls">
    <Style TargetType="{x:Type local:FlipPanel}">
        <Setter Property="Template">
            <Setter.Value>
                <ControlTemplate TargetType="local:FlipPanel">
                    ...
                </ControlTemplate>
            </Setter.Value>
        </Setter>
    </Style>
</ResourceDictionary>
還有最後一個細節。為通知控制項從generic.xaml文件獲取預設樣式,需要在FlipPanel類的靜態構造函數中調用DefaultStyleKeyProperty.OverrideMetadata()方法:
DefaultStyleKeyProperty.OverrideMetadata(typeof(FlipPanel), new FrameworkPropertyMetadata(typeof(FlipPanel)));
二、選擇部件和狀態
現在已經具備了基本結構,並且已經準備好確定將在控制項模板中使用的部件和狀態了。
顯然,FlipPanel需要兩個狀態:
- 正常狀態。該故事板確保只有前面的內容是可見的,後面的內容被翻轉、淡化或移出試圖。
- 翻轉狀態。該故事板確保只有後面的內容是可見的,前面的內容通過動畫被移出試圖。
此外,需要兩個部件:
- FlipButton。這是一個按鈕,當單擊該按鈕時,將試圖從前面改到後面(或從後面改到前面)。FlipPanel控制項通過處理該按鈕的事件提供該服務。
- FlipButtonAlternate。這是一個可選元素,與FlipButton的工作方式相同。允許控制項使用者在自定義模板中使用兩種不同的方法。一種選擇是使用在可翻轉區域外的單個翻轉按鈕、另一種選擇是在可翻轉區域的面板兩側放置獨立的翻轉按鈕。
還應當為前後內容區域添加部件。然而,FlipPanel克難攻堅不需要直接操作這些區域,只要模板包含在適當的時間隱藏和顯示它們的動畫即可(另一種選擇是定義這些部件,從而可以明確地使用代碼改變它們的可見性。這樣一來,即使沒有定義動畫,通過隱藏一部分並顯示另一部分,面板仍能在前後內容區域之間變化。為簡單起見,FlipPanel沒有採取這種選擇)。
為錶面FlipPanel使用這些部件和狀態的事實,應為自定義控制項類應用TemplatePart特性,如下所示:
    [TemplatePart(Name = "FlipButton", Type = typeof(ToggleButton))]
    [TemplatePart(Name = "FlipButtonAlternate", Type = typeof(ToggleButton))]
    [TemplateVisualState(Name = "Normal", GroupName = "ViewStates")]
    [TemplateVisualState(Name = "Flipped", GroupName = "ViewStates")]
    public class FlipPanel : Control
    {

    }
三、預設控制項模板
現在,可將這些內容投入到預設控制項模板中。根元素是具有兩行的Grid面板,該面板包含內容區域(在頂行)和翻轉按鈕(在底行)。用兩個相互重疊的Border元素填充內容區域,代表前面和後面的內容,但一次只顯示前面和後面的內容。
為了填充前面和後面的內容區域,FlipPanel控制項使用ContentControl元素。該技術幾乎和自定義按鈕示例相同,只是需要兩個ContentPresenter元素,分別用於FlipPanel控制項的前面和後面。FlipPanel控制項還包含獨立的Border元素來封裝每個ContentPresenter元素。從而讓控制項使用者能通過設置FlipPanel的幾個直接屬性勾勒出可翻轉內容區域(BorderBrush、BorderThickness、Background以及CornerRadius),而不是強制性地手動添加邊框。
下麵是預設控制項模板的基本骨架:
<ResourceDictionary xmlns="http://schemas.microsoft.com/winfx/2006/xaml/presentation"
                    xmlns:x="http://schemas.microsoft.com/winfx/2006/xaml"
                    xmlns:local="clr-namespace:CustomControls">
    <Style TargetType="{x:Type local:FlipPanel}">
        <Setter Property="Template">
            <Setter.Value>
                <ControlTemplate TargetType="{x:Type local:FlipPanel}">
                    <Grid>
                        <Grid.RowDefinitions>
                            <RowDefinition Height="Auto"></RowDefinition>
                            <RowDefinition Height="Auto"></RowDefinition>
                        </Grid.RowDefinitions>

                        <!-- This is the front content. -->
                        <Border x:Name="FrontContent" BorderBrush="{TemplateBinding BorderBrush}"
               BorderThickness="{TemplateBinding BorderThickness}"
               CornerRadius="{TemplateBinding CornerRadius}"
               >
                            <ContentPresenter
                     Content="{TemplateBinding FrontContent}">
                            </ContentPresenter>
                        </Border>

                        <!-- This is the back content. -->
                        <Border x:Name="BackContent" BorderBrush="{TemplateBinding BorderBrush}"
           BorderThickness="{TemplateBinding BorderThickness}"
           CornerRadius="{TemplateBinding CornerRadius}"
           >
                            <ContentPresenter
                     Content="{TemplateBinding BackContent}">
                            </ContentPresenter>
                        </Border>

                        <!-- This the flip button. -->
                        <ToggleButton Grid.Row="1" x:Name="FlipButton"
                     Margin="0,10,0,0" >
                        </ToggleButton>
                    </Grid>
                </ControlTemplate>
            </Setter.Value>
        </Setter>
    </Style>
</ResourceDictionary>
當創建預設控制項模板時,最好避免硬編碼控制項使用者可能希望定製的細節。相反,需要使用模板綁定表達式。在這個示例中,使用模板綁定表達式設置了幾個屬性:BorderBrush、BorderThickness、CornerRadius、Background、FrontContent以及BackContent。為設置這些屬性的預設值(這樣即使控制項使用者沒有設置它們,也仍然確保能得到正確的可視化外觀),必須為控制項的預設樣式添加額外的設置器。
1、翻轉按鈕
在上面的示例中,顯示的控制項模板包含一個ToggleButton按鈕。然而,該按鈕使用ToggleButton的預設外觀,這使得ToggleButton按鈕看似普遍的按鈕,完全具有傳統的陰影背景。這對於FlipPanel控制項是不合適的。
儘管可替換ToggleButton中的任何內容,但FlipPanel需要進一步。它需要去掉標準的背景並根據ToggleButton按鈕的狀態改變其內部元素的外觀。
為創建這種效果,需要為ToggleButton設置自定義控制項模板。該控制項模板能夠包含繪製所需箭頭的形狀元素。在該例中,ToggleButton是使用用於繪製圓的Ellipse元素和用於繪製箭頭的Path元素繪製的,這兩個元素都放在具有單個單元格的Grid面板中,以及需要一個改變箭頭指向的RotateTransform對象:
<ToggleButton Grid.Row="1" x:Name="FlipButton" RenderTransformOrigin="0.5,0.5"
                     Margin="0,10,0,0" Width="19" Height="19">
                            <ToggleButton.Template>
                                <ControlTemplate>
                                    <Grid>
                                        <Ellipse Stroke="#FFA9A9A9"  Fill="AliceBlue"  />
                                        <Path Data="M1,1.5L4.5,5 8,1.5"
                             Stroke="#FF666666" StrokeThickness="2"
                             HorizontalAlignment="Center" VerticalAlignment="Center">
                                        </Path>
                                    </Grid>
                                </ControlTemplate>
                            </ToggleButton.Template>
                            <ToggleButton.RenderTransform>
                                <RotateTransform x:Name="FlipButtonTransform" Angle="-90"></RotateTransform>
                            </ToggleButton.RenderTransform>
                        </ToggleButton>
2、定義狀態動畫
狀態動畫是控制項模板中最有趣的部分。它們是提供翻轉行為的要素,它們還是為FlipPanel創建自定義模板的開發人員最有可能修改的細節。
為定義狀態組,必須在控制模板的根元素中添加VisualStateManager.VisualStateGroups元素,如下所示:
 <ControlTemplate TargetType="{x:Type local:FlipPanel}">
                    <Grid>
                        <VisualStateManager.VisualStateGroups>
                            ...
                        </VisualStateManager.VisualStateGroups>
                    </Grid>
</ControlTemplate>
可在VisualStateGroups元素內部使用具有合適名稱的VisualStateGroup元素創建狀態組。在每個VisualStateGroup元素內部,為每個狀態添加一個VisualState元素。對於FlipPanel面板,有一個包含兩個可視化狀態的組:
<VisualStateManager.VisualStateGroups>
   <VisualStateGroup x:Name="ViewStates">
       <VisualState x:Name="Normal">
            <Storyboard>
               ...
            </Storyboard>
       </VisualState>
   </VisualStateGroup>
   <VisualStateGroup x:Name="FocusStates">
       <VisualState x:Name="Flipped">
            <Storyboard>
               ...
            </Storyboard>
       </VisualState>
   </VisualStateGroup>
</VisualStateManager.VisualStateGroups>
每個狀態對應一個具有一個或多個動畫的故事板。如果存在這些故事板,就會在適當的時機觸發它們(如果不存在,控制項將按正常方式降級,而不會引發錯誤)。
在預設控制項模板中,動畫使用簡單的淡化效果從一個內容區域改變到另一個內容區域,並使用旋轉變換翻轉ToggleButton箭頭使其指向另一個方向。下麵是完成這兩個任務的標記:
<VisualState x:Name="Normal">
     <Storyboard>
           <DoubleAnimation Storyboard.TargetName="BackContent"
                       Storyboard.TargetProperty="Opacity" To="0" Duration="0" ></DoubleAnimation>
     </Storyboard>
</VisualState>

<VisualState x:Name="Flipped">
    <Storyboard>
        <DoubleAnimation Storyboard.TargetName="FlipButtonTransform"
       Storyboard.TargetProperty="Angle" To="90" Duration="0">
        </DoubleAnimation>
     <DoubleAnimation Storyboard.TargetName="FrontContent"
                       Storyboard.TargetProperty="Opacity" To="0" Duration="0"></DoubleAnimation>
    </Storyboard>
</VisualState>
通過上面標記,發現可視化狀態持續時間設置為0,這意味著動畫立即應用其效果。這看起來可能有些怪——畢竟,不是需要更平緩的改變從而能夠註意到動畫效果嗎?
時機上,該設計完成正確,因為可視化狀態用於表示控制項在適當狀態時的外觀。例如,當翻轉面板處於翻轉過的狀態是,簡單地顯示其背面內容。翻轉過程是在FlipPanel控制項進入翻轉狀態前得過渡,而不是翻轉狀態本身的一部分。
3、定義狀態過渡
過渡是從當前狀態到新狀態的動畫。變換模型的優點之一是不需要為動畫創建故事板。例如,如果添加如下標記,WPF會創建持續時間為0.7秒得動畫以改變FlipPanel控制項的透明度,從而創建所希望的悅目的褪色效果:
 <VisualStateGroup x:Name="ViewStates">
      <VisualStateGroup.Transitions>
           <VisualTransition GeneratedDuration="0:0:0.7">
           </VisualTransition>
      </VisualStateGroup.Transitions>
      <VisualState x:Name="Normal">
       ...
      </VisualState>
</VisualStateGroup>
過渡會應用到狀態組,當定義過渡時,必須將其添加到VisualStateGroup.Transitions集合。這個示例使用最簡單的過渡類型:預設過渡。預設過渡應用於該組中的所有狀態變化。
預設過渡是很方便的,但用於所有情況的解決方案不可能總是適合的。例如,可能希望FlipPanel控制項根據其進入的狀態以不同的速度過渡。為實現該效果,需要定義多個過渡,並且需要設置To屬性以指示何時應用過渡效果。
例如,如果有以下過渡:
<VisualStateGroup.Transitions>
       <VisualTransition To="Flipped" GeneratedDuration="0:0:0.5"></VisualTransition>
       <VisualTransition To="Normal" GeneratedDuration="0:0:0.1"></VisualTransition>
</VisualStateGroup.Transitions>
FlipPanel將在0.5秒得時間內切換到Flipped狀態,併在0.1秒得時間內進入Normal狀態。
這個示例顯示了當進入特定狀態時應用的過渡,但還可使用From屬性創建當離開某個狀態時應用的過渡,並且可結合使用To和From屬性來創建更特殊的只有當在特定的兩個狀態之間移動時才會應用的過渡。當應用過渡時WPF遍歷過渡集合,在所有應用的過渡中查找最特殊的過渡,並只使用最特殊的那個過渡。
為進一步加以控制,可創建自定義過渡動畫來替換WPF通常使用的自動生成的過渡。可能會猶由於幾個原因而創建自定義過渡。下麵是一些例子:使用更複雜的動畫控制動畫的步長,使用動畫緩動、連續運行幾個動畫或在運行動畫時播放聲音。
為定義自定義過渡,在VisualTransition元素中放置具有一個或多個動畫的故事板。在FlipPanel示例中,可使用自定義過渡確保ToggleButton箭頭更快遞旋轉自身,而淡化過程更緩慢:
<VisualStateGroup.Transitions>
                                    <VisualTransition GeneratedDuration="0:0:0.7" To="Flipped">
                                        <Storyboard>
                                            <DoubleAnimation Storyboard.TargetName="FlipButtonTransform"
       Storyboard.TargetProperty="Angle" To="90" Duration="0:0:0.2"></DoubleAnimation>
                                        </Storyboard>
                                    </VisualTransition>
                                    <VisualTransition GeneratedDuration="0:0:0.7" To="Normal">
                                        <Storyboard>
                                            <DoubleAnimation Storyboard.TargetName="FlipButtonTransform"
       Storyboard.TargetProperty="Angle" To="-90" Duration="0:0:0.2"></DoubleAnimation>
                                        </Storyboard>
                                    </VisualTransition>
                                </VisualStateGroup.Transitions>
但許多控制項需要自定義過渡,而且編寫自定義過渡是非常乏味的工作。仍需保持零長度的狀態動畫,這還會不可避免地再可視化狀態和過渡之間複製一些細節。
4、關聯元素
通過上面的操作,已經創建了一個相當好的控制項模板,需要在FlipPanel控制項中添加一些內容以使該模板工作。
訣竅是使用OnApplyTemplate()方法,該方法還款用於在ColorPicker控制項中設置綁定。對於FlipPanel控制項,OnApplyTemplate()方法用於為FlipButton和FlipButtonAlternate部件檢索ToggleButton,併為每個部件關聯事件處理程式,從而當用戶單擊以翻轉控制項時能夠進行響應。最後,OnApplyTemplate()方法調用名為ChangeVisualState()的自定義方法,該方法確保控制項的可視化外觀和其當前狀態的相匹配:
public override void OnApplyTemplate()
        {
            base.OnApplyTemplate();
            ToggleButton flipButton = base.GetTemplateChild("FlipButton") as ToggleButton;
            if (flipButton != null) flipButton.Click += flipButton_Click;

            // Allow for two flip buttons if needed (one for each side of the panel).
            // This is an optional design, as the control consumer may use template
            // that places the flip button outside of the panel sides, like the
            // default template does.
            ToggleButton flipButtonAlternate = base.GetTemplateChild("FlipButtonAlternate") as ToggleButton;
            if (flipButtonAlternate != null)
                flipButtonAlternate.Click += flipButton_Click;

            this.ChangeVisualState(false);
        }
下麵是非常簡單的允許用戶單擊ToggleButton按鈕並翻轉面板的事件處理程式:
private void flipButton_Click(object sender, RoutedEventArgs e)
        {
            this.IsFlipped = !this.IsFlipped;
        }
幸運的是,不需要手動觸髮狀態動畫。即不需要創建也不需要觸發過渡動畫。相反,為從一個狀態改變到另一個狀態,只需要調用靜態方法VisualStateManager.GoToState()。當調用該方法時,傳遞正在改變狀態的控制項對象的引用、新狀態的名稱以及確定是否顯示過渡的Boolean值。如果是由用戶引發的改變(例如,當用戶單擊ToggleButton按鈕時),該值應當為true;如果是由屬性設置引發的改變(例如,如果使用頁面的標記設置IsFlipped屬性的初始值),該值為false。
處理控制項支持的所有不同狀態可能會變得凌亂。為避免在整個控制項代碼中分散調用GoToState()方法,大多數控制項添加了與在FlipPanel控制項中添加的ChangeVisualState()類似地方法。該方法負責應用每個狀態組中的正確狀態。該方法中的代碼使用If語句塊(或switch語句)應用每個狀態組的當前狀態。該方法之所以可行,是因為它完全可以使用當前狀態的名稱調用GoToState()方法。在這種情況下,如果當前狀態和請求的狀態相同,那麼什麼也不會發生。
下麵是用於FlipPanel控制項的ChangeVisualState()方法:
private void ChangeVisualState(bool useTransitions)
{
            if (!this.IsFlipped)
            {
                VisualStateManager.GoToState(this, "Normal", useTransitions);
            }
            else
            {
                VisualStateManager.GoToState(this, "Flipped", useTransitions);
            }
}
通常在以下位置調用ChangeVisualState()方法或其等效的方法:
- 在OnApplyTemplate()方法的結尾,在初始化控制項之後。
- 在響應代表狀態變化的事件時,例如滑鼠移動或單擊ToggleButton按鈕。
- 當響應屬性改變或通過代碼觸發方法時(例如,IsFlipped屬性設置器調用ChangEVisualState()方法並且總是提供true,所以顯示過渡動畫。如果希望為控制項使用者提供不顯示過渡的機會,可添加Flip()方法,該方法接受與為ChangeVisualState()方法傳遞的相同的Boolean參數)。
正如上面介紹的,FlipPanel控制項非常靈活。例如,可使用該控制項並且不使用ToggleButton按鈕,通過代碼進行翻轉(可能是當用戶單擊不同的控制項時)。也可在控制項模板中包含一兩個翻轉按鈕,並且允許用戶進行控制。
四、使用FlipPanel控制項
使用FlipPanel控制項相對簡單。標記如下所示:
<Window x:Class="CustomControlsClient.FlipPanelTest"
        xmlns="http://schemas.microsoft.com/winfx/2006/xaml/presentation"
        xmlns:x="http://schemas.microsoft.com/winfx/2006/xaml"
        Title="FlipPanelTest" Height="300" Width="300"
        xmlns:lib="clr-namespace:CustomControls;assembly=CustomControls" >
    <Grid x:Name="LayoutRoot" Background="White">
        <lib:FlipPanel x:Name="panel" BorderBrush="DarkOrange" BorderThickness="3" IsFlipped="True"
         CornerRadius="4" Margin="10">
            <lib:FlipPanel.FrontContent>
                <StackPanel Margin="6">
                    <TextBlock TextWrapping="Wrap" Margin="3" FontSize="16" Foreground="DarkOrange">This is the front side of the FlipPanel.</TextBlock>
                    <Button Margin="3" Padding="3" Content="Button One"></Button>
                    <Button Margin="3" Padding="3" Content="Button Two"></Button>
                    <Button Margin="3" Padding="3" Content="Button Three"></Button>
                    <Button Margin="3" Padding="3" Content="Button Four"></Button>
                </StackPanel>
            </lib:FlipPanel.FrontContent>
            <lib:FlipPanel.BackContent>
                <Grid Margin="6">
                    <Grid.RowDefinitions>
                        <RowDefinition Height="Auto"></RowDefinition>
                        <RowDefinition></RowDefinition>
                    </Grid.RowDefinitions>
                    <TextBlock TextWrapping="Wrap" Margin="3" FontSize="16" Foreground="DarkMagenta">This is the back side of the FlipPanel.</TextBlock>
                    <Button Grid.Row="2" Margin="3" Padding="10" Content="Flip Back to Front" HorizontalAlignment="Center" VerticalAlignment="Center" Click="cmdFlip_Click"></Button>
                </Grid>
            </lib:FlipPanel.BackContent>
        </lib:FlipPanel>
    </Grid>
</Window>
當單擊FlipPanel背面的按鈕時,通過編程翻轉面板:
private void cmdFlip_Click(object sender, RoutedEventArgs e)
        {
            panel.IsFlipped = !panel.IsFlipped;
        }
本實例源碼:FlipPanel.zip


