內容控制項不僅包括基本控制項,如標簽、按鈕以及工具提示;它們還包含特殊容器,這些容器可用於構造用戶界面中比較大的部分區域。 首先介紹ScrollViewer控制項,該控制項直接繼承自ContentControl類,提供了虛擬界面,允許用戶圍繞更大的元素滾動。與所有內容控制項一樣,ScrollViewer只能包 ...
內容控制項不僅包括基本控制項,如標簽、按鈕以及工具提示;它們還包含特殊容器,這些容器可用於構造用戶界面中比較大的部分區域。
首先介紹ScrollViewer控制項,該控制項直接繼承自ContentControl類,提供了虛擬界面,允許用戶圍繞更大的元素滾動。與所有內容控制項一樣,ScrollViewer只能包含單個元素,雖然如此,你仍可在內部放置佈局容器來保存自己需要的任意類型的元素。
此後將分析附加繼承層中的另外三個控制項:GroupBox、TabItem以及Expander。所有這些控制項都繼承自HeaderedContentControl類,HeaderedContentControl又繼承自ContentControl類。HeaderedContentControl類的作用十分簡單,它表示包含單一元素內容(存儲在Content屬性中)和單一元素標題(存儲在Header屬性中)的容器。正是由於添加了標題,才使HeaderedContentControl與前面章節介紹的內容控制項區別開來。重申一次,可使用標題和或內容的佈局容器,將內容封裝在HeaderedContentControl中。
一、ScrollViewer
如果希望讓大量內容適應有限的空間,滾動是重要特性之一。在WPF中為了獲得滾動支持,需要在ScrollViewer控制項中封裝希望滾動的內容。
儘管ScrollViewer控制項可以包含任何內容,但通常用來封裝佈局容器。如下示例中,使用Grid元素創建三列,用於顯示文本、文本框和按鈕。為使這個Grid面板能夠滾動,只需將Grid面板封裝到ScrollViewer控制項中,如下麵的標記所示:

 <ScrollViewer Name="scroller">

            <Grid Margin="0,10,0,0" Focusable="False">
                <Grid.RowDefinitions>
                    <RowDefinition Height="Auto"></RowDefinition>
                    <RowDefinition Height="Auto"></RowDefinition>
                    <RowDefinition Height="Auto"></RowDefinition>
                    <RowDefinition Height="Auto"></RowDefinition>
                    <RowDefinition Height="Auto"></RowDefinition>
                    <RowDefinition Height="Auto"></RowDefinition>
                    <RowDefinition Height="Auto"></RowDefinition>
                    <RowDefinition Height="Auto"></RowDefinition>
                </Grid.RowDefinitions>
                <Grid.ColumnDefinitions>
                    <ColumnDefinition Width="Auto"></ColumnDefinition>
                    <ColumnDefinition Width="*" MinWidth="50" MaxWidth="800"></ColumnDefinition>
                    <ColumnDefinition Width="Auto"></ColumnDefinition>
                </Grid.ColumnDefinitions>

                <Label Grid.Row="0" Grid.Column="0" Margin="3"
             VerticalAlignment="Center">Home:</Label>
                <TextBox Grid.Row="0" Grid.Column="1" Margin="3"
             Height="Auto"  VerticalAlignment="Center"></TextBox>
                <Button Grid.Row="0" Grid.Column="2" Margin="3" Padding="2">Browse</Button>

                <Label Grid.Row="1" Grid.Column="0" Margin="3"
             VerticalAlignment="Center">Network:</Label>
                <TextBox Grid.Row="1" Grid.Column="1" Margin="3"
             Height="Auto"  VerticalAlignment="Center"></TextBox>
                <Button Grid.Row="1" Grid.Column="2" Margin="3" Padding="2">Browse</Button>

                <Label Grid.Row="2" Grid.Column="0" Margin="3"
             VerticalAlignment="Center">Web:</Label>
                <TextBox Grid.Row="2" Grid.Column="1" Margin="3"
             Height="Auto"  VerticalAlignment="Center"></TextBox>
                <Button Grid.Row="2" Grid.Column="2" Margin="3" Padding="2">Browse</Button>

                <Label Grid.Row="3" Grid.Column="0" Margin="3"
             VerticalAlignment="Center">Secondary:</Label>
                <TextBox Grid.Row="3" Grid.Column="1" Margin="3"
             Height="Auto"  VerticalAlignment="Center"></TextBox>
                <Button Grid.Row="3" Grid.Column="2" Margin="3" Padding="2">Browse</Button>

                <Label Grid.Row="4" Grid.Column="0" Margin="3"
       VerticalAlignment="Center">Home:</Label>
                <TextBox Grid.Row="4" Grid.Column="1" Margin="3"
             Height="Auto"  VerticalAlignment="Center"></TextBox>
                <Button Grid.Row="4" Grid.Column="2" Margin="3" Padding="2">Browse</Button>

                <Label Grid.Row="5" Grid.Column="0" Margin="3"
             VerticalAlignment="Center">Network:</Label>
                <TextBox Grid.Row="5" Grid.Column="1" Margin="3"
             Height="Auto"  VerticalAlignment="Center"></TextBox>
                <Button Grid.Row="5" Grid.Column="2" Margin="3" Padding="2">Browse</Button>

                <Label Grid.Row="6" Grid.Column="0" Margin="3"
             VerticalAlignment="Center">Web:</Label>
                <TextBox Grid.Row="6" Grid.Column="1" Margin="3"
             Height="Auto"  VerticalAlignment="Center"></TextBox>
                <Button Grid.Row="6" Grid.Column="2" Margin="3" Padding="2">Browse</Button>

                <Label Grid.Row="7" Grid.Column="0" Margin="3"
             VerticalAlignment="Center">Secondary:</Label>
                <TextBox Grid.Row="7" Grid.Column="1" Margin="3"
             Height="Auto"  VerticalAlignment="Center"></TextBox>
                <Button Grid.Row="7" Grid.Column="2" Margin="3" Padding="2">Browse</Button>

            </Grid>

        </ScrollViewer>
ScrollViewer
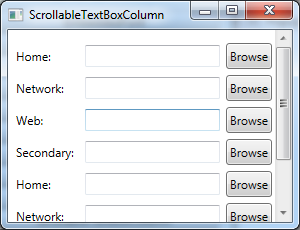
最終效果如下圖所示:

在該例中,如果改變視窗的尺寸以使視窗足以容納所有內容,將會禁用滾動條。但仍會顯示滾動條,可通過設置VerticalScrollBarVisibility屬性來控制這一行為,該屬性使用ScrollBarVisibility枚舉值。預設值 Visible確保總是提供垂直滾動條。如果希望當需要時顯示滾動條而當不需要時不顯示,可將該屬性設置為Auto。如果根本就不希望顯示滾動條,可將該屬性設置為Disable。
ScrollViewer控制項也支持水平滾動功能。但預設情況下,HorizontalScrollBarVisibility屬性設置為Hidden。為了使用水平滾動功能,需要將該屬性改為Visible或Auto。
1、通過代碼進行滾動
為滾動上圖中顯示的視窗,可使用滑鼠單擊滾動條,將滑鼠移到網路上並使用滑鼠滾輪進行滾動,可使用Tab鍵查看控制項,或單擊網格控制項的空白處並使用向上或向下的方向鍵進行滾動。如果這些還不夠靈活,還可使用ScrollViewer類提供的方法,通過代碼來滾動內容:
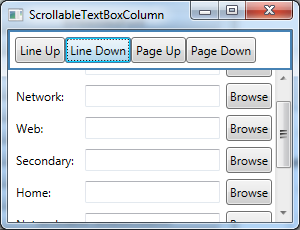
- 最明顯的方法是LineUp()和LineDown(),這兩個方法向上和向下移動的效果相當於單擊一次垂直滾動條兩端的箭頭按鈕。
- 還可使用PageUp()和PageDown()方法,這兩個方法向上或向下滾動一整屏,相當於在滾動滑塊的上面或下麵單擊滾動條
- 用於水平滾動的類似方法包括LineLeft()、LineRight()、PageLeft()和PageRight()
- 最後,還可使用ScrollToXxx()這一類方法,從而滾動到任何特定位置。對於垂直滾動,包括ScrollToEnd()和ScrollToHome(),這兩個方法可以滾動到內容的頂部和底部。還有ScrollToVerticalOffset(),該方法可滾動到特定位置。對於水平滾動也有類似的方法,包括ScrollToLeftEnd()、ScrollToRightEnd()和ScrollToHorizontalOffset()。
現在創建一個簡單的示例,代碼如下所示:

<Window x:Class="Controls.ScrollableTextBoxColumn"
        xmlns="http://schemas.microsoft.com/winfx/2006/xaml/presentation"
        xmlns:x="http://schemas.microsoft.com/winfx/2006/xaml"
        Title="ScrollableTextBoxColumn" Height="230.075" Width="300">
    <DockPanel>
        <Border DockPanel.Dock="Top"  BorderBrush="SteelBlue" BorderThickness="2">
            <StackPanel Margin="5" Orientation="Horizontal">
                <Button Padding="3" Click="LineUp">Line Up</Button>
                <Button Padding="3" Click="LineDown">Line Down</Button>
                <Button Padding="3" Click="PageUp">Page Up</Button>
                <Button Padding="3" Click="PageDown">Page Down</Button>
            </StackPanel>
        </Border>
        <ScrollViewer Name="scroller">

            <Grid Margin="0,10,0,0" Focusable="False">
                <Grid.RowDefinitions>
                    <RowDefinition Height="Auto"></RowDefinition>
                    <RowDefinition Height="Auto"></RowDefinition>
                    <RowDefinition Height="Auto"></RowDefinition>
                    <RowDefinition Height="Auto"></RowDefinition>
                    <RowDefinition Height="Auto"></RowDefinition>
                    <RowDefinition Height="Auto"></RowDefinition>
                    <RowDefinition Height="Auto"></RowDefinition>
                    <RowDefinition Height="Auto"></RowDefinition>
                </Grid.RowDefinitions>
                <Grid.ColumnDefinitions>
                    <ColumnDefinition Width="Auto"></ColumnDefinition>
                    <ColumnDefinition Width="*" MinWidth="50" MaxWidth="800"></ColumnDefinition>
                    <ColumnDefinition Width="Auto"></ColumnDefinition>
                </Grid.ColumnDefinitions>

                <Label Grid.Row="0" Grid.Column="0" Margin="3"
             VerticalAlignment="Center">Home:</Label>
                <TextBox Grid.Row="0" Grid.Column="1" Margin="3"
             Height="Auto"  VerticalAlignment="Center"></TextBox>
                <Button Grid.Row="0" Grid.Column="2" Margin="3" Padding="2">Browse</Button>

                <Label Grid.Row="1" Grid.Column="0" Margin="3"
             VerticalAlignment="Center">Network:</Label>
                <TextBox Grid.Row="1" Grid.Column="1" Margin="3"
             Height="Auto"  VerticalAlignment="Center"></TextBox>
                <Button Grid.Row="1" Grid.Column="2" Margin="3" Padding="2">Browse</Button>

                <Label Grid.Row="2" Grid.Column="0" Margin="3"
             VerticalAlignment="Center">Web:</Label>
                <TextBox Grid.Row="2" Grid.Column="1" Margin="3"
             Height="Auto"  VerticalAlignment="Center"></TextBox>
                <Button Grid.Row="2" Grid.Column="2" Margin="3" Padding="2">Browse</Button>

                <Label Grid.Row="3" Grid.Column="0" Margin="3"
             VerticalAlignment="Center">Secondary:</Label>
                <TextBox Grid.Row="3" Grid.Column="1" Margin="3"
             Height="Auto"  VerticalAlignment="Center"></TextBox>
                <Button Grid.Row="3" Grid.Column="2" Margin="3" Padding="2">Browse</Button>

                <Label Grid.Row="4" Grid.Column="0" Margin="3"
       VerticalAlignment="Center">Home:</Label>
                <TextBox Grid.Row="4" Grid.Column="1" Margin="3"
             Height="Auto"  VerticalAlignment="Center"></TextBox>
                <Button Grid.Row="4" Grid.Column="2" Margin="3" Padding="2">Browse</Button>

                <Label Grid.Row="5" Grid.Column="0" Margin="3"
             VerticalAlignment="Center">Network:</Label>
                <TextBox Grid.Row="5" Grid.Column="1" Margin="3"
             Height="Auto"  VerticalAlignment="Center"></TextBox>
                <Button Grid.Row="5" Grid.Column="2" Margin="3" Padding="2">Browse</Button>

                <Label Grid.Row="6" Grid.Column="0" Margin="3"
             VerticalAlignment="Center">Web:</Label>
                <TextBox Grid.Row="6" Grid.Column="1" Margin="3"
             Height="Auto"  VerticalAlignment="Center"></TextBox>
                <Button Grid.Row="6" Grid.Column="2" Margin="3" Padding="2">Browse</Button>

                <Label Grid.Row="7" Grid.Column="0" Margin="3"
             VerticalAlignment="Center">Secondary:</Label>
                <TextBox Grid.Row="7" Grid.Column="1" Margin="3"
             Height="Auto"  VerticalAlignment="Center"></TextBox>
                <Button Grid.Row="7" Grid.Column="2" Margin="3" Padding="2">Browse</Button>

            </Grid>

        </ScrollViewer>
    </DockPanel>
</Window>
ScrollableTextBoxColumn.xaml

using System;
using System.Collections.Generic;
using System.Linq;
using System.Text;
using System.Windows;
using System.Windows.Controls;
using System.Windows.Data;
using System.Windows.Documents;
using System.Windows.Input;
using System.Windows.Media;
using System.Windows.Media.Imaging;
using System.Windows.Shapes;

namespace Controls
{
    /// <summary>
    /// ScrollableTextBoxColumn.xaml 的交互邏輯
    /// </summary>
    public partial class ScrollableTextBoxColumn : Window
    {
        public ScrollableTextBoxColumn()
        {
            InitializeComponent();
        }
        private void LineUp(object sender, RoutedEventArgs e)
        {
            scroller.LineUp();
        }
        private void LineDown(object sender, RoutedEventArgs e)
        {
            scroller.LineDown();
        }
        private void PageUp(object sender, RoutedEventArgs e)
        {
            scroller.PageUp();
        }
        private void PageDown(object sender, RoutedEventArgs e)
        {
            scroller.PageDown();
        }
    }
}
ScrollableTextBoxColumn.xaml.cs
最終效果如下所示:

2、自定義滾動條
ScrollViewer控制項內置的滾動功能是很有用的。該功能允許緩慢滾動任何內容,從複雜的矢量圖形乃至元素網格。不過,ScrollViewer控制項最奇特的特征是允許其包含的內容參與滾動過程。下麵是工作原理:
(1)在ScrollViewer控制項中放置能滾動的元素,可以是實現了IScrollInfo介面的任意元素。
(2)通過將ScrollViewer.CanContentScroll屬性設置為true,告訴ScrollViewer控制項其內容知道如何進行滾動。
(3)當和ScrollViewer控制項進行交互時(通過使用滾動條、滑鼠輪和滾動方法等),ScrollViewer控制項通過IScrollInfo介面來調用元素的恰當方法。元素接著執行它自己的自定義滾動功能。
IScrollInfo介面定義了一套方法,這套方法響應不同的滾動動作。例如,它包含了ScrollViewer控制項提供的許多滾動方法,如LineUp()、LineDown()、PageUp()以及PageDown()。它還定義了一些處理滑鼠滾輪的方法。
實現了IScrollInfo介面的元素極少,其中一個元素是StackPanel面板容器。StackPanel類對IScrollInfo介面的實現使用邏輯滾動,從元素滾動到元素,而不是逐行滾動。
如果在ScrollViewer控制項中放置StackPanel面板,而且不設置CanContentScroll,將得到普通的滾動行為。一次可向上或向下滾動幾個像素。但如果將CanContentScroll屬性設置為true,那麼每次單擊時會滾動到下一個元素的開頭:
<ScrollViewer CanContentScroll="True">
        <StackPanel>
            <Button Height="100">1</Button>
            <Button Height="100">2</Button>
            <Button Height="100">3</Button>
            <Button Height="100">4</Button>
        </StackPanel>
    </ScrollViewer>
StackPanel面板的邏輯滾動系統對應用程式可能有用也可能沒用。但是,如果要創建具有特殊滾動行為的自定義面板,它是必不可少的。
二、GroupBox
GroupBox是這三個繼承自HeaderedContentControl類的控制項中最簡單的一個。它顯示為具有圓角和標題的方框。下麵是一個示例,下過如下圖所示:

<Window x:Class="Controls.GroupBoxDemo"
        xmlns="http://schemas.microsoft.com/winfx/2006/xaml/presentation"
        xmlns:x="http://schemas.microsoft.com/winfx/2006/xaml"
        Title="GroupBoxDemo" Height="300" Width="300">
    <Grid>
        <GroupBox Header="A GroupBox Test" Padding="5" Margin="5" VerticalAlignment="Top">
            <StackPanel>
                <RadioButton Margin="3">One</RadioButton>
                <RadioButton Margin="3">Two</RadioButton>
                <RadioButton Margin="3">Three</RadioButton>
                <Button  Margin="3">Save</Button>
            </StackPanel>
        </GroupBox>
    </Grid>
</Window>
GroupBoxDemo

三、TabItem
TabItem表示TabControl控制項中的一頁。TabItem類添加的唯一有意義的屬性是IsSelected,該屬性只是選項卡(tab)當前是否顯示在TabControl控制項中。下麵是創建簡單示例:

<Window x:Class="Controls.TabItemDemo"
        xmlns="http://schemas.microsoft.com/winfx/2006/xaml/presentation"
        xmlns:x


