Spring框架主要包括IoC和AOP,這兩大功能都可以使用註解進行配置。 一、bean定義 二、依賴註入 三、使用Primary註解 四、Scope註解 五、方法註入 六、AOP註解 七、ComponentScan註解 ...
Spring框架主要包括IoC和AOP,這兩大功能都可以使用註解進行配置。
開發環境:IntelliJ IDEA 2019.2.2
Spring Boot版本:2.1.8
新建一個名稱為demo的Spring Boot項目。
一、bean定義
在 Spring 中,構成應用程式主幹並由Spring IoC容器管理的對象稱為bean。
bean是一個由Spring IoC容器實例化、組裝和管理的對象。
使用@Component、@Service或@Configuration註解來修飾一個類,這些類會被Spring自動檢測並註冊到容器中,在類裡面使用@Bean註解修
飾的方法,會被視為一個bean存放到Spring容器中。
下麵例子實現了怎樣根據類型獲取bean的名稱,獲取bean;
1、新建類 MyBean.java
package com.example.demo;

public class MyBean {

    public MyBean(String id){
       this.id = id;
    }

    private String id;

    public String getId() {
        return id;
    }

    public void setId(String id) {
        this.id = id;
    }
}
2、新建類 MyConfig.java
package com.example.demo;

import org.springframework.context.annotation.Bean;
import org.springframework.context.annotation.Configuration;

@Configuration
public class MyConfig {

    //預設bean的名稱為方法名,即下麵的getMyBean
    @Bean
    public MyBean getMyBean(){
        return new MyBean("1");
    }

    //設置bean的名稱為bean
    @Bean("bean2")
    public MyBean getMyBean2(){
        return new MyBean("2");
    }
}
3、修改啟動類代碼 DemoApplication.java
package com.example.demo;

import org.springframework.beans.factory.annotation.Autowired;
import org.springframework.boot.SpringApplication;
import org.springframework.boot.autoconfigure.SpringBootApplication;
import org.springframework.context.ApplicationContext;
import org.springframework.web.bind.annotation.RequestMapping;
import org.springframework.web.bind.annotation.RestController;

@SpringBootApplication
@RestController
public class DemoApplication  {

    public static void main(String[] args) {
        SpringApplication.run(DemoApplication.class, args);
    }

    @Autowired
    ApplicationContext ctx;

    @RequestMapping(value = "/")
    public String index(){
        //根據類型獲取bean的名稱
        String[] names = ctx.getBeanNamesForType(MyBean.class);
        for(String name : names){
            System.out.println(name);
        }

        //獲取bean
        MyBean bean1 = (MyBean)ctx.getBean("getMyBean");
        System.out.println(bean1.getId());

        MyBean bean2 = (MyBean)ctx.getBean("bean2");
        System.out.println(bean2.getId());

        return "";
    }
}
運行項目後,瀏覽器訪問:http://localhost:8080/,IDEA控制台輸出:
getMyBean
bean2
1
2
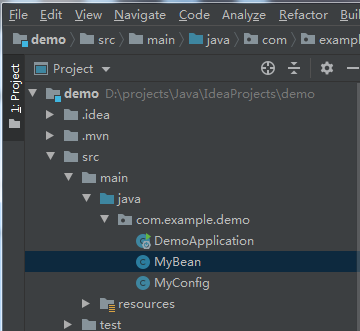
項目結構

二、依賴註入
使用註解可以實現實例的註入,最常用的是@Resource及@Autowired。
@Resource是JSR-250定義的註解,預設會根據名稱進行註入。
@Autowired預設會根據類型進行註入。
1、繼續使用上面例子的兩個類 MyBean.java、MyConfig.java
2、修改啟動類代碼 DemoApplication.java
package com.example.demo;

import org.springframework.beans.factory.annotation.Autowired;
import org.springframework.boot.SpringApplication;
import org.springframework.boot.autoconfigure.SpringBootApplication;
import org.springframework.web.bind.annotation.RequestMapping;
import org.springframework.web.bind.annotation.RestController;

import javax.annotation.Resource;

@SpringBootApplication
@RestController
public class DemoApplication  {

    public static void main(String[] args) {
        SpringApplication.run(DemoApplication.class, args);
    }

    //使用@Resource註入
    @Resource(name="getMyBean")
    MyBean myBean1;

    //使用@Autowired註入
    @Autowired
    MyBean bean2;

    @RequestMapping(value = "/")
    public String index(){
        System.out.println(myBean1.getId());
        System.out.println(bean2.getId());
        return "";
    }
}
瀏覽器訪問:http://localhost:8080/,IDEA控制台輸出:
getMyBean
bean2
1
2
備註:
上面MyBean bean2的bean2不能修改為別的名稱。原因:
@Autowired根據類型進行註入,如果容器中只有一個MyBean類型的bean,則bean2可以隨便命名。
但本例子容器中有兩個MyBean類型的bean,碰到這種有多個bean的情況,則根據屬性名來查找,這裡屬性名bean2最終會找到相應的bean。
如果把MyBean bean2改成MyBean myBean2,則運行時IEAD控制台會報異常信息:
Field myBean2 in com.example.demo.DemoApplication required a single bean, but 2 were found:
	- getMyBean: defined by method 'getMyBean' in class path resource [com/example/demo/MyConfig.class]
	- bean2: defined by method 'getMyBean2' in class path resource [com/example/demo/MyConfig.class]
以上例子的註入方式為設值註入,還可以使用構造註入,向控制器的構造器中註入bean。
修飾構造器只能使用@Autowired註解,@Resource不能修改構造器。
例子:
package com.example.demo;

import org.springframework.beans.factory.annotation.Autowired;
import org.springframework.boot.SpringApplication;
import org.springframework.boot.autoconfigure.SpringBootApplication;
import org.springframework.web.bind.annotation.RequestMapping;
import org.springframework.web.bind.annotation.RestController;

import javax.annotation.Resource;

@SpringBootApplication
@RestController
public class DemoApplication  {

    public static void main(String[] args) {
        SpringApplication.run(DemoApplication.class, args);
    }

    MyBean bean2;

    //構造註入
    @Autowired
    public DemoApplication(MyBean bean2){
        this.bean2 = bean2;
    }

    @RequestMapping(value = "/")
    public String index(){
        System.out.println(bean2.getId());
        return "";
    }
}
三、使用Primary註解
根據類型來註入,如果容器中存在多個相同類型的bean時,會拋異常,因為此時Spring不知道將哪個bean註入。
針對這個問題,可以使用@Primary註解。
1、修改MyConfig.java代碼,為第一個bean增加註解@Primary
package com.example.demo;

import org.springframework.context.annotation.Bean;
import org.springframework.context.annotation.Configuration;
import org.springframework.context.annotation.Primary;

@Configuration
public class MyConfig {

    //預設bean的名稱為方法名,即下麵的getMyBean
    @Bean
    @Primary
    public MyBean getMyBean(){
        return new MyBean("1");
    }

    //設置bean的名稱為bean
    @Bean("bean2")
    public MyBean getMyBean2(){
        return new MyBean("2");
    }
}
2、啟動類代碼 DemoApplication.java還是用上面例子
package com.example.demo;

import org.springframework.beans.factory.annotation.Autowired;
import org.springframework.boot.SpringApplication;
import org.springframework.boot.autoconfigure.SpringBootApplication;
import org.springframework.web.bind.annotation.RequestMapping;
import org.springframework.web.bind.annotation.RestController;

import javax.annotation.Resource;

@SpringBootApplication
@RestController
public class DemoApplication  {

    public static void main(String[] args) {
        SpringApplication.run(DemoApplication.class, args);
    }

    //使用@Resource註入
    @Resource(name="getMyBean")
    MyBean myBean1;

    //使用@Autowired註入
    @Autowired
    MyBean bean2;

    @RequestMapping(value = "/")
    public String index(){
        System.out.println(myBean1.getId());
        System.out.println(bean2.getId());
        return "";
    }
}
瀏覽器訪問:http://localhost:8080/,IDEA控制台輸出:
1
1
四、Scope註解
配置bean時可以指定bean的作用域(scope),一般的bean可以配置為單態(singleton)或者非單態(prototype)。
配置為singleton,Spring的bean工廠只返回同一個bean的實例。
配置為prototype,則每次會創建一個新的實例。
1、修改代碼 MyConfig.java
package com.example.demo;

import org.springframework.beans.factory.annotation.Autowired;
import org.springframework.boot.SpringApplication;
import org.springframework.boot.autoconfigure.SpringBootApplication;
import org.springframework.context.ApplicationContext;
import org.springframework.web.bind.annotation.RequestMapping;
import org.springframework.web.bind.annotation.RestController;

import javax.annotation.Resource;

@SpringBootApplication
@RestController
public class DemoApplication  {

    public static void main(String[] args) {
        SpringApplication.run(DemoApplication.class, args);
    }

    @Autowired
    ApplicationContext ctx;

    @RequestMapping(value = "/")
    public String index(){
        String s = "prototype:" + ctx.getBean("bean1") + "<br /> "
                  + "singleton:" + ctx.getBean("bean2") + "<br /> ";
        return s;
    }
}
瀏覽器訪問:http://localhost:8080/,多次刷新,頁面內容都變化:
prototype:com.example.demo.MyBean@6fce7ec4
singleton:com.example.demo.MyBean@7626c5f9
prototype:com.example.demo.MyBean@357b01f6
......
註意:
如果在一個單態的bean裡面註入一個非單態的bean,則這個單態的bean所維護的非單態bean實例,將不會被刷新。
例子Spring MVC的控制器是單態的,如果往控制器裡面註入一個非單態的bean,如下所示:
    //註入一個非單態的bean
    @Autowired
    private MyBean bean1;

    @RequestMapping(value = "/")
    public String index(){
        return bean1.toString();
    }
瀏覽器訪問:http://localhost:8080/,多次刷新,頁面都是顯示如下:
com.example.demo.MyBean@5d0c61c9
說明index()方法輸出的MyBean都是調用同一個實例,因為控制器在初始化時,就已經被註入了一個bean,而且一直維護著同一個實例。
五、方法註入
如果在一個單態的bean裡面註入一個非單態的bean,則這個單態的bean所維護的非單態bean實例,將不會被刷新。
有兩種簡單的解決方法:
1、在需要註入的一方(單態的bean),直接使用ApplicationContext,每次調用非單態的bean,都由容器返回。
package com.example.demo;

import org.springframework.beans.factory.annotation.Autowired;
import org.springframework.context.ApplicationContext;
import org.springframework.web.bind.annotation.RequestMapping;
import org.springframework.web.bind.annotation.RestController;

@RestController
public class DemoController {

    @Autowired
    private ApplicationContext ctx;

    private MyBean getBean1(){
        return (MyBean)ctx.getBean("bean1");//一個非單態的bean
    }

    @RequestMapping(value = "/")
    public String index(){
        return getBean1().toString();
    }
}
瀏覽器訪問:http://localhost:8080/,多次刷新,頁面每次都變化:
com.example.demo.MyBean@12a7cacc
com.example.demo.MyBean@1776b0ea
......
2、使用Spring的方法註入。
使用@Lookup註解來修飾一個抽象方法,該方法會返回bean的實例。
下麵代碼運行結果和上面使用ApplicationContext一樣。
package com.example.demo;

import org.springframework.beans.factory.annotation.Lookup;
import org.springframework.web.bind.annotation.RequestMapping;
import org.springframework.web.bind.annotation.RestController;

@RestController
public abstract class DemoController {
    @Lookup("bean1")
    public abstract MyBean createBean() ;

    @RequestMapping(value = "/")
    public String index(){
        return createBean().toString();
    }
}
六、AOP註解
實現AOP功能使用AspectJ註解
1、需要在pom.xml加入依賴:
        <dependency>
            <groupId>org.aspectj</groupId>
            <artifactId>aspectjweaver</artifactId>
        </dependency>
2、新建一個業務類 TestServiceImpl.java
package com.example.demo;

import org.springframework.stereotype.Component;

@Component
public class TestServiceImpl {
    public void testService(){
        System.out.println("要代理的業務方法");
    }
}
3、新建一個代理類 ProxyService.java
package com.example.demo;

import org.aspectj.lang.annotation.After;
import org.aspectj.lang.annotation.Aspect;
import org.aspectj.lang.annotation.Before;
import org.springframework.stereotype.Component;

@Aspect
@Component
public class ProxyService {
    @Before("execution(* com.example.demo.*ServiceImpl.*(..))")
    public void before(){
        System.out.println("業務方法調用前執行");
    }
    @After("execution(* com.example.demo.*ServiceImpl.*(..))")
    public void after(){
        System.out.println("業務方法調用後執行");
    }
}
4、修改啟動類方法 DemoApplication.java
package com.example.demo;

import org.springframework.boot.SpringApplication;
import org.springframework.boot.autoconfigure.SpringBootApplication;
import org.springframework.boot.builder.SpringApplicationBuilder;

@SpringBootApplication
public abstract class DemoApplication  {
    public static void main(String[] args) {
        //SpringApplication.run(DemoApplication.class, args);
        new SpringApplicationBuilder(DemoApplication.class).properties(
                "spring.aop.proxy-target-class=true"
        ).run(args);
    }
}
5、控制器 DemoController.java
package com.example.demo;

import org.springframework.beans.factory.annotation.Autowired;
import org.springframework.web.bind.annotation.RequestMapping;
import org.springframework.web.bind.annotation.RestController;

@RestController
public class DemoController {

    @Autowired
    TestServiceImpl testService;

    @RequestMapping(value = "/")
    public String index(){
        testService.testService();
        System.out.println("TestServiceImpl的class:" + testService.getClass());
        return "";
    }
}
瀏覽器訪問:http://localhost:8080/,控制臺中輸出:
業務方法調用前執行
要代理的業務方法
業務方法調用後執行
TestServiceImpl的class:class com.example.demo.TestServiceImpl$$EnhancerBySpringCGLIB$$2a53cdeb
七、ComponentScan註解
ComponentScan註解主要用於檢測使用@Component修飾的組件,包括間接使用@Component的組件(如@Service、@Repository、@Controller
),並把它們註冊到Spring容器中。


