通過上一篇(abp(net core)+easyui+efcore實現倉儲管理系統——EasyUI前端頁面框架 (十八) )文章,我們已經將EasyUI添加到我們的項目中了。下麵我們通過EasyUI做為前端頁面的UI控制項來展現一個貨物信息管理的前端功能,並使用創建相應的實體類,服務類等來實現後臺功能... ...
abp(net core)+easyui+efcore實現倉儲管理系統目錄
abp(net core)+easyui+efcore實現倉儲管理系統——ABP總體介紹(一)
abp(net core)+easyui+efcore實現倉儲管理系統——解決方案介紹(二)
abp(net core)+easyui+efcore實現倉儲管理系統——領域層創建實體(三)
abp(net core)+easyui+efcore實現倉儲管理系統——定義倉儲並實現 (四)
abp(net core)+easyui+efcore實現倉儲管理系統——創建應用服務(五)
abp(net core)+easyui+efcore實現倉儲管理系統——展現層實現增刪改查之控制器(六)
abp(net core)+easyui+efcore實現倉儲管理系統——展現層實現增刪改查之列表視圖(七)
abp(net core)+easyui+efcore實現倉儲管理系統——展現層實現增刪改查之增刪改視圖(八)
abp(net core)+easyui+efcore實現倉儲管理系統——展現層實現增刪改查之菜單與測試(九)
abp(net core)+easyui+efcore實現倉儲管理系統——多語言(十)
abp(net core)+easyui+efcore實現倉儲管理系統——使用 WEBAPI實現CURD (十一)
abp(net core)+easyui+efcore實現倉儲管理系統——使用 WEBAPI實現CURD (十二)
abp(net core)+easyui+efcore實現倉儲管理系統——使用 WEBAPI實現CURD (十三)
abp(net core)+easyui+efcore實現倉儲管理系統——使用 WEBAPI實現CURD (十四)
abp(net core)+easyui+efcore實現倉儲管理系統——使用 WEBAPI實現CURD (十五)
abp(net core)+easyui+efcore實現倉儲管理系統——菜單-上 (十六)
abp(net core)+easyui+efcore實現倉儲管理系統——菜單-下(十七)
abp(net core)+easyui+efcore實現倉儲管理系統——EasyUI前端頁面框架 (十八)
通過上一篇(abp(net core)+easyui+efcore實現倉儲管理系統——EasyUI前端頁面框架 (十八) )文章,我們已經將EasyUI添加到我們的項目中了。下麵我們通過EasyUI做為前端頁面的UI控制項來展現一個貨物信息管理的前端功能,並使用創建相應的實體類,服務類等來實現後臺功能。
四、創建Cargo實體
1. 在Visual Studio 2017的“解決方案資源管理器”中,右鍵單擊“ABP.TPLMS.Core”項目的“Entitys”文件夾,在彈出菜單中選擇“添加” >
> “類”。 將類命名為 Cargo,然後選擇“添加”。
2.創建Cargo類繼承自Entity<int>,通過實現審計模塊中的IHasCreationTime來實現保存創建時間。代碼如下:
using Abp.Domain.Entities;
using Abp.Domain.Entities.Auditing;
using System;
using System.Collections.Generic;
using System.ComponentModel.DataAnnotations;
using System.ComponentModel.DataAnnotations.Schema;
using System.Text;

namespace ABP.TPLMS.Entitys
{

    public class Cargo : Entity<int>, IHasCreationTime
    {

        public Cargo()
        {

            this.Id = 0;
            this.SupplierId = 0;
            this.CargoCode = string.Empty;
            this.CargoName = string.Empty;
            this.Brand = string.Empty;
            this.Country = string.Empty;
            this.CreationTime = DateTime.Now;
            this.Curr = string.Empty;

            this.GrossWt = 0;
            this.Height = 0;
            this.HSCode = string.Empty;
            this.Length = 0;

            this.MaxNum = 100;
            this.MinNum = 0;
            this.NetWt = 0;

            this.Package = string.Empty;
            this.Price = 0;
            this.Remark = string.Empty;

            this.Spcf = string.Empty;
            this.Unit = string.Empty;
            this.UpdateTime = DateTime.Now;

            this.UpdOper = string.Empty;
            this.Vol = 0;
            this.Width = 0;

        }


        public int SupplierId { get; set; }
        [StringLength(50)]
        public string CargoCode { get; set; }
        [StringLength(10)]
        public string HSCode { get; set; }

        [StringLength(250)]
        public string CargoName { get; set; }

        [StringLength(512)]
        public string Spcf { get; set; }
        public string Unit { get; set; }

        public string Country { get; set; }
        public string Brand { get; set; }

        public string Curr { get; set; }
        public string Package { get; set; }
        public decimal Length { get; set; }

        public decimal Width { get; set; }
        public decimal Height { get; set; }
        public decimal Vol { get; set; }


        public decimal MinNum { get; set; }
        public decimal MaxNum { get; set; }

        public decimal Price { get; set; }
        public decimal GrossWt { get; set; }

         public decimal NetWt { get; set; }
        public string Remark { get; set; }

        public DateTime CreationTime { get; set; }
        public DateTime UpdateTime { get; set; }
        public string UpdOper { get; set; }

    }

}
3.定義好實體之後,我們去“ABP.TPLMS.EntityFrameworkCore”項目中的“TPLMSDbContext”類中定義實體對應的DbSet,以應用Code First 數據遷移。添加以下代碼
using Microsoft.EntityFrameworkCore;
using Abp.Zero.EntityFrameworkCore;
using ABP.TPLMS.Authorization.Roles;
using ABP.TPLMS.Authorization.Users;
using ABP.TPLMS.MultiTenancy;

using ABP.TPLMS.Entitys;


namespace ABP.TPLMS.EntityFrameworkCore
{
    public class TPLMSDbContext : AbpZeroDbContext<Tenant, Role, User, TPLMSDbContext>
    {

        /* Define a DbSet for each entity of the application */


        public TPLMSDbContext(DbContextOptions<TPLMSDbContext> options)
            : base(options)
        {
        }

        public DbSet<Module> Modules { get; set; }
        public DbSet<Supplier> Suppliers { get; set; }
  public DbSet<Cargo> Cargos { get; set; }

    }
}
4.從菜單中選擇“工具->NuGet包管理器器—>程式包管理器控制台”菜單。
5. 在PMC中,預設項目選擇EntityframeworkCore對應的項目後。輸入以下命令:Add-Migration AddEntityCargo,創建遷移。
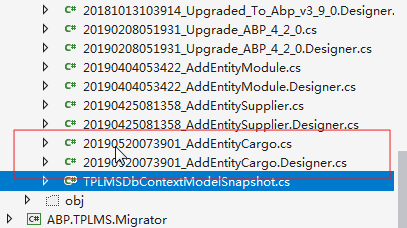
6. 在上面的命令執行完畢之後,創建成功後,會在Migrations文件夾下創建時間_AddEntityCargo格式的類文件,這些代碼是基於DbContext指定的模型。如下圖。

7.在程式包管理器控制台,輸入Update-Database,回車執行遷移。執行成功後,如下圖。

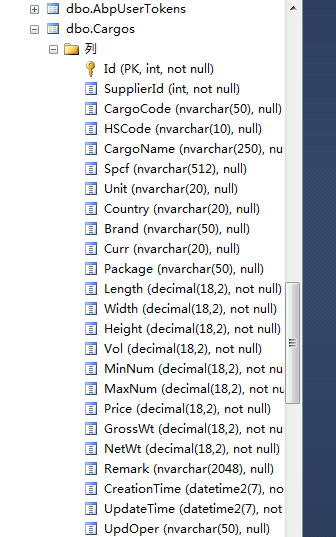
8. 在SQL Server Management Studio中查看資料庫,Cargos表創建成功。

五、定義應用服務介面需要用到的分頁類
為了在進行查詢時使用, PagedCargoResultRequestDto被用來將貨物查詢條件的數據傳遞到給應用層.
1. 在Visual Studio 2017的“解決方案資源管理器”中,右鍵單擊“ABP.TPLMS.Application”項目,在彈出菜單中選擇“添加” > “新建文件夾”,並重命名為“Cargos”
2. 使用滑鼠右鍵單擊我們剛纔創建的“Cargos”文件夾,在彈出菜單中選擇“添加” > “新建文件夾”,並重命名為“Dto”。
3.右鍵單擊“Dto”文件夾,然後選擇“添加” > “類”。 將類命名為 Paged CargoResultRequestDto,然後選擇“添加”。代碼如下。
using Abp.Application.Services.Dto;
using System;
using System.Collections.Generic;
using System.Text;

namespace ABP.TPLMS.Cargos.Dto
{
    public class PagedCargoResultRequestDto : PagedResultRequestDto
    {

        public string Keyword { get; set; }
    }
}
4.右鍵單擊“Dto”文件夾,然後選擇“添加” > “類”。 將類命名為 CargoDto,然後選擇“添加”。代碼如下。
using Abp.Application.Services.Dto;
using Abp.AutoMapper;
using ABP.TPLMS.Entitys;
using System;
using System.Collections.Generic;
using System.Text;

namespace ABP.TPLMS.Cargos.Dto
{

    [AutoMapFrom(typeof(Cargo))]
    public class CargoDto:EntityDto<int>
    {

        public int SupplierId { get; set; }
        public string CargoCode { get; set; }
        public string HSCode { get; set; }

        public string CargoName { get; set; }

        public string Spcf { get; set; }
        public string Unit { get; set; }
        public string Country { get; set; }

        public string Brand { get; set; }

        public string Curr { get; set; }
        public string Package { get; set; }
        public decimal Length { get; set; }
        public decimal Width { get; set; }

        public decimal Height { get; set; }
       public decimal Vol { get; set; }

         public decimal MinNum { get; set; }
        public decimal MaxNum { get; set; }
        public decimal Price { get; set; }
        public decimal GrossWt { get; set; }

        public decimal NetWt { get; set; }

        public string Remark { get; set; }
        public DateTime CreationTime { get; set; }

        public DateTime UpdateTime { get; set; }
        public string UpdOper { get; set; }

    }
}
5.右鍵單擊“Dto”文件夾,然後選擇“添加” > “類”。 將類命名為 CreateUpdateCargoDto,然後選擇“添加”。代碼如下。
using Abp.Application.Services.Dto;
using Abp.AutoMapper;
using ABP.TPLMS.Entitys;
using System;
using System.Collections.Generic;
using System.ComponentModel.DataAnnotations;
using System.Text;

namespace ABP.TPLMS.Cargos.Dto
{

    [AutoMapTo(typeof(Cargo))]
    public class CreateUpdateCargoDto : EntityDto<int>
    {

        public int SupplierId { get; set; }
        [StringLength(50)]
        public string CargoCode { get; set; }

        [StringLength(10)]
        public string HSCode { get; set; }

        [StringLength(250)]
        public string CargoName { get; set; }

        [StringLength(512)]
        public string Spcf { get; set; }

        [StringLength(20)]
        public string Unit { get; set; }
        [StringLength(20)]
        public string Country { get; set; }

        [StringLength(50)]
        public string Brand { get; set; }

        [StringLength(20)]
        public string Curr { get; set; }

        [StringLength(50)]
        public string Package { get; set; }

        public decimal Length { get; set; }
        public decimal Width { get; set; }
        public decimal Height { get; set; }
        public decimal Vol { get; set; }

        public decimal MinNum { get; set; }
        public decimal MaxNum { get; set; }
        public decimal Price { get; set; }
        public decimal GrossWt { get; set; }
        public decimal NetWt { get; set; }
        [StringLength(2048)]
        public string Remark { get; set; }
        public DateTime CreationTime { get; set; }

        public DateTime UpdateTime { get; set; }
        [StringLength(50)]
        public string UpdOper { get; set; }
    }
}


