
一、預設配置文件 二、指定配置文件 三、使用profile指定配置 ...
開發環境:IntelliJ IDEA 2019.2.2
Spring Boot版本:2.1.8
新建一個名稱為demo的Spring Boot項目。
一、預設配置文件
Spring Boot會讀取名稱application.properties(yml)的配置文件。
如果有多個同名文件,預設情況下,按照下麵順序讀取:
(1)項目根目錄的config目錄
(2)項目根目錄
(3)項目classpath下的config目錄
(4)項目classpath根目錄
如果同一個配置項出現在多份配置文件中,後面讀取的值不會覆蓋前面的。
測試:
在項目的4個位置各建立application.properties,內容如下:
(1)config/application.properties
test = config/application.properties
test1 = test1
(2)application.properties
test = application.properties
test2 = test2
(3)src/main/resources/config/application.properties
test = src/main/resources/config/application.properties
test3 = test3
(4)src/main/resources/application.properties
test = src/main/resources/application.properties
test4 = test4
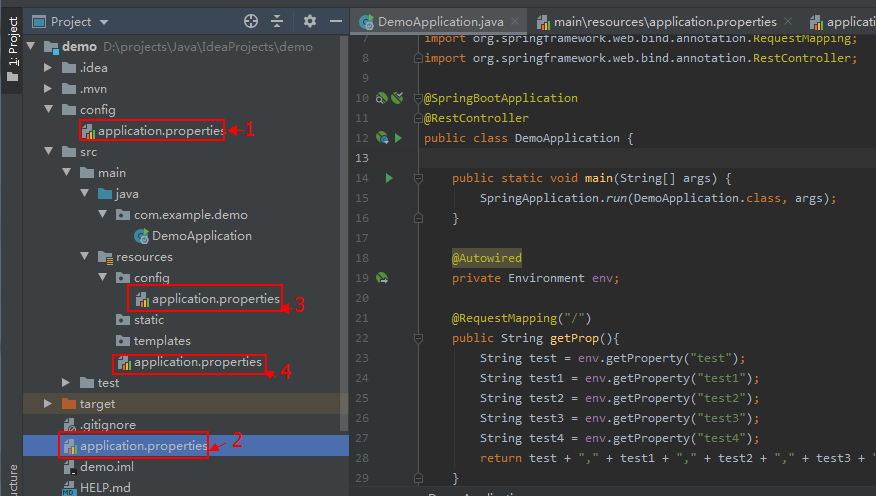
修改預設生成的啟動類 DemoApplication.cs 代碼:
package com.example.demo;

import org.springframework.beans.factory.annotation.Autowired;
import org.springframework.boot.SpringApplication;
import org.springframework.boot.autoconfigure.SpringBootApplication;
import org.springframework.core.env.Environment;
import org.springframework.web.bind.annotation.RequestMapping;
import org.springframework.web.bind.annotation.RestController;

@SpringBootApplication
@RestController
public class DemoApplication {

    public static void main(String[] args) {
        SpringApplication.run(DemoApplication.class, args);
    }

    @Autowired
    private Environment env;

    @RequestMapping("/")
    public String getProp(){
        String test = env.getProperty("test");
        String test1 = env.getProperty("test1");
        String test2 = env.getProperty("test2");
        String test3 = env.getProperty("test3");
        String test4 = env.getProperty("test4");
        return test + "," + test1 + "," + test2 + "," + test3 + "," + test4;
    }
}
訪問 http://localhost:8080/
輸出:config/application.properties,test1,test2,test3,test4
二、指定配置文件
讀取指定的配置文件,不使用預設的application.properties。
測試:
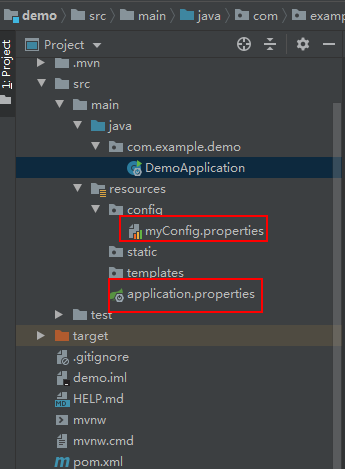
(1)src/main/resources/application.properties 內容:
test1 = application.properties
(2)在項目的src/main/resources新建目錄config,新建配置文件myConfig.properties,內容:
test2= myConfig.properties
修改預設生成的啟動類 DemoApplication.cs 代碼:
package com.example.demo;

import org.springframework.beans.factory.annotation.Autowired;
import org.springframework.boot.SpringApplication;
import org.springframework.boot.autoconfigure.SpringBootApplication;
import org.springframework.boot.builder.SpringApplicationBuilder;
import org.springframework.core.env.Environment;
import org.springframework.web.bind.annotation.RequestMapping;
import org.springframework.web.bind.annotation.RestController;

@SpringBootApplication
@RestController
public class DemoApplication {

    public static void main(String[] args) {
        //SpringApplication.run(DemoApplication.class, args);
        new SpringApplicationBuilder(DemoApplication.class).properties(
                "spring.config.location=classpath:/config/myConfig.properties"
        ).run(args);
    }

    @Autowired
    private Environment env;

    @RequestMapping("/")
    public String getProp(){
        String test1 = env.getProperty("test1");
        String test2 = env.getProperty("test2");
        return test1 + "," + test2;
    }
}
訪問 http://localhost:8080/
輸出:null,myConfig.properties
可見application.properties已讀取不到,成功讀取到配置文件myConfig.properties。
也可以使用spring.config.name指定配置文件的名稱,如下麵代碼指定了myConfig,Spring Boot會到classpath下尋找myConfig.properties(yml)。
    public static void main(String[] args) {
        //SpringApplication.run(DemoApplication.class, args);
        /*new SpringApplicationBuilder(DemoApplication.class).properties(
                "spring.config.location=classpath:/config/myConfig.properties"
        ).run(args);*/
        new SpringApplicationBuilder(DemoApplication.class).properties(
                "spring.config.name=myConfig").run(args);
    }
三、使用profile指定配置
使用profile可以根據特定的環境來激活不同的配置。
src/main/resources/application.yml 內容如下:
spring:
  profiles: mysql
jdbc:
  driver:
    com.mysql.jdbc.Driver
---
spring:
  profiles: oracle
jdbc:
  driver:
    oracle.jdbc.driver.OracleDriver
修改預設生成的啟動類 DemoApplication.cs 代碼:
package com.example.demo;

import org.springframework.beans.factory.annotation.Autowired;
import org.springframework.boot.SpringApplication;
import org.springframework.boot.autoconfigure.SpringBootApplication;
import org.springframework.boot.builder.SpringApplicationBuilder;
import org.springframework.core.env.Environment;
import org.springframework.web.bind.annotation.RequestMapping;
import org.springframework.web.bind.annotation.RestController;

import java.util.Scanner;

@SpringBootApplication
@RestController
public class DemoApplication {

    public static void main(String[] args) {
        //SpringApplication.run(DemoApplication.class, args);

        Scanner scan = new Scanner(System.in);
        String profile = scan.nextLine();
        new SpringApplicationBuilder(DemoApplication.class).properties(
                "spring.config.location=classpath:/application.yml"
        ).profiles(profile).run(args);
    }

    @Autowired
    private Environment env;

    @RequestMapping("/")
    public String getProp(){
        String res = env.getProperty("jdbc.driver");
        return res;
    }
}
在IDEA中點擊Run按鈕後,在控制台先敲回車再輸入oracle,
訪問 http://localhost:8080/ 輸出:oracle.jdbc.driver.OracleDriver
重新Run,在控制台先敲回車再輸入mysql,
訪問 http://localhost:8080/ 輸出:com.mysql.jdbc.Driver
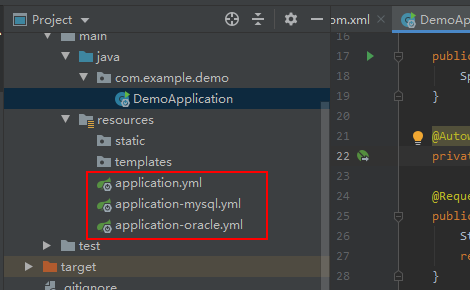
還可以通過不同配置文件的名稱來設置profile,創建下麵3個文件。
(1)src/main/resources/application.yml 內容:
spring:
  profiles:
    active: oracle
(2)src/main/resources/application-mysql.yml 內容:
jdbc:
  driver:
    com.mysql.jdbc.Driver
(3)src/main/resources/application-oracle.yml 內容:
jdbc:
  driver:
    oracle.jdbc.driver.OracleDriver
修改預設生成的啟動類 DemoApplication.cs 代碼:
package com.example.demo;

import org.springframework.beans.factory.annotation.Autowired;
import org.springframework.boot.SpringApplication;
import org.springframework.boot.autoconfigure.SpringBootApplication;
import org.springframework.boot.builder.SpringApplicationBuilder;
import org.springframework.core.env.Environment;
import org.springframework.web.bind.annotation.RequestMapping;
import org.springframework.web.bind.annotation.RestController;

import java.util.Scanner;

@SpringBootApplication
@RestController
public class DemoApplication {

    public static void main(String[] args) {
        SpringApplication.run(DemoApplication.class, args);
    }

    @Autowired
    private Environment env;

    @RequestMapping("/")
    public String getProp(){
        String res = env.getProperty("jdbc.driver");
        return res;
    }
}
訪問 http://localhost:8080/ 輸出:oracle.jdbc.driver.OracleDriver


