[TOC] css: 層疊樣式表 1. css引入方式 行內樣式 內嵌式 在head標簽內部書寫style 外接式 三種引入方式的優先順序: 1.行內樣式 內嵌式和外接式, 2.內嵌和外接要看誰在後面,在後面的優先順序高 2. css選擇器 2.1 基礎選擇器 1.id選擇器 特定屬性的元素(標簽)、唯 ...
目錄
css: 層疊樣式表
1. css引入方式
行內樣式
<div style='color:red;'>mjj</div>內嵌式
在head標簽內部書寫style
<style>
/*css代碼*/
#box{
            background-color: greenyellow;
        }
</style>
外接式
<link href='css/index.css' rel='stylesheet'>
三種引入方式的優先順序:
- 1.行內樣式>內嵌式和外接式,
- 2.內嵌和外接要看誰在後面,在後面的優先順序高
2. css選擇器
2.1 基礎選擇器
1.id選擇器
特定屬性的元素(標簽)、唯一的
語法: #xxx
2.類選擇器
可以重覆歸類,類也可以設置多個
語法: .xxx
<style>
  .box{
    width:200px;
    height:200px;
    background-color:yellow;
 }
  <!--單獨設置 類1 中某個樣式與 類2 不一樣-->
  .active{
    border-radius: 200px; <!--設置盒子邊框-->
 }
</style>
<div class='box active'></div> <!--類1-->
<div class='box'></div>  <!--類2-->
<div class='box'></div>  <!--類2-->
3.標簽選擇器
標簽選擇器有:div{} 、p{} 、ul 、ol ...
<head>
    <meta charset="UTF-8">
    <title>Title</title>
    <style>
        a{
            /*設置文本修飾*/
            text-decoration: none;
        }
        input{
            border:none;
            outline:none;
        }
        #user{
            border: 1px solid #555;
            height: 60px;
            font-size: 20px;
            padding: 0 10px;
        }
        .box {
            width: 200px;
            height: 200px;
            background-color: yellow;
        }
        .active {
            border-radius: 4px;
        }
        #box{
            color: red;
        }
        div{
            border:1px solid #000;
        }
    </style>
</head>
<body>
<div class='box active' id="box">wusir</div>
<hr>
<div class='box'></div>
<hr>
<div class='box'></div>
<a href="">百度一下</a>
<input type="text" id="user">
</body>
2.2 高級選擇器
1.後代選擇器
語法:
/*用空格連接*/
div p{
  color: red;
}
2.子代選擇器
語法:
/*用>連接*/
div>p{
  color: red;
}
3.組合選擇器
常用於重置樣式
語法:
/*用,連接*/
div,p,body,html,ul,ol....{
  padding: 0;
  margin: 0;
}
input,textarea{
            border:none;
            outline: 0;
        }
如何重置網頁樣式?
html,body,p,ul,ol{
    margin: 0;
    padding: 0;
}
/*通配符選擇器 */
*{
    margin: 0;
    padding: 0;
}
a{
    text-decoration: none;
}
/*清除input和textarea標簽的預設邊框和外線*/
input,textarea{
    border: none;
    outline: none;
}
4.交集選擇器
span.active
語法:
div.active{

}
2.3 偽類選擇器
對於a標簽,如果想設置a標簽的樣式,要作用於a標簽上,對於繼承性來說,a標簽不起作用的
“愛恨準則” — LoVe HAte :L - link 、V - visited 、H - hover 、A - active
/*LoVe HAte*/
/*a標簽沒有被訪問時候設置的屬性*/
a:link{
    /*color: red;*/
}
/*a標簽被訪問過後設置的屬性*/
a:visited{
    color:yellow;
}
/*a標簽被滑鼠懸浮時設置的屬性*/
a:hover{
    color: deeppink;
}
/*a標簽被摁住的時候設置的屬性*/
a:active{
    color: deepskyblue;
}
2.4 屬性選擇器
<style>
    input[type='text']{
        background-color: red;
    }
    input[type='checkbox']{

    }
    input[type='submit']{

    }
</style>
2.5 偽元素選擇器
<style>
    /*設置內容中的第一個文字*/
    p::first-letter{
        color: red;
        font-size: 20px;
        font-weight: bold;
    }
    /*在內容前加一個@*/
    p::before{
        content:'@';
    }
    /*::after是解決浮動佈局常用的一種方法*/
    /*在內容後面加一個$*/
    p::after{
        /*通過偽元素添加的內容為行內元素*/
        content:'$';
    }
</style>
註意:
- 1.通過偽元素添加的內容為行內元素
- 2.::after是解決浮動佈局常用的一種方法
- 3.1個':'是偽類選擇器,2個':'是偽元素選擇器
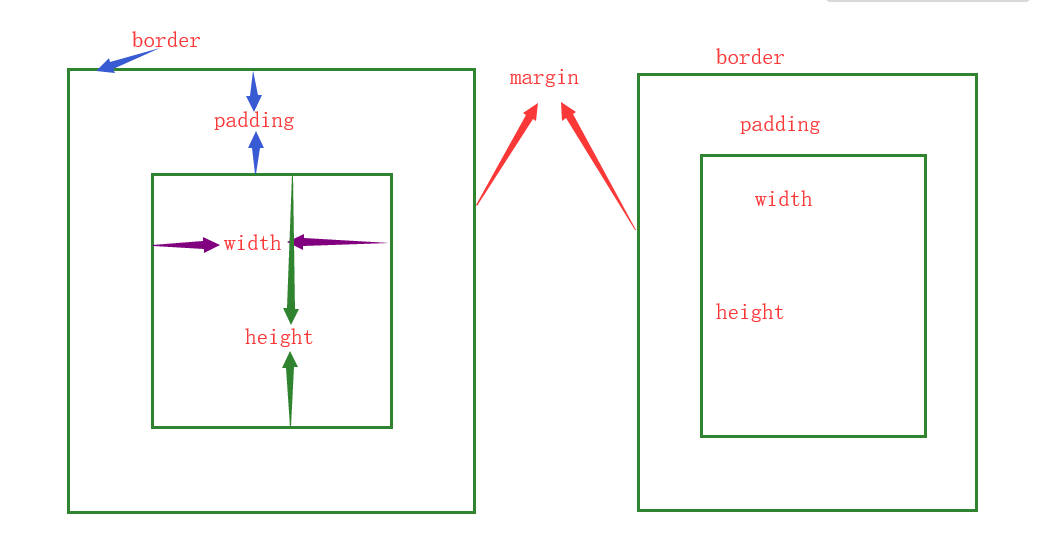
3. css的盒模型
1.盒子模型的屬性及含義:
width: 內容的寬度
height:內容的高度
padding:內邊距(又叫內填充),盒子的border到內容的距離
1.單個屬性分別設置不同方向的padding
padding-top  頂部填充的距離
padding-right  右側填充的距離
padding-bottom  底部填充的距離
padding-left  左側填充的距離
2.綜合屬性,多個屬性用空格隔開。
/*綜合設置:四個方向的內邊距為:*/
padding: 20px;

/*盒子的上下內邊距設置為第一個數值,左右內邊距設置第二個數值*/


/*上  左右  下*/
padding: 0 20px 30px;

/*上  右  下  左*/
padding: 10px 20px 30px 40px;
border:盒子的邊框
boder邊框三要素:粗細 、線性樣式 、顏色
- 1.按照三要素書寫border
border-width:3px; /*邊框四邊線的粗細*/ border-style:solid; /*邊框線樣式*/ border-color:red; /*邊框線顏色*/ /*上面三句代碼相當於一句代碼:*/ border:3px solid red; /*同樣,也可以分別設置邊框四個方向的粗細 線性樣式 顏色,跟padding的四個方向一樣。*/ /*上下5px 左右10px*/ border-width:5px 10px; /*上:實線 右:點狀線 下:雙線 左:虛線*/ border-style: solid dotted double dashed; /*上:紅色 左右:綠色 下:黃色*/ border-color: red green yellow;- 2.按照方向劃分
/*boder的頂部邊框*/
border-top-width: 10px;
border-top-color: red;
border-top-style: solid;
/*可以簡寫成*/
border-top: 10px solid red;

/*boder的右側邊框*/
border-right-width: 10px;
border-right-color: red;
border-right-style: solid;
/*可以簡寫成*/
border-right: 10px solid red;

/*boder的底部邊框*/
border-bottom-width: 10px;
border-bottom-color: red;
border-bottom-style: solid;
/*可以簡寫成*/
border-bottom: 10px solid red;

/*boder的左側邊框*/
border-left-width: 10px;
border-left-color: red;
border-left-style:solid;
/*可以簡寫成*/
border-left: 10px solid red;
3.清除預設邊框
清除某些標簽預設的邊框 :border:none; 或者 border:0;
清除某些標簽預設的外邊框 :outline: none; 或者 border:0;
4.邊框屬性
1.設置為圓角或者圓
語法: border-radius:20px;
<style>
        #box{
            width: 300px;
            height: 300px;
            background-color: red;
            /*border-radius: 50%;*/
            border-radius: 4px;
            border: 3px solid blue;
        }
         #box:hover{
             background-color: #000;
         }
    </style>
除了同時設置四個圓角以外,還可以單獨對每個角進行設置。對應四個角,CSS3提供四個單獨的屬性:
- border-top-left-radius
- border-top-right-radius
- border-bottom-right-radius
- border-bottom-left-radius
這四個屬性都可以同時設置1到2個值。如果設置1個值,表示水平半徑與垂直半徑相等。如果設置2個值,第一個值表示水平半徑,第二個值表示垂直半徑。
2.設置陰影效果
語法:box-shadow: h-shadow v-shadow blur color inset;
h-shadow 水平陰影的位置、距離
v-shadow 垂直陰影的位置、距離
blur 模糊距離、程度
color 陰影的顏色
inset 將外部陰影 (outset,預設值) 改為內部陰影。
<style>
    .box{
        width: 200px;
        height: 200px;
        background-color: #000;
        margin: 100px auto;
        position: relative;
        transition: all .2s linear;
    }
    .box:hover{
        top: -2px;
        box-shadow: 0 0  20px red;
    }
</style>
margin:盒子的外邊距,一個盒子到另一個盒子的距離。
水平方向的外邊距
/*左外邊距*/
margin-left: 30px;
/*右外邊距*/
margin-right: 20px;
垂直方向外邊距
margin在水平方向上不會出現問題,但在垂直方向上會出現外邊距合併(或重疊)現象,這種現象叫做塌陷問題,會以設置的最大的magrin距離為基準。
如何避免出現這種問題呢?
- 為了避免出現塌陷問題,只需要設置一個盒子的一個方向的margin即可。
/*頂部外邊距*/
margin-top:50px;
/*底部外邊距*/
margin-bottom:30px;
也可以綜合設置水平與垂直方向的外邊距
/*水平居中*/
margin:0 auto;
2.盒子模型圖


