環境: 這裡參考官方使用一臺伺服器:Centos 7 redis-5.0.4 192.168.10.10 redis集群cluster最少要3個主節點,所以本次需要創建6個實例:3個主節點,3個從節點。 1、創建cluster工作目錄 [root@localhost ~]# mkdir -p /op ...
環境:
這裡參考官方使用一臺伺服器:Centos 7 redis-5.0.4 192.168.10.10
redis集群cluster最少要3個主節點,所以本次需要創建6個實例:3個主節點,3個從節點。
1、創建cluster工作目錄
[root@localhost ~]# mkdir -p /opt/redis-5.0.4/cluster-test/{7000,7001,7002,7003,7004,7005}
2、創建cluster的配置文件
[root@localhost ~]# cd /opt/redis-5.0.4/cluster-test/
[root@localhost cluster-test]# vim 7000/redis.conf
port 7000       // 埠號
daemonize yes   // 開啟守護進程
dir "/opt/redis-5.0.4/cluster-test/data"  // 集群的工作目錄
logfile "/opt/redis-5.0.4/cluster-test/log/cluster-7000.log" // 日誌文件
dbfilename "dump-7000.rdb"
cluster-enabled yes   // 啟用集群功能
cluster-config-file nodes-7000.conf   // 集群配置文件的名字
cluster-require-full-coverage no  // #redis cluster需要16384個slot都正常的時候才能對外提供服務,換句話說,只要任何一個slot異常那麼整個cluster不對外提供服務。 因此生產環境一般為no
cluster-node-timeout 5000  //請求超時  預設15秒,可自行設置
appendonly yes  //aof日誌開啟  有需要就開啟,它會每次寫操作都記錄一條日誌
由於這6個實例的配置文件除了埠以外基本相同。所以我們將redis.conf分別複製一份到剩下的7001、7002、7003、7004、7005的目錄下然後修改對應的埠。
最終的配置文件看起來向下麵這樣

[root@localhost cluster-test]# vim 7000/redis.conf
port 7000
daemonize yes
dir "/opt/redis-5.0.4/cluster-test/data"
logfile "/opt/redis-5.0.4/cluster-test/log/cluster-7000.log"
dbfilename "dump-7000.rdb"
cluster-enabled yes
cluster-config-file nodes-7000.conf
cluster-require-full-coverage no
cluster-node-timeout 5000
appendonly yes

---------------------------------------------------------------------

[root@localhost cluster-test]# vim 7001/redis.conf
port 7001
daemonize yes
dir "/opt/redis-5.0.4/cluster-test/data"
logfile "/opt/redis-5.0.4/cluster-test/log/cluster-7001.log"
dbfilename "dump-7001.rdb"
cluster-enabled yes
cluster-config-file nodes-7001.conf
cluster-require-full-coverage no
cluster-node-timeout 5000
appendonly yes

------------------------------------------------------------------------

[root@localhost cluster-test]# vim 7002/redis.conf
port 7002
daemonize yes
dir "/opt/redis-5.0.4/cluster-test/data"
logfile "/opt/redis-5.0.4/cluster-test/log/cluster-7002.log"
dbfilename "dump-7002.rdb"
cluster-enabled yes
cluster-config-file nodes-7002.conf
cluster-require-full-coverage no
cluster-node-timeout 5000
appendonly yes

------------------------------------------------------------------------

[root@localhost cluster-test]# vim 7003/redis.conf
port 7003
daemonize yes
dir "/opt/redis-5.0.4/cluster-test/data"
logfile "/opt/redis-5.0.4/cluster-test/log/cluster-7003.log"
dbfilename "dump-7003.rdb"
cluster-enabled yes
cluster-config-file nodes-7003.conf
cluster-require-full-coverage no
cluster-node-timeout 5000
appendonly yes

------------------------------------------------------------------------

[root@localhost cluster-test]# vim 7004/redis.conf
port 7004
daemonize yes
dir "/opt/redis-5.0.4/cluster-test/data"
logfile "/opt/redis-5.0.4/cluster-test/log/cluster-7004.log"
dbfilename "dump-7004.rdb"
cluster-enabled yes
cluster-config-file nodes-7004.conf
cluster-require-full-coverage no
cluster-node-timeout 5000
appendonly yes

------------------------------------------------------------------------

[root@localhost cluster-test]# vim 7005/redis.conf
port 7005
daemonize yes
dir "/opt/redis-5.0.4/cluster-test/data"
logfile "/opt/redis-5.0.4/cluster-test/log/cluster-7005.log"
dbfilename "dump-7005.rdb"
cluster-enabled yes
cluster-config-file nodes-7005.conf
cluster-require-full-coverage no
cluster-node-timeout 5000
appendonly yes
redis.conf
創建好配置文件,在創建對應的cluster工作目錄和日誌文件目錄
[root@localhost ~]# mkdir -p /opt/redis-5.0.4/cluster-test/data
[root@localhost ~]# mkdir -p /opt/redis-5.0.4/cluster-test/log
3、運行集群
這裡需要註意:
如果你使用的是Redis 5,我們可以使用redis-cli中的Redis集群命令行實用程式來創建新的集群、檢查或重新分割現有集群,等等。
對於Redis版本3或4,需要使用redis-trib。可以在Redis源代碼發行版的src目錄中找到它。需要安裝redis gem才能運行redis-trib,而gem需要reby環境,所以需要安裝reby
如果是redis版本5以下的請按照下麵安裝reby環境和redis.gem。
3.1安裝reby環境
[root@localhost cluster-test]# wget -P /opt/source https://cache.ruby-lang.org/pub/ruby/2.3/ruby-2.3.1.tar.gz
[root@localhost cluster-test]# tar -zxvf /opt/source/ruby-2.3.1.tar.gz -C /opt/
[root@localhost cluster-test]# cd /opt/ruby-2.3.1/
[root@localhost ruby-2.3.1]# ./configure --prefix=/opt/ruby231
[root@localhost ruby-2.3.1]# make && make install
[root@localhost bin]# vim /etc/profile  // 添加環境變數
PATH="/opt/python362/bin:/usr/local/sbin:/usr/local/bin:/usr/sbin:/usr/bin:/root/bin:/opt/tngx230/sbin:/opt/node-v8.6.0-linux-x64/bin:/opt/ruby231/bin"
[root@localhost src]# cp /opt/ruby231/bin/ruby /usr/local/  // redis-trib.rb會到這裡去找reby
[root@localhost src]# cp /opt/ruby231/bin/gem /usr/local/
[root@localhost bin]# source /etc/profile  // 使配置立即生效
3.2安裝redis.gem
[root@localhost ~]# gem install redis
3.3開啟redis實例
[root@localhost ~]# redis-server /opt/redis-5.0.4/cluster-test/7000/redis.conf
[root@localhost ~]# redis-server /opt/redis-5.0.4/cluster-test/7001/redis.conf
[root@localhost ~]# redis-server /opt/redis-5.0.4/cluster-test/7002/redis.conf
[root@localhost ~]# redis-server /opt/redis-5.0.4/cluster-test/7003/redis.conf
[root@localhost ~]# redis-server /opt/redis-5.0.4/cluster-test/7004/redis.conf
[root@localhost ~]# redis-server /opt/redis-5.0.4/cluster-test/7005/redis.conf
開啟成功後,看起來像下麵這樣:

3.3運行集群
[root@localhost src]# ./redis-trib.rb create --replicas 1 127.0.0.1:7000 127.0.0.1:7001 127.0.0.1:7002 127.0.0.1:7003 127.0.0.1:7004 127.0.0.1:7005
如果是redis5.0以上版本會有如下提示信息:

對於3或4版本的盆友,我也就只能走到這裡了,下麵我將以5.0版本進行操作。
4、運行集群
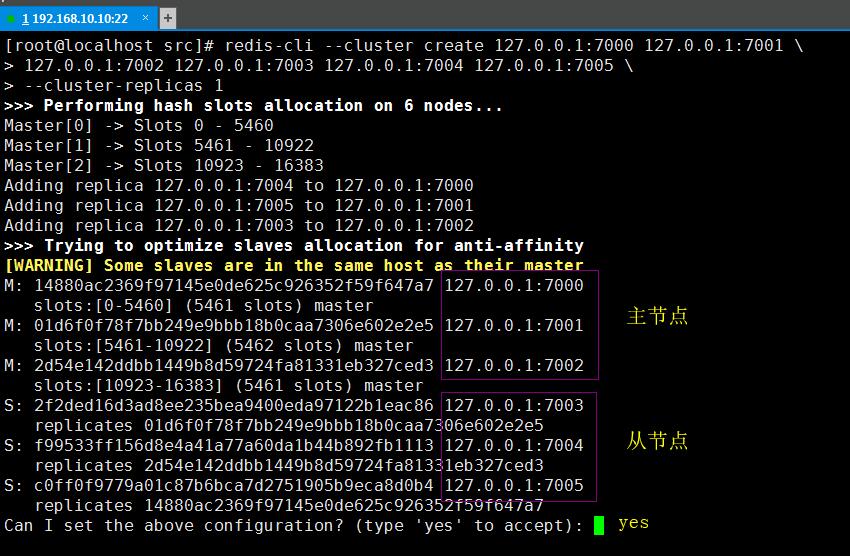
[root@localhost src]# redis-cli --cluster create 127.0.0.1:7000 127.0.0.1:7001 127.0.0.1:7002 127.0.0.1:7003 127.0.0.1:7004 127.0.0.1:7005 --cluster-replicas 1
命令執行成功後,會看到如下界面:

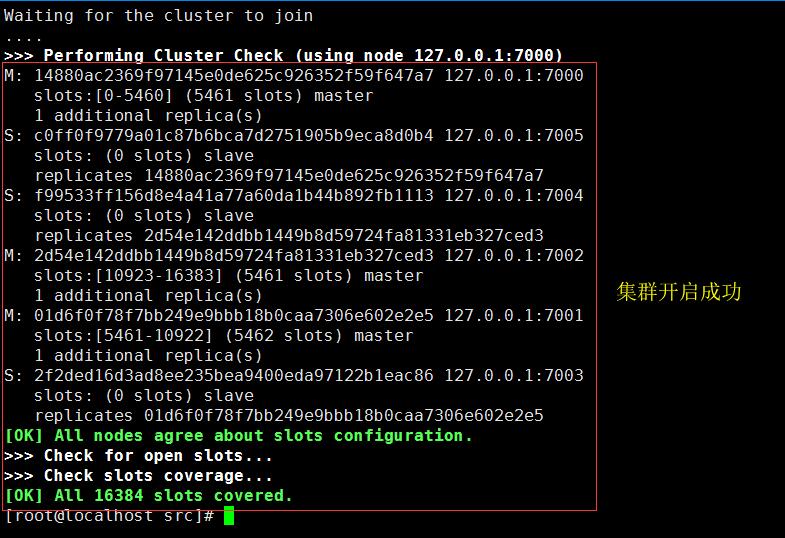
輸入yes根據上面的配置進行設置開啟集群,集群開啟成功後如下所示:

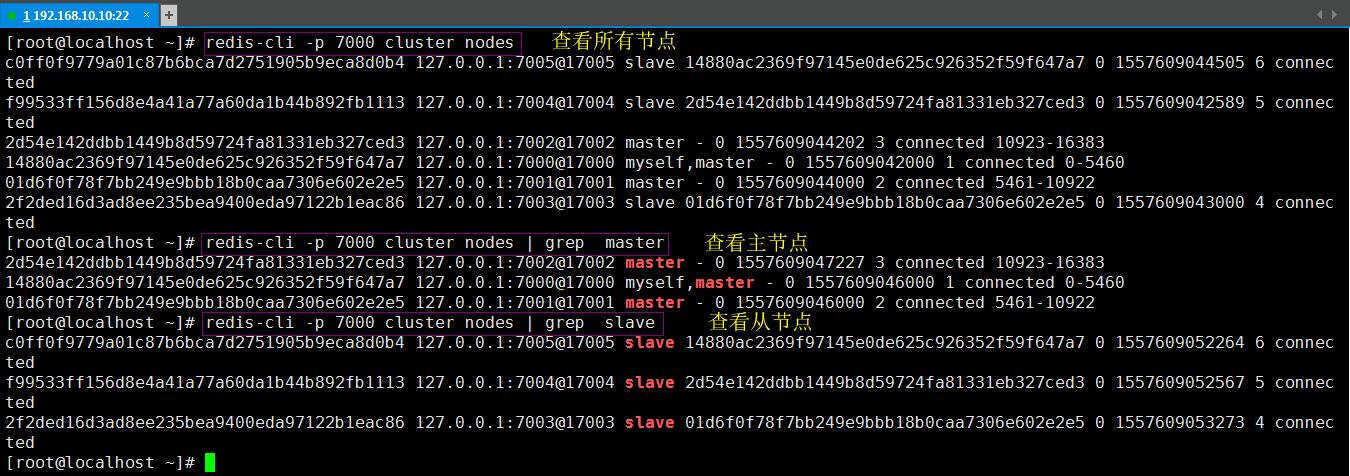
5、查看集群狀態
redis-cli -p 7000 cluster info   // 查看節點詳細信息
redis-cli -p 7000 cluster nodes  // 查看所有節點
redis-cli -p 7000 cluster nodes | grep master  // 過濾出主節點
redis-cli -p 7000 cluster nodes | grep slave   // 過濾出從節點

6、驗證集群
開兩個shell登陸redis實例
[root@localhost ~]# redis-cli -c -p 7000   // 登陸7000的實例
[root@localhost ~]# redis-cli -c -p 7003   // 登陸7003的實例

--------------------------------------------------------------------------------到此redis集群就算簡單的實現了-----------------------------------------------------------------
參考文檔:https://redis.io/topics/cluster-tutorial


