View動畫 幀動畫 屬性動畫 幀動畫最簡單,通過順序播放一系列的圖像產生動畫,就和動畫片的原理是一樣的。做好的結果可以是這樣: 也可以是這樣的動態圖: 如果無法播放動態圖的話,可能是您的瀏覽器需要升級一下了。我們為了創建一個好的幀動畫,首先應該創建一個xml文件,用於圖片的輪播,但是這個xml文件 ...
Android動畫主要分為3種
何為幀動畫?
幀動畫最簡單,通過順序播放一系列的圖像產生動畫,就和動畫片的原理是一樣的。做好的結果可以是這樣:

也可以是這樣的動態圖:
如果無法播放動態圖的話,可能是您的瀏覽器需要升級一下了。我們為了創建一個好的幀動畫,首先應該創建一個xml文件,用於圖片的輪播,但是這個xml文件有點特殊,因為她必須創建在我們的drawble文件夾下,而且其xml必須以<animation-list>來做開頭與結尾。
對於很多童鞋而言,創建這個xml文件的方式之前大家可能都沒有接觸過,這裡先普及一下如何創建這個文件:
第一步
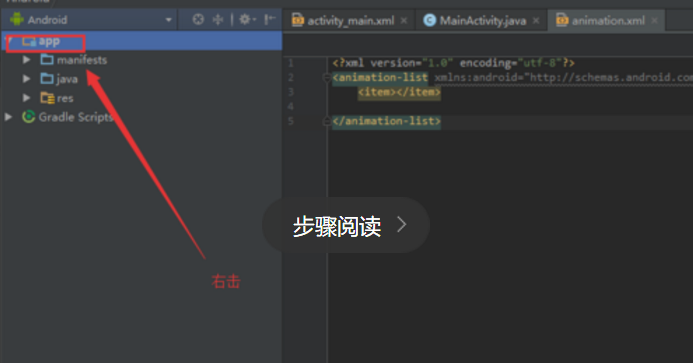
先將目錄欄的模式切換成android 模式

然後右擊你需要創建xml 對應的module

選擇new, 然後 找到Android resource file

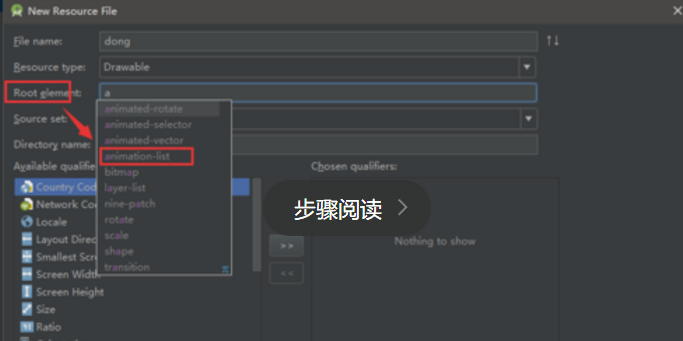
將Resource type 選成Drawable

將Root element 選成 animation-list,然後點擊OK 即可

這樣我們的animaition-list的xml文件就創建好了。
再在這個文件里寫上我們的代碼,用於引入我們的圖片:
<?xml version="1.0" encoding="utf-8"?>
<animation-list xmlns:android="http://schemas.android.com/apk/res/android">
    <item android:drawable="@drawable/i1" android:duration="20"></item>
    <item android:drawable="@drawable/i2" android:duration="20"></item>


    <item android:drawable="@drawable/i3" android:duration="20"/>
    <item android:drawable="@drawable/i4" android:duration="20"/>
    <item android:drawable="@drawable/i5" android:duration="20"/>
    <item android:drawable="@drawable/i6" android:duration="20"/>

    <item android:drawable="@drawable/i7" android:duration="20"/>
    <item android:drawable="@drawable/i8" android:duration="20"/>
    <item android:drawable="@drawable/i9" android:duration="20"/>
    <item android:drawable="@drawable/i10" android:duration="20"/>
    <item android:drawable="@drawable/i11" android:duration="20"/>
    <item android:drawable="@drawable/i12" android:duration="20"/>
    <item android:drawable="@drawable/i12" android:duration="20"/>
    <item android:drawable="@drawable/i12" android:duration="20"/>
    <item android:drawable="@drawable/i12" android:duration="20"/>
    <item android:drawable="@drawable/i12" android:duration="20"/>
    <item android:drawable="@drawable/i12" android:duration="20"/>
    <item android:drawable="@drawable/i12" android:duration="20">


    </item>
</animation-list>
後面的duration作為一幀圖片的播放時間,前面則是引入圖片的地址,一般放到drawble文件夾里,對圖片的名稱沒有順序的限制,圖片輪播的順序主要是根據上面這段代碼的順序來制定的。
第二步.編寫activity_main.xml
<?xml version="1.0" encoding="utf-8"?>
<RelativeLayout xmlns:android="http://schemas.android.com/apk/res/android"
    xmlns:tools="http://schemas.android.com/tools"
    android:layout_width="match_parent"
    android:layout_height="match_parent" >

    <ImageView
        android:id="@+id/imageView1"
        android:layout_width="match_parent"
        android:layout_height="237dp"
        android:layout_alignParentStart="true"
        android:layout_centerVertical="true"
        android:background="@drawable/anima" />

</RelativeLayout>
一般來說,裡面的imageview用來承接剛剛的animation-list的佈局以及圖片,最後我們在我們的java代碼里引入這個imageview就可以了。
第三步.編寫Java代碼
主活動來播放動畫,這裡設置點擊背景時觸發動畫,代碼很簡單,之後我們再看直接不需要點擊就播放的代碼:
public class MainActivity extends Activity
{

    @Override
    public void onCreate(Bundle savedInstanceState)
    {
        super.onCreate(savedInstanceState);
        setContentView(R.layout.activity_main);

        ImageView imageView = (ImageView) findViewById(R.id.imageView1);

        final AnimationDrawable background = (AnimationDrawable) imageView
                .getBackground();
        imageView.setOnClickListener(new OnClickListener()
        {

            public void onClick(View v)
            {
                background.start();
            }
        });
    }

}
無需點擊,直接播放的代碼如下:
public class MainActivity extends Activity
{

    @Override
    public void onCreate(Bundle savedInstanceState)
    {
        super.onCreate(savedInstanceState);
        setContentView(R.layout.activity_main);

        ImageView imageView = (ImageView) findViewById(R.id.imageView1);

        final AnimationDrawable background = (AnimationDrawable) imageView
                .getBackground();


                background.start();


}
這樣再運行我們的文件,可以看到動畫已經播放出來啦!!


