各位好!這次要來替大家介紹的是如何在 .NET Web API 中自訂一個 ModelBinder 透過自定義的 ModelBinder 我們可以很簡單的將 QueryString 傳過來的參數綁定成我們設計好的 Complex Model 。 為什麼需要自行定義一個 ModelBinder 呢? ...
各位好!這次要來替大家介紹的是如何在 .NET Web API 中自訂一個 ModelBinder
透過自定義的 ModelBinder 我們可以很簡單的將 QueryString 傳過來的參數綁定成我們設計好的 Complex Model 。
為什麼需要自行定義一個 ModelBinder 呢? 一個主要的原因是,如果我們的 HTTP GET API 需要多個參數的話,一般來說是可以直接在函數這裡定義好對應的參數。
如下圖
但如果參數過多的話,其實會造成閱讀不容易以及使用上十分的不方便。
比如說你可能會這樣子將收到的參數重新組合成相關方法會用到的 Model
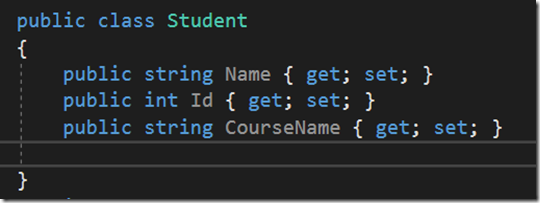
但這裡還是要提一下,如果你的 Model 是 Simple Model 的話 (也就是你的 Model 並沒有再利用其它 Class 做為 Property ) ,.NET Web API 是可以很聰明的替你將參數做綁定的
比如說像這樣的 Model , .NET Web API 是可以替你將參數做綁定的
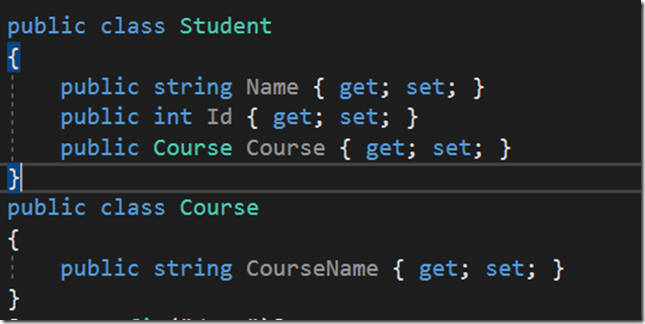
但如果是像下麵這樣的 Model ,就會需要用到我們今天提的自定義的 ModelBinder 來
處理了
那麼要如何建立我們自已的 ModelBinder 呢?
首先需要瞭解的概念是在 Web API 的 ModelBinder 裡會分為三塊,分別是Binder 、ValueProvider 、ProviderFactory 。而 Web API 在處理的流程則是會先建立好 ProviderFactory ,並在 Binder 呼叫 ValueProvider 取值時,呼叫對應的 ValueProvider 進行取值的動作。
詳細的觀念也可參考保哥這篇
ModelBinder 與 ValueProvider 的用途
接下來我們就一步一步將我們的 ModelBinder 建立起來吧!
第一步:建立 ProviderFactory
建立 ProviderFacotry 這一步非常的簡單,其實 PrivderFacotry 要做的事就是在裡頭去將對應的 ValueProvider 建立起來並回傳。詳細的程式碼如下
public class ComplexProviderFactory : ValueProviderFactory
{
public override IValueProvider GetValueProvider(HttpActionContext actionContext)
{
return new ComplexProvider(actionContext);
}
}
這裡可以看到我們直接繼承一個 ValueProviderFactory 然後在實作裡面回傳一個我們定義好的 ValueProvider
是不是很簡單呢,接下來我們就要來建立我們的 ValueProvider 了
第二步:建立 ValueProvider
在建立 ValueProvider 時,我們一樣也會繼承一個 IValueProvider 並去實作他
在這裡有幾個主要要實作的地方,一個是建構子的部分,從 ComplexProviderFactory 的程式碼我們可以看到,我們在回傳一個 ValueProvider 的時候,其實是有傳入一個 HttpActionContext 的參數。所以在我們的 ValueProvider 也要建對應的參數(黑色粗體處)
再來是 ValueProvider 要如何取值呢? 這裡就要看我們 GetValue 這個方法如何實作了,我這裡實作的方式有一部分是參考 .NET 官方提供的 Source Code
首先,因為我希望這個 ModelBinder 能夠泛用,所以我在 ValueProvider 這裡將傳入的 QueryString 以 Key,Value 的形式直接存放到 Dictionary ,讓 ModelBinder 在取值時是直接取回一組 Dictionary ,並做後續的處理。在這裡 ContainsPrefix 我們並沒有用到故先略過,完整的程式碼如下
public class ComplexProvider : IValueProvider
{
private Dictionary<string, object> _vals;//取值器只做取值的動作
public ComplexProvider(HttpActionContext actionContext)
{
_vals = new Dictionary<string, object>();
foreach (var pair in actionContext.Request.GetQueryNameValuePairs())
{
_vals.Add(pair.Key, pair.Value);
}
}public bool ContainsPrefix(string prefix)
{
return true;
}public ValueProviderResult GetValue(string key)
{
if (_vals.Count > 0)
{
return new ValueProviderResult(_vals, "", CultureInfo.InvariantCulture);
}
return null;
}
}
第三步:就是我們的 ModelBinder了
一樣 ModelBinder 我們這裡也需要繼承對應的介面 IModelBinder 並實作 BindModel 這個方法,在實作的時候我們比較常會用到的就是 bindingContext 了, bindingContext 是在 Model 做繫結的過程中,讓我們可以去得知目前繫結參數的名稱以及取用相對應的 Value ,最後還可以去設定繫結的結果。
先前我們有提到想要實作一個泛用的 ModelBinder ,在這裡我們先來看看黃底的程式碼
在黃底程式碼的第一行我們先取得這次繫結的參數類型,接下來在第二行我們就直接取回我們在 ValueProvider 建立的 Dictionary ,這裡有一個有趣的點是,依照我觀看 .NET 官方的實作,一般來說是會透過 .GetValue(bindingContext.ModelName) 搭配不同的參數名稱 (ModelName) 取得對應的值。但我這裡為了簡單化,所以在 ValueProvider 中是不管參數名稱的。
接下來在粗體字處,我們就簡單的判斷目前有沒有取到 ValueProvider 建立的 Dictionary
並透過反射來建立好我們完整的 Model ,最後將結果設定回 bindingContext.Model 即可
詳細的程式碼如下:
到此我們已經差不多都完成囉! 最後一步只需要將我們寫好的 ValueProviderFactory 做註冊就行了。public class ComplexBinder : IModelBinder
{
public bool BindModel(HttpActionContext actionContext, ModelBindingContext bindingContext)
{
if (actionContext == null) { throw new ArgumentException("action context is null"); }
var target = bindingContext.ModelType;
var val = bindingContext.ValueProvider.GetValue(bindingContext.ModelName);
if (val == null)
{
return false;
}
if (val.RawValue != null)
{
var result = Activator.CreateInstance(target);
var pros = result.GetType().GetProperties();
var valDic = val.RawValue as Dictionary<string, object>;
foreach (var propertyInfo in pros)
{
object propertyVal;
if (valDic.TryGetValue(propertyInfo.Name, out propertyVal))
{
propertyInfo.SetValue(result, Convert.ChangeType(propertyVal, propertyInfo.PropertyType));
}
else
{
if (!propertyInfo.PropertyType.IsPrimitive && propertyInfo.PropertyType != typeof(string))
{
var childInstance = Activator.CreateInstance(propertyInfo.PropertyType);
var childPros = childInstance.GetType().GetProperties();
object childPropVal;
foreach (var childPro in childPros)
{
if (valDic.TryGetValue(childPro.Name, out childPropVal))
{
childPro.SetValue(childInstance, Convert.ChangeType(childPropVal, childPro.PropertyType));
}
}
propertyInfo.SetValue(result, Convert.ChangeType(childInstance, propertyInfo.PropertyType));
}
}}
bindingContext.Model = result;
}
return true;
}
}
在 Web API 專案中找到我們的 WebApiConfig.cs 設定檔,將我們剛剛做好的 Factory 註冊進去即可。設定的方式如下(粗體字處)
public static class WebApiConfig
{
public static void Register(HttpConfiguration config)
{
// Web API 設定和服務
config.Services.Add(typeof(ValueProviderFactory), new ComplexProviderFactory());
//var provider = new SimpleModelBinderProvider(typeof(Student), new ComplexBinder());
//config.Services.Insert(typeof(ModelBinderProvider),0,provider);
// Web API 路由
config.MapHttpAttributeRoutes();config.Routes.MapHttpRoute(
name: "DefaultApi",
routeTemplate: "api/{controller}/{id}",
defaults: new { id = RouteParameter.Optional }
);
}
}
最後來看一下我們的結果
從上圖可以看到,我們利用 ModelBinder 指定了我們剛剛寫好的 Binder 後,在參數繫結上,Course 這個屬性已經正確的被初始化並且指定了我們傳入的名稱給 CourseName
以上就是如何自定義一個 ModelBinder ,是不是很簡單呢?
下次如果發現參數實在太多又不適合通通放在同一個 Model 中,可以試試看這樣的方法喔!
我們下次見


