作者:[美]Adam Freeman 來源:《精通ASP.NET MVC 4》 本文將繼續構建 SportsStore 示例應用程式。在上一章中,添加了對購物車的基本支持,現在打算改善並完成其功能。 1.使用模型綁定 MVC 框架使用了一個叫作“模型綁定”的系統,以便通過 HTTP 請求來創建一些 ...
作者:[美]Adam Freeman 來源:《精通ASP.NET MVC 4》
本文將繼續構建 SportsStore 示例應用程式。在上一章中,添加了對購物車的基本支持,現在打算改善並完成其功能。
1.使用模型綁定
MVC 框架使用了一個叫作“模型綁定”的系統,以便通過 HTTP 請求來創建一些 C# 對象,目的是把它們作為參數值傳遞給動作方法。例如,MVC 處理表單的方式就是這樣。框架會考察目標動作方法的參數,並用一個模型綁定器來獲取表單中 input 元素的值,並把它們轉換成同名的參數類型。
模型綁定器能夠通過請求中可用的信息來創建 C# 類型,這是 MVC 框架的核心特性之一。本節將創建一個自定義模型綁定器來蓋上 CartController 類。
人們喜歡使用 Cart 控制器中的會話狀態特性來存儲和管理 Cart 對象,但卻不喜歡它要採取的工作方式。它不符合本應用程式模型的其餘部分,而那是基於動作方法參數的(因為動作方法參數的操作以模型為基礎,而會話狀態的操作需要設置鍵值對,兩者的工作方式不一致)。另外。除非模仿基類的 Session 參數,否則不能適當的對 CartController 類進行單元測試,而這意味著需要模仿 Controller 類(控制器的基類),以及其他一些不希望處理的東西。
為瞭解決這一問題,我們打算創建一個自定義模型綁定器,以獲得包含在會話數據中的 Cart 對象(註意,常規的模型綁定器能夠直接處理請求中的數據來創建模型對象,這裡創建自定義綁定器的目的是為了處理會話中的數據,手工用會話數據創建 Cart 對象)。然後,MVC 框架能夠創建 Cart 對象,並把它們作為參數傳遞給 Controller 類的動作方法。
創建自定義模型綁定器
通過實現 IModelBinder 介面,可以創建一個自定義模型綁定器。在 SportsStore.WebUI 項目中新建文件夾“Binders”,並新建類文件 CartModelBinder.cs ,代碼如下:
using SportsStore.Domain.Entities;
using System.Web.Mvc;

namespace SportsStore.WebUI.Binders
{
    public class CartModelBinder : IModelBinder
    {
        private const string sessionKey = "Cart";
        public object BindModel(ControllerContext controllerContext, ModelBindingContext bindingContext)
        {
            //通過會話獲取 Cart
            Cart cart = (Cart)controllerContext.HttpContext.Session[sessionKey];
            //若會話中沒有 Cart ,則創建一個
            if (cart == null)
            {
                cart = new Cart();
                controllerContext.HttpContext.Session[sessionKey] = cart;
            }
            //返回 cart
            return cart;
        }
    }
}
這些 IModelBinder 介面定義了一個方法: BindModel 。所提供的兩個參數使得創建域模型對象成為可能。 ControllerContext 對控制器類所具有的全部信息提供了訪問,這些信息包含了客戶端請求的細節。 ModelBindingContext 提供了要求建立的模型對象的信息,以及使綁定更易於處理的工具。
對於本例的目的而言,所關心的是 ControllerContext 類,它具有 HttpContext 屬性,它又相應地有一個 Session 屬性,該屬性能夠獲取和設置會話數據。通過讀取會話數據的鍵值可以獲取 Cart,而在會話中還沒有 Cart 時,又可以創建一個 Cart 。
需要告訴 MVC 框架,它可以使用 CartModelBinder 類來創建 Cart 的實例。這需要在 Global.asax 的 Application_Start 方法中進行註冊:
using SportsStore.Domain.Entities;
using SportsStore.WebUI.Binders;
using SportsStore.WebUI.Infrastructure;
using System.Web.Http;
using System.Web.Mvc;
using System.Web.Optimization;
using System.Web.Routing;

namespace SportsStore.WebUI
{
    public class MvcApplication : System.Web.HttpApplication
    {
        protected void Application_Start()
        {
            AreaRegistration.RegisterAllAreas();

            WebApiConfig.Register(GlobalConfiguration.Configuration);
            FilterConfig.RegisterGlobalFilters(GlobalFilters.Filters);
            RouteConfig.RegisterRoutes(RouteTable.Routes);
            BundleConfig.RegisterBundles(BundleTable.Bundles);

            ControllerBuilder.Current.SetControllerFactory(new NinjectControllerFactory());

            ModelBinders.Binders.Add(typeof(Cart), new CartModelBinder());
        }
    }
}
現在可以更新 CartController 類,刪除 GetCart 方法而依靠現在的模型綁定器,MVC 框架會自動地應用它,代碼如下:
using SportsStore.Domain.Abstract;
using SportsStore.Domain.Entities;
using SportsStore.WebUI.Models;
using System;
using System.Collections.Generic;
using System.Linq;
using System.Web;
using System.Web.Mvc;

namespace SportsStore.WebUI.Controllers
{
    public class CartController : Controller
    {
        private IProductRepository repository;

        public CartController(IProductRepository repo)
        {
            repository = repo;
        }

        public RedirectToRouteResult AddToCart(Cart cart, int productId, string returnUrl)
        {
            Product product = repository.Products.FirstOrDefault(p => p.ProductID == productId);
            if (product != null)
            {
                cart.AddItem(product, 1);
            }
            return RedirectToAction("Index", new { returnUrl });
        }

        public RedirectToRouteResult RemoveFromCart(Cart cart, int productId, string returnUrl)
        {
            Product product = repository.Products.FirstOrDefault(p => p.ProductID == productId);
            if (product != null)
            {
                cart.RemoveLine(product);
            }
            return RedirectToAction("Index", new { returnUrl });
        }

        public ViewResult Index(Cart cart, string returnUrl)
        {
            return View(new CartIndexViewModel
            {
                Cart = cart,
                ReturnUrl = returnUrl
            });
        }
    }
}
上面代碼刪除了 GetCart 方法,並對每個動作方法添加了 Cart 參數。當 MVC 框架接收到一個請求,比如,要求調用 AddToCart 方法時,會首先考察動作方法的參數,然後考察可用的綁定器列表,並試圖找到一個能夠創建每個參數類型實例的綁定器。這會要求自定義綁定器創建一個 Cart 對象,而這時通過利用會話狀態特性來完成的。通過自定義綁定器的預設綁定器,MVC 框架能夠創建一組調用動作方法所需要的參數,這讓開發者能夠重構控制器,以便在接收到請求時知道如何創建 Cart 對象。
像這樣使用自定義模型綁定器有幾個好處。第一個好處是把用來創建 Cart 與創建控制器的邏輯分離開來了,這讓開發者能夠修改存儲 Cart 對象,而不需要修改控制器。第二個好處是任何使用 Cart 對象的控制器類,都能夠簡單地把這些對象聲明為動作方法參數,並能夠利用自定義模型綁定器。第三個好處是它能夠對 Cart 控制器進行單元測試,而不需要模仿大量的ASP.NET 通道。
2.完成購物車
前面已經介紹了自定義模型綁定器,現在到了添加兩個新特性來完成購物車功能的時候了。第一個特性將允許客戶刪除購物車物品,第二個特性將在頁面的頂部顯示購物車的摘要。
2.1 刪除購物車物品
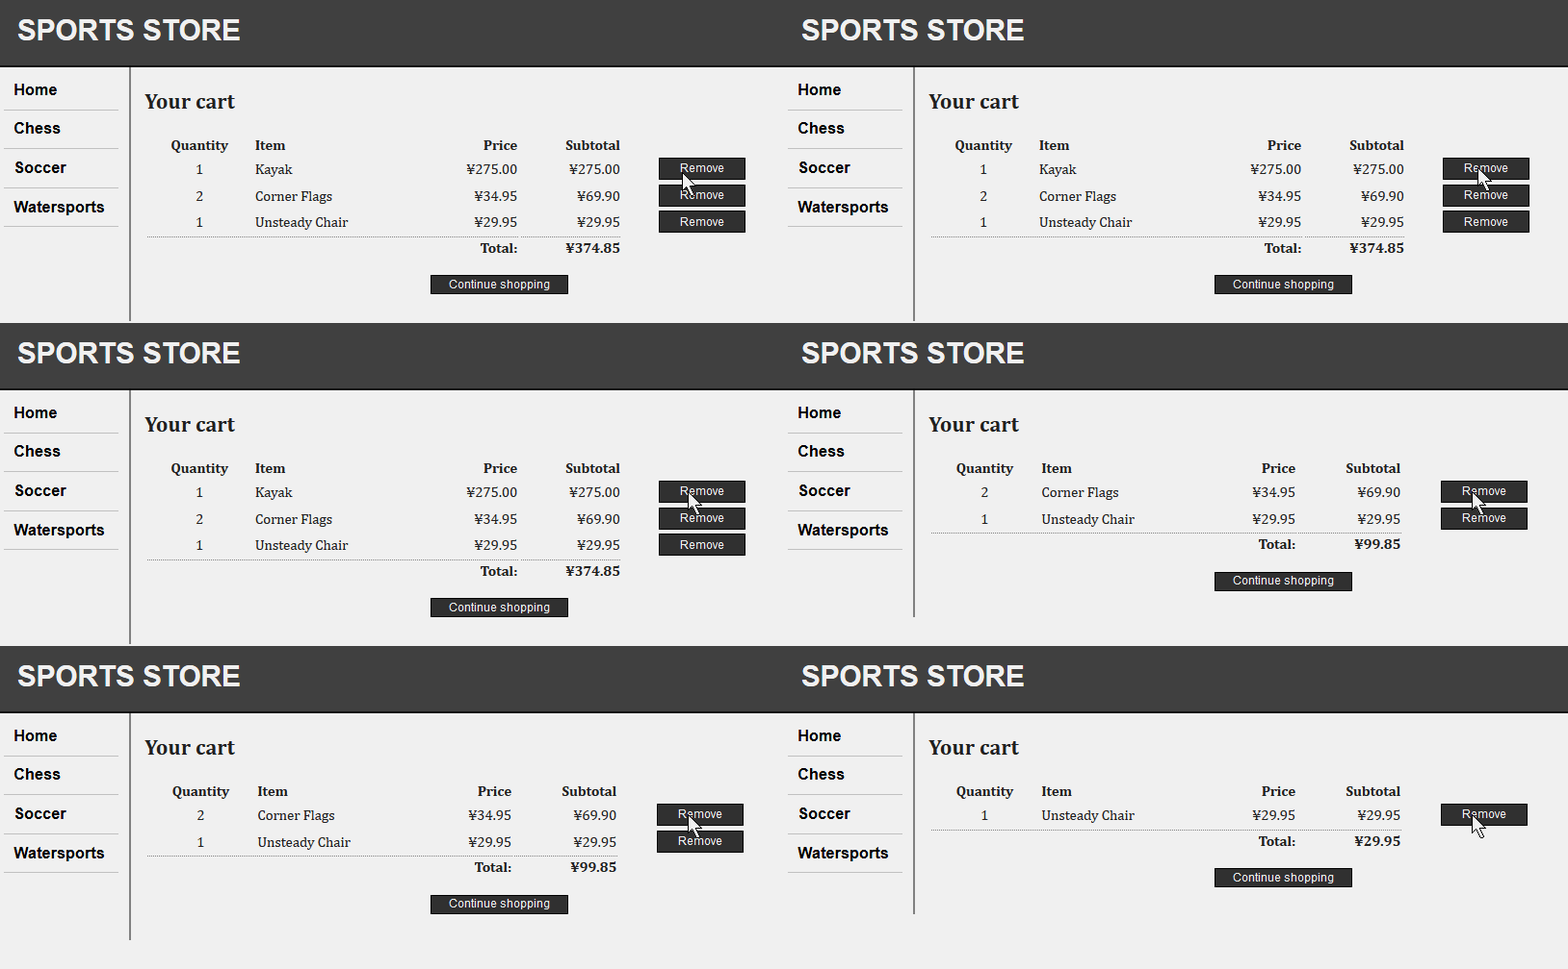
前面已經定義了控制器中的 RemoveFromCart 動作方法,因此,讓客戶刪除物品只不過是在視圖中將這個方法暴露出來的事情。本文打算在購物車摘要的每一行中添加一個“Remove”按鈕來做這件事。對 Views/Cart/Index.cshtml 所做的修改如下:
    <tbody>
        @foreach (var line in Model.Cart.Lines)
        {
            <tr>
                <td class="aling_center">@line.Quantity</td>
                <td class="aling_left">@line.Product.Name</td>
                <td class="aling_right">@line.Product.Price.ToString("c")</td>
                <td class="aling_right">@((line.Quantity * line.Product.Price).ToString("c"))</td>
                <td>
                    @using (Html.BeginForm("RemoveFromCart", "Cart"))
                    {
                        @Html.Hidden("ProductId", line.Product.ProductID)
                        @Html.HiddenFor(x => x.ReturnUrl)
                        <input class="actionButtons" type="submit" value="Remove" />
                    }
                </td>
            </tr>
        }
    </tbody>
註:可以使用強類型的 Html.HiddenFor 輔助器方法,為 ReturnUrl 模型屬性創建一個隱藏欄位,但這需要使用基於字元串的 Html.Hidden 輔助器方法,對 ProductID 欄位做同樣的事情。 如果寫成“Html.HiddenFor(x=>line.Product.ProductID)”,該輔助器方法便會渲染一個以“line.Product.ProductID”為名稱的隱藏欄位。該欄位名與 CartController.RemoveFromCart 動作方法的參數名不匹配,這會使預設的模型綁定器無法工作,因此 MVC 框架便不能調用此方法了。
運行應用程式,可以看到效果:
2.2 添加購物車摘要
現在已經實現了一個功能化的購物車,但將該購物車集成到解密的方式還存在一個問題:只有通過查看購物車摘要屏幕,客戶才能知道他們的購物車裡有些什麼。而且,他們只能通過把一個新的物品加入購物車,才能看到購物車的摘要屏幕。
為瞭解決這一問題,本節打算添加一個小部件,它彙總購物車的內容,並能夠通過點擊來顯示購物車內容。下麵將採用與添加導航不見十分相似的方式來完成這一工作——作為一個動作,把它的輸出註入到 Razor 佈局。
首先,需要對 CartController 類添加一個簡單的方法,代碼如下:
        public PartialViewResult Summary(Cart cart)
        {
            return PartialView(cart);
        }
可以看出,這是一個簡單的方法。它只需要渲染一個視圖,以當前 Cart (它是自定義模型綁定器獲得的)作為視圖數據。還需要一個分部視圖,它在對這個 Summary 方法調用做出響應時被渲染。添加對應的 Summary 視圖文件,代碼如下:
@model SportsStore.Domain.Entities.Cart

<div id="cart">
    <span class="caption">
        <b>Your cart:</b>
        @Model.Lines.Sum(x => x.Quantity) item(s),
        @Model.ComputeTotalValue().ToString("c")
    </span>
    @Html.ActionLink("Checkout", "Index", "Cart",
    new { returnUrl = Request.Url.PathAndQuery }, null)
</div>
這是一個簡單的視圖,它顯示了購物車的物品數、這些物品的總費用,以及把購物車內容顯示給用戶的一個鏈接。現在,已經定義了有 Summary 動作方法所返回的這個視圖,可以在 _Layout.cshtml 文件中包含它的渲染結果,代碼如下:
<!DOCTYPE html>
<html>
<head>
    <meta charset="utf-8" />
    <meta name="viewport" content="width=device-width" />
    <title>@ViewBag.Title</title>
    <link href="~/Content/Site.css" type="text/css" rel="stylesheet" />
</head>
<body>
    <div id="header">
        @{Html.RenderAction("Summary", "Cart");}
        <div class="title">SPORTS STORE</div>
    </div>
    <div id="categories">
        @{Html.RenderAction("Menu", "Nav");}
    </div>
    <div id="content">
        @RenderBody()
    </div>
</body>
</html>
最後一步是添加一些 CSS規則,對該分部視圖中的元素進行格式化。對 SportsStore.WebUI 項目中的 Site.css 文件添加樣式文件如下:
div#cart {float:right;margin:.8em;color:silver;background-color:#555;padding:.5em .5em .5em 1em;}
div#cart a {text-decoration:none;padding:.4em 1em .4em 1em;line-height:2.1em;margin-left:.5em;background-color:#333;color:white;border:1px solid black;}
運行程式即可以看到效果,對購物車添加物品時,物品數以及總費用都會增加,如下圖所示:
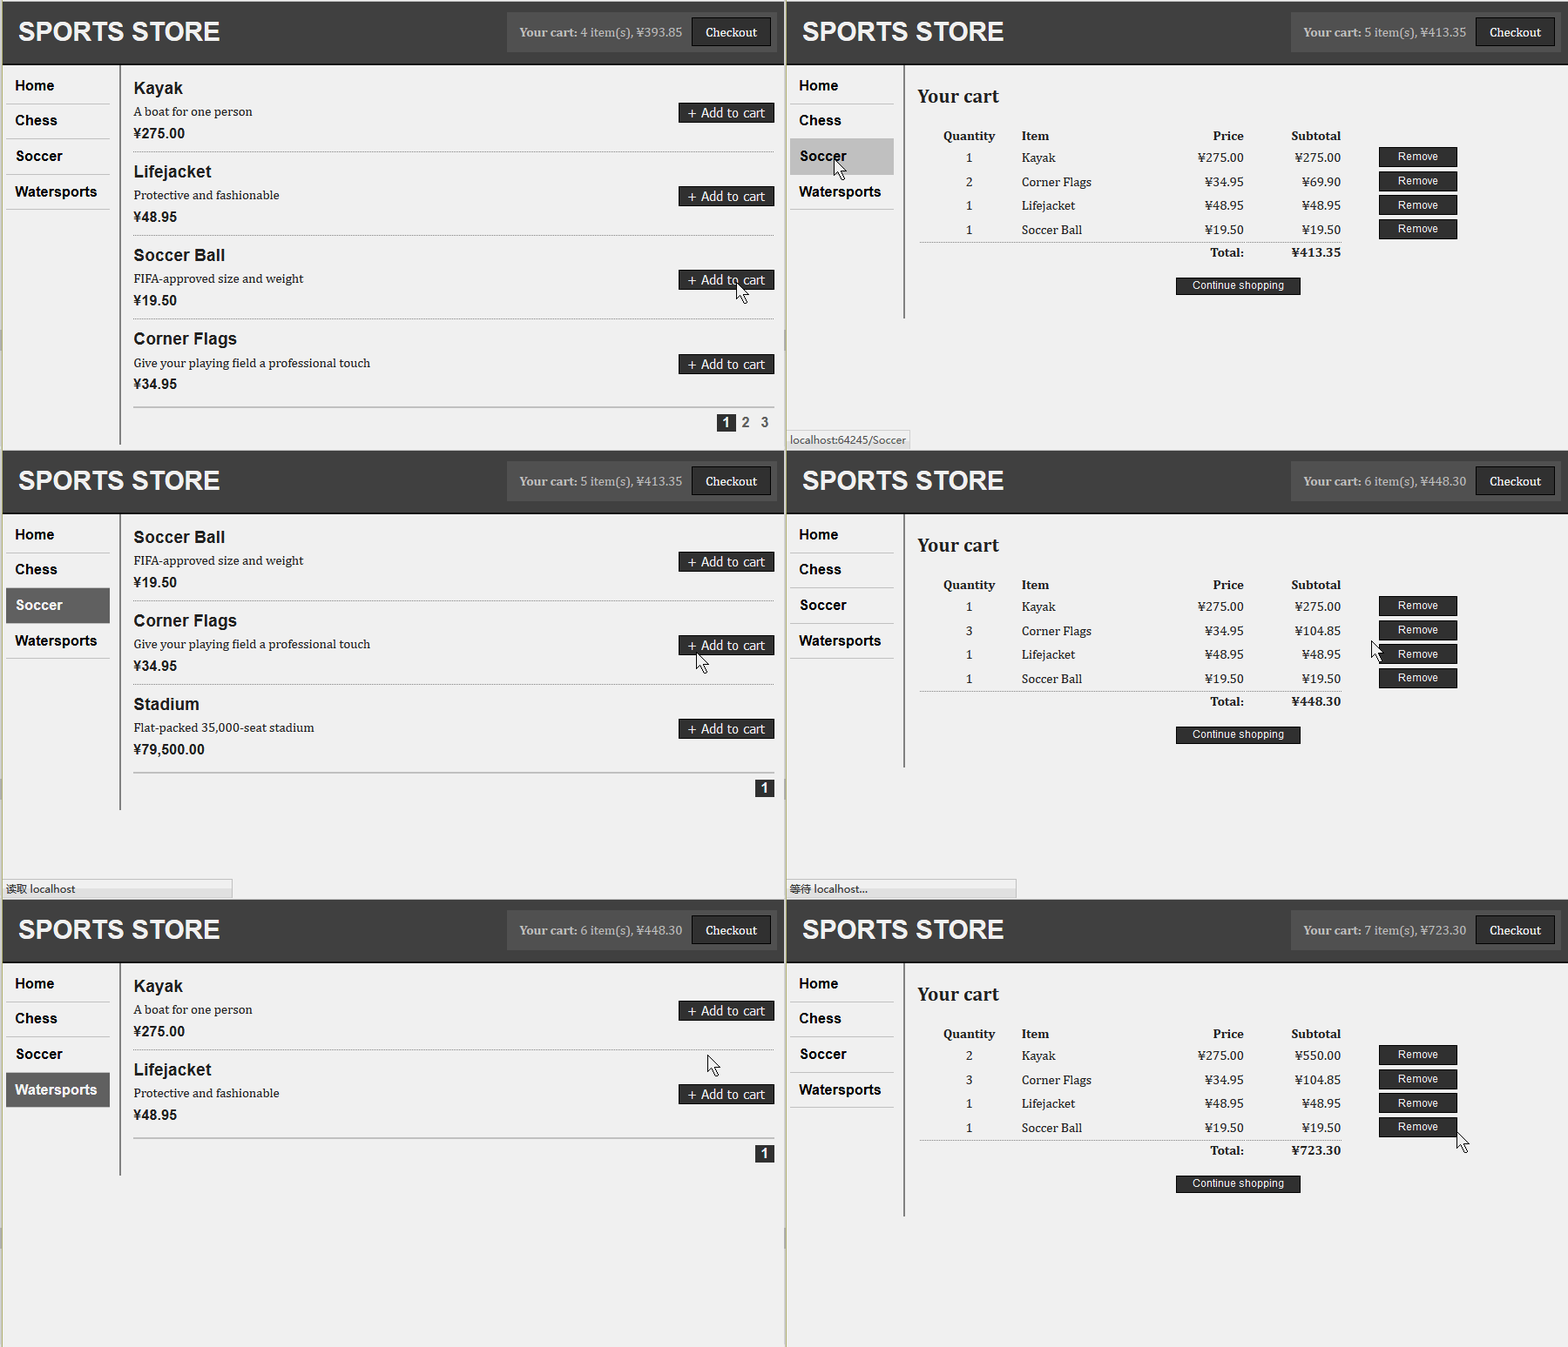
利用這個附件,現在可以讓客戶知道自己的購物車中有什麼。這個附件也顯示的提供了一個結算離店的辦法。從中再一次看到用 RenderAction 把一個動作方法所渲染的輸出組合到一個 Web 頁面是多麼容易。這是將應用程式功能分解成清晰可重用模塊的一種很好的技術。
3.遞交訂單
現在到了顯示 SportsStore 最後一個客戶特性的時候了:結算並完成訂單的能力。下麵將擴充域模型,以提供收集用戶送貨細節的支持,並添加一個處理這些細節的特性。
3.1 擴充域模型
在 SportsStore.Domain 項目的 Entities 文件夾中新建類 ShippingDetails 。這是用來表示客戶送貨細節的類,具體代碼如下:
using System.ComponentModel.DataAnnotations;

namespace SportsStore.Domain.Entities
{
    public class ShippingDetails
    {
        [Required(ErrorMessage = "Please enter a name")]
        public string Name { get; set; }

        [Required(ErrorMessage = "Please enter the first address line")]
        public string Line1 { get; set; }
        public string Line2 { get; set; }
        public string Line3 { get; set; }

        [Required(ErrorMessage = "Please enter a city name")]
        public string City { get; set; }

        [Required(ErrorMessage = "Please enter a state name")]
        public string State { get; set; }

        public string Zip { get; set; }

        [Required(ErrorMessage = "Please enter a country name")]
        public string Country { get; set; }

        public bool GiftWrap { get; set; }
    }
}
上述代碼利用了 System.ComponentModel.DataAnnotations 命名空間的驗證註解屬性,正如之前文章 【MVC 4】1.第一個 MVC 應用程式 所做的那樣。
3.2 添加結算過程
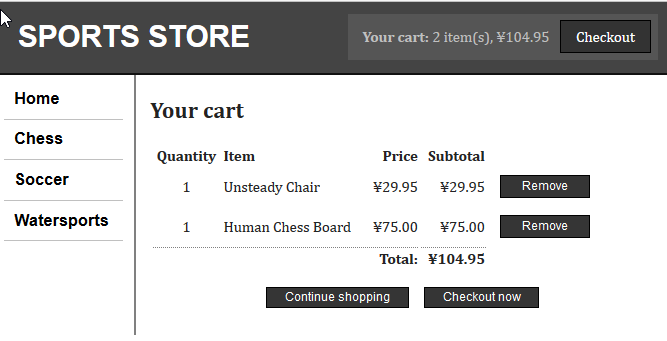
本例的目的是到達一個程式節點,以此作為用戶輸入其送貨細節並遞交訂單的入口。為此,需要在購物車摘要視圖上添加一個“Checkout now”按鈕。修改 Views/Cart/Index.cshtml 文件,修改代碼如下:
...
<p class="aling_center actionButtons">
    <a href="@Model.ReturnUrl">Continue shopping</a>
    @Html.ActionLink("Checkout now", "Checkout")
</p>
...
黃色為修改部分,這一修改生成了一個鏈接,點擊這個鏈接時,調用 Cart 控制器的 Checkout 動作方法。顯示效果如下:
現在需要在 CartController 類中定義這個 Checkout 方法:
public ViewResult Checkout()
{
   return View(new ShippingDetails());
}
此 Checkout 方法返回預設視圖,並傳遞一個新的 ShippingDetails 對象作為視圖模型。為了創建相應的視圖文件 Views/Cart/Checkout.cshtml ,視圖內容如下:
@model SportsStore.Domain.Entities.ShippingDetails

@{
    ViewBag.Title = "SportsStore: Checkout";
}

<h2>Check out now</h2>
Please enter your details, and we'll ship your goods right away!
@using (Html.BeginForm())
{
    <h3>Ship to</h3>
    <div>Name:@Html.EditorFor(x => x.Name)</div>

    <h3>Address</h3>
    <div>Line 1: @Html.EditorFor(x => x.Line1)</div>
    <div>Line 2: @Html.EditorFor(x => x.Line2)</div>
    <div>Line 3: @Html.EditorFor(x => x.Line3)</div>
    <div>City: @Html.EditorFor(x => x.City)</div>
    <div>State: @Html.EditorFor(x => x.State)</div>
    <div>Zip: @Html.EditorFor(x => x.Zip)</div>
    <div>Country: @Html.EditorFor(x => x.Country)</div>

    <h3>Options</h3>
    <label>
        @Html.EditorFor(x => x.GiftWrap)
        Gift wrap these items
    </label>

    <p class="align_center">
        <input class="actionButtons" type="submit" value="Complete order" />
    </p>
}
運行程式,可以看到該視圖是如何渲染的,效果如下圖所示,該視圖為收集客戶的送貨細節渲染了一個表單。
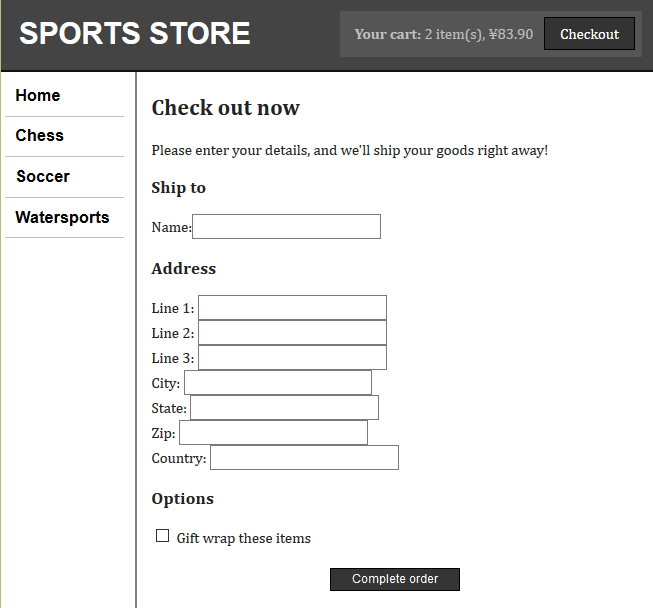
本例用 Html.EditorFor 輔助器方法為每個表單欄位渲染了一個 input 元素。該方法是模板化輔助器方法的一個例子(註意,對模型對象的每個屬性使用的都是 Html.EditorFor 輔助器方法,並未針對各個屬性的類型,去選定特定的輔助器方法)。它讓 MVC 框架去決定一個視圖模型屬性需要採用哪種 input 元素,而不是進行明確的指定(例如,使用 Html.TextBoxFor)。
從顯示效果可以看出, MVC 框架為布爾屬性渲染了一個覆選框,如“Gift wrap these items”選擇,而對那些字元串屬性渲染了文本框。
3.3 實現訂單處理器
在這個應用程式中還需要一個組件,以便能夠對訂單的細節進行處理。為了與 MVC 模型原理保持一致,本例打算為此功能定義一個藉口、編寫該介面的一個實現,然後用 DI 容器 Ninject 把兩者關聯起來。
定義介面
在 SportsStore.Domain 項目的 Abstract 文件夾中新建介面 IOrderProcessor ,內容如下:
using SportsStore.Domain.Entities;

namespace SportsStore.Domain.Abstract
{
    public interface IOrderProcessor
    {
        void ProcessOrder(Cart cart, ShippingDetails shippingDetails);
    }
}
實現介面
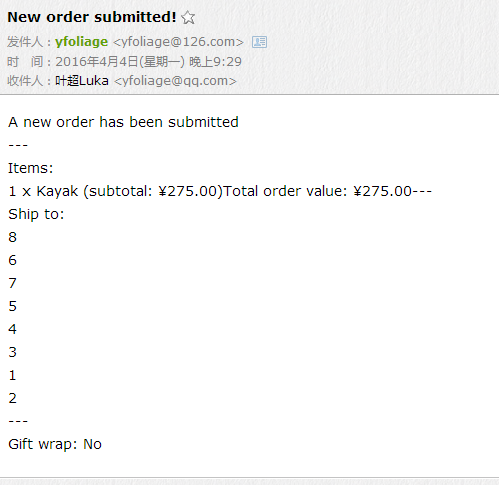
IOrderProcessor 的實現打算採用的訂單處理方式是向網站管理員發送訂單右擊。當然,這簡化了銷售過程。大多數電子商務網站不會簡單的發送訂單郵件,而且也沒有提供信用卡處理或其他支付形式的支持,只是希望把事情維持在關註 MVC 方面,因此採用了這種發送郵件作為訂單處理的方式。
在 SportsStore.Domain 項目的 Concrete 文件夾中新建類 EmailOrderProcessor,這個類使用了包含在 .NET 框架中內建的 SMTP(簡單郵件傳輸協議)支持,以發送一份電子郵件。具體代碼如下:
using SportsStore.Domain.Abstract;
using SportsStore.Domain.Entities;
using System.Net;
using System.Net.Mail;
using System.Text;
namespace SportsStore.Domain.Concrete
{
    public class EmailSettings
    {
        public string MailToAddress = "[email protected]";
        public string MailFromAddress = "[email protected]";
        public bool UserSsl = true;
        public string Username = "MySmtpUsername";
        public string Password = "MySmtpPassword";
        public string ServerName = "smtp.example.com";
        public int ServerPort = 587;
        public bool WriteAsFile = false;
        public string FileLocation = @"c:\sports_store_emails";
    }

    public class EmailOrderProcessor : IOrderProcessor
    {
        private EmailSettings emailSettings;

        public EmailOrderProcessor(EmailSettings settings)
        {
            emailSettings = settings;
        }

        public void ProcessOrder(Cart cart, ShippingDetails shippingInfo)
        {
            using (var smtpClient = new SmtpClient())
            {
                smtpClient.EnableSsl = emailSettings.UserSsl;
                smtpClient.Host = emailSettings.ServerName;
                smtpClient.Port = emailSettings.ServerPort;
                smtpClient.UseDefaultCredentials = false;
                smtpClient.Credentials = new NetworkCredential(emailSettings.Username, emailSettings.Password);

                if (emailSettings.WriteAsFile)
                {
                    smtpClient.DeliveryMethod = SmtpDeliveryMethod.SpecifiedPickupDirectory;
                    smtpClient.PickupDirectoryLocation = emailSettings.FileLocation;
                    smtpClient.EnableSsl = false;
                }

                StringBuilder body = new StringBuilder()
                    .AppendLine("A new order has been submitted")
                    .AppendLine("---")
                    .AppendLine("Items:");

                foreach (var line in cart.Lines)
                {
                    var subTotal = line.Product.Price * line.Quantity;
                    body.AppendFormat("{0} x {1} (subtotal: {2:c})", line.Quantity, line.Product.Name, subTotal);
                }

                body.AppendFormat("Total order value: {0:c}", cart.ComputeTotalValue())
                    .AppendLine("---")
                    .AppendLine("Ship to:")
                    .AppendLine(shippingInfo.Name)
                    .AppendLine(shippingInfo.Line1)
                    .AppendLine(shippingInfo.Line2 ?? "")
                    .AppendLine(shippingInfo.Line3 ?? "")
                    .AppendLine(shippingInfo.City)
                    .AppendLine(shippingInfo.State ?? "")
                    .AppendLine(shippingInfo.Country)
                    .AppendLine(shippingInfo.Zip)
                    .AppendLine("---")
                    .AppendFormat("Gift wrap: {0}", shippingInfo.GiftWrap ? "Yes" : "No");

                MailMessage mailmessage = new MailMessage(
                    emailSettings.MailFromAddress,//Form
                    emailSettings.MailToAddress,//To
                    "New order submitted!",//Subject
                    body.ToString());//Body

                if (emailSettings.WriteAsFile)
                {
                    mailmessage.BodyEncoding = Encoding.ASCII;
                }
                smtpClient.Send(mailmessage);
            }
        }
    }
}
為了使事情更簡單些,也定義了 EmailSettings 類。 EmailOrderProcessor 的構造器需要這個類(EmailSettings 類)的一個實例,該實例包含了配置 .NET 郵件類所需要的全部設置信息。
提示:如果沒有可用的 SMTP 伺服器也沒關係,可以將 EmailSettings.WriteAsFile屬性設置為true,這樣會把郵件消息作為文件寫到由 FileLocation 屬性指定的目錄。該目錄必須依據存在且是可寫入的。郵件文件的擴展名將為 .eml ,但它們可以被任何文本編輯器所讀取。
3.4 註冊(介面)實現
現在,有了 IOrderProcessor 介面的一個實現以及配置它的手段,便可以用 Ninject 來創建它的實例。編輯 SportsStore.WebUI 項目中的 NinjectController 類(在 Infrastructure 文件夾中),對 AddBindings 方法進行修改:
using Moq;
using Ninject;
using SportsStore.Domain.Abstract;
using SportsStore.Domain.Entities;
using System;
using System.Linq;
using System.Collections.Generic;
using System.Web.Mvc;
using System.Web.Routing;
using SportsStore.Domain.Concrete;
using System.Configuration;


namespace SportsStore.WebUI.Infrastructure
{
    public class NinjectControllerFactory : DefaultControllerFactory
    {
        private IKernel ninjectKernel;

        public NinjectControllerFactory()
        {
            ninjectKernel = new StandardKernel();
            AddBindings();
        }

        protected override IController GetControllerInstance(RequestContext requestContext, Type controllerType)
        {
            return controllerType == null
                ? null
                : (IController)ninjectKernel.Get(controllerType);
        }

        private void AddBindings()
        {
            //put bindings here
            ninjectKernel.Bind<IProductRepository>().To<EFProductRepository>();

            EmailSettings emailSettings = new EmailSettings
            {
                WriteAsFile = bool.Parse(ConfigurationManager.AppSettings["Email.WriteAsFile"] ?? "false")
            };
            ninjectKernel.Bind<IOrderProcessor>().To<EmailOrderProcessor>().WithConstructorArgument("settings", emailSettings);
        }
    }
}
上述代碼創建了一個 EmailSettings 對象,將其用於 Ninject 的 WithConstructorArgument 方法,以便在需要創建一個新實例對 IOrderProcessor 介面的請求進行服務時,把它註入到 EmailOrderProcessor 構造器中。上述代碼只為 EmailSettings 中一個屬性 WriteAsFiles 指定了值。使用 ConfigurationManager.AppSettings 屬性來讀取該屬性的值,這讓用戶能夠訪問已經放在 Web.config 文件中的應用程式,在應用程式配置文件 Web.config 中讀取這個 WriteAsFile 屬性的設置值,這也是從應用程式配置文件 Web.config 中讀取某個屬性設置值的方法。配置文件修改如下:
  <appSettings>
    <add key="webpages:Version" value="2.0.0.0" />
    <add key="webpages:Enabled" value="false" />
    <add key="PreserveLoginUrl" value="true" />
    <add key="ClientValidationEnabled" value="true" />
    <add key="UnobtrusiveJavaScriptEnabled" value="true" />
    <add key="Email.WriteAsFile" value="true"/>
  </appSettings>
3.5 完成購物車控制器
為了完成 CartController 類,需要修改構造器,以使它要求 IOrderProcessor 介面的一個實現,並添加一個新的動作方法,它將在客戶點擊“Complete order”按鈕時,處理 HTTP 表單的 POST 請求。
using SportsStore.Domain.Abstract;
using SportsStore.Domain.Entities;
using SportsStore.WebUI.Models;
using System;
using System.Collections.Generic;
using System.Linq;
using System.Web;
using System.Web.Mvc;

namespace SportsStore.WebUI.Controllers
{
    public class CartController : Controller
    {
        private IProductRepository repository;
        private IOrderProcessor orderProcessor;

        public CartController(IProductRepository repo, IOrderProcessor proc)
        {
            repository = repo;
            orderProcessor = proc;
        }

        public RedirectToRouteResult AddToCart(Cart cart, int productId, string returnUrl)
        {
            Product product = repository.Products.FirstOrDefault(p => p.ProductID == productId);
            if (product != null)
            {
                cart.AddItem(product, 1);
            }
            return RedirectToAction("Index", new { returnUrl });
        }

        public RedirectToRouteResult RemoveFromCart(Cart cart, int productId, string returnUrl)
        {
            Product product = repository.Products.FirstOrDefault(p => p.ProductID == productId);
            if (product != null)
            {
                cart.RemoveLine(product);
            }
            return RedirectToAction("Index", new { returnUrl });
        }

        public ViewResult Index(Cart cart, string returnUrl)
        {
            return View(new CartIndexViewModel
            {
                Cart = cart,
                ReturnUrl = returnUrl
            });
        }

        public PartialViewResult Summary(Cart cart)
        {
            return PartialView(cart);
        }


        [HttpPost]
        public ViewResult Checkout(Cart cart, ShippingDetails shippingDetails)
        {
            if (cart.Lines.Count() == 0)
            {
                ModelState.AddModelError("", "Sorry,your cart is empty!");
            }

            if (ModelState.IsValid)
            {
                orderProcessor.ProcessOrder(cart, shippingDetails);
                cart.Clear();
                return View("Completed");
            }
            else
            {
                return View(shippingDetails);
            }
        }

        public ViewResult Checkout()
        {
            return View(new ShippingDetails());
        }
    }
}
可以看出,這裡所添加的 Checkout 動作方法是用 HttpPost 註解屬性來修飾的,這表明該方法將用於對 POST 請求的處理 —— 在此例中,這是用戶遞交表單的時候。再次重申,ShippingDetails 參數(這是使用 HTTP 表單數據自動創建的)和 Cart 參數(這是用自定義綁定器創建的)都要依賴於模型綁定器系統。
註:構造器中的修改迫使用戶需要對 CartController 類創建的單元測試進行更新。為新的構造器參數傳遞 null ,便會使單元測試能夠通過編譯。
在上述代碼中, MVC 框架會檢查驗證約束,這些約束是用數據註解屬性而運用於 ShippingDetails 的,並通過 ModelState 屬性把非法情況傳遞給該動作方法。因此,可以通過檢查 Model.IsValid 屬性來查看是否存在問題。註意,如果購物車中無物品,還調用 ModelState.AddModelError 方法註冊了一條錯誤消息。
3.6 顯示驗證錯誤
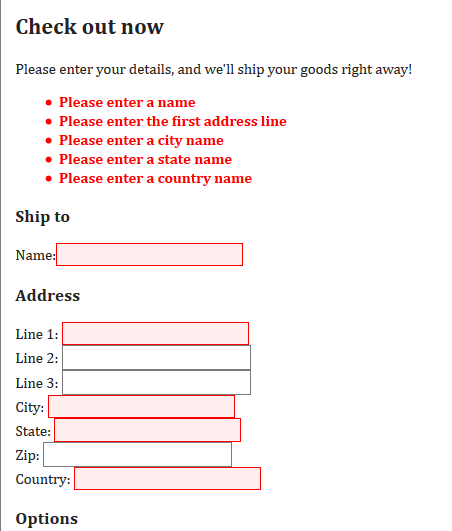
如果客戶輸入了非法的錯誤信息,有問題的那些非法表單欄位將被高亮,但沒有消息被顯示出來。更糟的是,如果客戶試圖對一個空購物車進行結算,這不會完成這個訂單,但客戶卻根本看不到任何錯誤信息。為瞭解決這個問題,需要對視圖添加一個驗證摘要。下麵代碼顯示了添加到 Checkout.cshtml 視圖的內容。
...
<h2>Check out now</h2>
Please enter your details, and we'll ship your goods right away!
@using (Html.BeginForm())
{
    @Html.ValidationSummary();

    <h3>Ship to</h3>
    <div>Name:@Html.EditorFor(x => x.Name)</div>
...
現在,當客戶提供非法送貨數據或試圖對空購物車進行結算時,系統會向他們顯示一些有用的錯誤消息,如下圖所示:
3.7 顯示致謝界面
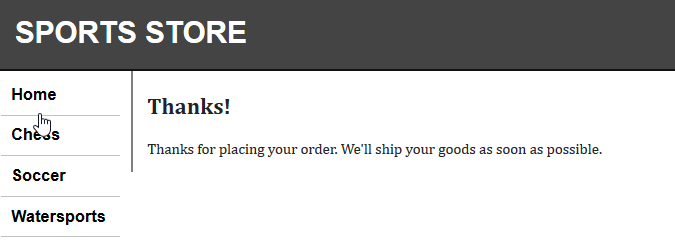
為了完成結算過程,需要向客戶顯示一個已經完成訂單處理的確認頁面,並感謝他們的購物。新建視圖文件 Views/Cart/Completed.cshtml ,代碼如下:
@{
    ViewBag.Title = "SportsStore: OrderSubmitted";
}

<h2>Thanks!</h2>
Thanks for placing your order. We'll ship your goods as soon as possible.
現在,客戶可以進行從選擇產品到結算離開的整個購物過程。如果客戶提供有效的的送貨細節(且購物車中有物品),當他們點擊“Complete order”按鈕時,便會看到一個致謝頁面,如下圖所示:
