一.概述 本章使用 Entity Framework Core 構建執行基本數據訪問的 ASP.NET Core MVC 應用程式。使用遷移(migrations)基於數據模型創建資料庫,是一種code first模式。可以在Windows 上使用 Visual Studio 2017,或在 Win ...
一.概述
本章使用 Entity Framework Core 構建執行基本數據訪問的 ASP.NET Core MVC 應用程式。使用遷移(migrations)基於數據模型創建資料庫,是一種code first模式。可以在Windows 上使用 Visual Studio 2017,或在 Windows、macOS 或 Linux 上使用 .NET Core CLI 來學習。已經安裝了NET Core 2.1 SDK,這裡使用Visual Studio 2017和sql server 2012演示。
1.1 創建新項目
(1) 打開 Visual Studio 2017
(2) 選擇 ASP.NET Core Web 應用程式。
(3) 輸入 EFGetStarted.AspNetCore.NewDb 作為名稱。
(4) 在新建 ASP.NET Core Web 應用程式 對話框中:
確保在下拉列表中選擇“.NET Core”和“ASP.NET Core 2.2”
選擇“Web 應用程式(模型視圖控制器)”項目模板
確保將“身份驗證”設置為“無身份驗證”
(5) 編譯
出錯:“任務不支持“SharedCompilationId”參數。請確認該參數存在於此任務中” ,安裝如下:
PM> install-package Microsoft.Net.Compilers
1.2 安裝 Entity Framework Core
要安裝 EF Core,需要把目標對象的 EF Core 資料庫提供程式安裝。本篇使用SQL Server資料庫,需要安裝 SQL Server 提供程式包。
install-package Microsoft.EntityFrameworkCore.SqlServer -Version 2.2.0

1.3 創建模型
右鍵單擊“Models”文件夾,然後選擇“添加”>“類。輸入“Model.cs”作為名稱。
    /// <summary>
    /// 創建模型
    /// using Microsoft.EntityFrameworkCore;
    /// </summary>
    public class BloggingContext : DbContext
    {
        public BloggingContext(DbContextOptions<BloggingContext> options)
            : base(options)
        { }

        public DbSet<Blog> Blogs { get; set; }
        public DbSet<Post> Posts { get; set; }
    }

    public class Blog
    {
        public int BlogId { get; set; }
        public string Url { get; set; }

        public ICollection<Post> Posts { get; set; }
    }

    public class Post
    {
        public int PostId { get; set; }
        public string Title { get; set; }
        public string Content { get; set; }

        public int BlogId { get; set; }
        public Blog Blog { get; set; }
    }
1.4 使用依賴註入註冊上下文
服務(例如 BloggingContext)在應用程式啟動期間通過依賴關係註入進行註冊。 需要這些服務的組件(如 MVC 控制器)可以通過向構造函數或屬性添加相關參數來獲得對應服務。
        public void ConfigureServices(IServiceCollection services)
        {
            services.Configure<CookiePolicyOptions>(options =>
            {
                // This lambda determines whether user consent for non-essential cookies is needed for a given request.
                options.CheckConsentNeeded = context => true;
                options.MinimumSameSitePolicy = SameSiteMode.None;
            });
            services.AddMvc().SetCompatibilityVersion(CompatibilityVersion.Version_2_2);
            /*
              using EFGetStarted.AspNetCore.NewDb.Models;
              using Microsoft.EntityFrameworkCore;
             */
                     var connection = "Data Source = {ip};Initial Catalog = EFGetStarted.AspNetCore.NewDb; User ID = hsr;Password =js*2015;";
                      vices.AddDbContext<BloggingContext>
                (options => options.UseSqlServer(connection));
        }
上面通過services.AddDbContext< BloggingContext)服務註入到容器中,並使用UseSqlServer 連接方式。我在sql 2012中已手動建立了EFGetStarted.AspNetCore.NewDb庫。在生產應用中,通常會將連接字元串放在配置文件或環境變數中。 為簡單起見,本篇在代碼中定義它。
1.5 創建資料庫
以下步驟使用遷移Migration創建資料庫。根據上面1.3以有的模型。在工具”>“NuGet 包管理器”>“包管理器控制台”,運行以下命令:
   PM> Add-Migration InitialCreate
    The Entity Framework Core Package Manager Console Tools don't support PowerShell version 2.0. Upgrade to PowerShell version 3.0 or higher,
    restart Visual Studio, and try again.
解決方案: https://blog.csdn.net/lilinoscar/article/details/81739770
    PM> Add-Migration InitialCreate
        Microsoft.EntityFrameworkCore.Infrastructure[10403]
              Entity Framework Core 2.2.1-servicing-10028 initialized 'BloggingContext' using provider 'Microsoft.EntityFrameworkCore.SqlServer'
     with options: None
      To undo this action, use Remove-Migration.
在vs 2017當前項目結構中查看,自動生成二個.cs類, 如下所示:

PM> Update-Database

Add-Migration 命令為遷移搭建基架,以便為模型創建一組初始表。 Update-Database 命令創建資料庫並向其應用新的遷移。
1.6 創建控制器
生成 Blogs實體 控制器和視圖。右鍵單擊“控制器”文件夾,然後選擇“添加”>“控制器”
   public class BlogsController : Controller
    {

        public BloggingContext BloggingContext { get; }

        public BlogsController(BloggingContext bloggingContext)
        {
            this.BloggingContext = bloggingContext;
        }

        // GET: /<controller>/
        public IActionResult Index()
        {
            return View();
        }

        [HttpGet]
        public IActionResult Create()
        {
            return View();
        }

        [HttpPost]
        public async Task<IActionResult> Create([Bind("Url")] Blog blog)
        {
            BloggingContext.Add<Blog>(blog);
            await BloggingContext.SaveChangesAsync();
            return View();
        }
    }
1.7 創建視圖
新建視圖,結構目錄是:Views-- Blogs-- Create.cshtml
    @model EFGetStarted.AspNetCore.NewDb.Models.Blog;

    @{
    <form asp-controller="Blogs" asp-action="Create" method="post" >
        <p>
            url: <input type="text" asp-for="Url" />
            <input type="submit" value="Create" />
        </p>
    </form>
    }
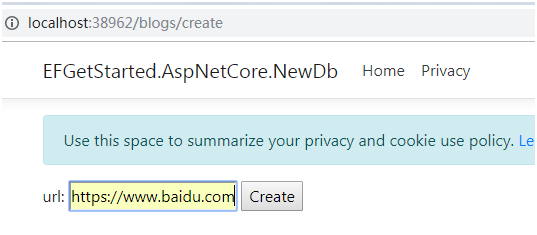
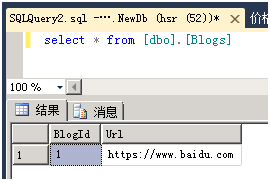
演示如下,點擊create按鈕,非同步調用後臺控制器Blogs下的Create的HttpPost特性方法。插入一條數據到Blogs數據表中。


參考文獻:
官方文檔:ASP.NET Core 新建資料庫


