
此文章非常詳細介紹了Springboot2.0與Mybatis的整合,並且採用Rest風格作為輸入和輸出,項目還使用了兩個很優秀的工具,一個是:Mybatis-Generator代碼生成器,可以方便生成PO、Mapper介面、MapperXml映射文件,而且直接配置生成到項目指定目錄下,不用做任何修... ...
Springboot+ Mybatis+MySql整合構建Rest服務(涵蓋增、刪、改、查)
1.概要
1.1 為什麼要使用Spring boot?
1.1.1 簡單方便、配置少、整合了大多數框架
1.1.2 適用於微服務搭建,搭建的微服務與Spring clound進行完美融合,都屬於Spring家族,Spring boot+Spring clound屬於品牌機,dubbo+zookeeper屬於組裝機,品牌機穩定性更好
1.2 使用Spring boot+Mybatis構建Restful項目詳細步驟
2. 準備
2.1 使用的工具及詳細版本
2.1.1 JDK Version:1.8.0_181
2.1.2 Idea Version:Ultimate Edition 2018.1.6
2.1.3 MySql Version:MySql 5.7
2.1.4 Maven Version:3.5.4
2.1.5 Mybatis-Generator Version:1.3.5
2.1.6 Http Test Restful Webservice Idea帶,沒看到版本號
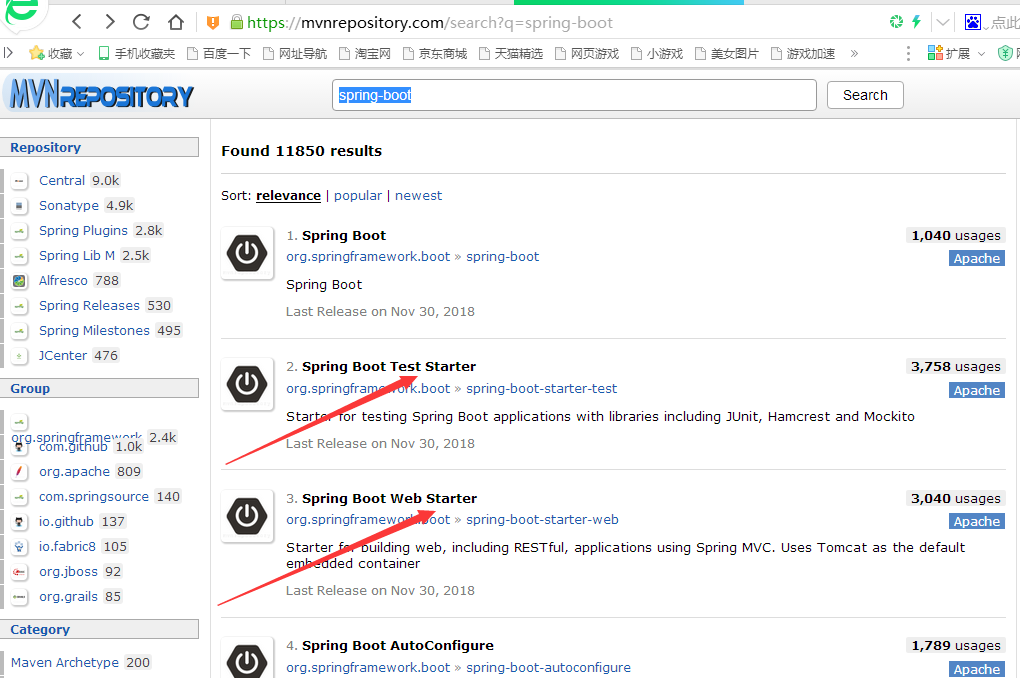
2.2 maven倉庫地址:https://mvnrepository.com/
3. POM文件
<?xml version="1.0" encoding="UTF-8"?>
<project xmlns="http://maven.apache.org/POM/4.0.0"
         xmlns:xsi="http://www.w3.org/2001/XMLSchema-instance"
         xsi:schemaLocation="http://maven.apache.org/POM/4.0.0 http://maven.apache.org/xsd/maven-4.0.0.xsd">
    <modelVersion>4.0.0</modelVersion>

    <groupId>com.wuji</groupId>
    <artifactId>spring_boot_mybatis</artifactId>
    <version>1.0-SNAPSHOT</version>

    <parent>
        <groupId>org.springframework.boot</groupId>
        <artifactId>spring-boot-starter-parent</artifactId>
        <version>2.1.1.RELEASE</version>
    </parent>

    <dependencies>

        <!-- https://mvnrepository.com/artifact/org.springframework.boot/spring-boot-starter-web -->
        <dependency>
            <groupId>org.springframework.boot</groupId>
            <artifactId>spring-boot-starter-web</artifactId>
            <version>2.1.1.RELEASE</version>
        </dependency>
        <!-- https://mvnrepository.com/artifact/org.springframework.boot/spring-boot-starter-test -->
        <dependency>
            <groupId>org.springframework.boot</groupId>
            <artifactId>spring-boot-starter-test</artifactId>
            <version>2.1.1.RELEASE</version>
            <scope>test</scope>
        </dependency>
        <!-- https://mvnrepository.com/artifact/org.mybatis.spring.boot/mybatis-spring-boot-starter -->
        <dependency>
            <groupId>org.mybatis.spring.boot</groupId>
            <artifactId>mybatis-spring-boot-starter</artifactId>
            <version>1.3.2</version>
        </dependency>

        <!-- https://mvnrepository.com/artifact/mysql/mysql-connector-java -->
        <dependency>
            <groupId>mysql</groupId>
            <artifactId>mysql-connector-java</artifactId>
            <version>5.1.38</version>
        </dependency>
        <!-- https://mvnrepository.com/artifact/com.alibaba/druid-spring-boot-starter -->
        <dependency>
            <groupId>com.alibaba</groupId>
            <artifactId>druid-spring-boot-starter</artifactId>
            <version>1.1.10</version>
        </dependency>

    </dependencies>

    <build>
        <plugins>
            <plugin>
                <groupId>org.mybatis.generator</groupId>
                <artifactId>mybatis-generator-maven-plugin</artifactId>
                <version>1.3.5</version>
                <configuration>
                    <configurationFile>${basedir}/src/main/resources/generator/generatorConfig.xml</configurationFile>
                    <overwrite>true</overwrite>
                    <verbose>true</verbose>
                </configuration>
            </plugin>

        </plugins>
    </build>
</project>
4. 詳細開發步驟
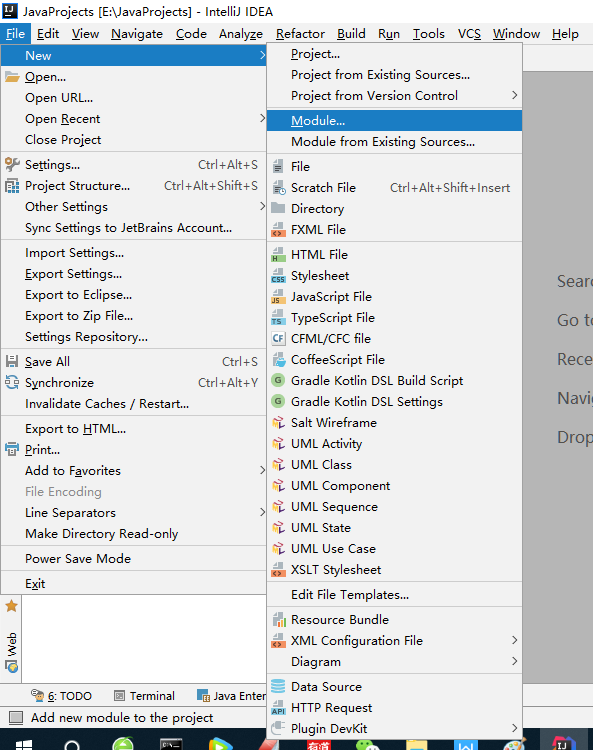
4.1 spring_boot_mybatis模塊創建:File->New->Module如下圖
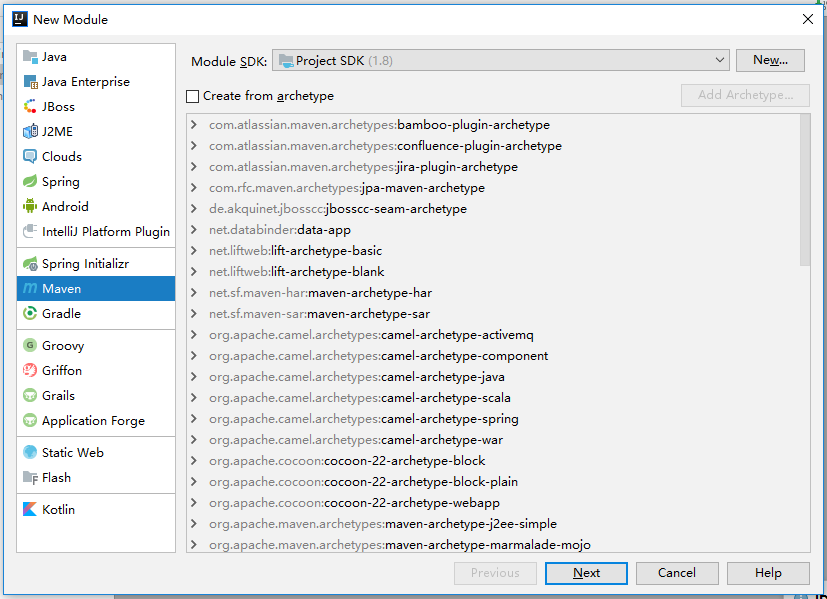
4.2 彈出視窗,選擇左側maven,點擊右側“下一步”,如下圖:
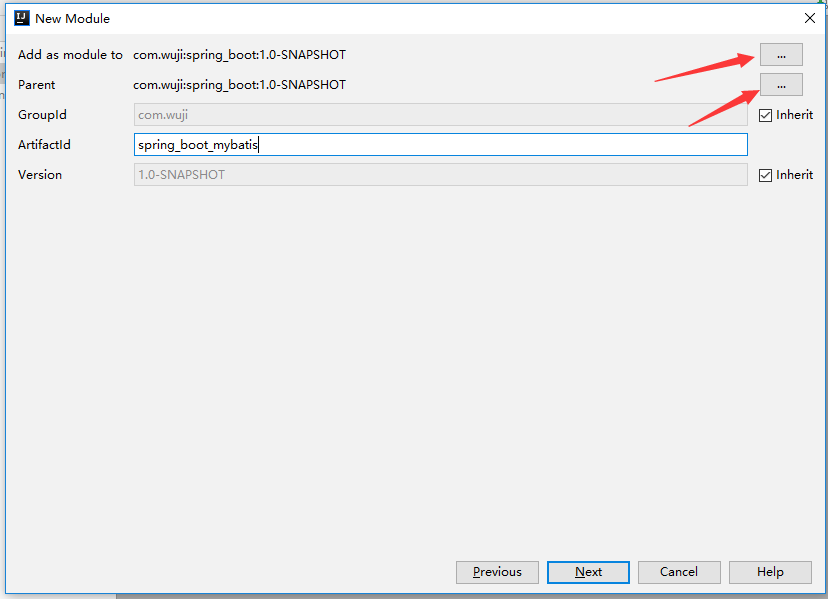
4.3 輸入,紅線指的地方都設為None,點擊“下一步”如下圖:
4.4 輸入,點擊“完成”如下圖:

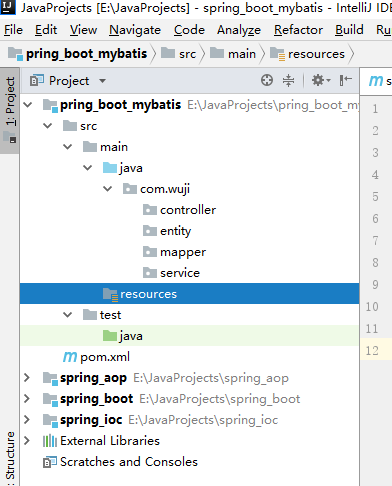
4.5 模塊創建完成,如下圖:

4.5.1 src\main\java存放源文件
4.5.2 src\main\resources存放資源文件
4.5.3 Src\test\java存放測試文件
4.6 創建層次結構,父包為:com.wuji
4.6.1 創建mapper層:選中左側src\main下“java”,點擊File->New->Package,彈出視窗輸入:com.wuji.mapper,點擊“OK”
4.6.2 創建service層:同上
4.6.3 創建entity層:同上
4.6.4 創建controller層:同上
4.6.5 創建springboot啟動:同上
4.6.6 最終結構圖如下:
4.7 在pom文件中添加依賴包
4.7.1 打開https://mvnrepository.com網址,搜索:spring-boot,從列表中點擊:spring-boot-starter-web,選擇 2.1.1.RELEASE版本,
如下圖:
4.7.2 同上點擊:spring-boot-starter-test,選擇2.1.1.RELEASE版本
4.7.3 添加mybatis-spring-boot-starter依賴,選擇1.3.2版本
4.7.4 添加mysql-connector-java依賴,選擇5.1.38版本
4.7.5 添加druid-spring-boot-starter依賴,選擇版本1.1.10版本
4.8 配置Mybatis-Generator生成器
4.8.1 Pom文件中添加Mybatis-Generator插件依賴
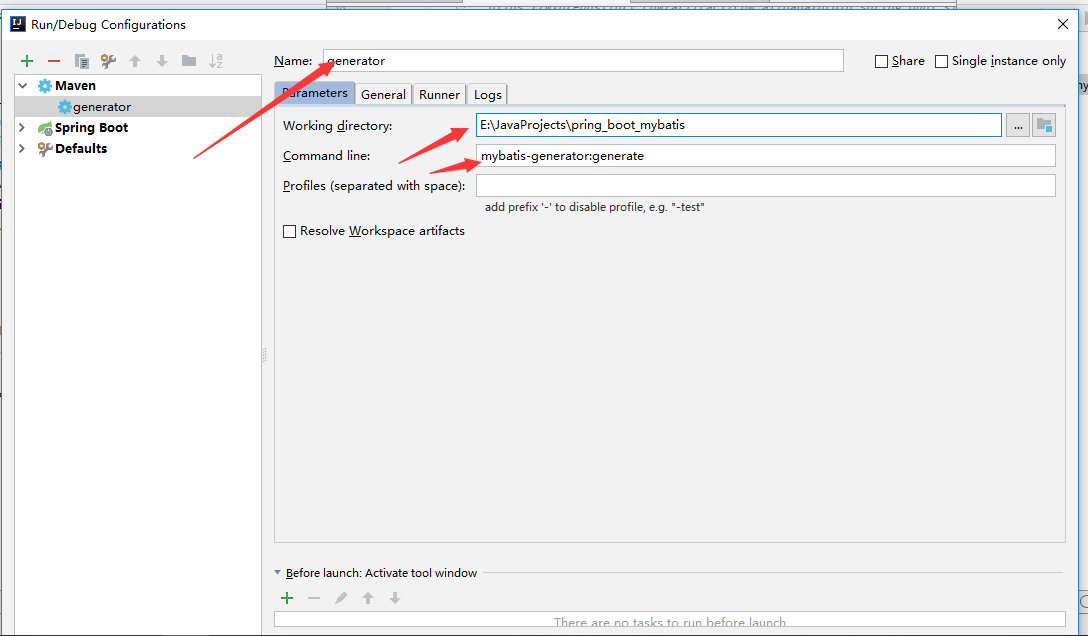
4.8.2 Idea中配置:Run->Edit Configurations,具體設置如下圖:
4.8.3 設置generatorConfig.xml文件,具體如下:
<?xml version="1.0" encoding="UTF-8"?>
<!DOCTYPE generatorConfiguration
        PUBLIC "-//mybatis.org//DTD MyBatis Generator Configuration 1.0//EN"
        "http://mybatis.org/dtd/mybatis-generator-config_1_0.dtd">

<generatorConfiguration>
   <classPathEntry location="D:\MyBatisGenerator\mysql-connector-java-5.1.38.jar"/>

    <context id="MysqlContext" targetRuntime="MyBatis3" defaultModelType="flat">

        <commentGenerator>
            <property name="suppressAllComments" value="true"/>
            <property name="suppressDate" value="true" />
        </commentGenerator>

        <jdbcConnection driverClass="com.mysql.jdbc.Driver"
                        connectionURL="jdbc:mysql://localhost:3306/daducha"
                        userId="root"
                        password="root">
        </jdbcConnection>


        <javaTypeResolver>
            <property name="forceBigDecimals" value="false" />
        </javaTypeResolver>

        <!--生成PO實體類-->
        <javaModelGenerator targetPackage="com.wuji.entity.po"  targetProject="src/main/java">
            <property name="trimStrings" value="true" />
        </javaModelGenerator>

        <!--生成Mybatis XML Mapper Sql操作-->
        <sqlMapGenerator targetPackage="mapping" targetProject="src/main/resources">
        </sqlMapGenerator>

        <!--生成Mybatis Mpper數據操作介面-->
        <javaClientGenerator type="XMLMAPPER" targetPackage="com.wuji.mapper"  targetProject="src/main/java">
        </javaClientGenerator>

        <table tableName="users" domainObjectName="User" enableCountByExample="false" enableUpdateByExample="false" enableDeleteByExample="false" enableSelectByExample="false"  selectByExampleQueryId="false"/>
       <!--
        <table tableName="%">
            <generatedKey column="id" sqlStatement="Mysql"/>
        </table>
        -->
    </context>
</generatorConfiguration>
4.8.9 將generatorConfig.xml文件放置到resources/generator/generatorConfig.xml下麵
4.8.10 以上配置完成即可運行,如下圖:

4.8.11 生成的po、mapper、mapping文件如下:
PO文件:
package com.wuji.entity.po;

public class User {
    private Integer id;

    private String name;

    private Integer age;

    public Integer getId() {
        return id;
    }

    public void setId(Integer id) {
        this.id = id;
    }

    public String getName() {
        return name;
    }

    public void setName(String name) {
        this.name = name == null ? null : name.trim();
    }

    public Integer getAge() {
        return age;
    }

    public void setAge(Integer age) {
        this.age = age;
    }
}
Mapper文件:
package com.wuji.mapper;

import com.wuji.entity.po.User;

public interface UserMapper {
    int deleteByPrimaryKey(Integer id);

    int insert(User record);

    int insertSelective(User record);

    User selectByPrimaryKey(Integer id);

    int updateByPrimaryKeySelective(User record);

    int updateByPrimaryKey(User record);
}
Mapping文件(按照規則放在了資源文件夾下麵):
 1 <?xml version="1.0" encoding="UTF-8"?>
 2 <!DOCTYPE mapper PUBLIC "-//mybatis.org//DTD Mapper 3.0//EN" "http://mybatis.org/dtd/mybatis-3-mapper.dtd">
 3 <mapper namespace="com.wuji.mapper.UserMapper">
 4   <resultMap id="BaseResultMap" type="com.wuji.entity.po.User">
 5     <id column="id" jdbcType="INTEGER" property="id" />
 6     <result column="name" jdbcType="VARCHAR" property="name" />
 7     <result column="age" jdbcType="INTEGER" property="age" />
 8   </resultMap>
 9   <sql id="Base_Column_List">
10     id, name, age
11   </sql>
12   <select id="selectByPrimaryKey" parameterType="java.lang.Integer" resultMap="BaseResultMap">
13     select
14     <include refid="Base_Column_List" />
15     from users
16     where id = #{id,jdbcType=INTEGER}
17   </select>
18   <delete id="deleteByPrimaryKey" parameterType="java.lang.Integer">
19     delete from users
20     where id = #{id,jdbcType=INTEGER}
21   </delete>
22   <insert id="insert" parameterType="com.wuji.entity.po.User">
23     insert into users (id, name, age
24       )
25     values (#{id,jdbcType=INTEGER}, #{name,jdbcType=VARCHAR}, #{age,jdbcType=INTEGER}
26       )
27   </insert>
28   <insert id="insertSelective" parameterType="com.wuji.entity.po.User">
29     insert into users
30     <trim prefix="(" suffix=")" suffixOverrides=",">
31       <if test="id != null">
32         id,
33       </if>
34       <if test="name != null">
35         name,
36       </if>
37       <if test="age != null">
38         age,
39       </if>
40     </trim>
41     <trim prefix="values (" suffix=")" suffixOverrides=",">
42       <if test="id != null">
43         #{id,jdbcType=INTEGER},
44       </if>
45       <if test="name != null">
46         #{name,jdbcType=VARCHAR},
47       </if>
48       <if test="age != null">
49         #{age,jdbcType=INTEGER},
50       </if>
51     </trim>
52   </insert>
53   <update id="updateByPrimaryKeySelective" parameterType="com.wuji.entity.po.User">
54     update users
55     <set>
56       <if test="name != null">
57         name = #{name,jdbcType=VARCHAR},
58       </if>
59       <if test="age != null">
60         age = #{age,jdbcType=INTEGER},
61       </if>
62     </set>
63     where id = #{id,jdbcType=INTEGER}
64   </update>
65   <update id="updateByPrimaryKey" parameterType="com.wuji.entity.po.User">
66     update users
67     set name = #{name,jdbcType=VARCHAR},
68       age = #{age,jdbcType=INTEGER}
69     where id = #{id,jdbcType=INTEGER}
70   </update>
71 </mapper>
4.9 application.yml文件配置(格式很嚴格,註意節點的縮近和對齊,有問題直接加微信回覆更快)
 1 server:
 2   port: 8080
 3 spring:
 4   datasource:
 5            name: daducha
 6            type: com.alibaba.druid.pool.DruidDataSource
 7            druid:
 8                 url: jdbc:mysql://127.0.0.1:3306/daducha
 9                 username: root
10                 password: root
11                 maxActive: 20
12                 initialSize: 1
13                 maxWait: 60000
14                 minIdle: 1
15                 timeBetweenEvictionRunsMillis: 60000
16                 minEvictableIdleTimeMillis: 300000
17                 testWhileIdle: true
18                 testOnBorrow: false
19                 testOnReturn: false
20                 poolPreparedStatements: true
21                 maxOpenPreparedStatements: 20
22                 driver-class-name: com.mysql.jdbc.Driver
23
24 mybatis:
25   mapper-locations: classpath:mapping/*.xml
26   type-aliases-package: com.wuji.entity.po
5.10 service介面文件
 1 package com.wuji.service;
 2
 3 import com.wuji.entity.po.User;
 4
 5 public interface UserService {
 6     int addUser(User user);
 7     int delUserById(int id);
 8     int updateUserById(int id,String userName);
 9     User getUserById(int id);
10 }
5.11 service介面實現類
 1 package com.wuji.service;
 2
 3 import com.wuji.entity.po.User;
 4 import com.wuji.mapper.UserMapper;
 5 import org.springframework.beans.factory.annotation.Autowired;
 6 import org.springframework.stereotype.Service;
 7
 8 @Service
 9 public class UserServiceImpl implements UserService {
10
11     @Autowired
12     private UserMapper userMapper;
13
14     public int addUser(User user) {
15         return userMapper.insert(user);
16     }
17
18     public int delUserById(int id) {
19         return userMapper.deleteByPrimaryKey(id);
20     }
21
22     public int updateUserById(int id,String userName) {
23         User user=getUserById(id);
24         user.setName(userName);
25         return userMapper.updateByPrimaryKey(user);
26     }
27
28     public User getUserById(int id) {
29         return userMapper.selectByPrimaryKey(id);
30     }
31 }
5.12 controller restful風格實現
 1 package com.wuji.controller;
 2 /**
 3  * author:zhangwuji
 4  * date:2018-12-31
 5  * weixin:17091005779
 6  */
 7 import com.wuji.entity.po.User;
 8 import com.wuji.service.UserService;
 9 import org.springframework.beans.factory.annotation.Autowired;
10 import org.springframework.web.bind.annotation.RequestMapping;
11 import org.springframework.web.bind.annotation.RequestMethod;
12 import org.springframework.web.bind.annotation.RestController;
13
14 import java.util.List;
15
16 @RestController
17 @RequestMapping("/api/user")
18 public class UserController {
19
20     @Autowired
21     private UserService userService;
22
23     @RequestMapping(value = "/add",method = RequestMethod.POST)
24     public int addUser(User user){
25         return userService.addUser(user);
26     }
27
28     @RequestMapping(value = "/get",method = RequestMethod.GET)
29     public User getUser(int id){
30         return userService.getUserById(id);
31     }
32
33     @RequestMapping(value = "/del",method = RequestMethod.DELETE )
34     public int delUser(int id){return userService.delUserById(id);}
35
36     @RequestMapping(value = "/update",method = RequestMethod.POST)
37     public int updateUser(User user){return userService.updateUserById(user);}
38
39
40 }
5.13.spring boot 啟動器文件
 1 package com.wuji.springboot;
 2 /**
 3  * author:zhangwuji
 4  * date:2018-12-31
 5  * weixin:17091005779
 6  */
 7
 8 import org.mybatis.spring.annotation.MapperScan;
 9 import org.springframework.boot.SpringApplication;
10 import org.springframework.boot.autoconfigure.SpringBootApplication;
11 import org.springframework.context.annotation.ComponentScan;
12 import org.springframework.context.annotation.ComponentScans;
13
14 @SpringBootApplication
15 @ComponentScan(basePackages = {"com.wuji"})
16 @MapperScan("com.wuji.mapper")
17 public class Application {
18     public static void main(String[] args) {
19         SpringApplication.run(Application.class,args);
20     }
21 }
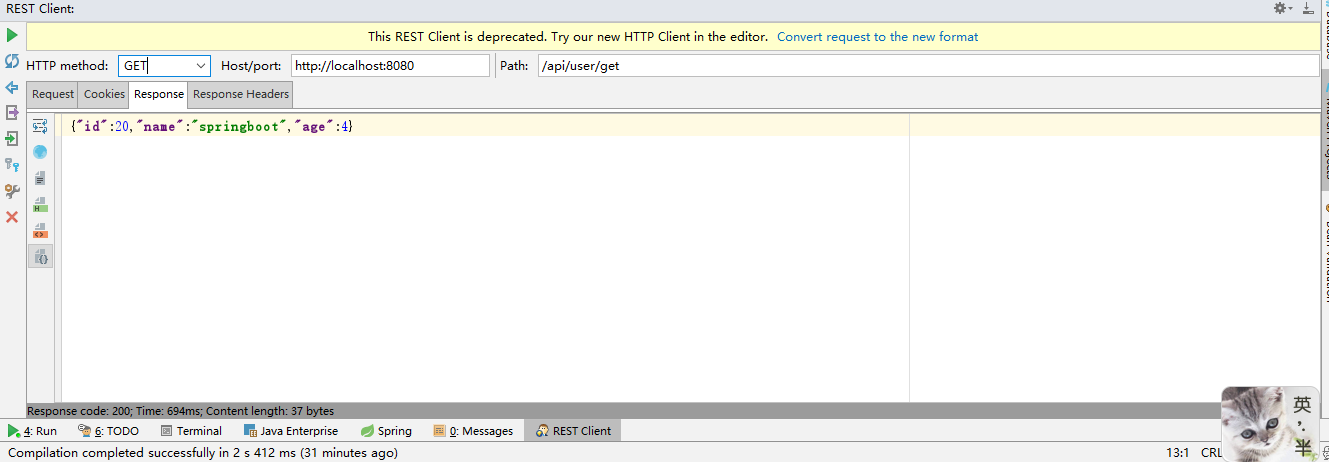
5.14 使用Test Restful Web Service進行介面測試如下:

5.15 測試結果如下圖


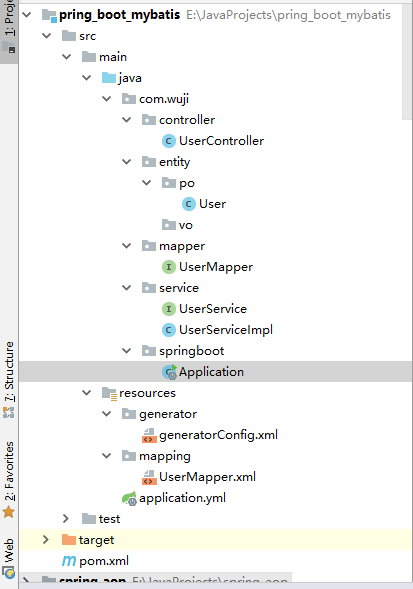
5.16 最最終項目結構圖(此結構自認為是很標準的,大家可以多發表意見)
5. 錯誤拋析及解決方法(可能會遇到的坑)
5.1 創建包一定要先選擇src\main\java目錄,右擊New->Package,彈出視窗輸入全路徑如:com.wuji.mapper,否則會在當前選擇路徑下創建包,不符合Java命名約定
5.2 在啟動類上添加@SpringBootApplication註解時,不能引入包;原因是:沒有下載依賴
5.3 配置mybatis-generator時,working directory要設置成模塊路徑如:E:\JavaProjects\pring_boot_mybatis
5.4 運行mybatis-generator時出現如下錯誤:[ERROR] Failed to execute goal org.mybatis.generator:mybatis-generator-maven-plugin:1.3.5:generate (default-cli) on project spring_boot_mybatis: configfile E:\JavaProjects\pring_boot_mybatis\src\main\resources\generator\generatorConfig.xml does not exist ,經檢查是由於generatorConfig.xml 直接在\src\main\resources下,故報找不到錯誤。放入正確的目錄。再一次提醒Java同胞,不要任性,要遵守java命名規則約束。這些規則的使用可以標準化項目,比自己定義的結構要清晰。
5.5 [ERROR] Failed to execute goal org.mybatis.generator:mybatis-generator-maven-plugin:1.3.5:generate (default-cli) on project spring_boot_mybatis: XML Parser Error on line 46: 元素類型為 "context" 的內容必須匹配 "(property*,plugin*,commentGenerator?,(connectionFactory|jdbcConnection),javaTypeResolver?,javaModelGenerator,sqlMapGenerator?,javaClientGenerator?,table+)"。 -> [Help 1] 節點要嚴格按照"(property*,plugin*,commentGenerator?,(connectionFactory|jdbcConnection),javaTypeResolver?,javaModelGenerator,sqlMapGenerator?,javaClientGenerator?,table+)"順序
5.6 [ERROR] Failed to execute goal org.mybatis.generator:mybatis-generator-maven-plugin:1.3.5:generate (default-cli) on project spring_boot_mybatis: Execution default-cli of goal org.mybatis.generator:mybatis-generator-maven-plugin:1.3.5:generate failed: Cannot resolve classpath entry: mysql-connector-java-5.1.38.jar -> [Help 1]是由於這個節點:<classPathEntry location="mysql-connector-java-5.1.38.jar"/>location要指定絕對路徑如:<classPathEntry location="D:\MyBatisGenerator\mysql-connector-java-5.1.38.jar"/>
5.7 java.lang.IllegalStateException: Failed to load property source from location 'classpath:/application.yml'原因:application.yml首字母大寫了,改為小寫
5.8 org.yaml.snakeyaml.parser.ParserException: while parsing a block mapping 原因:yml文件節點沒有對齊,將Mybatis節點與Spring節點對齊
5.9 No active profile set, falling back to default profiles: default這個錯誤是由於idea沒有設置預設啟動環境。具體設置如下:
5.10 Caused by: java.lang.ClassNotFoundException: org.springframework.boot.bind.RelaxedPropertyResolver這個錯誤是由於沒有添加:<parent>
<groupId>org.springframework.boot</groupId>
<artifactId>spring-boot-starter-parent</artifactId>
<version>2.1.1.RELEASE</version>
</parent>從而找不到RelaxedPropertyResolver這個類
5.11 Failed to configure a DataSource: 'url' attribute is not specified and no embedded datasource could be configured.還是出現在yml文件節點。具體是druid:這個節點,要有層次結構。詳見yml文件。
5.12 server:
port: 8080 錯誤:server:標黃,提示無法解析。由於port:和8080間要加空格。
5.13 Springboot 啟動文件報錯,原因是@ComponentScan寫成了@ComponentScans
5.14 No MyBatis mapper was found in '[com.wuji.springboot]' package. Please check your configuration.這個原因是啟動器上要添加:@MapperScan("com.wuji.mapper")註解
5.15 Field userService in com.wuji.controller.UserController required a bean of type 'com.wuji.service.UserService' that could not be found.原因:說明IOC里沒有創建Bean,在啟動文件上手動添加:@ComponentScan(basePackages = {"com.wuji"})註解
5.16
6.總結:
此文章非常詳細介紹了Springboot2.0與Mybatis的整合,並且採用Rest風格作為輸入和輸出,項目還使用了兩個很優秀的工具,一個是:Mybatis-Generator代碼生成器,可以方便生成PO、Mapper介面、MapperXml映射文件,而且直接配置生成到項目指定目錄下,不用做任何修改,生成的文件即可使用,同時無忌也介紹了怎樣嵌入到Idea詳細見上面。另一個是:Test Restful Web Service,這是個用於Rest風格介面測試工具,直接集成到Idea了,可以非常方便使用進行測試。
7.張無忌介紹:
張無忌專註Java技術10餘年,產品控、代碼控,擁有豐富的項目經驗,主持研發了多個成功上線的大型互聯網項目
熱愛互聯網,精通Java、J2EE,深入研究過JDK、Spring、Mybatis源碼,擅長互聯網高併發、高可靠架構設計。願意
和他人分享自己對技術的理解和感悟。需要更多資源或有任何疑問可以添加張無忌微信(17091005779)


