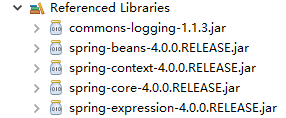
1.Spring依賴的jar包下載網址: https://repo.spring.io/webapp/#/artifacts/browse/tree/General/libs-release-local/org/springframework/spring/4.0.0.RELEASE/spring- ...
1.Spring依賴的jar包下載網址:
https://repo.spring.io/webapp/#/artifacts/browse/tree/General/libs-release-local/org/springframework/spring/4.0.0.RELEASE/spring-framework-4.0.0.RELEASE-dist.zip
下載之後得到:

解壓在libs目錄中找到如下的四個jar包:

除此之外還需要一個commons-logging.jar包。
2.例如要用spring實現如下的普通的java代碼實現的功能:
HelloWorld.java
package com.java.spring;

public class HelloWorld {

	private String name;

	public void setName(String name){
		this.name=name;
	}

	public void hello(){
		System.out.println("hello:"+name);
	}

}
Main.java
package com.java.spring;

public class Main {

	public static void main(String[] args){

		HelloWorld helloWorld=new HelloWorld();
		helloWorld.setName("koala");
		helloWorld.hello();

	}
}
2.1 新建一個普通的java工程,工程目錄下新建lib目錄,拷貝所需的jar包:

之後build path:

2.2 在src目錄下創建spring bean的配置文件:applicationContext.xml。選中項目,右擊-->Configure Facets-->Install Spring Facet。

3.示例代碼
HelloWorld.java
package com.java.spring;

public class HelloWorld {

	private String name;

	public void setName(String name){
		this.name=name;
	}

	public void hello(){
		System.out.println("hello:"+name);
	}

}
Main.java
package com.java.spring;

import org.springframework.context.ApplicationContext;
import org.springframework.context.support.ClassPathXmlApplicationContext;

public class Main {

	public static void main(String[] args){
		//1.創建spring的IOC對象
		ApplicationContext ctx=new ClassPathXmlApplicationContext("applicationContext.xml");
		//2.從IOC容器中獲取bean實例
		HelloWorld helloWorld=(HelloWorld) ctx.getBean("helloworld");
		helloWorld.hello();
	}
}
配置文件applicationContext.xml文件內容:
<?xml version="1.0" encoding="UTF-8"?>
<beans
	xmlns="http://www.springframework.org/schema/beans"
	xmlns:xsi="http://www.w3.org/2001/XMLSchema-instance"
	xmlns:p="http://www.springframework.org/schema/p"
	xsi:schemaLocation="http://www.springframework.org/schema/beans http://www.springframework.org/schema/beans/spring-beans-4.1.xsd">

<bean id="helloworld" class="com.java.spring.HelloWorld">
  <property name="name" value="koala"></property>
</bean>

</beans>
①class的值為Bean所在的全類名;
②創建spring的IOC對象,ApplicationContext ctx=new ClassPathXmlApplicationContext("applicationContext.xml");參數為spring bean的配置文件的名稱;
③從IOC容器中獲取bean實例,HelloWorld helloWorld=(HelloWorld) ctx.getBean("helloworld"); 配置文件中<bean id="helloworld">的值與代碼中getBean(String str);方法中的str一致;
④<property name="name" value="koala"></property> 是實現public void setName(String name){ this.name=name; },將koala賦值給name屬性;


