註意:借鑒原文章:http://www.cnblogs.com/roy-blog/p/7196054.html 感興趣的可以加一下481845043 java交流群,共同進步。 1 session的概念 在網路應用中我們會稱為“會話控制”,在開發中我們常稱其為session對象,用來存儲特定用戶會話 ...
註意:借鑒原文章:http://www.cnblogs.com/roy-blog/p/7196054.html
感興趣的可以加一下481845043 java交流群,共同進步。
1 session的概念
在網路應用中我們會稱為“會話控制”,在開發中我們常稱其為session對象,用來存儲特定用戶會話所需的屬性及配置信息。當用戶在應用程式的 Web 頁之間跳轉時,存儲在 Session 對象中的變數將不會丟失,而是在整個用戶會話中一直存在下去。當用戶請求來自應用程式的 Web 頁時,如果該用戶還沒有會話,則 Web 伺服器將自動創建一個 Session 對象。當會話過期或被放棄後,伺服器將終止該會話。Session 對象最常見的一個用法就是存儲用戶的首選項。例如,如果用戶指明不喜歡查看圖形,就可以將該信息存儲在 Session 對象中。註意 :會話狀態僅在支持 cookie 的瀏覽器中保留。
2 為什麼實現session共用
在利用nginx實現了負載均衡和動靜分離之後,會面臨一個記憶體數據同步的問題,我們通常將一些例如:用戶信息,重要標識等具有唯一標識的數據,存在記憶體中,典型的一種就是在數據存在session中。例如:我有A,B兩台伺服器做了負載均衡,當我在A伺服器上執行了登錄並且將登錄數據存入session的時候,這些session數據只存在於A伺服器上,而沒有在B伺服器上,假如在處理下一個請求的時候,我需要用到session的數據,而不巧的是,這個請求剛好被交由B伺服器來處理,這時候就會出現B伺服器拿不到session數據的情況,從而造成錯誤。如何讓session數據在集群的各個分支中共用session呢,
肯定方法不只一種,但是本質肯定是實現session數據在各個伺服器的同步,可能大家第一次想到的是使用資料庫進行數據的存儲,但其實質上是存儲在改伺服器的磁碟中,但是我們都知道session之所以出現是因為它是在記憶體中的,程式讀取記憶體的數據要遠遠比讀取磁碟的數據快,所以我們把一些經常用到的東西都放在session裡面。
有沒有一種資料庫,是存放在記憶體中的呢?這就是redis。通俗的講,它就是一個資料庫,但是這個資料庫是存儲在記憶體裡面的,所以讀寫數據速度要比磁碟的快得多。又因為它是一個資料庫,所以可以實現數據的同步。我們把session數據存放在redis中,然後所有的集群分支都可以去訪問這個資料庫裡面的東西,這就是全局緩存的原理。
3 安裝與運行
本人是在Windows本地系統下下載測試的,下載地址:https://github.com/MSOpenTech/redis/releases。Redis 支持 32 位和 64 位。這個需要根據你系統平臺的實際情況選擇,這裡我下載 Redis-x64-xxx.zip壓縮包到 E 盤,解壓後可以直接使用,將文件夾重新命名為 redis。目錄結構如下。

可以通過目錄下的redis.windows.conf 文件Ctrl+F 查找 # requirepass,將其前面的#刪除 後面加入你的新密碼,例如123,來設置你的密碼,因為一開始redis是預設沒有密碼的。但是為了安全起見,在開發中使用要設置密碼。
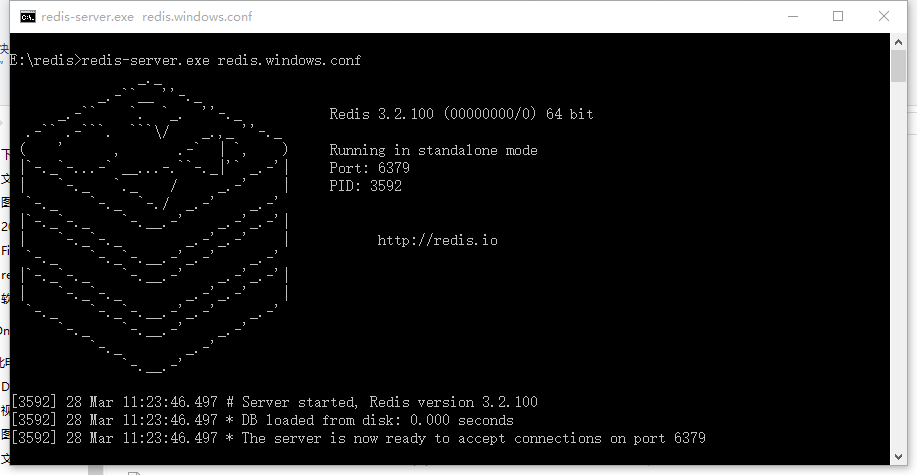
解壓後打開一個 cmd 視窗 使用cd命令切換目錄到 E:\redis 運行 redis-server.exe redis.windows.conf 。如果想方便的話,可以把 redis 的路徑加到系統的環境變數里,這樣就省得再輸路徑了,後面的那個 redis.windows.conf 可以省略,如果省略,會啟用預設的。輸入之後,會顯示如下界面:

只要你出現上圖樣式,即為開啟成功。註意的是,當你關閉這個dos視窗,redis服務會馬上關閉,所以為了以後使用方便,可以使用redis命令:
redis-server --service-install redis.windows.conf 將其安裝成Windows服務,設置自啟或手動,安裝成功後可以在服務中找到Redis。
還有需要註意的一點就是當你在redis.windows.conf 文件中修改密碼後,不能馬上起作用。需要使用redis命令,redis-server --service-stop進行redis服務的關閉。
4 項目中使用,做一些配置工作,來實現session數據的全局緩存。
1)首先是添加jar包,如果你是maven項目,需要在pom.xml加入下麵代碼
        <dependency>
            <groupId>org.springframework.session</groupId>
            <artifactId>spring-session-data-redis</artifactId>
            <version>1.3.1.RELEASE</version>
            <type>pom</type>
     </dependency>
如果不是maven項目,你需要加入下麵這些jar包。

2) 編寫redis.properties,代碼如下:
redis_isopen:yes
#主機地址
redis_hostName=xxx.xxx.xxx.xxx
#埠
redis_port=6379
#密碼
redis_password=xxxxxxxx
#連接超時時間
redis_timeout=200000
redis_maxIdle=300
redis_maxActive=600
redis_maxWait=100000
redis_testOnBorrow=true
3)編寫spring-redis.xml配置文件,這個文件配置關於redis的一些基本信息。
<?xml version="1.0" encoding="UTF-8" standalone="no"?>
<beans xmlns="http://www.springframework.org/schema/beans"
    xmlns:context="http://www.springframework.org/schema/context" xmlns:tx="http://www.springframework.org/schema/tx"
    xmlns:util="http://www.springframework.org/schema/util" xmlns:xsi="http://www.w3.org/2001/XMLSchema-instance"
    xsi:schemaLocation="http://www.springframework.org/schema/beans http://www.springframework.org/schema/beans/spring-beans.xsd  http://www.springframework.org/schema/context http://www.springframework.org/schema/context/spring-context.xsd  http://www.springframework.org/schema/tx http://www.springframework.org/schema/tx/spring-tx.xsd  http://www.springframework.org/schema/util http://www.springframework.org/schema/util/spring-util.xsd  ">
    <!-- session設置 maxInactiveIntervalInSeconds為session的失效時間,單位為秒-->
    <bean
        class="org.springframework.session.data.redis.config.annotation.web.http.RedisHttpSessionConfiguration">
        <property name="maxInactiveIntervalInSeconds" value="3600"></property>
    </bean>
    <!-- redis連接池 -->
    <bean id="poolConfig" class="redis.clients.jedis.JedisPoolConfig">
        <property name="maxIdle" value="${redis_maxIdle}" />
        <property name="testOnBorrow" value="${redis_testOnBorrow}" />
    </bean>
    <!-- redis連接工廠 -->
    <bean id="connectionFactory"
        class="org.springframework.data.redis.connection.jedis.JedisConnectionFactory">
        <property name="hostName" value="${redis_hostName}" />
        <property name="port" value="${redis_port}" />
        <property name="password" value="${redis_password}" />
        <property name="timeout" value="${redis_timeout}" />
        <property name="poolConfig" ref="poolConfig"></property>
    </bean>
</beans>
4)在application.xml(spring的主配置文件)需要加入redis.properties配置文件的掃描,如下。
<!-- 讀取redis參數配置 -->
    <bean id="propertyConfigurer"
        class="org.springframework.beans.factory.config.PropertyPlaceholderConfigurer">
        <property name="locations">
            <list>
                <value>/WEB-INF/classes/redis.properties</value>
            </list>
        </property>
    </bean>
5)在主配置文件中引入spring-redis.xml,如下。
<import resource="spring-redis.xml" />
6)在web.xml中,加入關於session的過濾器,只有這樣session才會被redis所操縱。
<filter>
    <filter-name>springSessionRepositoryFilter</filter-name>
    <filter-class>org.springframework.web.filter.DelegatingFilterProxy</filter-class>
  </filter>
  <filter-mapping>
    <filter-name>springSessionRepositoryFilter</filter-name>
    <url-pattern>/*</url-pattern>
  </filter-mapping>
這樣以後,我們就實現了redis對session的管理。 PS.再退出的時候,需要這樣寫才不會出錯。(ssh項目)
public String yipinExit(){
        Iterator<String>keys=session.keySet().iterator();
        while(keys.hasNext()){
            String key=keys.next();
            session.remove(key);
        }
        return "yipinExit";
    }


