
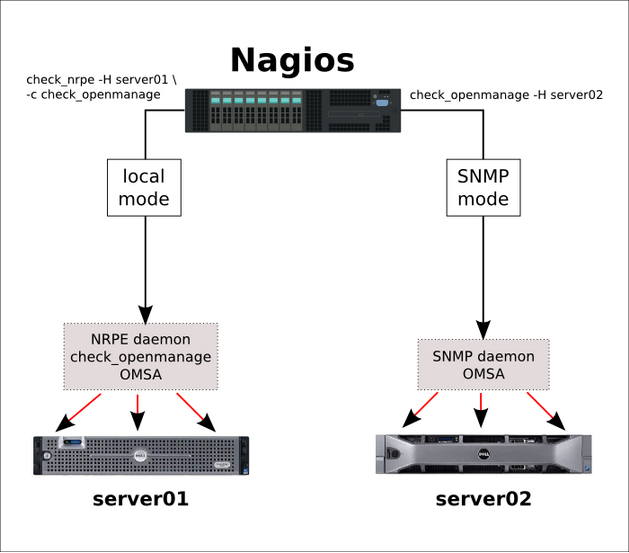
Nagios->check_openmanage[Dell R7*] Nagios->check_openmanage[Dell R7*] 2014年11月13日 下午 07:44 2014年11月13日 下午 07:44 需求介紹: 透過Nagios監控Dell R7系列伺服器硬體狀態 環境信息: ...
Nagios->check_openmanage[Dell R7*] 2014年11月13日 下午 07:44 需求介紹: 透過Nagios監控Dell R7系列伺服器硬體狀態 環境信息: Nagios監控主機:xxx.xxx.xxx.xxx Nagios使用版本:3.2.3 NagioSQL: 3.2.0 Dell R710:xxx.xxx.xxx.xxx 監控邏輯: 1.Nagios通過插件check_nrpe 調用 check_openmange接收硬體信息。 2.伺服器端SNMP服務通過Openmanage軟體獲取硬體狀態。 Nagios:需安裝check_openmange插件 Dell R7:需安裝SNMP服務、Openmanage軟體、Naiogs代理(只監控硬體可不安裝)
插件下載地址:http://folk.uio.no/trondham/software/check_openmanage.html
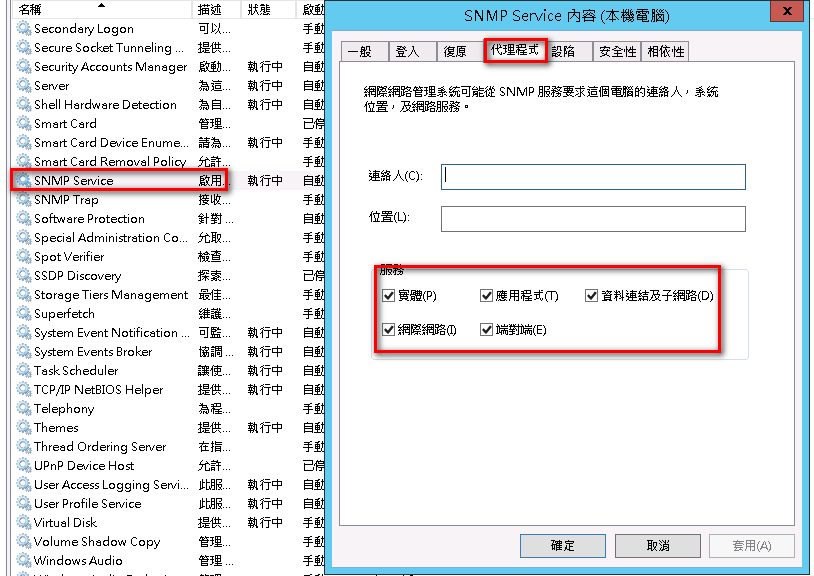
Nagios監控主機安裝插件: [root@nagios ~]# tar zxvf check_openmanage-3.7.12.tar.gz [root@nagios check_openmanage-3.7.12]# ./install.sh /usr/local/nagios/libexec /usr/local/nagios [root@nagios ~]# rmp -ivh perl-Net-SNMP-5.2.0-1.el5.1.noarch.rpm [root@nagios ~]# rpm -ivh perl-Config-Tiny-2.10-1.el5.noarch.rpm snmp協議訪問 snmpwalk -Os -c public -v 1 192.168.x.x 被監控端安裝SNMP和Dell Openamge[Windows] 被監控端安裝SNMP SNMP服務需開啟硬體信息的推送
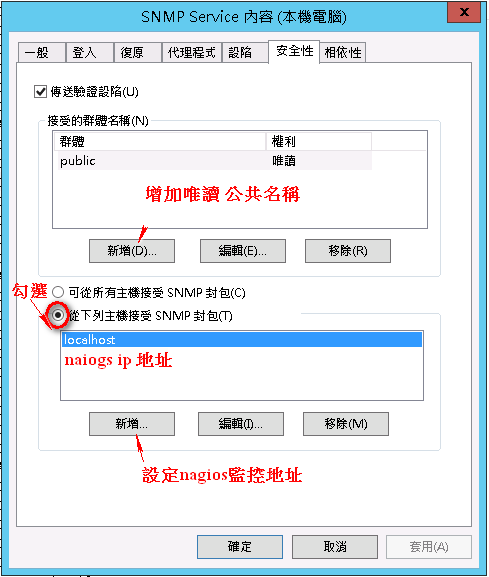
SNMP服務設定公共名稱和Nagios監控主機地址,提高安全性
安裝Dell Openmanage(預設埠1311)
OM-DRAC-Dell-Web-WINX64-8.4.0-2193_A00安裝包(dell官網自行下載)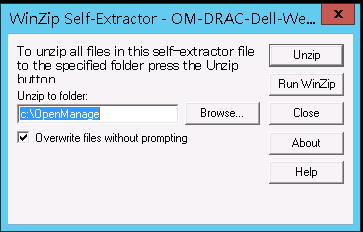
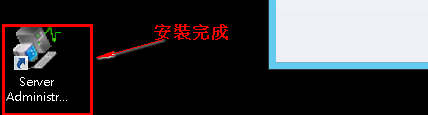
解壓後安裝Openmanage

安裝完成後測試訪問,輸入當前用戶名稱或密碼(IE支持度不高) 可以訪問地址: https://伺服器IP地址:1311/
被監控端安裝Nagios代理 NSCP-0.4.1.73-x64
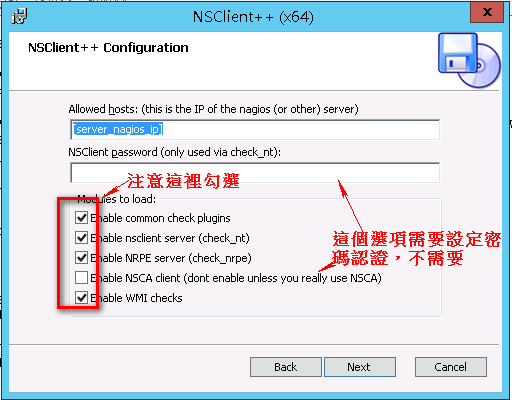
更新Nagios代理軟體配置 C:\Program Files\NSClient(安裝路徑)

在nsclinet.ini尾部增加如下信息: ';'號表示註釋不生效
[/settings/NRPE/server]

; COMMAND ARGUMENT PROCESSING - This option determines whether or not the we will allow clients to specify arguments to commands that are executed.
allow arguments = true

; COMMAND ALLOW NASTY META CHARS - This option determines whether or not the we will allow clients to specify nasty (as in |`&><'"\[]{}) characters in arguments.
allow nasty characters = true
allow_nasty_meta_chars = 1

; ALLOWED HOSTS - A comaseparated list of allowed hosts. You can use netmasks (/ syntax) or * to create ranges. parent for this key is found under: /settings/default this is marked as advanced in favour of the parent.
;allowed hosts = 192.168.xx.xx/24(可以限制訪問網段)

; PORT NUMBER - Port to use for NRPE.
port = 5666


[/settings/NRPE/server]
allow arguments=true

[/settings/external scripts]
allow arguments=true

;(這裡也可以自己設定腳本 如vbs)
[/settings/external scripts/scripts]
timevbs = cscript.exe //T:30 //NoLogo scripts\\lib\\check_time.vbs $ARG1$ $ARG2$ $ARG3$
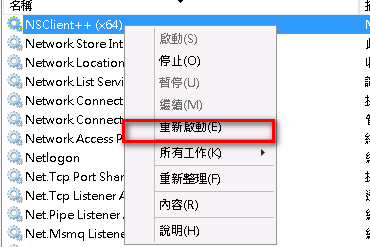
重啟nagios代理服務
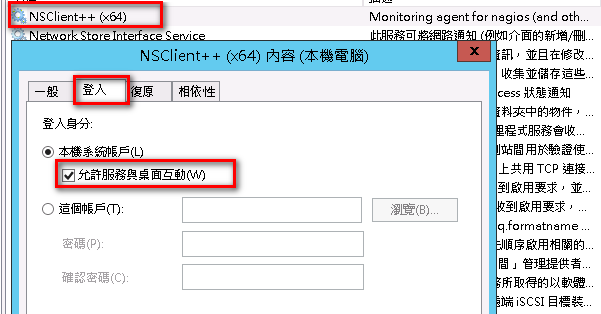
重啟服務
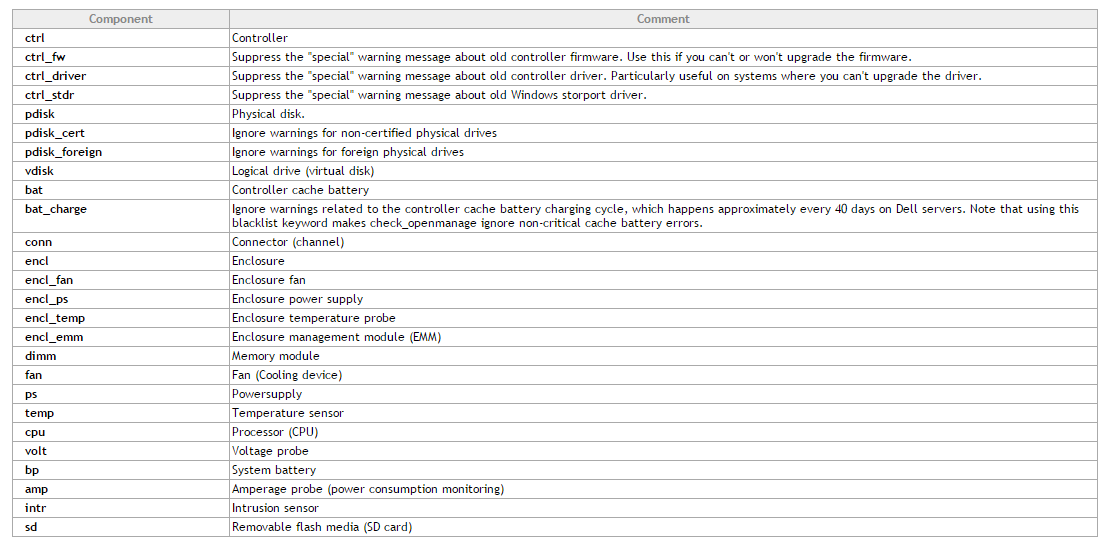
 Nagios監控Dell Server硬體是忽略Server固件版本
[root@nagios libexec]# ./check_openmanage -H 被監控主機IP
Controller 0 [PERC H700 Integrated]: Firmware '12.10.1-0001' is out of date
Controller 1 [PERC H800 Adapter]: Firmware '12.10.1-0001' is out of date
[root@nagios libexec]# ./check_openmanage -H 被監控主機IP -b ctrl_fw=all -b ctrl_driver=all -b ctrl_stdr=all
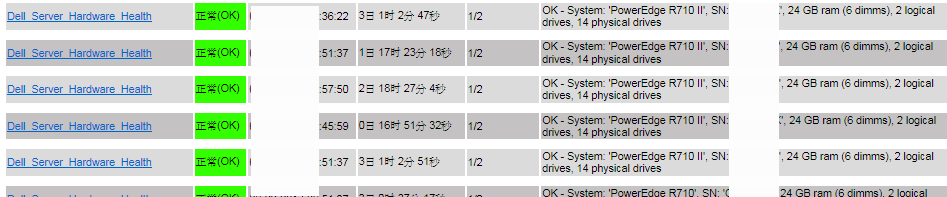
OK - System: 'PowerEdge R710 II', SN: '8Dxxx3X', 24 GB ram (6 dimms), 2 logical drives, 14 physical drives
Esx客服端安裝SNMP&OMSA組件
Nagios監控Dell Server硬體是忽略Server固件版本
[root@nagios libexec]# ./check_openmanage -H 被監控主機IP
Controller 0 [PERC H700 Integrated]: Firmware '12.10.1-0001' is out of date
Controller 1 [PERC H800 Adapter]: Firmware '12.10.1-0001' is out of date
[root@nagios libexec]# ./check_openmanage -H 被監控主機IP -b ctrl_fw=all -b ctrl_driver=all -b ctrl_stdr=all
OK - System: 'PowerEdge R710 II', SN: '8Dxxx3X', 24 GB ram (6 dimms), 2 logical drives, 14 physical drives
Esx客服端安裝SNMP&OMSA組件
- Make sure ESXi has patch 1 installed (at least build 175625)…if not, update it.
- Make sure the root user has a password.
- Download and install vSphere remote CLI from VMware’s website.
- Download oem-dell-openmanage-esxi_6.1-0000.zip from the Dell Support web site and copy it to C:\Program Files\VMware\VMware vSphere CLI\bin on the system you installed the vSphere remote CLI.
- On the system where you installed the vSphere remote CLI, open a command prompt and change directory to C:\Program Files\VMware\VMware vSphere CLI\bin
- Type the following command:
- vihostupdate.pl --server <esxhost> --username root -i -b c:\oem-dell-openmanage-esxi_6.1-0000.zip
- Enter the root password at the prompt and after a few minutes you should see "Host updated successfully".
- Reboot the server.
- From the vSphere client:
- Choose the Configuration tab on the host
- Click Advanced Settings under the Software section
- In the dialog that appears click "UserVars" on the left
- Change the value of CIMOEMProvidersEnabled to 1
- Click OK.
- From the DCUI: Restart Management Agents
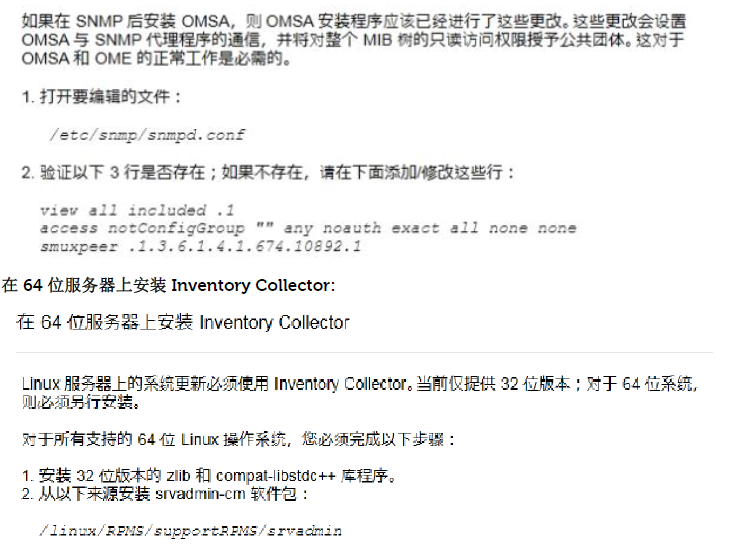
RedHat5.9客服端安裝SNMP&OMSA組件 所需安裝包Dell官網可自行下載 [root@localhost ~]# tar zxvf OM-SrvAdmin-Dell-Web-LX-7.3.0-350_A00.RHEL5.x86_64.tar.gz [root@localhost ~]# cd linux/RPMS/supportRPMS/opensource-components/RHEL5/ [root@localhost RHEL5]# cd x86_64/ [root@localhost x86_64]# ls libcmpiCppImpl0-2.0.0Dell-4.1.6.el5.x86_64.rpm libwsman1-2.2.3.9-4.1.7.el5.x86_64.rpm openwsman-client-2.2.3.9-4.1.7.el5.x86_64.rpm openwsman-server-2.2.3.9-4.1.7.el5.x86_64.rpm sblim-sfcb-1.3.7-4.13.1.el5.x86_64.rpm sblim-sfcc-2.2.1-4.7.1.el5.x86_64.rpm [root@localhost x86_64]# rpm -ivh libcmpiCppImpl0-2.0.0Dell-4.1.6.el5.x86_64.rpm [root@localhost x86_64]# rpm -ivh libwsman1-2.2.3.9-4.1.7.el5.x86_64.rpm openwsman-client-2.2.3.9-4.1.7.el5.x86_64.rpm [root@localhost1 x86_64]# rpm -ivh sblim-sfcb-1.3.7-4.13.1.el5.x86_64.rpm [root@localhost x86_64]# rpm -ivh sblim-sfcc-2.2.1-4.7.1.el5.x86_64.rpm [root@localhost x86_64]# rpm -ivh openwsman-server-2.2.3.9-4.1.7.el5.x86_64.rpm [root@localhost supportscripts]# pwd /root/linux/supportscripts [root@localhost supportscripts]# ./srvadmin-install.sh -x [root@localhost ~]# vim /etc/snmp/snmpd.conf
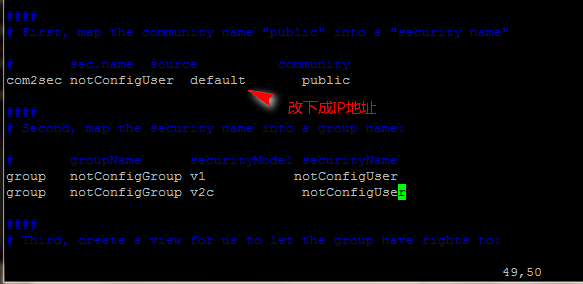
[root@xxxx supportscripts]# ./srvadmin-services.sh start Starting Systems Management Device Drivers: Starting dell_rbu: [ OK ] Starting ipmi driver: [ OK ] Starting Systems Management Data Engine: Starting dsm_sa_datamgrd: [ OK ] Starting dsm_sa_eventmgrd: [ OK ] Starting dsm_sa_snmpd: [ OK ] Starting DSM SA Shared Services: [ OK ] Starting DSM SA Connection Service: [ OK ] [root@anagios libexec]# ./check_openmanage -H 被監控服務ip OK - System: 'PowerEdge R720xd', SN: 'FTLxxxxx2', 8 GB ram (2 dimms), 14 logical drives, 12 physical drives 可以通過web方式訪問Openmanage管理頁面 在IE中輸入https://伺服器IP:1311,用操作系統的用戶名和密碼登陸即可正常訪問管理。 https://伺服器ip地址:1311/OMSALogin?msgStatus=null 指定IP地址訪問SNMP [root@localhost supportscripts]# vim /etc/snmp/snmpd.conf # sec.name source community com2sec notConfigUser [監控主機] public [root@localhost supportscripts]# /etc/init.d/snmpd restart Stopping snmpd: [ OK ] Starting snmpd: [ OK ]
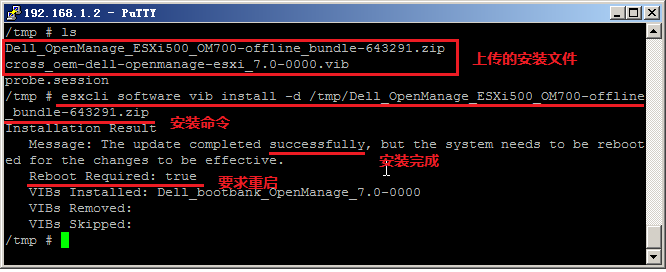
Esx系統安裝agent esxcli software vib install –d /<離線安裝包.zip>(一定要絕對路徑)
~ # esxcli system snmp set -e true
~ # esxcli system snmp set -t 伺服器IP地址@162/public ~ # esxcli system snmp get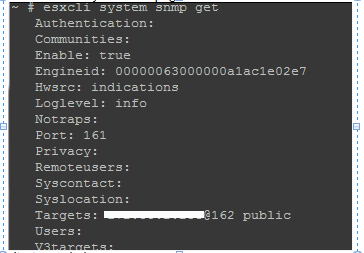
常用SNMP命令: esxcli system snmp -help #幫助命令 esxcli system snmp get #獲取配置 esxcli system snmp set <參數> <參數值> esxcli system snmp set -r #重置 esx測試 esxcli software vib list |grep hp /etc # esxcli software vib list |grep hp char-hpcru 5.0.6.6-1OEM.500.0.0.434156 Hewlett-Packard PartnerSupported 2014-11-19 char-hpilo 500.9.0.2.3-1OEM.500.0.0.434156 Hewlett-Packard PartnerSupported 2014-11-19 hp-ams 500.10.0.1-07.434156 Hewlett-Packard PartnerSupported 2014-11-19 hp-esxi-fc-enablement 500.2.1.8-434156 Hewlett-Packard PartnerSupported 2014-11-19 hp-smx-limited 500.03.06.00.21-434156 Hewlett-Packard VMwareAccepted 2014-11-19 ata-pata-hpt3x2n 0.3.4-3vmw.510.0.0.799733 VMware VMwareCertified 2013-09-18 scsi-hpsa 5.0.0-21vmw.510.0.0.799733 VMware VMwareCertified 2013-09-18 異常參考 ERROR: (SNMP) OpenManage is not installed or is not working correctly Windows 導致異常:先安裝OMSA再安裝SNMP 解決方法:卸載OMSA重新安裝一次,要先安裝SNMP再安裝OMSA Linux sed -r -i 's/^(SNMP)=disable$/\1=enable/' /opt/dell/srvadmin/etc/srvadmin-omilcore/install.ini rm /opt/dell/srvadmin/var/lib/srvadmin-deng/dcsnmp.off srvadmin-services.sh restart service snmpd restart http://en.community.dell.com/techcenter/systems-management/f/4494/t/19597153


