前言 轉載請標明出處:http://www.cnblogs.com/smfx1314/p/7795837.html 本項目是我寫的一個練習,目的是回顧ssh框架的整合以及使用。項目介紹:此項目主要有前臺管理員通過登錄進入員工管理系統頁面,之後可以對員工列表進行常規的增刪改查。以及部門列表的增刪改查。 ...
前言 轉載請標明出處:http://www.cnblogs.com/smfx1314/p/7795837.html
本項目是我寫的一個練習,目的是回顧ssh框架的整合以及使用。項目介紹:此項目主要有前臺管理員通過登錄進入員工管理系統頁面,之後可以對員工列表進行常規的增刪改查。以及部門列表的增刪改查。IDE使用的是eclipse,個人感覺比較好用,不過最近我正在研究idea,資料庫是mysql,前臺主要以bootstrap為主。
這點是直接摘抄的
struts 控制用的
hibernate 操作資料庫的
spring 用解耦的
Struts 、 spring 、 Hibernate 在各層的作用
1 ) struts 負責 web 層 .
ActionFormBean 接收網頁中表單提交的數據,然後通過 Action 進行處理,再 Forward 到對應的網頁。
在 struts-config.xml 中定義 <action-mapping>, ActionServlet 會載入。
2 ) spring 負責業務層管理,即 Service (或 Manager).
1 . service 為 action 提供統計的調用介面,封裝持久層的 DAO.
2 .可以寫一些自己的業務方法。
3 .統一的 javabean 管理方法
4 .聲明式事務管理
5. 集成 Hiberante
3 ) Hiberante ,負責持久化層,完成資料庫的 crud 操作
hibernate 為持久層,提供 OR/Mapping 。
它有一組 .hbm.xml 文件和 POJO, 是跟資料庫中的表相對應的。然後定義 DAO ,這些是跟資料庫打交道的類,它們會使用 PO 。
在 struts+spring+hibernate 的系統中,
對象的調用流程是: jsp-> Action - > Service ->DAO ->Hibernate 。
數據的流向是 ActionFormBean 接受用戶的數據, Action 將數據從 ActionFromBean 中取出,封裝成 VO 或 PO,
再調用業務層的 Bean 類,完成各種業務處理後再 forward 。而業務層 Bean 收到這個 PO 對象之後,會調用 DAO 介面方法,進行持久化操作。
spring:Aop管理事務控制,IoC管理各個組件的耦合,DaoTemplate作為常規持久層的快速開發模板!
struts:控制層Action,頁面標簽和Model數據,調用業務層
Hibernate:負責資料庫和對象的映射,負責DAO層(Data Access Object:數據訪問)
spring整合hibernate和struts,只要在配好了applicationContext.xml,在struts的action中直接調用就可以了。hibernate訪問資料庫的操作都在spring中實現了,spring的調用又在stuts的action中實現了。這個ssh框架就連到了一起……
備註
這裡關於mysql的表我就不貼出來了,這個大家可以根據實體類進行創建,我創建的是emp和dept表,他們之間是一對多關係。
另外,關於jsp頁面中的*.js,你可以根據jsp中的路徑自己創建
由於內容過多,今天我先說下ssh框架的整合
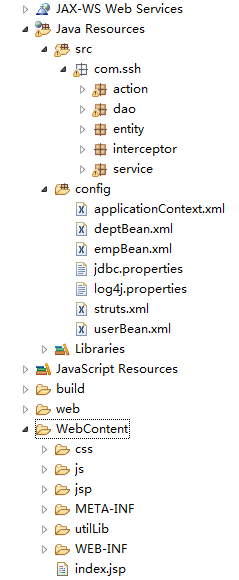
接下來讓我們看下目錄結構

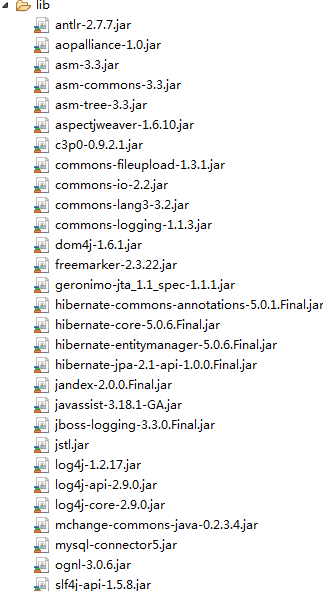
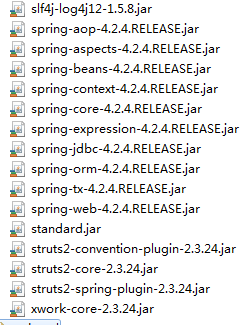
第一步,導入jar包


第二步:我們看下index.jsp頁面
<%@ page language="java" contentType="text/html; charset=UTF-8"
pageEncoding="UTF-8"%>
<%@ taglib uri="/struts-tags" prefix="s" %>
<!DOCTYPE html PUBLIC "-//W3C//DTD HTML 4.01 Transitional//EN" "http://www.w3.org/TR/html4/loose.dtd">
<html>
<head>
<meta charset="utf-8">
<meta http-equiv="Content-Type" content="IE=edge">
<title>登錄</title>
<script type="text/javascript" src="${pageContext.request.contextPath }/js/jquery.min.js"></script>
<link rel="stylesheet" href="${pageContext.request.contextPath }/utilLib/bootstrap.min.css" type="text/css" media="screen" />
</head>
<body>
<div class="div_from_aoto" style="width: 500px;">
<form action="${pageContext.request.contextPath }/user_login.action" method="post">
<div class="control-group">
<label class="laber_from">用戶名</label>
<div class="controls" ><input class="input_from" type=text name="username" placeholder=" 請輸入用戶名"></input><p class="help-block"></p></div>
</div>
<div class="control-group">
<label class="laber_from" >密碼</label>
<div class="controls" ><input class="input_from" type=password name="password" placeholder=" 請輸入密碼"></input><p class="help-block"></p></div>
</div>
<div class="control-group">
<label class="laber_from" ></label>
<div class="controls" >
<button class="btn btn-success" style="width:120px;" >確認</button>
</div>
</div>
</form>
</div>
</body>
</html>
上面主要使用了bootstrap框架。當然,登錄頁面我做的比較簡單,你也可以根據自己的感覺去寫效果
第三步是配置文件,首先我們配置web.xml
<?xml version="1.0" encoding="UTF-8"?>
<web-app xmlns:xsi="http://www.w3.org/2001/XMLSchema-instance" xmlns="http://java.sun.com/xml/ns/javaee" xmlns:web="http://java.sun.com/xml/ns/javaee/web-app_2_5.xsd" xsi:schemaLocation="http://java.sun.com/xml/ns/javaee http://java.sun.com/xml/ns/javaee/web-app_3_0.xsd" id="WebApp_ID" version="3.0">
<display-name>ssh-day02</display-name>
<welcome-file-list>
<welcome-file>index.jsp</welcome-file>
</welcome-file-list>
<!-- 載入spring監聽器 -->
<listener>
<listener-class>org.springframework.web.context.ContextLoaderListener</listener-class>
</listener>
<!-- 載入spring的配置文件applicationContext.xml -->
<context-param>
<param-name>contextConfigLocation</param-name>
<param-value>classpath:applicationContext.xml</param-value>
</context-param>
<!-- 解決no session問題 -->
<filter>
<filter-name>OpenSessionInviewFilter</filter-name>
<filter-class>org.springframework.orm.hibernate5.support.OpenSessionInViewFilter</filter-class>
</filter>
<filter-mapping>
<filter-name>OpenSessionInviewFilter</filter-name>
<url-pattern>/*</url-pattern>
</filter-mapping>
<!-- 配置Struts -->
<filter>
<filter-name>struts2</filter-name>
<filter-class>org.apache.struts2.dispatcher.ng.filter.StrutsPrepareAndExecuteFilter</filter-class>
</filter>
<filter-mapping>
<filter-name>struts2</filter-name>
<url-pattern>/*</url-pattern>
</filter-mapping>
<!-- 設置session有效時間 -->
<!-- <session-config>
<session-timeout>1</session-timeout>
</session-config> -->
</web-app>
都是些基本的配置,no session配置是後邊兩張表進行關聯查詢時session提前關閉的問題
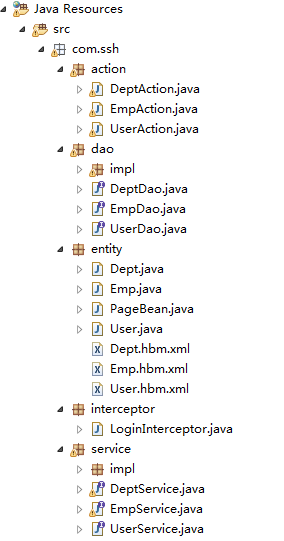
第四步:把對應的包類創建出來,方便我們在applicationContext.xml中配置bean實例

接下來我們開始配置applicationContext.xml
主要是創建資料庫連接池,創建sessionFactory ,配置hibernate屬性以及聲明式事務,aop(我這塊沒有用到,就沒有配置),以及bean的實例化配置
<?xml version="1.0" encoding="UTF-8"?>
<beans xmlns="http://www.springframework.org/schema/beans"
xmlns:xsi="http://www.w3.org/2001/XMLSchema-instance"
xmlns:aop="http://www.springframework.org/schema/aop"
xmlns:tx="http://www.springframework.org/schema/tx"
xmlns:context="http://www.springframework.org/schema/context"
xsi:schemaLocation="http://www.springframework.org/schema/beans
http://www.springframework.org/schema/beans/spring-beans.xsd
http://www.springframework.org/schema/tx
http://www.springframework.org/schema/tx/spring-tx.xsd
http://www.springframework.org/schema/aop
http://www.springframework.org/schema/aop/spring-aop.xsd
http://www.springframework.org/schema/context
http://www.springframework.org/schema/context/spring-context.xsd"> <!-- 整合hibernate -->
<!-- 1.配置資料庫-->
<bean id="dataSource" class="com.mchange.v2.c3p0.ComboPooledDataSource">
<property name="driverClass" value="com.mysql.jdbc.Driver"></property>
<property name="jdbcUrl" value="jdbc:mysql://localhost:3306/ssh2"></property>
<property name="user" value="root"></property>
<property name="password" value="1234"></property>
</bean>
<!-- 配置sessionFactory -->
<bean id="sessionFactory" class="org.springframework.orm.hibernate5.LocalSessionFactoryBean">
<!-- 數據源 -->
<property name="dataSource" ref="dataSource"></property>
<!-- 配置hibernate基本屬性 -->
<property name="hibernateProperties">
<props>
<prop key="hibernate.dialect">org.hibernate.dialect.MySQLDialect</prop>
<prop key="hibernate.show_sql">true</prop>
<prop key="hibernate.hbm2ddl.auto">update</prop>
</props>
</property>
<!-- 配置hibernate映射文件 -->
<property name="mappingResources">
<list>
<value>com/ssh/entity/User.hbm.xml</value>
<value>com/ssh/entity/Emp.hbm.xml</value>
<value>com/ssh/entity/Dept.hbm.xml</value>
</list>
</property>
</bean>
<!-- 配置hibernate事務 -->
<bean id="transactionManager" class="org.springframework.orm.hibernate5.HibernateTransactionManager">
<property name="sessionFactory" ref="sessionFactory"></property>
</bean>
<!-- 開啟事務 -->
<tx:annotation-driven transaction-manager="transactionManager"/>
<!-- 配置aop -->
</beans>
然後在引入Struts2的配置文件
<?xml version="1.0" encoding="UTF-8" ?>
<!DOCTYPE struts PUBLIC
"-//Apache Software Foundation//DTD Struts Configuration 2.3//EN"
"http://struts.apache.org/dtds/struts-2.3.dtd">
<struts>
<package name="ssh-day02" namespace="/" extends="struts-default">
</package>
</struts>
註意,上面把hibernate的配置文件和spring進行了整合,所有沒有單獨創建hibernate的配置文件。
到這裡,ssh的配置基本完成。運行成功就是一個登陸頁面


