
本文就linux中的壓縮工具gzip、bzip2和xz以及打包工具tar做出介紹,基本上能夠滿足工作中的需求和日常的使用。 ...
我們日常使用window的時候,經常會用到壓縮與解壓縮,如果要壓縮一個文件,右擊選擇【添加到壓縮文件】,解壓縮則右擊選擇【解壓到當前文件夾】,“點點點”就能完成。但是在一個沒有裝圖形化界面的linux操作系統又不能使用“點點點”,那該怎麼操作呢?本文就linux中如何使用壓縮和打包工具做出解釋。
為什麼要壓縮文件
壓縮的目的是為了就是將文件通過壓縮演算法轉變成一個體積更小格式的文件,減小了文件在硬碟上的占用空間,壓縮文件的時候,特別的消耗CPU的時鐘周期,因為CPU要進行大量的計算,所有壓縮也是一種拿時間換空間的操作,同時也能使文件能夠通過較慢的網路連接來實現更快的傳輸。
常用的壓縮工具
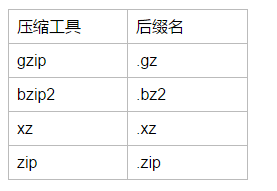
在linux操作系統中提供了很多的壓縮和解壓縮工具,每個壓縮工具在執行壓縮的時候所用的演算法是不一樣的,設計越優良的演算法,壓縮的程度就越高。比較老的壓縮工具有compress(現在已經不常用了),常用的壓縮工具有:gzip、bzip、xz和zip。我們可以通過尾碼名來區分壓縮文件是被什麼工具壓縮的,例如如果使用compress壓縮文件,得到的文件的尾碼名是.z,其他的壓縮的尾碼名如下:
gzip、gunzip和zcat
gzip是最常用的壓縮工具了,gunzip是對應的解壓縮工具。zcat可以在不解壓.gz格式的壓縮文件的情況下查看文件的內容。
語法:gzip [OPTION]... FILE...
常用選項: -d:解壓縮,相當於gunzip;
         -#:指定壓縮比,預設是6,數字越大壓縮比越大(1-9),壓縮比=壓縮前文件大小/壓縮後文件的大小;
         -c:將壓縮結果輸出至標準輸出。  gzip -c file  >  /path/to/somefile.gz
舉例:
將/etc/init.d/functions複製到tmp目錄下執行gzip壓縮:
[root@localhost tmp]# cp /etc/init.d/functions /tmp/
[root@localhost tmp]# ll
total 16
-rw-r--r--. 1 root root 15131 Sep  3 06:20 functions
[root@localhost tmp]# gzip functions
[root@localhost tmp]# ll
total 8
-rw-r--r--. 1 root root 4694 Sep  3 06:20 functions.gz
也可以使用gunzip,為了方便記憶,建議大家直接使用-d選項就好了:
[root@localhost tmp]# gzip functions
[root@localhost tmp]# ll
total 8
-rw-r--r--. 1 root root 4694 Sep  3 06:20 functions.gz
[root@localhost tmp]# gunzip functions.gz
[root@localhost tmp]# ll
total 16
-rw-r--r--. 1 root root 15131 Sep  3 06:20 functions
指定壓縮比:
[root@localhost tmp]# gzip -9 functions
[root@localhost tmp]# ll
total 8
-rw-r--r--. 1 root root 4686 Sep  3 06:20 functions.gz
將壓縮比設置為9之後,相對於壓縮比6,僅僅只減少了8個位元組,一般情況下都不需要去動壓縮比,因為6已經是一個最好的選擇。
使用-c將輸出結果至標準輸出,我們將看到一堆亂碼,那-c選項到底有什麼用呢?

我們在壓縮文件的時候原文件會被刪除,如果想保留原文件就可以通過-c選項來實現啦!
[root@localhost tmp]# gzip -c functions > functions.gz
[root@localhost tmp]# ll
total 24
-rw-r--r--. 1 root root 15131 Sep  3 06:20 functions
-rw-r--r--. 1 root root  4694 Sep  3 06:39 functions.gz
可以使用zcat在不解壓縮的情況下查看文件的內容:
[root@localhost tmp]# zcat functions.gz
# -*-Shell-script-*-
#
# functions    This file contains functions to be used by most or all
#        shell scripts in the /etc/init.d directory.
#

TEXTDOMAIN=initscripts

# Make sure umask is sane
umask 022

# Set up a default search path.
PATH="/sbin:/usr/sbin:/bin:/usr/bin"
......(略)
bzip2、bunzip2和bzcat
和gzip類似,bzip2為壓縮工具,bunzip2為解壓縮工具,同樣bzcat的作用了在不解壓文件的情況下,查看文件內容。
語法:bzip2 [OPTION]... FILE...
常用選項: -d:解壓縮,相當於bunzip2
         -#:指定壓縮比,預設是6,數字越大壓縮比越大(1-9)
         -k:keep,壓縮並保留原文件,bzip2不需要像gzip那樣使用輸出重定向至指定的文件,這樣就方便多啦
我們來舉例看一下:
將/etc/init.d/functions複製到tmp目錄下,使用bzip2壓縮:
[root@localhost tmp]# bzip2 functions
[root@localhost tmp]# ll
total 8
-rw-r--r--. 1 root root 4763 Sep  3 06:20 functions.bz2
說明bzip2在預設壓縮的情況下也會刪除原文件,節約了磁碟的空間。
再來看一下解壓縮的方法:
[root@localhost tmp]# ll
total 8
-rw-r--r--. 1 root root 4763 Sep  3 06:20 functions.bz2
[root@localhost tmp]#
[root@localhost tmp]# bunzip2 functions.bz2
[root@localhost tmp]# ll
total 16
-rw-r--r--. 1 root root 15131 Sep  3 06:20 functions
[root@localhost tmp]# bzip2 functions
[root@localhost tmp]# ll
total 8
-rw-r--r--. 1 root root 4763 Sep  3 06:20 functions.bz2
[root@localhost tmp]# bzip2 -d functions.bz2
[root@localhost tmp]# ll
total 16
-rw-r--r--. 1 root root 15131 Sep  3 06:20 functions
好吧,還是建議大家記住一個-d選項就好啦! 現在我們來使用以下-k選項:
[root@localhost tmp]# ll
total 16
-rw-r--r--. 1 root root 15131 Sep  3 06:20 functions
[root@localhost tmp]# bzip2 -k functions
[root@localhost tmp]# ll
total 24
-rw-r--r--. 1 root root 15131 Sep  3 06:20 functions
-rw-r--r--. 1 root root  4763 Sep  3 06:20 functions.bz2
使用bzcat在不打開壓縮文件的情況下查看文件的內容:
[root@localhost tmp]# bzcat functions.bz2
# -*-Shell-script-*-
#
# functions    This file contains functions to be used by most or all
#        shell scripts in the /etc/init.d directory.
#

TEXTDOMAIN=initscripts

# Make sure umask is sane
umask 022

# Set up a default search path.
PATH="/sbin:/usr/sbin:/bin:/usr/bin"
export PATH
......(略)
xz、unxz和xzcat
壓縮工具的新秀,xz為壓縮工具,unxz為解壓縮工具,xzcat也是在不打開壓縮文件的情況下查看文件內容。
語法:xz [OPTION]... FILE...
常用選項: -d:解壓縮
         -#:指定壓縮比,預設為6
         -k:壓縮並保留原文件
舉個例子吧! 將/etc/init.d/functions複製到tmp目錄下,使用xz壓縮:
[root@localhost tmp]# xz functions
[root@localhost tmp]# ll
total 8
-rw-r--r--. 1 root root 4576 Sep  3 06:20 functions.xz
解壓縮:
[root@localhost tmp]# unxz functions.xz     #使用unxz解壓縮
[root@localhost tmp]# ll
total 16
-rw-r--r--. 1 root root 15131 Sep  3 06:20 functions
[root@localhost tmp]# xz functions
[root@localhost tmp]# ll
total 8
-rw-r--r--. 1 root root 4576 Sep  3 06:20 functions.xz
[root@localhost tmp]# xz -d functions.xz   #使用-d選項解壓縮
[root@localhost tmp]# ll
total 16
-rw-r--r--. 1 root root 15131 Sep  3 06:20 functions
使用-k選項壓縮並保留原文件:
[root@localhost tmp]# xz -k  functions
[root@localhost tmp]# ll
total 24
-rw-r--r--. 1 root root 15131 Sep  3 06:20 functions
-rw-r--r--. 1 root root  4576 Sep  3 06:20 functions.xz
試試xzcat:
[root@localhost tmp]# xzcat functions.xz
# -*-Shell-script-*-
#
# functions    This file contains functions to be used by most or all
#        shell scripts in the /etc/init.d directory.
#

TEXTDOMAIN=initscripts

# Make sure umask is sane
umask 022

# Set up a default search path.
PATH="/sbin:/usr/sbin:/bin:/usr/bin"
export PATH
......(略)
擴展,是用man手冊的時候,我們會發現另外一個工具lzma、unlzma和lzcat,其尾碼名為.lzma,記住xz就好啦,它和lzma是有一定的關係的,詳細可見man手冊。
lzma is equivalent to xz --format=lzma
unlzma is equivalent to xz --format=lzma --decompress
lzcat is equivalent to xz --format=lzma --decompress --stdout
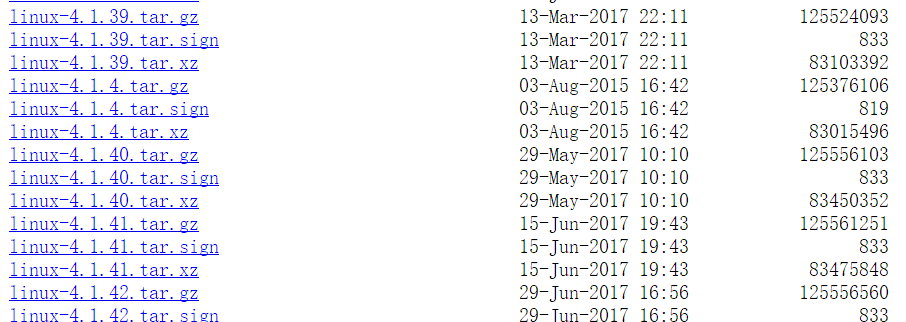
我們linux內核官網查找內核文件的時候,文件被壓縮使用的工具是gzip和xz,也可以看到xz的壓縮率更大。
https://www.kernel.org/pub/linux/kernel/v4.x/
現在存在的一個問題是,僅僅只是對單個文件進行壓縮,那麼這些工具能夠對目錄進行壓縮嗎?
我們在tmp文件下創建test目錄,拷貝幾個文件到裡面:
[root@localhost tmp]# ll /tmp/test/
total 332
-rw-r--r--. 1 root root  15131 Sep  3 06:59 functions
-rw-------. 1 root root 318014 Sep  3 06:59 messages
-rw-r--r--. 1 root root   1054 Sep  3 06:58 passwd
現在來試試壓縮目錄:
[root@localhost tmp]# gzip /tmp/test/
gzip: /tmp/test/ is a directory -- ignored
[root@localhost tmp]# bzip2 /tmp/test/
bzip2: Input file /tmp/test/ is a directory.
[root@localhost tmp]# xz /tmp/test/
xz: /tmp/test/: Is a directory, skipping
都不行,那該怎麼辦呢?接下來我們講講tar吧!
打包工具tar
tar命令是用來歸檔文件的,可以將多個文件或者一個目錄歸一成一個尾碼名為.tar的文件,歸檔文件並不會壓縮文件,反而可能使文件的大小稍微大一點,所以一般在歸檔之後再執行壓縮!。下麵我們就來看一下tar的使用方法吧!
語法:tar [OPTION]... FILE...
方法:
(1)創建歸檔
    -c -f /path/to/somefile.tar  file...
    -cf /path/to/somefile.tar  file...
(2)展開歸檔
    -xf /path/from/somefile.tar
    -xf /path/from/somefile.tar -C /path/to/somedir
(3)查看歸檔文件的文件列表
    -tf /path/to/somefile.tar
 歸檔之後然後進行壓縮,結合之前的壓縮工具,就能實現壓縮多個文件。
(4)歸檔壓縮
    -z:gzip2
        -zcf  /path/to/somefile.tar.gz   file...
        -zxf  /path/to/somefile.tar.gz   -C /path/to/somedir  #z可以去掉
    -j:bzip2
        -jcf  /path/to/somefile.tar.bz2   file...
        -jxf  /path/to/somefile.tar.bz2   -C /path/to/somedir  #j可以去掉
    -J:xz
        -Jcf  /path/to/somefile.tar.xz   file...
        -Jxf  /path/to/somefile.tar.xz   -C /path/to/somedir  #J可以去掉
下麵我們就將/tmp/test先使用tar打包成tar文件,再將tar壓縮成.xz的壓縮文件:
[root@localhost tmp]# tar -cf test.tar test/
[root@localhost tmp]# ll
total 340
drwxr-xr-x. 2 root root     53 Sep  3 06:59 test
-rw-r--r--. 1 root root 348160 Sep  3 07:35 test.tar
[root@localhost tmp]# xz test.tar
[root@localhost tmp]# ll
total 28
drwxr-xr-x. 2 root root    53 Sep  3 06:59 test
-rw-r--r--. 1 root root 26748 Sep  3 07:35 test.tar.xz
使用unxz解壓縮,再展開歸檔至/root下:
[root@localhost tmp]# unxz test.tar.xz #解壓縮
[root@localhost tmp]# ll
total 340
drwxr-xr-x. 2 root root     53 Sep  3 06:59 test
-rw-r--r--. 1 root root 348160 Sep  3 07:35 test.tar
[root@localhost tmp]# tar -xf test.tar  -C /root/   #展開歸檔至指定的目錄
[root@localhost tmp]# ll /root/
total 4
-rw-------. 1 root root 1707 Aug 10 07:14 anaconda-ks.cfg
drwxr-xr-x. 2 root root   53 Sep  3 06:59 test
這樣顯得有點麻煩,所有在生產環境中,我們一般直接使用選項-z,-j,-J來實現壓縮歸檔。
[root@localhost tmp]# tar -zcf  test.tar.gz  test/
[root@localhost tmp]# ll
total 48
drwxr-xr-x. 2 root root    53 Sep  3 06:59 test
-rw-r--r--. 1 root root 46416 Sep  3 07:48 test.tar.gz
[root@localhost tmp]#  tar -zxf  test.tar.gz  -C /root/
[root@localhost tmp]# ll /root/test/
total 332
-rw-r--r--. 1 root root  15131 Sep  3 06:59 functions
-rw-------. 1 root root 318014 Sep  3 06:59 messages
-rw-r--r--. 1 root root   1054 Sep  3 06:58 passwd
所有兩組命令 tar -zcf,tar -zxf 或者 tar -Jcf,tar -Jxf 的是非常好用的,也是最常用的組合。
zip和unzip
一個可以在windows和Linux共用的壓縮工具,方便在這兩種操作系統之間壓縮和解壓縮文件,這裡就簡單的看一下:
[root@localhost tmp]# ll
total 0
drwxr-xr-x. 2 root root 53 Sep  3 06:59 test
[root@localhost tmp]# zip test.zip test/
  adding: test/ (stored 0%)
[root@localhost tmp]# ll
total 4
drwxr-xr-x. 2 root root  53 Sep  3 06:59 test
-rw-r--r--. 1 root root 160 Sep  3 08:05 test.zip
[root@localhost tmp]# unzip test.zip -d /root/  #使用-d選項解壓至指定的文件夾
Archive:  test.zip
   creating: /root/test/
[root@localhost tmp]# ll /root/
total 4
-rw-------. 1 root root 1707 Aug 10 07:14 anaconda-ks.cfg
drwxr-xr-x. 2 root root    6 Sep  3 06:59 test


