簡介 RabbitMQ是流行的開源消息隊列系統,用erlang語言開發。RabbitMQ是AMQP(高級消息隊列協議)的標準實現。 安裝 首先安裝erlang環境。 官網:http://www.erlang.org/ Windows版下載地址:http://erlang.org/download/o... ...
簡介
RabbitMQ是流行的開源消息隊列系統,用erlang語言開發。RabbitMQ是AMQP(高級消息隊列協議)的標準實現。
安裝
首先安裝erlang環境。
官網:http://www.erlang.org/
Windows版下載地址:http://erlang.org/download/otp_win64_20.0.exe
Linux版:yum安裝
Windows安裝步驟
第一步運行

第二步
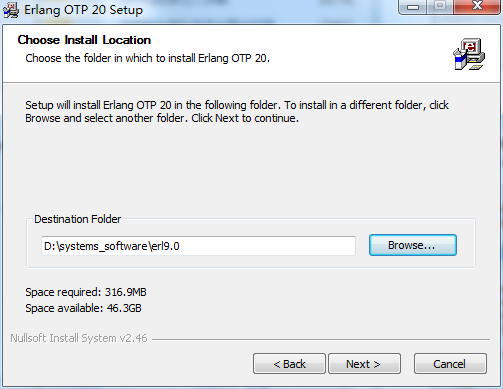
第三步
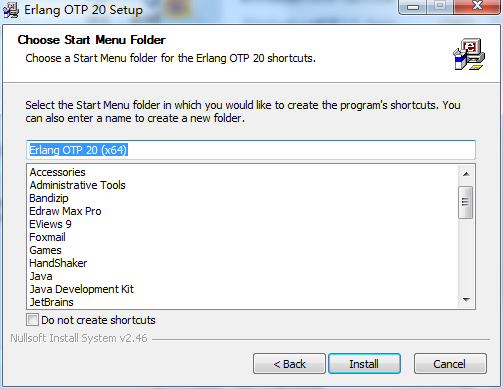
第四步
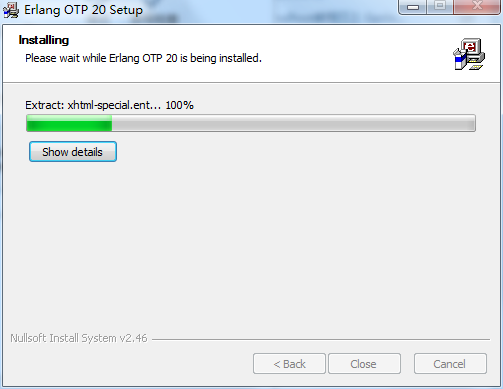
第五步

Erlang安裝完成。
然後安裝RabbitMQ,首先下載RabbitMQ的Windows版本。
官網:http://www.rabbitmq.com/
Windows版下載地址:http://www.rabbitmq.com/releases/rabbitmq-server/v3.6.10/rabbitmq-server-3.6.10.exe
打開安裝程式,按照下麵步驟安裝。
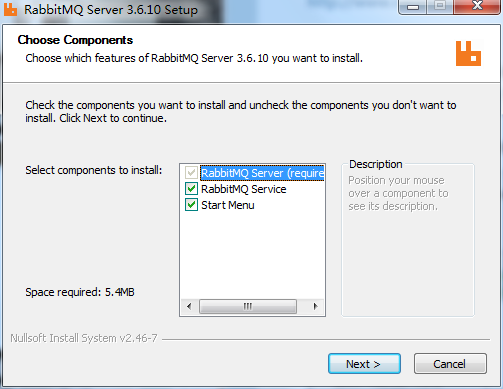

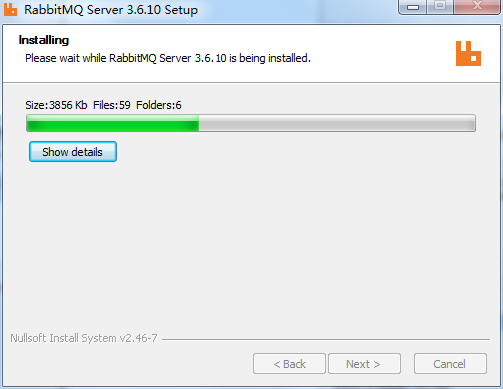
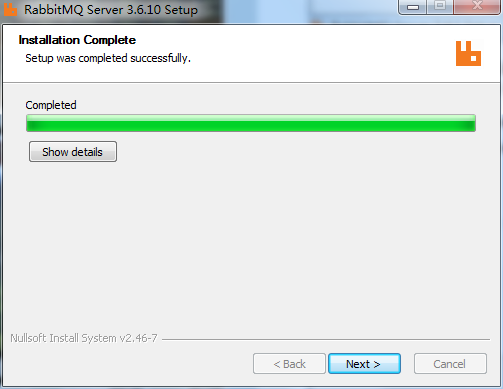
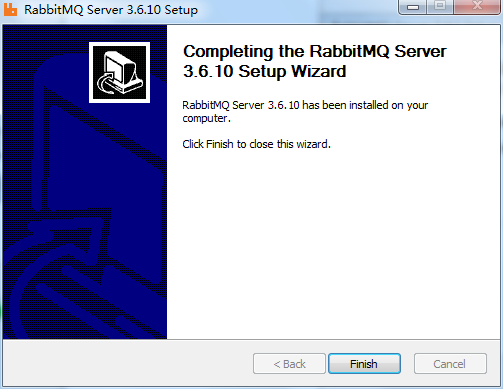
RabbitMQ安裝完成。
開始菜單中進入管理工具。

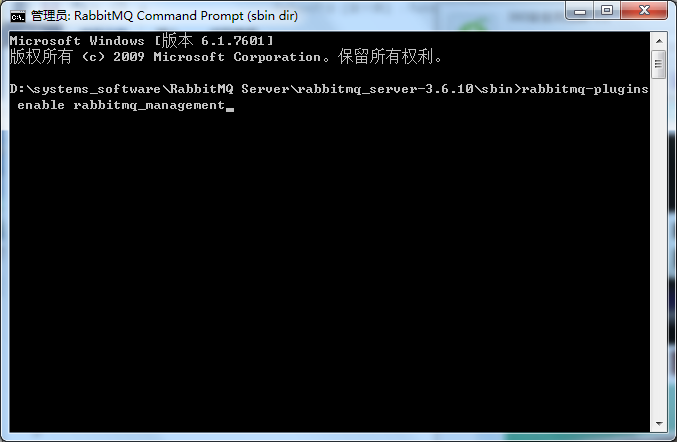
運行命令
- rabbitmq-plugins enable rabbitmq_management

查看RabbitMQ服務是否啟動。


至此全部安裝完成。
Linux安裝步驟
安裝erlang。
- yum -y install erlang
安裝RabbitMQ。
- wget https://github.com/rabbitmq/rabbitmq-server/archive/rabbitmq_v3_6_10.tar.gz
- rpm -ivh rabbitmq-server-3.6.10-1.el6.noarch.rpm
RabbitMQ安裝失敗,報錯如下。
- warning: rabbitmq-server-3.6.10-1.el6.noarch.rpm: Header V4 RSA/SHA512 Signature, key ID 6026dfca: NOKEY
- error: Failed dependencies:
- erlang >= R16B-03 is needed by rabbitmq-server-3.6.10-1.el6.noarch
- socat is needed by rabbitmq-server-3.6.10-1.el6.noarch
原因是yum安裝的erlang版本太低,這裡提供的RabbitMQ是最新版3.6.10,所需的erlang版本最低為R16B-03,否則編譯時將失敗,也就是上述錯誤。
重新安裝erlang。
- wget http://erlang.org/download/otp_src_20.0.tar.gz
- tar xvzf otp_src_20.0.tar.gz
- cd otp_src_20.0
- ./configure
- make && make install
重新安裝erlang完畢。
運行erlang。
- erl
- Erlang/OTP 20 [erts-9.0] [source] [64-bit] [smp:1:1] [ds:1:1:10] [async-threads:10] [hipe] [kernel-poll:false]
- Eshell V9.0 (abort with ^G)
安裝socat。
- yum install -y socat
再次安裝RabbitMQ。
- rpm -ivh rabbitmq-server-3.6.10-1.el6.noarch.rpm
- warning: rabbitmq-server-3.6.10-1.el6.noarch.rpm: Header V4 RSA/SHA512 Signature, key ID 6026dfca: NOKEY
- error: Failed dependencies:
- erlang >= R16B-03 is needed by rabbitmq-server-3.6.10-1.el6.noarch
上述錯誤信息顯示安裝失敗,因為rabbitMQ的依賴關係所導致,所以要忽略依賴,執行以下命令。
- rpm -ivh --nodeps rabbitmq-server-3.6.10-1.el6.noarch.rpm
安裝成功。
啟動、停止RabbitMQ。
- rabbitmq-server start #啟動
- rabbitmq-server stop #停止
- rabbitmq-server restart #重啟
RabbitMQ使用
實現最簡單的隊列通信
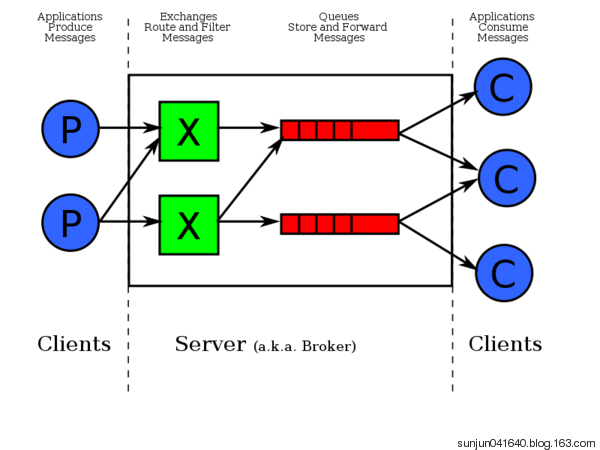
send端(producer)
- __author__ = 'Golden'
- #!/usr/bin/env python3
- # -*- coding:utf-8 -*-
- import pika
- connection = pika.BlockingConnection(pika.ConnectionParameters('localhost'))
- channel = connection.channel()
- # 聲明queue
- channel.queue_declare(queue='hello')
- channel.basic_publish(exchange='',
- routing_key='hello',
- body='hello word')
- print("[x] Sent 'hello word!'")
- connection.close()
receive端(consumer)
- __author__ = 'Golden'
- #!/usr/bin/env python3
- # -*- coding:utf-8 -*-
- import pika,time
- connection = pika.BlockingConnection(pika.ConnectionParameters('localhost'))
- channel = connection.channel()
- channel.queue_declare(queue='hello')
- def callback(ch,method,properties,body):
- print('-->',ch,method,properties)
- print("[x] Received %s" % body)
- channel.basic_consume(callback,
- queue='hello',
- no_ack=True
- )
- print('[*] waiting for messages.To exit press CTRL+C')
- channel.start_consuming()
no_ack分析
no_ack屬性是在調用Basic.Consume方法時可以設置的一個重要參數。no_ack的用途是確保message被consumer成功處理了。這裡成功的意識是,在設置了no_ack=false的情況下,只要consumer手動應答了Basic.Ack,就算其成功處理了。
no_ack=true(此時為自動應答)
在這種情況下,consumer會在接收到Basic.Deliver+Content-Header+Content-Body之後,立即回覆Ack,而這個Ack是TCP協議中的Ack。此Ack的回覆不關心consumer是否對接收到的數據進行了處理,當然也不關心處理數據所需要的耗時。
no_ack=False(此時為手動應答)
在這種情況下,要求consumer在處理完接收到的Basic.Deliver+Content-Header+Content-Body之後才回覆Ack,而這個Ack是AMQP協議中的Basic.Ack。此Ack的回覆與業務處理相關,所以具體的回覆時間應該要取決於業務處理的耗時。
總結
Basic.Ack發給RabbitMQ以告知,可以將相應message從RabbitMQ的消息從緩存中移除。
Basic.Ack未被consumer發給RabbitMQ前出現了異常,RabbitMQ發現與該consumer對應的連接被斷開,將該該message以輪詢方式發送給其他consumer(需要存在多個consumer訂閱同一個queue)。
在no_ack=true的情況下,RabbitMQ認為message一旦被deliver出去後就已被確認了,所以會立即將緩存中的message刪除,因此在consumer異常時會導致消息丟失。
來自consumer的Basic.Ack與發送給Producer的Basic.Ack沒有直接關係。
消息持久化
acknowledgment消息持久化
no-ack=False,如果consumer掛掉了,那麼RabbitMQ會重新將該任務添加到隊列中。
回調函數中
- ch.basic_ack(delivery_tag=method.delivery_tag)
basic_consume中
- no_ack=False
receive端(consumer)
- __author__ = 'Golden'
- #!/usr/bin/env python3
- # -*- coding:utf-8 -*-
- import pika,time
- connection = pika.BlockingConnection(pika.ConnectionParameters('localhost'))
- channel = connection.channel()
- channel.queue_declare(queue='hello')
- # 定義回調函數
- def callback(ch,method,properties,body):
- print('-->',ch,method,properties)
- print("[x] Received %s" % body)
- ch.basic_ack(delivery_tag=method.delivery_tag)
- # no_ack=False表示消費完以後不主動把狀態通知RabbitMQ
- channel.basic_consume(callback,
- queue='hello',
- no_ack=False
- )
- print('[*] waiting for messages.To exit press CTRL+C')
- channel.start_consuming()
durable消息持久化
producer發送消息時掛掉了,consumer接收消息時掛掉了,以下方法會讓RabbitMQ重新將該消息添加到隊列中。
回調函數中
- ch.basic_ack(delivery_tag=method.delivery_tag)
basic_consume中
- no_ack=False
basic_publish中添加參數
- properties=pika.BasicProperties(delivery_mode=2)
channel.queue_declare中添加參數
- channel.queue_declare(queue='hello',durable=True)
send端(producer)
- __author__ = 'Golden'
- #!/usr/bin/env python3
- # -*- coding:utf-8 -*-
- import pika
- connection = pika.BlockingConnection(pika.ConnectionParameters('localhost'))
- channel = connection.channel()
- # 聲明queue
- channel.queue_declare(queue='hello',durable=True)
- channel.basic_publish(exchange='',
- routing_key='hello',
- body='hello word',
- properties=pika.BasicProperties(delivery_mode=2))
- print("[x] Sent 'hello word!'")
- connection.close()
receive端(consumer)與acknowledgment消息持久化中receive端(consumer)相同。
消息分發
預設消息隊列里的數據是按照順序分發到各個消費者,但是大部分情況下,消息隊列後端的消費者伺服器的處理能力是不相同的,這就會出現有的伺服器閑置時間較長,資源浪費的情況。那麼,我們就需要改變預設的消息隊列獲取順序。可以在各個消費者端配置prefetch_count=1,意思就是告訴RabbitMQ在這個消費者當前消息還沒有處理完的時候就不要再發新消息了。

消費者端
- __author__ = 'Golden'
- #!/usr/bin/env python3
- # -*- coding:utf-8 -*-
- __author__ = 'Golden'
- #!/usr/bin/env python3
- # -*- coding:utf-8 -*-
- import pika,time
- connection = pika.BlockingConnection(pika.ConnectionParameters('localhost'))
- channel = connection.channel()
- channel.queue_declare(queue='hello2',durable=True)
- def callback(ch,method,properties,body):
- print('-->',ch,method,properties)
- print("[x] Received %s" % body)
- time.sleep(30)
- ch.basic_ack(delivery_tag=method.delivery_tag)
- channel.basic_qos(prefetch_count=1)
- channel.basic_consume(callback,
- queue='hello2',
- no_ack=False
- )
- print('[*] waiting for messages.To exit press CTRL+C')
- channel.start_consuming()
生產者端不變。
消息發佈和訂閱(publish\subscribe)
發佈和訂閱與簡單的消息隊列區別在於,發佈和訂閱會將消息發送給所有的訂閱者,而消息隊列中的數據被消費一次便消失。所以,RabbitMQ實現發佈和訂閱時,會為每一個訂閱者創建一個隊列,而發佈者發佈消息時,會將消息放置在所有相關隊列中。類似廣播的效果,這時候就要用到exchange。Exchange在定義的時候是有類型的,以決定到底是哪些Queue符合條件,可以接收消息。
fanout:所有bind到此exchange的queue都可以接收消息。
direct:通過routingKey和exchange決定的哪個唯一的queue可以接收消息。
topic:所有符合routingKey(可以是一個表達式)的routingKey所bind的queue可以接收消息。
表達式符號說明
#:一個或多個字元
*:任何字元
例如:#.a會匹配a.a,aa.a,aaa.a等。
*.a會匹配a.a,b.a,c.a等。
註意:使用RoutingKey為#,Exchange Type為topic的時候相對於使用fanout。
heaers:通過headers來決定把消息發給哪些queue。

publisher
- __author__ = 'Golden'
- #!/usr/bin/env python3
- # -*- coding:utf-8 -*-
- import pika,sys
- connection = pika.BlockingConnection(pika.ConnectionParameters(host='localhost'))
- channel = connection.channel()
- channel.exchange_declare(exchange='logs',type='fanout')
- message = ''.join(sys.argv[1:]) or 'info:Hello World!'
- channel.basic_publish(exchange='logs',
- routing_key='',
- body=message)
- print('[x] Send %r' % message)
- connection.close()
subscriber
- __author__ = 'Golden'
- #!/usr/bin/env python3
- # -*- coding:utf-8 -*-
- import pika
- connection = pika.BlockingConnection(pika.ConnectionParameters(host='localhost'))
- channel = connection.channel()
- channel.exchange_declare(exchange='logs',type='fanout')
- # 不指定queue名字,rabbit會隨機分配一個名字,exclusive=True會在使用此queue的消費者斷開後,自動將queue刪除
- result = channel.queue_declare(exclusive=True)
- queue_name = result.method.queue
- channel.queue_bind(exchange='logs',queue=queue_name)
- print('[*]Waiting for logs.To exit press CTRL+C')
- def callback(ch,method,properties,body):
- print('[*] %s'%body)
- channel.basic_consume(callback,
- queue=queue_name,
- no_ack=True)
- channel.start_consuming()
關鍵字發送(echange type=direct)
發送消息時明確指定某個隊列並向其中發送消息,RabbitMQ還支持根據關鍵字發送,即隊列綁定關鍵字,發送者將數據根據關鍵字發送到消息exchange,exchange根據關鍵字判定應該將數據發送至哪個隊列。

publisher
- __author__ = 'Golden'
- #!/usr/bin/env python3
- # -*- coding:utf-8 -*-
- import pika,sys
- connection = pika.BlockingConnection(pika.ConnectionParameters(host='localhost'))
- channel = connection.channel()
- channel.exchange_declare(exchange='direct_logs',
- type='direct')
- # severity = 'error'
- severity = sys.argv[1] if len(sys.argv) > 1 else 'info'
- # message = 'Hello World!'
- message = ''.join(sys.argv[2:]) or 'Hello World!'
- channel.basic_publish(exchange='direct_logs',
- routing_key=severity,
- body=message)
- print('[x] Send %r:%r' % (severity,message))
- connection.close()
subscriber
- __author__ = 'Golden'
- #!/usr/bin/env python3
- # -*- coding:utf-8 -*-
- import pika,sys
- connection = pika.BlockingConnection(pika.ConnectionParameters(host='localhost'))
- channel = connection.channel()
- channel.exchange_declare(exchange='direct_logs',
- type='direct')
- result = channel.queue_declare(exclusive=True)
- queue_name = result.method.queue
- severities = sys.argv[1:]
- if not severities:
- sys.stderr.write('Usage: %s [info] [warning] [error]\n' % sys.argv[0])
- sys.exit(1)
- for severity in severities:
- channel.queue_bind(exchange='direct_logs',
- queue=queue_name,
- routing_key=severity)
- print('[*] Waiting for logs.To exit press CTRL+C')
- def callback(ch,method,properties,body):
- print('[*] %r:%r' % (method.routing_key,body))
- channel.basic_consume(callback,
- queue=queue_name,
- no_ack=True)
- channel.start_consuming()
啟動subscriber1
- python3 direct_subscriber.py warning
啟動subscriber2
- python3 direct_subscriber.py error
啟動publisher1
- python3 direct_publisher.py info
啟動publisher2
- python3 direct_publisher.py warning
啟動publisher3
- python3 direct_publisher.py error
結果
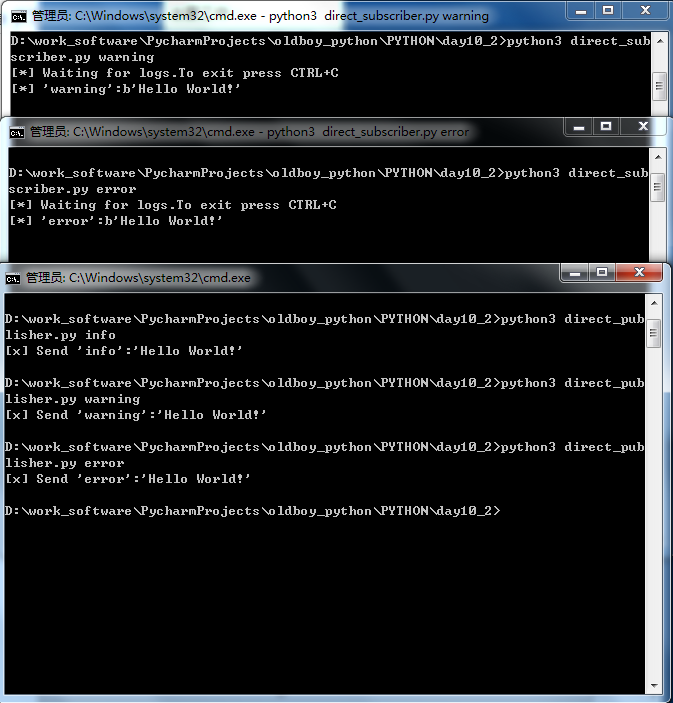
模糊匹配(exchange type=topic)
在topic類型下,可以讓隊列綁定幾個模糊的關鍵字,發送者將數據發送到exchange,exchange將傳入"路由值"和"關鍵字"進行匹配,匹配成功則將數據發送到指定隊列。

*:匹配任意一個字元
#:匹配任意個字元
publisher
- __author__ = 'Golden'
- #!/usr/bin/env python3
- # -*- coding:utf-8 -*-
- import pika,sys
- connection = pika.BlockingConnection(pika.ConnectionParameters(host='localhost'))
- channel = connection.channel()
- channel.exchange_declare(exchange='topic_logs',
- type='topic')
- routing_key = sys.argv[1] if len(sys.argv) > 1 else 'anonymous.info'
- message = ''.join(sys.argv[2:]) or 'Hello World!'
- channel.basic_publish(exchange='topic_logs',
- routing_key=routing_key,
- body=message)
- print('[x] Sent %r:%r' % (routing_key,message))
- connection.close()
subscriber
- __author__ = 'Golden'
- #!/usr/bin/env python3
- # -*- coding:utf-8 -*-
- import pika,sys
- connection = pika.BlockingConnection(pika.ConnectionParameters(host='localhost'))
- channel = connection.channel()
- channel.exchange_declare(exchange='topic_logs',
- type='topic')
- result = channel.queue_declare(exclusive=True)
- queue_name = result.method.queue
- binding_keys = sys.argv[1:]
- if not binding_keys:
- sys.stderr.write('Usage: %s [binding_key]...\n' % sys.argv[0])
- sys.exit(1)
- for binding_key in binding_keys:
- channel.queue_bind(exchange='topic_logs',
- queue=queue_name,
- routing_key=binding_key)
- print('[*] Waiting for logs.To exit press CTRL+C')
- def callback(ch,method,properties,body):
- print('[x] %r:%r' % (method.routing_key,body))
- channel.basic_consume(callback,
- queue=queue_name,
- no_ack=True)
- channel.start_consuming()
測試

遠程過程調用(RPC)
RPC(Remote Procedure Call Protocol)遠程過程調用協議。在一個大型的公司,系統由大大小小的服務構成,不同的團隊維護不同的代碼,部署在不同的伺服器。但是在做開發的時候往往要用到其他團隊的方法,因為已經有了實現。但是這些服務部署在不同的伺服器,想要調用就需要網路通信,這些代碼繁瑣且複雜,一不小心就會很低效。PRC協議定義了規劃,其它的公司都給出了不同的實現。比如微軟的wcf,以及WebApi。
在RabbitMQ中RPC的實現是很簡單高效的,現在客戶端、服務端都是消息發佈者與消息接受者。
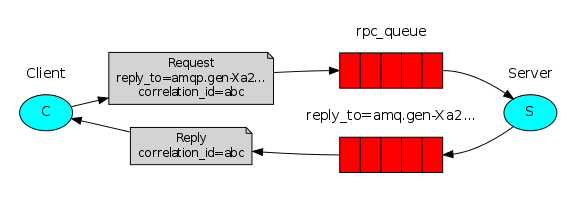
首先客戶端通過RPC向服務端發生請求。correlation_id:請求標識,erply_to:結果返回隊列。(我這裡有一些數據需要你給我處理一下,correlation_id是我請求標識,你處理完成之後把結果返回到erply_to隊列)
服務端拿到請求,開始處理並返回。correlation_id:客戶端請求標識。(correlation_id這是你的請求標識,還給你。這時候客戶端用自己的correlation_id與服務端返回的correlation_id進行對比,相同則接收。)
rpc_server
- __author__ = 'Golden'
- #!/usr/bin/env python3
- # -*- coding:utf-8 -*-
- import pika,time
- connection = pika.BlockingConnection(pika.ConnectionParameters(host='localhost'))
- channel = connection.channel()
- channel.queue_declare(queue='rpc_queue')
- def fib(n):
- if n == 0:
- return 0
- elif n == 1:
- return 1
- else:
- return fib(n-1) + fib(n-2)
- def on_request(ch,method,props,body):
- n = int(body)
- print('[.] fib(%s)' % n)
- response = fib(n)
- ch.basic_publish(exchange='',
- routing_key=props.reply_to,
- properties=pika.BasicProperties(correlation_id=props.correlation_id),
- body = str(response))
- ch.basic_ack(delivery_tag=method.delivery_tag)
- channel.basic_qos(prefetch_count=1)
- channel.basic_consume(on_request,queue='rpc_queue')
- print('[x] Awaiting RPC requests')
- channel.start_consuming()
rpc_client
- __author__ = 'Golden'
- #!/usr/bin/env python3
- # -*- coding:utf-8 -*-
- import pika,uuid
- class FibonacciRpcClient(object):
- def __init__(self):
- self.connection = pika.BlockingConnection(pika.ConnectionParameters(host='localhost'))
- self.channel = self.connection.channel()
- result = self.channel.queue_declare(exclusive=True)
- self.callback_queue = result.method.queue
- self.channel.basic_consume(self.on_response,no_ack=True,
- queue=self.callback_queue)
- def on_response(self,ch,method,props,body):
- if self.corr_id == props.correlation_id:
- self.response = body
- def call(self,n):
- self.response = None
- self.corr_id = str(uuid.uuid4())
- self.channel.basic_publish(exchange='',
- routing_key='rpc_queue',
- properties=pika.BasicProperties(
- reply_to=self.callback_queue,
- correlation_id=self.corr_id,),
- body=str(n))
- while self.response is None:
- self.connection.process_data_events()
- return int(self.response)
- fibonacci_rpc = FibonacciRpcClient()
- print('[x] Requesting fib(10)')
- response = fibonacci_rpc.call(10)
- print('[.] Got %r ' % response)


