imageView圖片放大縮小及旋轉 一、簡介 二、方法 1)設置圖片放大縮小效果 第一步:將<ImageView>標簽中的android:scaleType設置為"fitCenter" android:scaleType="fitCenter" 第二步:獲取屏幕的寬度 DisplayMetrics ...
imageView圖片放大縮小及旋轉
一、簡介

二、方法
1)設置圖片放大縮小效果
第一步:將<ImageView>標簽中的android:scaleType設置為"fitCenter"
android:scaleType="fitCenter"
第二步:獲取屏幕的寬度
DisplayMetrics dm=new DisplayMetrics();
getWindowManager().getDefaultDisplay().getMetrics(dm);
dm.widthPixels
第三步:設置seekBar的最大progree值為屏幕寬度
sb_one.setMax(dm.widthPixels);
第四步:設置imageview的佈局參數,也就是寬和高,也就是畫布的寬高
int width=progress;
int height=progress*3/4;
iv_pic.setLayoutParams(new LinearLayout.LayoutParams(width, height));
2)設置圖片旋轉方法
第一步:給matrix設置角度,用於新的bitmap
private Matrix matrix;
matrix=new Matrix();
matrix.setRotate((int)(progress*3.60));
第二步:獲取bitmap資源
BitmapDrawable bitmapDrawable=(BitmapDrawable)(getResources().getDrawable(R.drawable.image1));
Bitmap bitmap=bitmapDrawable.getBitmap();
第三步:重建bitmap用於顯示
Bitmap newBitmap=bitmap.createBitmap(bitmap, 0, 0, bitmap.getWidth(), bitmap.getHeight(),matrix,false);
第四步:給imageview設置新的bitmap
iv_pic.setImageBitmap(newBitmap);
三、代碼實例
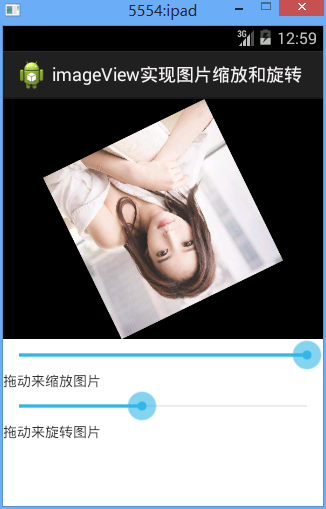
效果圖:

設置大小和設置旋轉的效果圖


代碼:
fry.Activity02
 1 package fry;
 2
 3 import com.example.iamgeViewDemo1.R;
 4
 5 import android.app.Activity;
 6 import android.graphics.Bitmap;
 7 import android.graphics.Matrix;
 8 import android.graphics.drawable.BitmapDrawable;
 9 import android.os.Bundle;
10 import android.util.DisplayMetrics;
11 import android.view.ViewGroup.LayoutParams;
12 import android.widget.ImageView;
13 import android.widget.LinearLayout;
14 import android.widget.SeekBar;
15 import android.widget.SeekBar.OnSeekBarChangeListener;
16
17 public class Activity02 extends Activity implements OnSeekBarChangeListener{
18     private ImageView iv_pic;
19     private SeekBar sb_one;
20     private SeekBar sb_two;
21     private Matrix matrix;
22
23     @Override
24     protected void onCreate(Bundle savedInstanceState) {
25         // TODO Auto-generated method stub
26         setTitle("imageView實現圖片縮放和旋轉");
27         super.onCreate(savedInstanceState);
28         setContentView(R.layout.activity02);
29
30         iv_pic=(ImageView) findViewById(R.id.iv_pic);
31         sb_one=(SeekBar) findViewById(R.id.sb_one);
32         sb_two=(SeekBar) findViewById(R.id.sb_two);
33         //設置SeekBar的progress值改變監聽事件
34         sb_one.setOnSeekBarChangeListener(this);
35         sb_two.setOnSeekBarChangeListener(this);
36
37         matrix=new Matrix();
38
39 //        1)設置圖片放大縮小效果
40 //
41 //        第一步:將<ImageView>標簽中的android:scaleType設置為"fitCenter"
42 //
43 //        第二步:獲取屏幕的寬度
44 //
45 //        第三步:設置seekBar的最大progree值為屏幕寬度
46 //
47 //        第四步:設置imageview的佈局參數,也就是寬和高,也就是畫布的寬高
48
49
50
51         //設置圖片放大縮小效果
52         //第一步:獲取屏幕的寬度
53         DisplayMetrics dm=new DisplayMetrics();
54         getWindowManager().getDefaultDisplay().getMetrics(dm);
55         //第二步:設置seekBar的最大progree值為屏幕寬度
56         sb_one.setMax(dm.widthPixels);
57     }
58     @Override
59     public void onProgressChanged(SeekBar seekBar, int progress,
60             boolean fromUser) {
61         // TODO Auto-generated method stub
62         switch (seekBar.getId()) {
63         case R.id.sb_one://放大或縮小
64             int width=progress;
65             int height=progress*3/4;
66             //第三步:設置imageview的佈局參數,也就是寬和高,也就是畫布的寬高
67             iv_pic.setLayoutParams(new LinearLayout.LayoutParams(width, height));
68             break;
69         case R.id.sb_two://旋轉
70             //設置旋轉度數
71             //設置圖片旋轉方法
72             //第一步:給matrix設置角度,用於新的bitmap
73             matrix.setRotate((int)(progress*3.60));
74             //第二步:獲取bitmap資源
75             BitmapDrawable bitmapDrawable=(BitmapDrawable)(getResources().getDrawable(R.drawable.image1));
76             Bitmap bitmap=bitmapDrawable.getBitmap();
77             //第三步:重建bitmap用於顯示
78             Bitmap newBitmap=bitmap.createBitmap(bitmap, 0, 0, bitmap.getWidth(), bitmap.getHeight(),matrix,false);
79             //第四步:給imageview設置新的bitmap
80             iv_pic.setImageBitmap(newBitmap);
81             break;
82         default:
83             break;
84         }
85
86
87
88     }
89     @Override
90     public void onStartTrackingTouch(SeekBar seekBar) {
91         // TODO Auto-generated method stub
92
93     }
94     @Override
95     public void onStopTrackingTouch(SeekBar seekBar) {
96         // TODO Auto-generated method stub
97
98     }
99 }
activity02.xml
 1 <?xml version="1.0" encoding="utf-8"?>
 2 <LinearLayout xmlns:android="http://schemas.android.com/apk/res/android"
 3     android:layout_width="match_parent"
 4     android:layout_height="match_parent"
 5     android:orientation="vertical" >
 6
 7     <ImageView
 8         android:id="@+id/iv_pic"
 9         android:layout_width="match_parent"
10         android:layout_height="300dip"
11         android:background="@android:color/black"
12         android:scaleType="fitCenter"
13         android:src="@drawable/image1"
14         />
15     <!-- 設置圖片的顯示方式:把圖片按比例擴大/縮小到view的寬度,居中顯示 -->
16     <SeekBar
17         android:id="@+id/sb_one"
18         android:layout_width="match_parent"
19         android:layout_height="wrap_content"
20         android:progress="100"
21         />
22
23     <TextView
24         android:layout_width="match_parent"
25         android:layout_height="wrap_content"
26         android:text="拖動來縮放圖片"
27         />
28     <SeekBar
29         android:id="@+id/sb_two"
30         android:layout_width="match_parent"
31         android:layout_height="wrap_content"
32         />
33     <TextView
34         android:layout_width="match_parent"
35         android:layout_height="wrap_content"
36         android:text="拖動來旋轉圖片"
37         />
38
39 </LinearLayout>
四、收穫
1、設置圖像居中顯示
android:scaleType="fitCenter"
2、矩陣對象
private Matrix matrix;
在Android中,如果你用Matrix進行過圖像處理,那麼一定知道Matrix這個類。android中的Matrix是一個3 x 3的矩陣。
在 Android 開發中,矩陣是一個功能強大並且應用廣泛的神器,例如:用它來製作動畫效果、改變圖片大小、給圖片加各類濾鏡等。
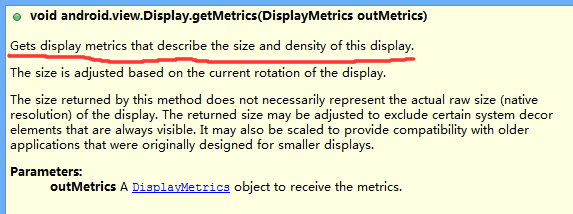
3、DisplayMetrics對象,用於屏幕大小等的顯示
DisplayMetrics dm=new DisplayMetrics();

4、獲取手機屏幕寬度
DisplayMetrics dm=new DisplayMetrics();
getWindowManager().getDefaultDisplay().getMetrics(dm);
sb_one.setMax(dm.widthPixels);
5、用LinearLayout設置imageView畫布參數
iv_pic.setLayoutParams(new LinearLayout.LayoutParams(width, height));
6、matrix設置旋轉
matrix.setRotate((int)(progress*3.60));
7、BitmapDrawable類,其實也是獲取圖片資源
BitmapDrawable bitmapDrawable=(BitmapDrawable)(getResources().getDrawable(R.drawable.image1));

8、bitmapDrawable到bitmap
Bitmap bitmap=bitmapDrawable.getBitmap();
9、新建bitmap
Bitmap newBitmap=bitmap.createBitmap(bitmap, 0, 0, bitmap.getWidth(), bitmap.getHeight(),matrix,false);
10、給imageView設置bitmap
iv_pic.setImageBitmap(newBitmap);


