
目錄: 小孫想要總結這一年來學到的關於stm32的USB相關知識,但又不知道怎麼總結,於是決定 從頭開始調試固件庫代碼,直到實現USB功能為止! 首先準備參照正點原子《第88講 USB虛擬串口實驗-M3》,把HID相關庫包含進工程中,工 程選用正點原子的USART試驗。因為目前手裡的開發板是“微雪電 ...
目錄: 小孫想要總結這一年來學到的關於stm32的USB相關知識,但又不知道怎麼總結,於是決定 從頭開始調試固件庫代碼,直到實現USB功能為止! 首先準備參照正點原子《第88講 USB虛擬串口實驗-M3》,把HID相關庫包含進工程中,工 程選用正點原子的USART試驗。因為目前手裡的開發板是“微雪電子”的stm32f103cbt6開發板, 其硬體串口為:USART1(PA9和PA10)和SART2(PA2和PA3)。準備先把正點原子《實驗4-串口 實驗》實例代碼移植到這款開發板上,好方便以後調試使用。 因為正點原子stm32f1開發板使用的晶振和手裡的開發板一樣都是8M的,所以在Keil里直接修 改MCU型號和Flash大小後準備編譯下載。沒有報錯。
 查看代碼中串口初始化函數,發現代碼中如下語句:
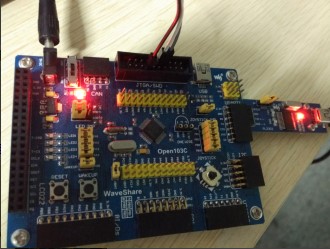
 是使用串口1,於是把開發板上的USART1插上USB轉串口模塊。準備下載後調試。
 插上模塊後開始下載,結果發現不能下載,報錯信息如下圖所示:
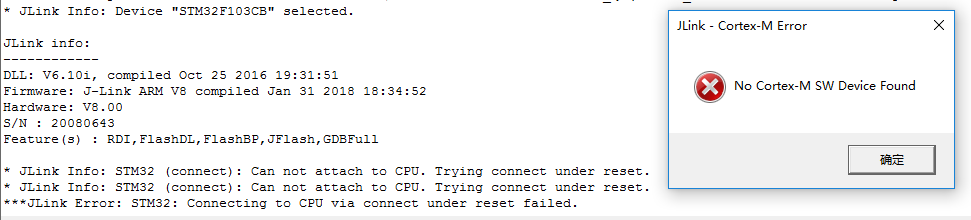 猜測可能是串口模塊干擾到SWD下載,於是把串口模塊拔掉。結果發現開發板沒電了。
也就是說,剛剛是靠串口模塊供電的。即剛剛也可能是MCU供電不足導致無法下載。於是
先撥動開關,用外接電源給開發板供電,
猜測可能是串口模塊干擾到SWD下載,於是把串口模塊拔掉。結果發現開發板沒電了。
也就是說,剛剛是靠串口模塊供電的。即剛剛也可能是MCU供電不足導致無法下載。於是
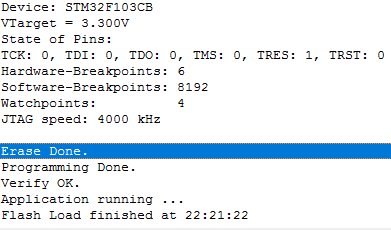
先撥動開關,用外接電源給開發板供電,
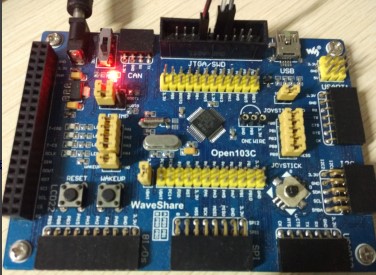
然後再重新燒錄,結果一次就成功了。
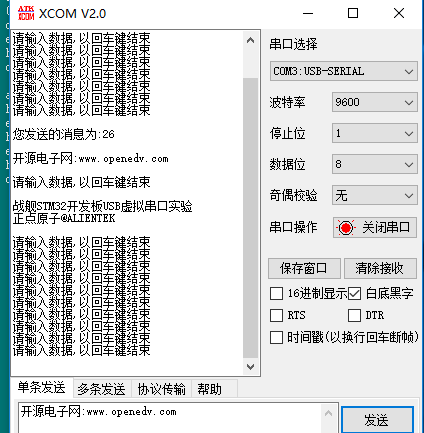
 下麵先把USB轉串口模塊插回開發板的USART1,測試串口功能是否正常。
打開串口調試工具,選擇串口後,點擊“打開串口”,串口調試助手就開始接受數據了。
下麵先把USB轉串口模塊插回開發板的USART1,測試串口功能是否正常。
打開串口調試工具,選擇串口後,點擊“打開串口”,串口調試助手就開始接受數據了。
 也就是說,正點原子的stm32f1串口代碼只要在Keil中修改MCU和flash大小後,可以在微雪
開發板上直接使用。
接下來就要準備開始USB相關的工程了。
這裡準備大致分為四布調試:
第一步:瞭解正點原子的USB虛擬串口實現步驟(不需要記得,大致看一下,需要時再
回頭仔細看);
第二步:下載正點原子的USB虛擬串口代碼到微雪開發板,看是否能正常工作。如果能
正常工作,則可以輕鬆地執行第三步;否則需要先查找原因,直到可以正常工作時,再執
行第三步;
第三步:不管第二部分是否正常工作,都需要親自按照第一步的步驟重新移植一遍,為
移植HID做準備;
第四步:參照第三步的步驟,移植ST官方庫中的HID代碼到微雪開發板。
--------------- 第一步: (不想看可以先跳過去,直接看第二步)----------
正點原子視頻教程中USB虛擬串口實現步驟如下:
正點原子f1開發板中USB硬體用的是PA11和PA12。微雪電子開發板中用的也是PA11
和PA12。查看f103收據手冊發現,這款MCU就只有這一個USB介面,所以不用擔心搞錯
介面了。正點原子和微雪開發板上都是在USB_D+上接1.5k上拉電阻,說明都定義此USB
是高速設備。
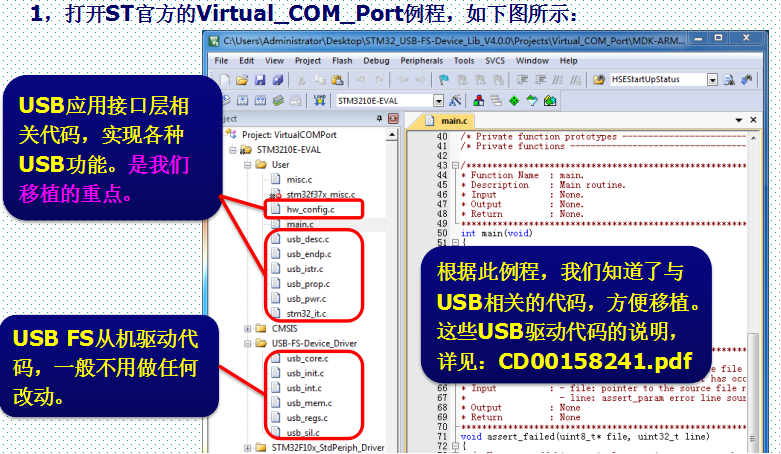
下麵是《第88講 USB虛擬串口試驗-M3》PPT中移植ST官方的Virtual_COM_Port常式的過程:
也就是說,正點原子的stm32f1串口代碼只要在Keil中修改MCU和flash大小後,可以在微雪
開發板上直接使用。
接下來就要準備開始USB相關的工程了。
這裡準備大致分為四布調試:
第一步:瞭解正點原子的USB虛擬串口實現步驟(不需要記得,大致看一下,需要時再
回頭仔細看);
第二步:下載正點原子的USB虛擬串口代碼到微雪開發板,看是否能正常工作。如果能
正常工作,則可以輕鬆地執行第三步;否則需要先查找原因,直到可以正常工作時,再執
行第三步;
第三步:不管第二部分是否正常工作,都需要親自按照第一步的步驟重新移植一遍,為
移植HID做準備;
第四步:參照第三步的步驟,移植ST官方庫中的HID代碼到微雪開發板。
--------------- 第一步: (不想看可以先跳過去,直接看第二步)----------
正點原子視頻教程中USB虛擬串口實現步驟如下:
正點原子f1開發板中USB硬體用的是PA11和PA12。微雪電子開發板中用的也是PA11
和PA12。查看f103收據手冊發現,這款MCU就只有這一個USB介面,所以不用擔心搞錯
介面了。正點原子和微雪開發板上都是在USB_D+上接1.5k上拉電阻,說明都定義此USB
是高速設備。
下麵是《第88講 USB虛擬串口試驗-M3》PPT中移植ST官方的Virtual_COM_Port常式的過程:


 《stm32f1開髮指南-庫函數版本》中USB虛擬串口的實現步驟如下:


 --------------- 第一步結束------------------------------------------------------------------------
--------------- 第二步: ---------------------------------------------------------------------------
好了,下麵是第二部分,直接下載正點原子開發板的程式,看是否能正常用,如果能
正常工作,則可以放心的執行第三步;否則,需要先查找到原因後再執行第三步。
為了避免液晶和串口功能的干擾,我們先屏蔽掉代碼中的液晶和串口部分的功能。
下載後實現效果如下:
--------------- 第一步結束------------------------------------------------------------------------
--------------- 第二步: ---------------------------------------------------------------------------
好了,下麵是第二部分,直接下載正點原子開發板的程式,看是否能正常用,如果能
正常工作,則可以放心的執行第三步;否則,需要先查找到原因後再執行第三步。
為了避免液晶和串口功能的干擾,我們先屏蔽掉代碼中的液晶和串口部分的功能。
下載後實現效果如下:
 很幸運,微雪開發板可以直接實現虛擬串口功能,可以直接進入第三步了。
--------------- 第二步結束---------------------------------------------------------------------------
--------------- 第三步: -----------------------------------------------------------------------------
親自按照第一步的步驟重新移植一遍虛擬串口的代碼
移植後編譯,結果報錯如下:
很幸運,微雪開發板可以直接實現虛擬串口功能,可以直接進入第三步了。
--------------- 第二步結束---------------------------------------------------------------------------
--------------- 第三步: -----------------------------------------------------------------------------
親自按照第一步的步驟重新移植一遍虛擬串口的代碼
移植後編譯,結果報錯如下:
 在第二步和第三步中的程式中分別查找“ EXTI_ClearITPendingBit”和“EXTI_Init”兩個變數。
第二步程式中搜索結果:
在第二步和第三步中的程式中分別查找“ EXTI_ClearITPendingBit”和“EXTI_Init”兩個變數。
第二步程式中搜索結果:

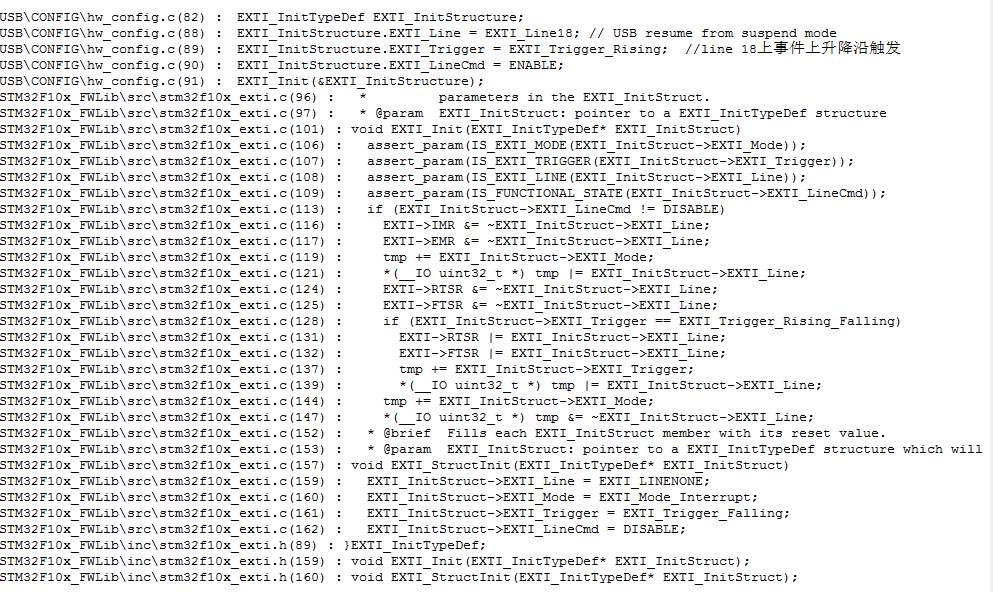
第三步程式中搜索結果:

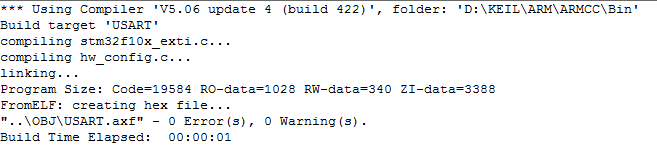
 從上面結果看,第三步中工程缺少庫文件:stm32f10x_exti.c。於是在Keil中把這個文件包含進去,
重新編譯,結果如下:
從上面結果看,第三步中工程缺少庫文件:stm32f10x_exti.c。於是在Keil中把這個文件包含進去,
重新編譯,結果如下:
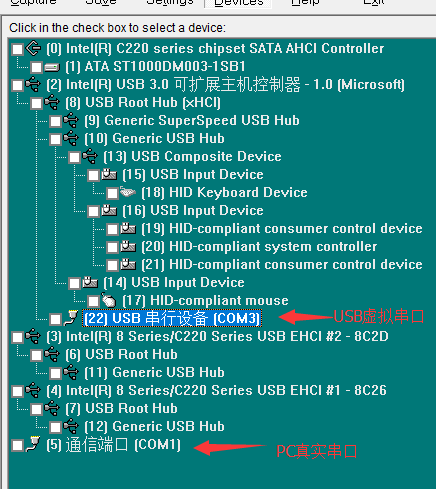
 把代碼下載到微雪電子開發板中,希望能直接成功。
結果如下:
把代碼下載到微雪電子開發板中,希望能直接成功。
結果如下:
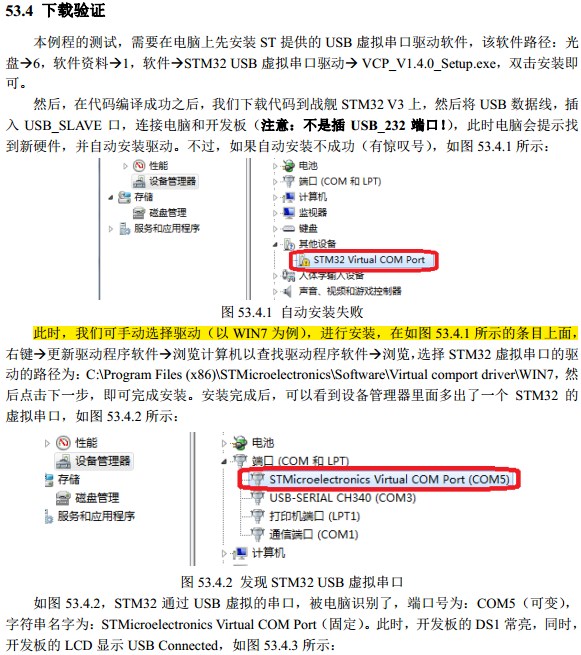
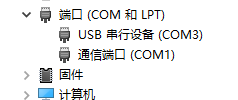
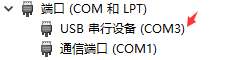 看來電腦識別到USB虛擬串口了。
--------------- 第三步結束---------------------------------------------------------------------
看來電腦識別到USB虛擬串口了。
--------------- 第三步結束------------------------------------------------------------------------------------ 第四步---------------------------------------------------------------------------
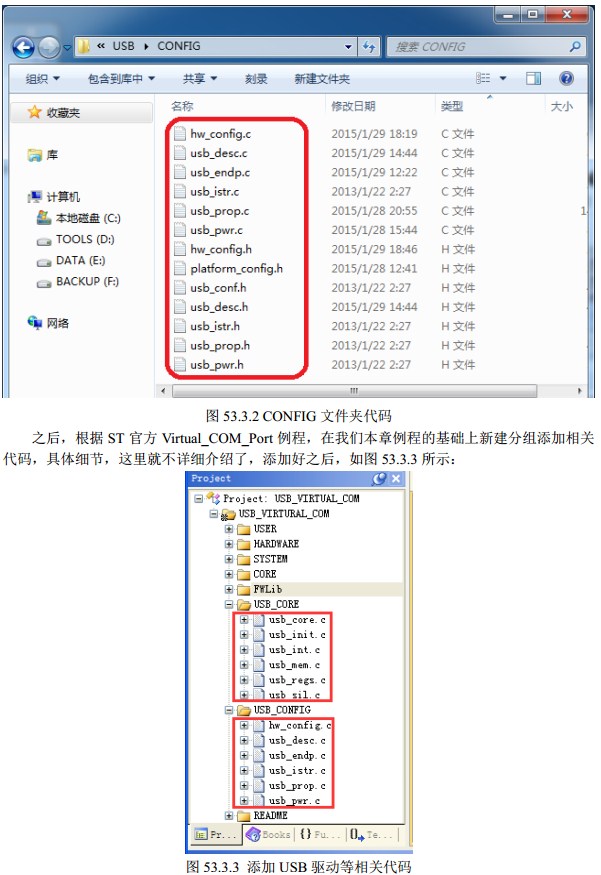
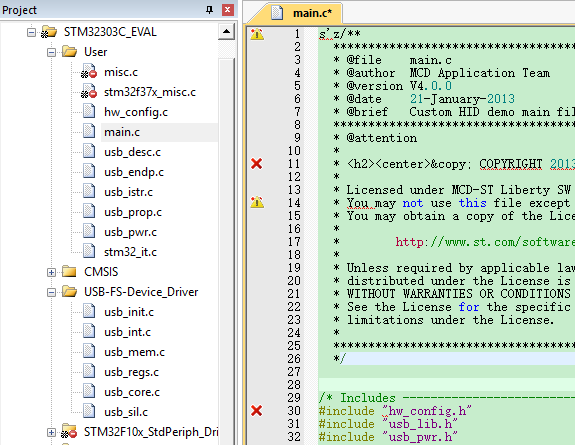
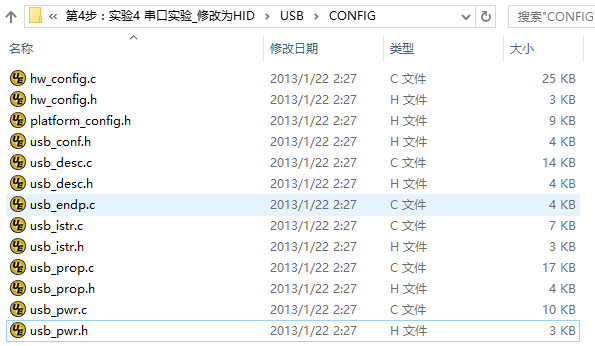
移植Custom_HID代碼到正點原子的串口代碼中,希望一切順利。 參照PPT《第88講 USB虛擬串口實驗-M3》,開始進行下列移植: 1.打開ST官方的Custom_HID常式,如下圖所示

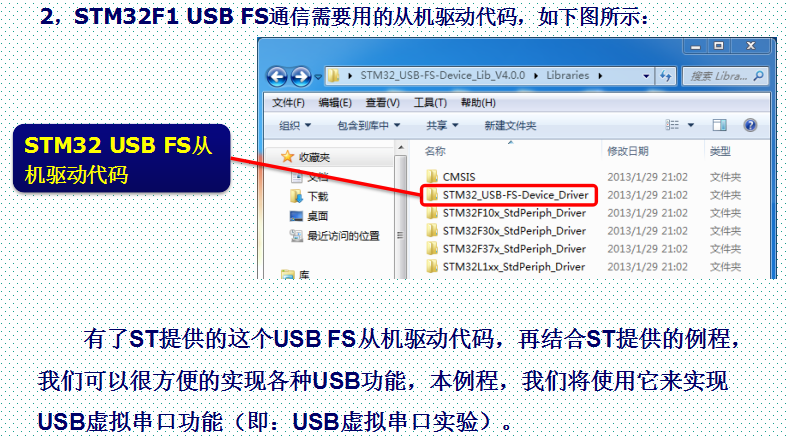
 2.移植USB通信需要的從機驅動代碼;
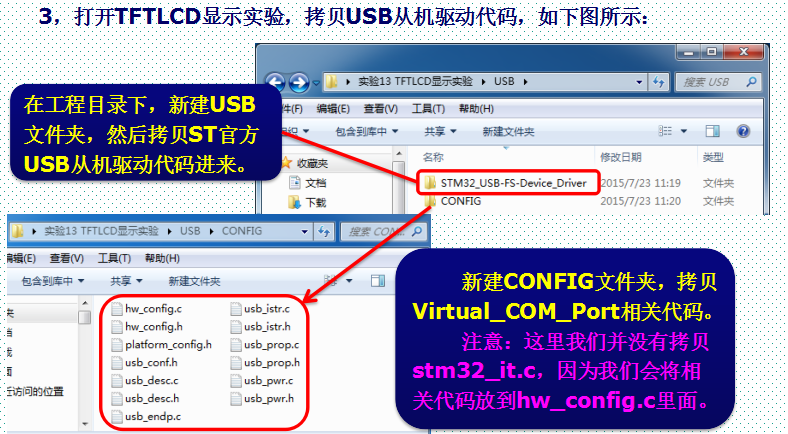
3.打開USUART通信實驗,拷貝USB從機驅動代碼;
2.移植USB通信需要的從機驅動代碼;
3.打開USUART通信實驗,拷貝USB從機驅動代碼;
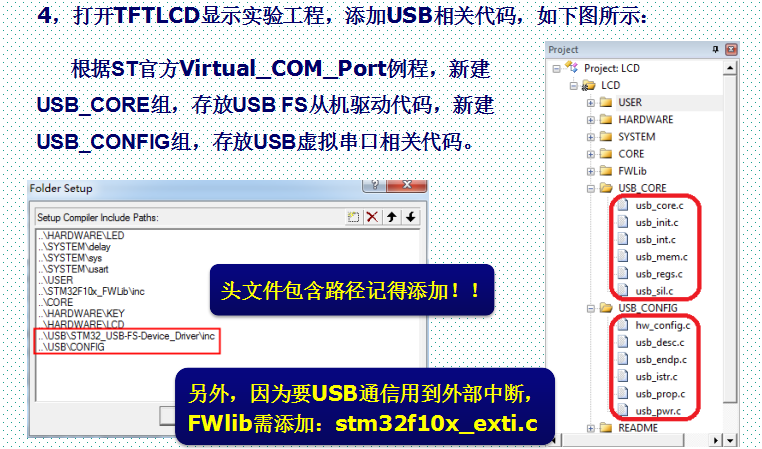
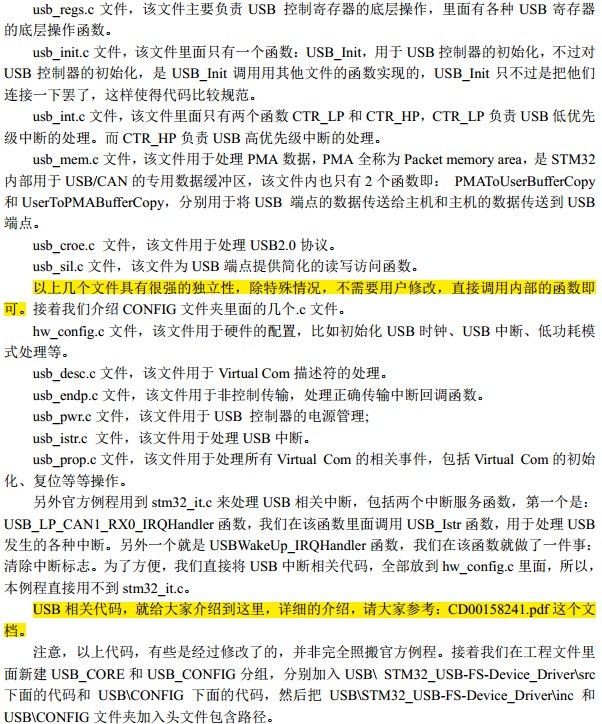
 4.打開 USART試驗工程,添加USB相關代碼,如下圖所示:
 突然發現PPT中有下列一句話:
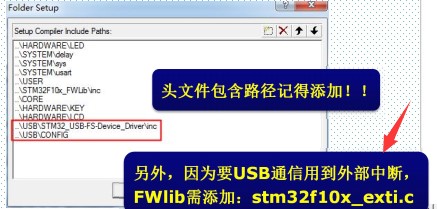 原來第三步中剛開始調試報錯,是因為沒看到這裡的"添加stm32f10x_exti.c"。
還是太粗心了。
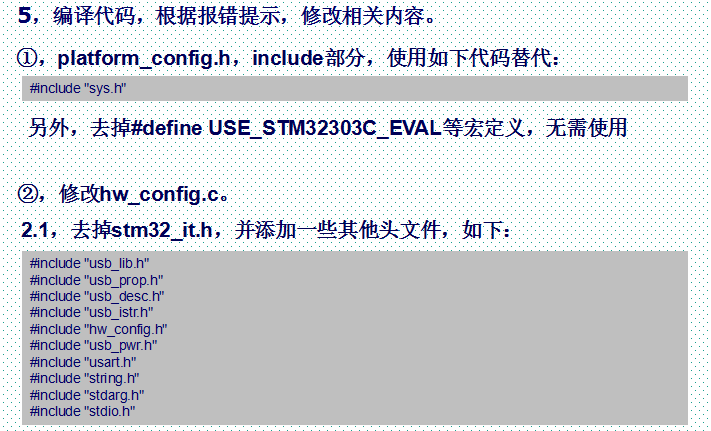
5.編譯代碼,根據報錯提示,修改相關內容。
原來第三步中剛開始調試報錯,是因為沒看到這裡的"添加stm32f10x_exti.c"。
還是太粗心了。
5.編譯代碼,根據報錯提示,修改相關內容。
 ①, platform_config.h, include部分, 使用如下代碼替代:
<wiz_code_mirror>
①, platform_config.h, include部分, 使用如下代碼替代:
<wiz_code_mirror>
xxxxxxxxxx
1
1
1
#include "sys.h"
另外, 去掉#define USE_STM32303C_EVAL等巨集定義, 無需使用
②,修改hw_config.c。
2.1,去掉stm32_it.h,並添加一些其他頭文件,如下:
<wiz_code_mirror>
xxxxxxxxxx
10
10
1
 因為替換的代碼是串口相關的,所以此時不知道是否應該替換了!!!
那就先編譯一下,根據報錯提示修改看看是否能直接運行。
編譯結果如下:
因為替換的代碼是串口相關的,所以此時不知道是否應該替換了!!!
那就先編譯一下,根據報錯提示修改看看是否能直接運行。
編譯結果如下:
 發現有很多錯誤,是跟評估板硬體相關的內容,應該是哪個巨集定義沒正確使用。
這樣一個一個修改太麻煩了,還是先根據PPT《第88講 USB虛擬串口實驗-M3》,
接著把" 能修改的部分 "修改了再根據情況調試。註:2.2這節暫時不修改了。
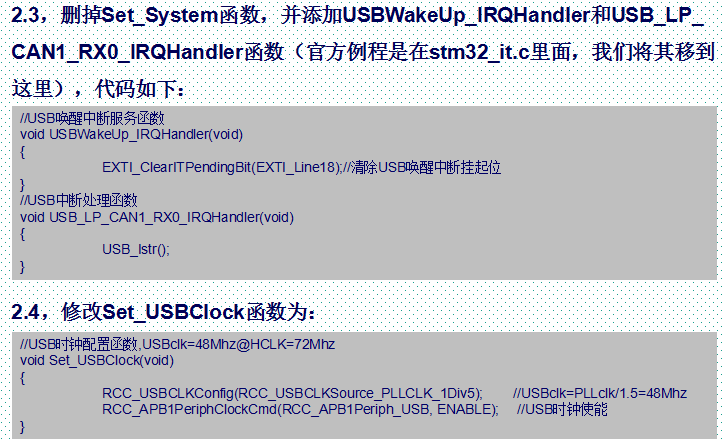
2.3,刪掉Set_System函數並添加USBWakeUp_IRQHandler和USB_LP_
CAN1_RX0_IRQHandler函數(官方常式是在stm32_it.c裡面, 我們將其移到
這裡) , 代碼如下
<wiz_code_mirror>
發現有很多錯誤,是跟評估板硬體相關的內容,應該是哪個巨集定義沒正確使用。
這樣一個一個修改太麻煩了,還是先根據PPT《第88講 USB虛擬串口實驗-M3》,
接著把" 能修改的部分 "修改了再根據情況調試。註:2.2這節暫時不修改了。
2.3,刪掉Set_System函數並添加USBWakeUp_IRQHandler和USB_LP_
CAN1_RX0_IRQHandler函數(官方常式是在stm32_it.c裡面, 我們將其移到
這裡) , 代碼如下
<wiz_code_mirror>
xxxxxxxxxx
10
10
1
//USB喚醒中斷服務函數
2
void USBWakeUp_IRQHandler(void)
3
{
4
EXTI_ClearITPendingBit(EXTI_Line18);//清除USB喚醒中斷掛起位
5
}//
6
USB中斷處理函數
7
void USB_LP_CAN1_RX0_IRQHandler(void)
8
{
9
USB_Istr();
10
}
2.4,修改Set_USBClock函數為:
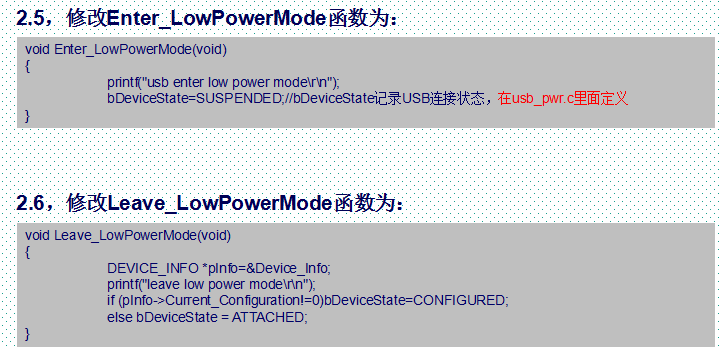
2.5,修改Enter_LowPowerMode函數為:
2.6,修改Leave_LowPowerMode函數為:
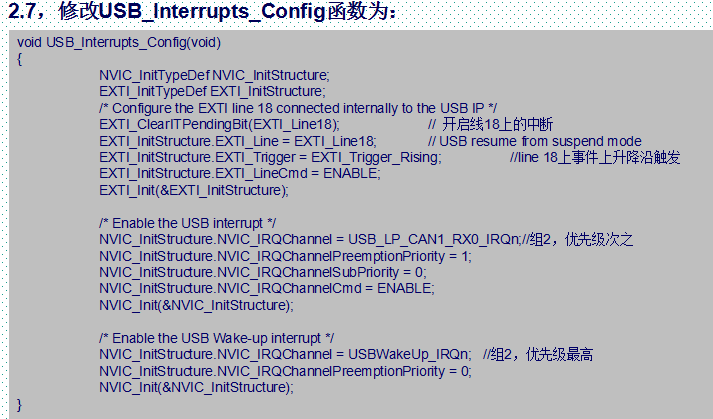
2.7,修改USB_Interrupts_Config函數為:
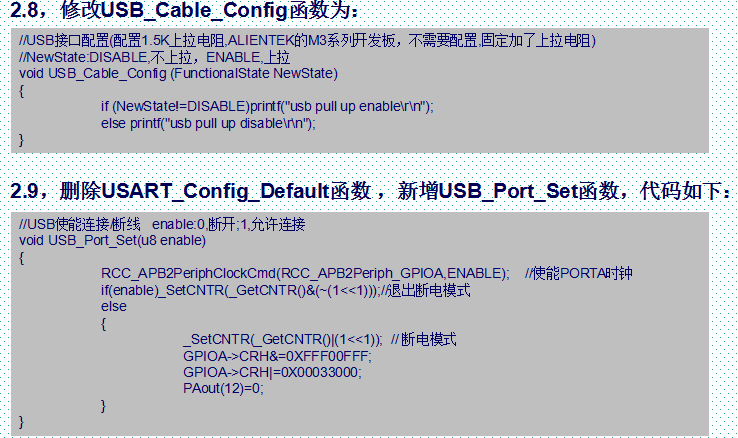
2.8,修改USB_Cable_Config函數為:
2.9,刪除USART_Config_Default函數,新增USB_Port_Set函數,代碼如下:
因為當前常式中沒有虛擬串口,所以不用刪除,直接添加USB_Port_Set函數即可。
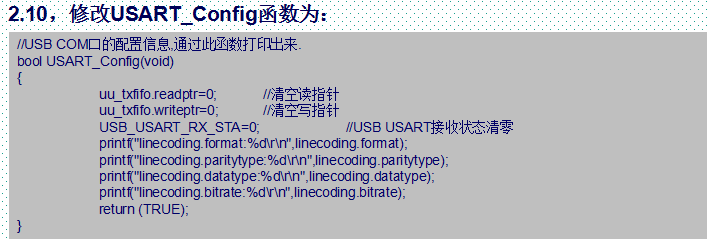
2.10,修改USART_Config函數為:(和串口相關,不用管):
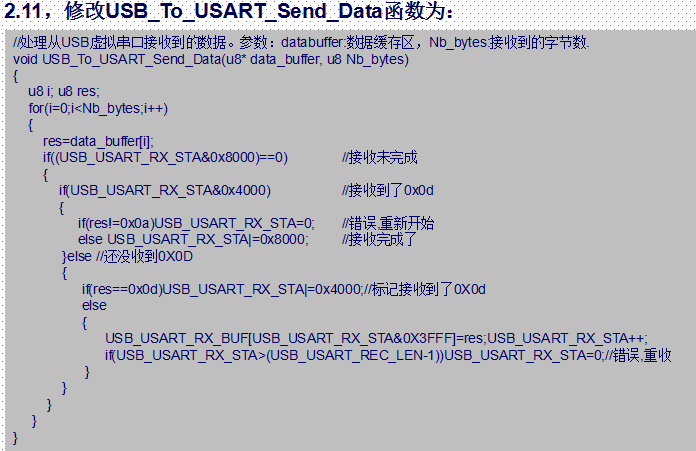
2.11,修改USB_To_USART_Send_Data函數為:(和串口相關,不用管):
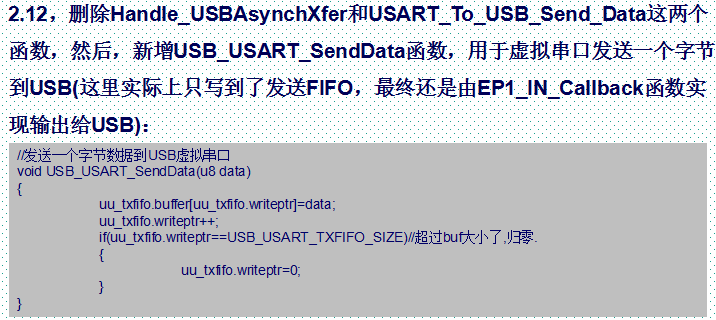
2.12,刪除Handle_USBAsynchXfer和USART_To_USB_Send_Data這兩個
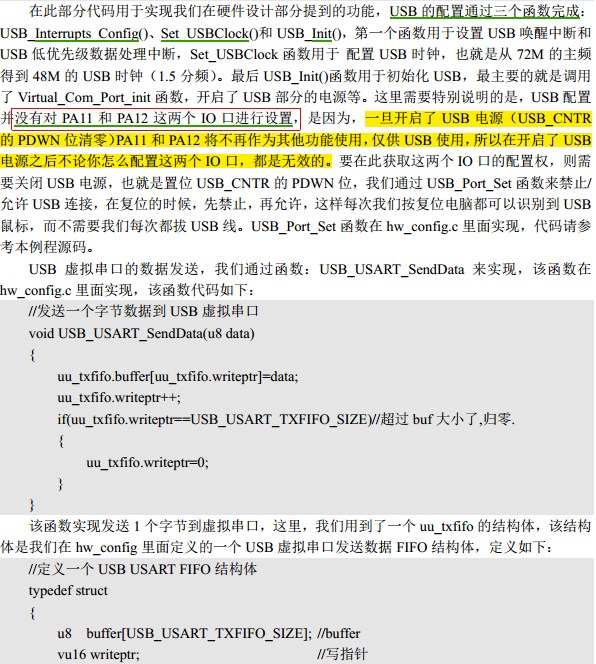
函數, 然後, 新增USB_USART_SendData函數, 用於虛擬串口發送一個位元組
到USB(這裡實際上只寫到了發送FIFO, 最終還是由EP1_IN_Callback函數實
現輸出給USB):(和串口相關,不用管):
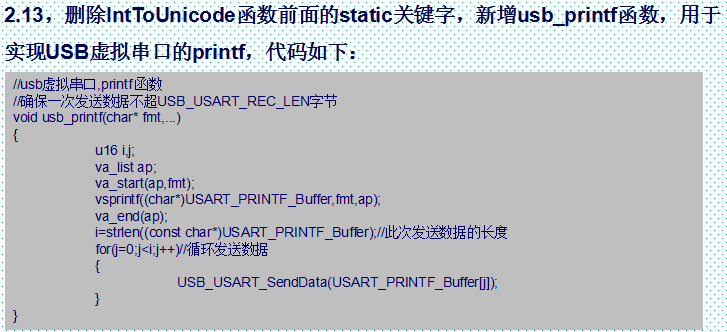
2.13, 刪除IntToUnicode函數前面的static關鍵字,
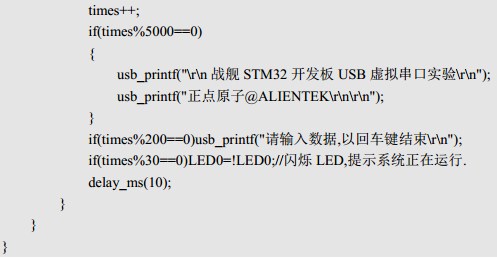
新增usb_printf函數, 用於實現USB虛擬串口的printf, 代碼如下: (和串口相關,不用管):
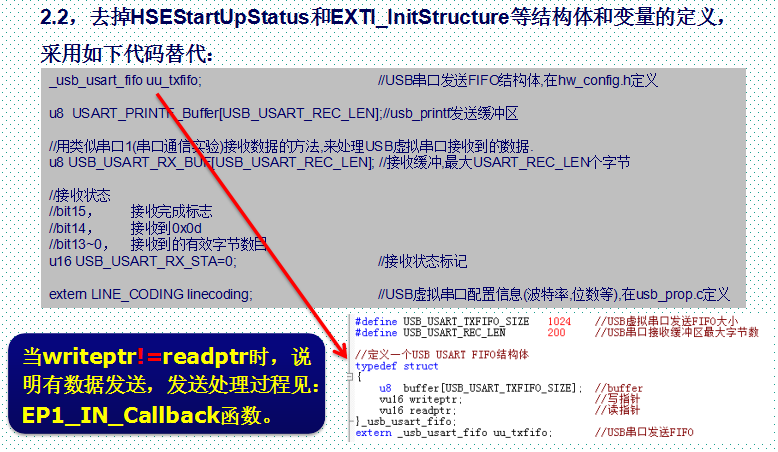
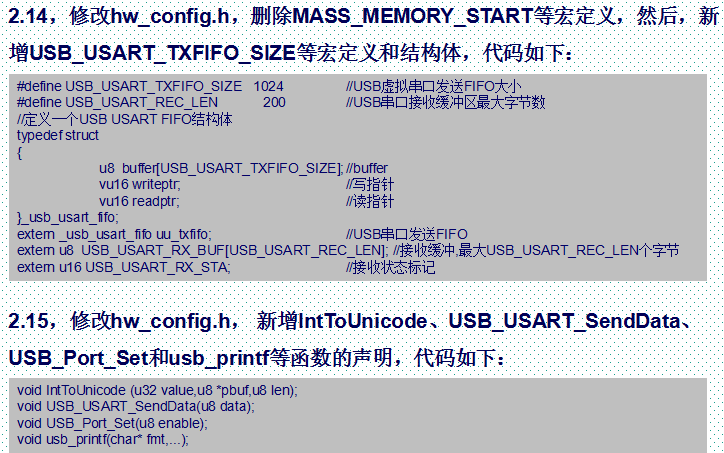
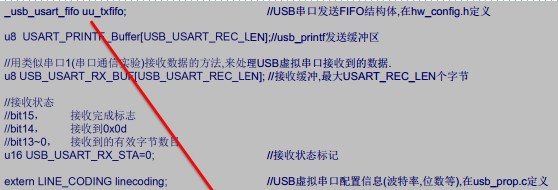
2.14, 修改hw_config.h, 刪除MASS_MEMORY_START等巨集定義, 然後, 新
增USB_USART_TXFIFO_SIZE等巨集定義和結構體, 代碼如下: (和串口相關,不用管):
2.15, 修改hw_config.h, 新增IntToUnicode、USB_Port_Set
USB_USART_SendData、和usb_printf等函數的聲明, 代碼如下: (和串口相關,不用管):
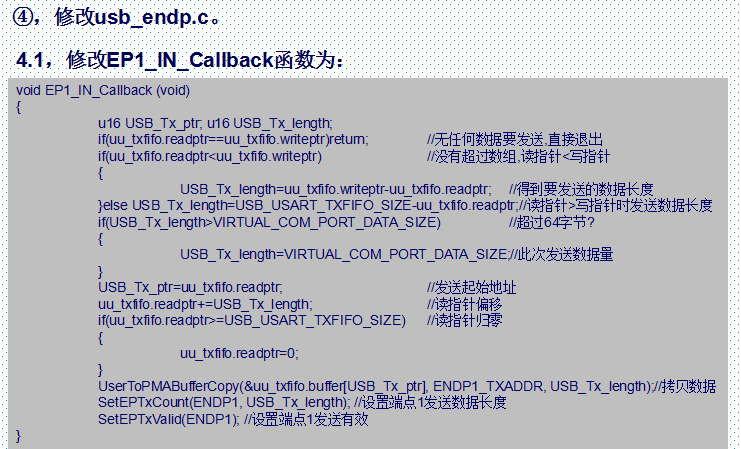
④, 修改usb_endp.c。
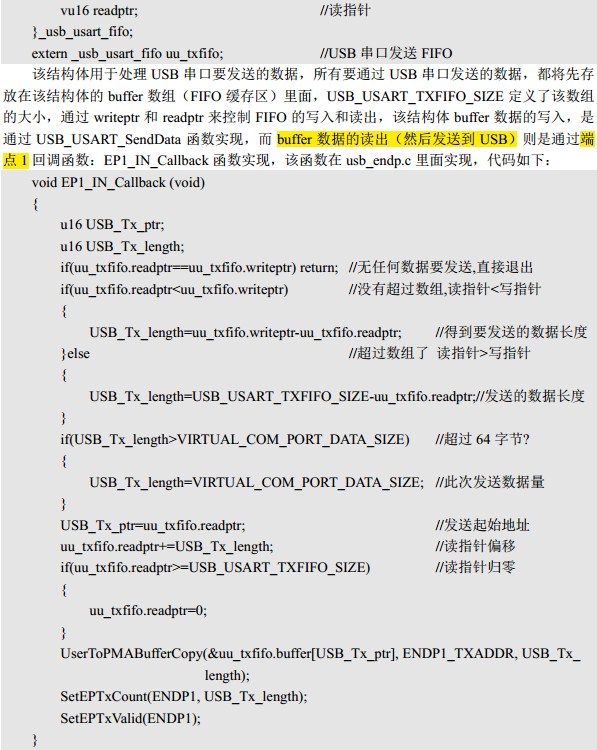
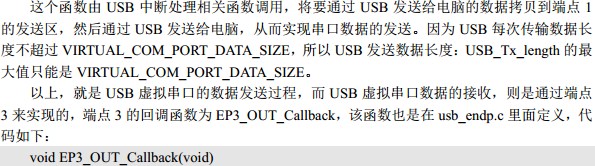
4.1, 修改EP1_IN_Callback函數為: (和串口相關,不用管):
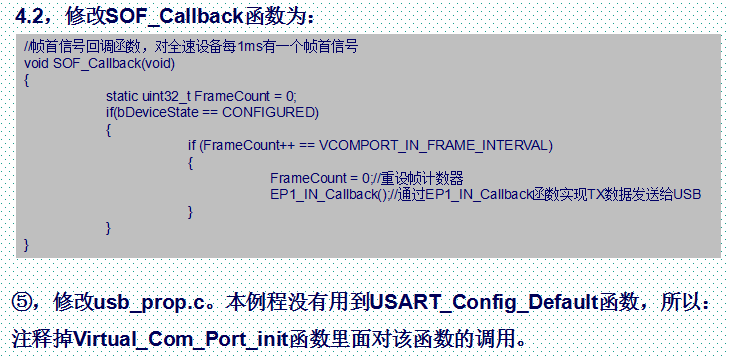
4.2, 修改SOF_Callback函數為:(工程中沒有這個函數的定義,直接從虛擬串口的工程中複製過來):
⑤, 修改usb_prop.c。 本常式沒有用到USART_Config_Default函數, 所以:
註釋掉Virtual_Com_Port_init函數裡面對該函數的調用:(工程中沒有這個函數,不用管):
⑥, 修改usb_pwr.c。 修改Suspend函數為:
6, 修改main.c。
因為虛擬串口常式中的main.c裡面執行的是串口收發,所以這裡只用其初始化部分,while(1)
裡面什麼也不做。結果編譯後報錯如下:
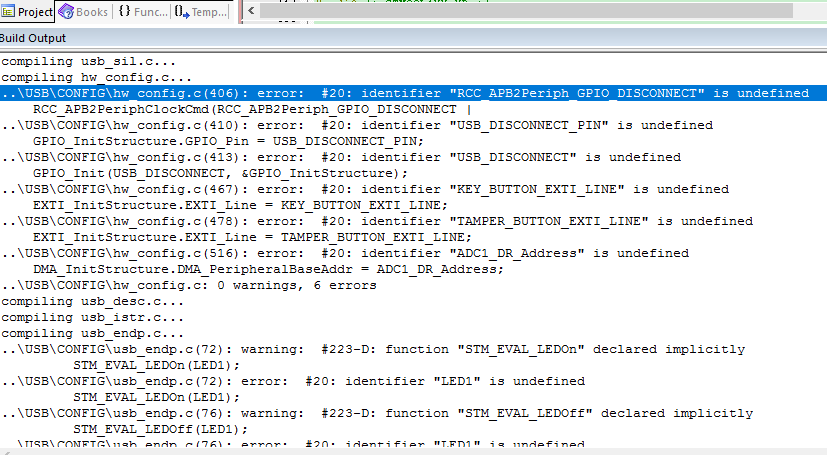 還是很多巨集定義沒有實現。接下來需要找到他們,定義他們或者刪除他們。
第一個報錯:RCC_APB2Periph_GPIO_DISCONNECT未定義。定位到函數如下:
<wiz_code_mirror>
還是很多巨集定義沒有實現。接下來需要找到他們,定義他們或者刪除他們。
第一個報錯:RCC_APB2Periph_GPIO_DISCONNECT未定義。定位到函數如下:
<wiz_code_mirror>
xxxxxxxxxx
1
1
1
void GPIO_Configuration(void)
但是程式中並未調用它,所以可以直接屏蔽掉。
重新編譯後,第一個報錯:KEY_BUTTON_EXTI_LINE未定義。定位到函數如下:
<wiz_code_mirror>
xxxxxxxxxx
1
1
1
void EXTI_Configuration(void)
但是程式中並未調用它,所以可以直接屏蔽掉。
重新編譯後,第一個報錯:ADC1_DR_Address未定義。定位到函數如下:
<wiz_code_mirror>
xxxxxxxxxx
1
1
1
void ADC_Configuration(void)
但是程式中並未調用它,所以可以直接屏蔽掉。
重新編譯後,第一個報錯:LED1未定義。定位到函數如下:
<wiz_code_mirror>
xxxxxxxxxx
1
1
1
void EP1_OUT_Callback(void)
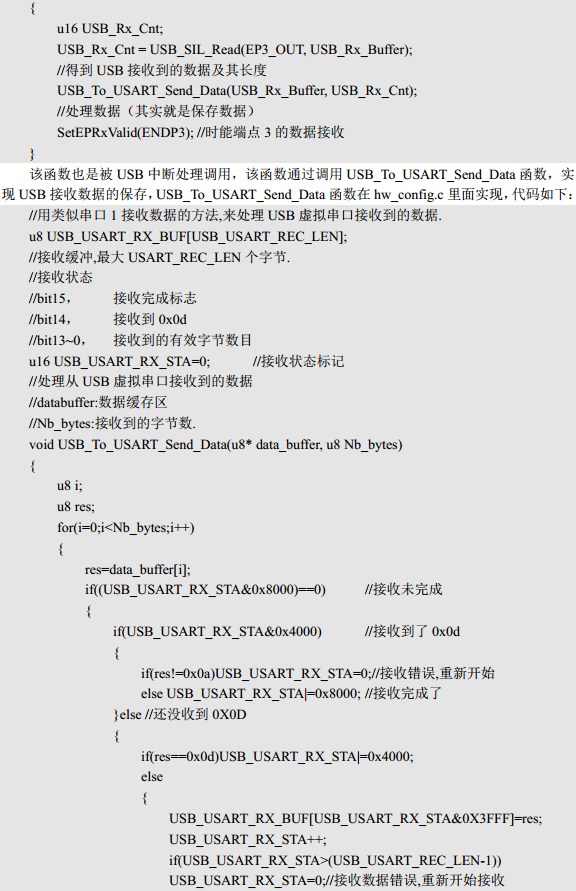
該函數的功能是接收從PC端發過來的數據。不能屏蔽掉。因為函數內容可以
自定義,於是把裡面原來開發板上的功能(主要是開關LED)屏蔽掉。只接收數據,
不做處理。
重新編譯後,第一個報錯:LED1未定義。定位到函數如下:第一個報錯:還是LED1未定義。定位到函數如下: <wiz_code_mirror>
xxxxxxxxxx
1
1
1
void CustomHID_Status_In(void)
該函數的功能是:狀態輸入。雖然不知道具體是做什麼的,但是根據網上看過
的HID程式資料,這個函數不能刪除。於是只屏蔽掉裡面關於LED等信息的語句。
重新編譯後,只有3個錯誤了:
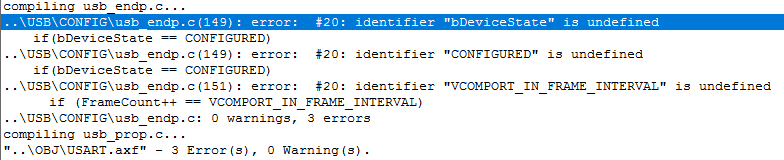
第一個報錯:bDeviceState未定義。定位到函數如下: <wiz_code_mirror>
xxxxxxxxxx
1
1
1
void SOF_Callback(void)
關於這個函數,網上找到下列解釋:
函數SOF_Callback定時查詢用戶是否有要發送的數據,如果有則進行發送,
在發送完成後會觸發發送中斷EP1_IN_Callback函數,如果發送完畢就不調用
SetEPTxValid(ENDP1)函數,發送完成後就不會再觸發EP1_IN_Callback函數。
所以就不刪除了。bDeviceState在代碼中肯定是定義過了的,應該是被屏蔽了。
搜索變數bDeviceState,看它的定義在什麼地方,為什麼被屏蔽了。結果如下:
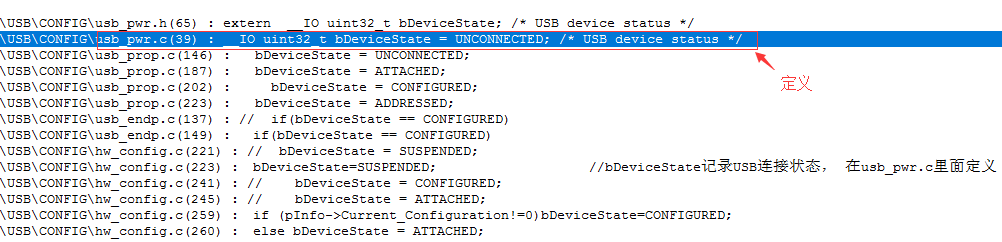 看來確實定義過,還在頭文件中聲明過可以外部調用。那應該是這個頭文件
沒有被usb_endp.c包含導致的。打開usb_endp.c查看,果然沒有這個頭文件。
加上後,編譯結果如下:
看來確實定義過,還在頭文件中聲明過可以外部調用。那應該是這個頭文件
沒有被usb_endp.c包含導致的。打開usb_endp.c查看,果然沒有這個頭文件。
加上後,編譯結果如下:
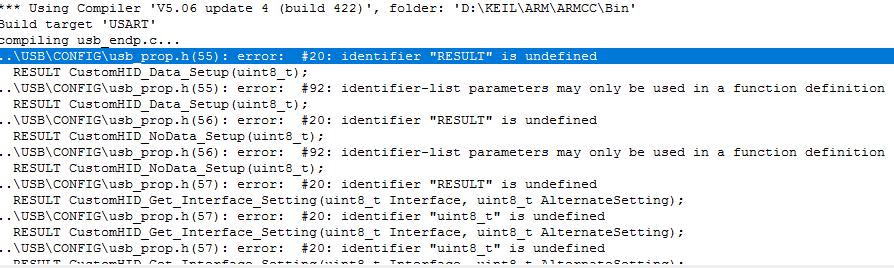 很多關於usb_prop.h的錯誤,這個是才加進去的頭文件,卻導致個能多錯誤,
應該是加的位置不對。打開看到usb_endp.c開頭只有幾個頭文件:
<wiz_code_mirror>
很多關於usb_prop.h的錯誤,這個是才加進去的頭文件,卻導致個能多錯誤,
應該是加的位置不對。打開看到usb_endp.c開頭只有幾個頭文件:
<wiz_code_mirror>
xxxxxxxxxx
4
4
1
#include "hw_config.h"
2
#include "usb_lib.h"
3
#include "usb_istr.h"
4
#include "usb_prop.h"
乾脆直接把USB虛擬串口相同文件中包含的頭文件都包含進來編譯看看。結果如下:
 老規矩,全局搜索變數“VCOMPORT_IN_FRAME_INTERVAL”,結果如下:
 竟然發現代碼中真的沒有定義過。因為這個代碼是從USB虛擬串口拷貝過來的,在
USB虛擬串口代碼中全局搜索,結果如下:
竟然發現代碼中真的沒有定義過。因為這個代碼是從USB虛擬串口拷貝過來的,在
USB虛擬串口代碼中全局搜索,結果如下:
 直接在usb_endp.c開頭加上這個巨集定義,重新編譯結果如下:
 直接點擊錯誤信息,不能跳轉,全局搜索PrevXferComplete,結果如下:
 發現竟然真的沒有定義。這部分是ST官方庫中的代碼,直接打開ST的HID工程,
全局搜索,發現是在main.c開始位置定義的。於是我們也在main.c處定義這個變數,
編譯後結果如下:
發現竟然真的沒有定義。這部分是ST官方庫中的代碼,直接打開ST的HID工程,
全局搜索,發現是在main.c開始位置定義的。於是我們也在main.c處定義這個變數,
編譯後結果如下:
 ADC_SoftwareStartConvCmd好像是和串口有關,但沒有直接證據,全局搜索發現
 也就是說,這個函數只有聲明,沒有定義。
同理,在ST官方庫中HID工程中搜索,結果如下:
也就是說,這個函數只有聲明,沒有定義。
同理,在ST官方庫中HID工程中搜索,結果如下:
 原來,這個函數在adc庫文件中。而我的工程還沒有添加這個庫文件。
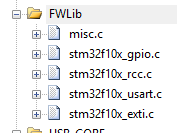 添加後編譯,結果如下:
 沒有報錯,很好,但是下載後結果如何還不知道,因為剛剛在ST的HID工程中看到main函數
初始化時的步驟和這裡從USB虛擬串口移植過來的不一樣。不過還是先試一下看看。
開始下載......
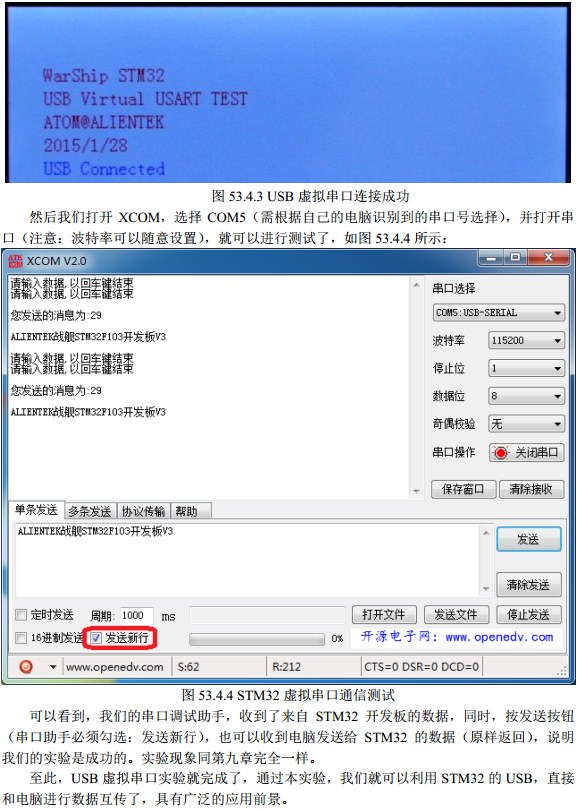
微雪開發板上電後結果如下:
沒有報錯,很好,但是下載後結果如何還不知道,因為剛剛在ST的HID工程中看到main函數
初始化時的步驟和這裡從USB虛擬串口移植過來的不一樣。不過還是先試一下看看。
開始下載......
微雪開發板上電後結果如下:
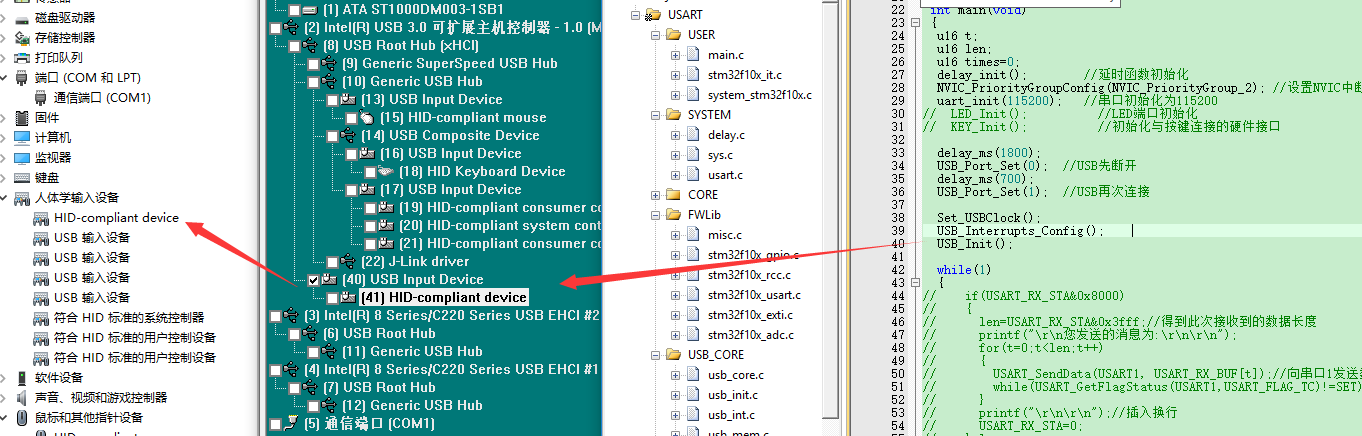 太神奇了,雖然初始化代碼和ST工程不一樣,但竟然一下子就識別成HID了!!!
 趁熱打鐵,接下來就是實現HID發送和接收功能,否則小孫的三分鐘熱性一旦消失,就要再
耗費半天才能繼續下去了。
剛纔細看USB虛擬串口代碼,發現其發送和接收功能其實和網上的HID類似,都是調用
UserToPMABufferCopy()和PMAToUserBufferCopy()函數。而這兩個函數分別有另一個函
數調用,即USB_SIL_Write()和USB_SIL_Read()。在ST的HID工程中也有這兩個函數,這
里先實現他們看看是否有效果。
趁熱打鐵,接下來就是實現HID發送和接收功能,否則小孫的三分鐘熱性一旦消失,就要再
耗費半天才能繼續下去了。
剛纔細看USB虛擬串口代碼,發現其發送和接收功能其實和網上的HID類似,都是調用
UserToPMABufferCopy()和PMAToUserBufferCopy()函數。而這兩個函數分別有另一個函
數調用,即USB_SIL_Write()和USB_SIL_Read()。在ST的HID工程中也有這兩個函數,這
里先實現他們看看是否有效果。
 添加上面的代碼,編譯下載後結果如下:
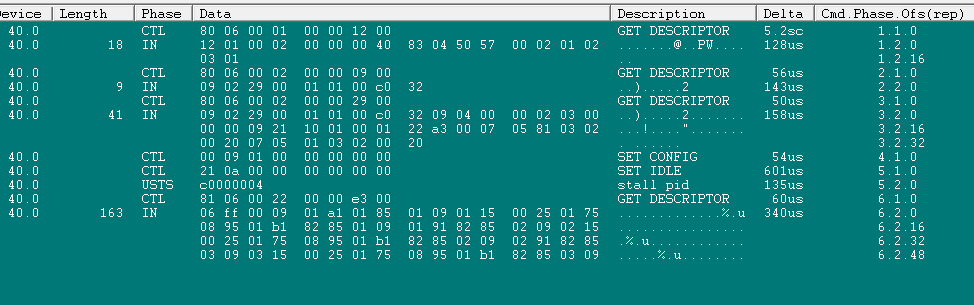 一直沒有數據發送上來。看來需要讓開發板在調試模式運行,看是否是卡在哪裡了。
結果調試模式下發現,代碼一直在迴圈執行,沒有卡頓問題。就是說,發送代碼執行了,
但是數據沒有發送出去。
打開USB的配置描述符發現,預設最大發送長度為2位元組,而小孫的發送函數一次發送
3位元組,需要修改一下。
修改之後,編譯下載,結果還是和上面一樣,不能發送數據。
把單片機多功能調試助手打開,打開開發板的埠檢測。結果仍然沒有數據發送。
把串口初始化代碼屏蔽掉時,PC端反而不能識別HID了。
一直沒有數據發送上來。看來需要讓開發板在調試模式運行,看是否是卡在哪裡了。
結果調試模式下發現,代碼一直在迴圈執行,沒有卡頓問題。就是說,發送代碼執行了,
但是數據沒有發送出去。
打開USB的配置描述符發現,預設最大發送長度為2位元組,而小孫的發送函數一次發送
3位元組,需要修改一下。
修改之後,編譯下載,結果還是和上面一樣,不能發送數據。
把單片機多功能調試助手打開,打開開發板的埠檢測。結果仍然沒有數據發送。
把串口初始化代碼屏蔽掉時,PC端反而不能識別HID了。
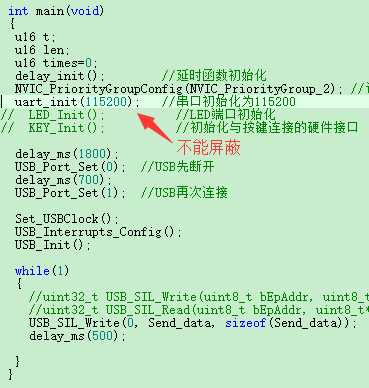 分析uart_init()函數,沒發現什麼特別功能的語句。屏蔽掉它,繼續調試。
但是目前進度卡住了,不知道怎麼向下調試了。
這種情況,一年前剛剛學習stm32 USB時就遇到過,後來是別人替小孫調好的。
當時小孫調了接近1個月,都沒有正常收發數據,後來覺得自己短時間內調不出來
了跟領導說讓其重新招人,自己準備辭職的。後來是領導花兩三天幫他調試出來的。
雖然當時已經有兩年半工作經驗了,但那幾天都在想自己是否真的適合走嵌入式這條路???
分析uart_init()函數,沒發現什麼特別功能的語句。屏蔽掉它,繼續調試。
但是目前進度卡住了,不知道怎麼向下調試了。
這種情況,一年前剛剛學習stm32 USB時就遇到過,後來是別人替小孫調好的。
當時小孫調了接近1個月,都沒有正常收發數據,後來覺得自己短時間內調不出來
了跟領導說讓其重新招人,自己準備辭職的。後來是領導花兩三天幫他調試出來的。
雖然當時已經有兩年半工作經驗了,但那幾天都在想自己是否真的適合走嵌入式這條路???因為沒有刨根問底的精神,小孫這幾年的電子生涯一直是閉著眼睛瞎混的,沒有 好好的鑽研讓自己拿得出手的技術,所以每天都生活在自卑和失落中。 綜上所述,在屏蔽掉uart_init()函數後,程式並不能被PC識別為HID設備。 俗話說,人不能讓不撞南牆不回頭,這裡是裝了南牆必須回頭,否則沒有哪個 老闆願意給你薪水。所以,小孫準備從ST的HID工程本身提供的初始化HID方式 嘗試實現HID功能。畢竟,網上大多數HID工程初始化部分都和ST的HID部分類似, 而跟他上面自己移植的不一樣。 ****************** 根據ST的HID修改工程代碼 *********************** 預想中的修改步驟如下: 第一步:先用HID工程中的初始化代碼替換上面工程中的初始化代碼; 第二步:根據報錯,修改上面步驟中被修改過的相關函數,使HID初始化成功; 第三步:添加HID發送和接收函數,並實現功能; ---------------


