
1、下載fastqc 2、解壓 3、 給予執行許可權,否則執行的時候會顯示沒有許可權 cd FastQCchmod 755 fastqc 4、加入到PATH export PATH=/home/h/FastQC/:$PATH 4、加入到PATH 5、測試 fastqc --help 5、測試 使用例子 ...
1、下載fastqc
wget http://www.bioinformatics.babraham.ac.uk/projects/fastqc/fastqc_v0.11.5.zip2、解壓
unzip fastqc_v0.11.5.zip3、 給予執行許可權,否則執行的時候會顯示沒有許可權
cd FastQC4、加入到PATH
chmod 755 fastqc
export PATH=/home/h/FastQC/:$PATH5、測試
fastqc --help使用例子
fastqc -o ./tmp.result/fastQC/ -t 6 ./tmp.data/fastq/H1EScell-dnase-2014-GSE56869_20151208_SRR1248176_1.fq# -o --outdir FastQC生成的報告文件的儲存路徑,生成的報告的文件名是根據輸入來定的 # -t --threads 選擇程式運行的線程數,每個線程會占用250MB記憶體,越多越快咯 FastQC的報告介紹 整個報告分成若幹個部分。合格會有個綠色的對勾,警告是個“!”,不合格是個紅色的叉子 基本信息
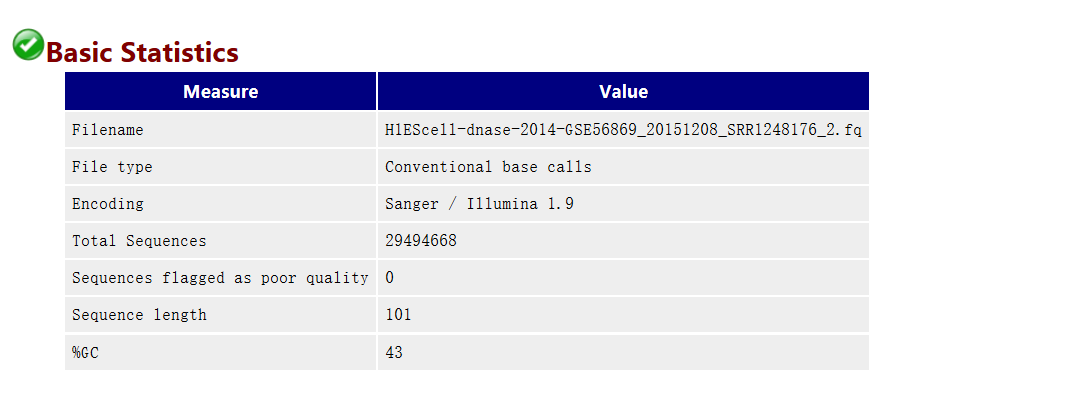 # Encoding指測序平臺的版本和相應的編碼版本號,這個在計算Phred反推error P的時候有用
# Total Sequences記錄了輸入文本的reads的數量
# Sequence length是測序的長度
# %GC是我們需要重點關註的一個指標,這個值表示的是整體序列中的GC含量,這個數值一般是物種特異的,比如人類細胞就是42%左右
序列測序質量統計
# Encoding指測序平臺的版本和相應的編碼版本號,這個在計算Phred反推error P的時候有用
# Total Sequences記錄了輸入文本的reads的數量
# Sequence length是測序的長度
# %GC是我們需要重點關註的一個指標,這個值表示的是整體序列中的GC含量,這個數值一般是物種特異的,比如人類細胞就是42%左右
序列測序質量統計
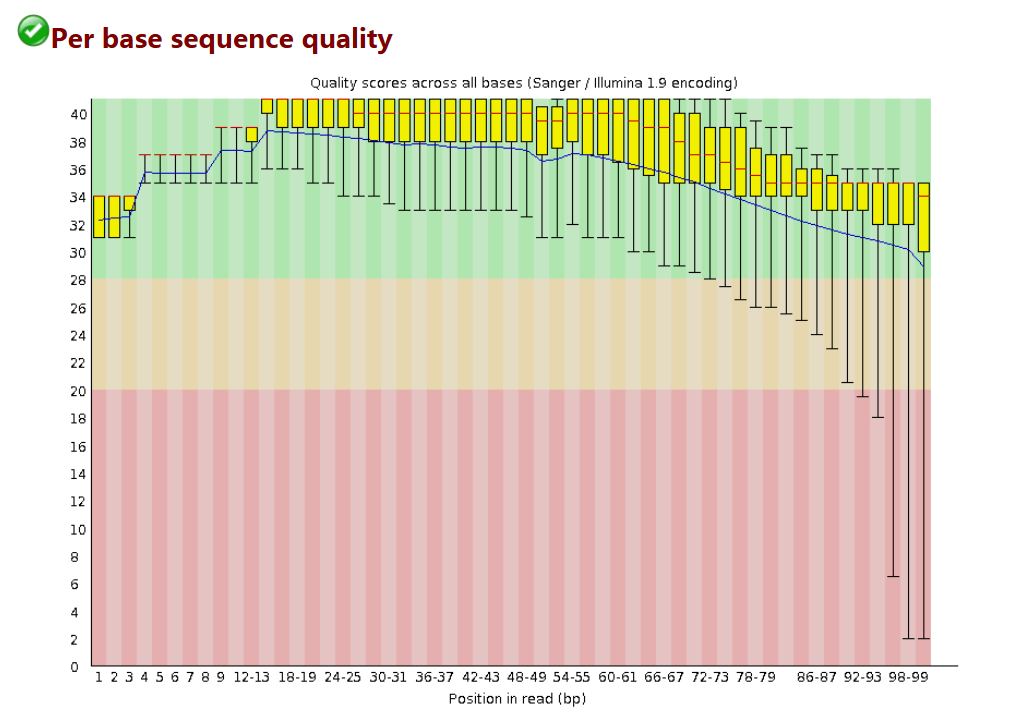 # 此圖中的橫軸是測序序列第1個鹼基到第101個鹼基
# 縱軸是質量得分,Q = -10*log10(error P)即20表示1%的錯誤率,30表示0.1%
# 圖中每1個boxplot,都是該位置的所有序列的測序質量的一個統計,上面的bar是90%分位數,下麵的bar是10%分位數,箱子的中間的橫線是50%分位數,箱子的上邊是75%分位數,下邊是25%分位數
# 圖中藍色的細線是各個位置的平均值的連線
# 一般要求此圖中,所有位置的10%分位數大於20,也就是我們常說的Q20過濾
# 所以上面的這個測序結果,需要把後面的87bp以後的序列切除,從而保證後續分析的正確性
# Warning 報警 如果任何鹼基質量低於10,或者是任何中位數低於25
# Failure 報錯 如果任何鹼基質量低於5,或者是任何中位數低於20
每個tail測序的情況
# 此圖中的橫軸是測序序列第1個鹼基到第101個鹼基
# 縱軸是質量得分,Q = -10*log10(error P)即20表示1%的錯誤率,30表示0.1%
# 圖中每1個boxplot,都是該位置的所有序列的測序質量的一個統計,上面的bar是90%分位數,下麵的bar是10%分位數,箱子的中間的橫線是50%分位數,箱子的上邊是75%分位數,下邊是25%分位數
# 圖中藍色的細線是各個位置的平均值的連線
# 一般要求此圖中,所有位置的10%分位數大於20,也就是我們常說的Q20過濾
# 所以上面的這個測序結果,需要把後面的87bp以後的序列切除,從而保證後續分析的正確性
# Warning 報警 如果任何鹼基質量低於10,或者是任何中位數低於25
# Failure 報錯 如果任何鹼基質量低於5,或者是任何中位數低於20
每個tail測序的情況
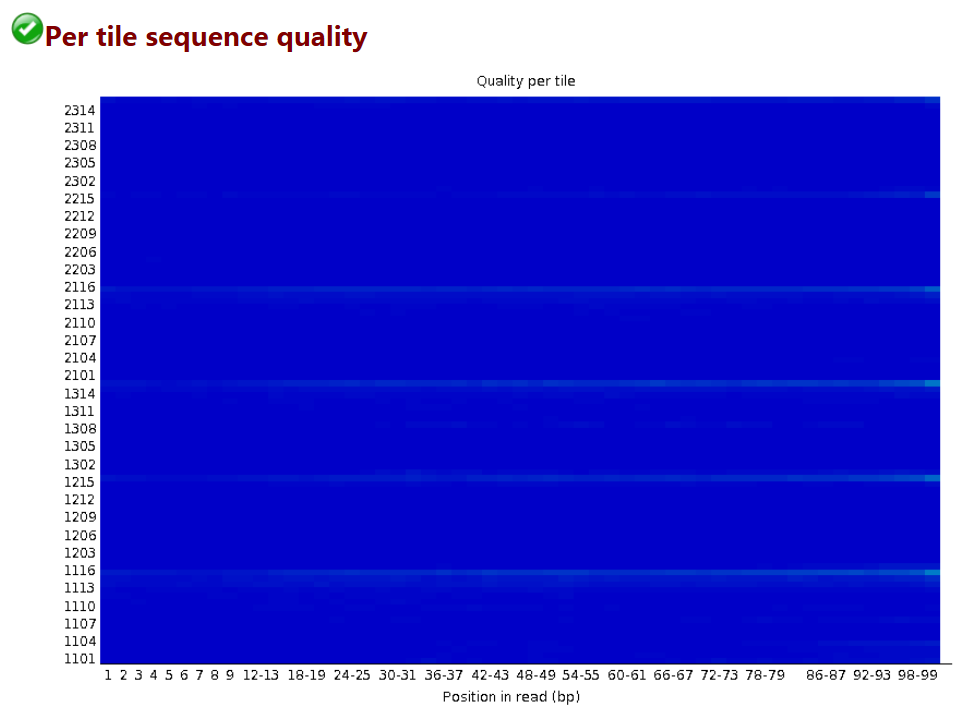 # 橫軸和之前一樣,代表101個鹼基的每個不同位置
# 縱軸是tail的Index編號
# 這個圖主要是為了防止在測序過程中,某些tail受到不可控因素的影響而出現測序質量偏低
# 藍色代表測序質量很高,暖色代表測序質量不高,如果某些tail出現暖色,可以在後續分析中把該tail測序的結果全部都去除
每條序列的測序質量統計
# 橫軸和之前一樣,代表101個鹼基的每個不同位置
# 縱軸是tail的Index編號
# 這個圖主要是為了防止在測序過程中,某些tail受到不可控因素的影響而出現測序質量偏低
# 藍色代表測序質量很高,暖色代表測序質量不高,如果某些tail出現暖色,可以在後續分析中把該tail測序的結果全部都去除
每條序列的測序質量統計
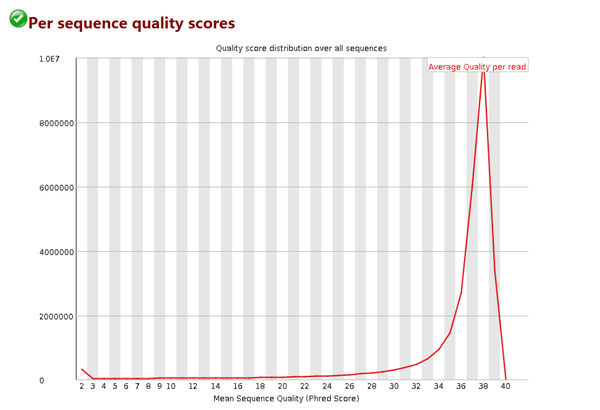 # 假如我測的1條序列長度為101bp,那麼這101個位置每個位置Q值的平均值就是這條reads的質量值
# 該圖橫軸是0-40,表示Q值
# 縱軸是每個值對應的reads數目
# 我們的數據中,測序結果主要集中在高分中,證明測序質量良好!
GC 含量統計
# 假如我測的1條序列長度為101bp,那麼這101個位置每個位置Q值的平均值就是這條reads的質量值
# 該圖橫軸是0-40,表示Q值
# 縱軸是每個值對應的reads數目
# 我們的數據中,測序結果主要集中在高分中,證明測序質量良好!
GC 含量統計
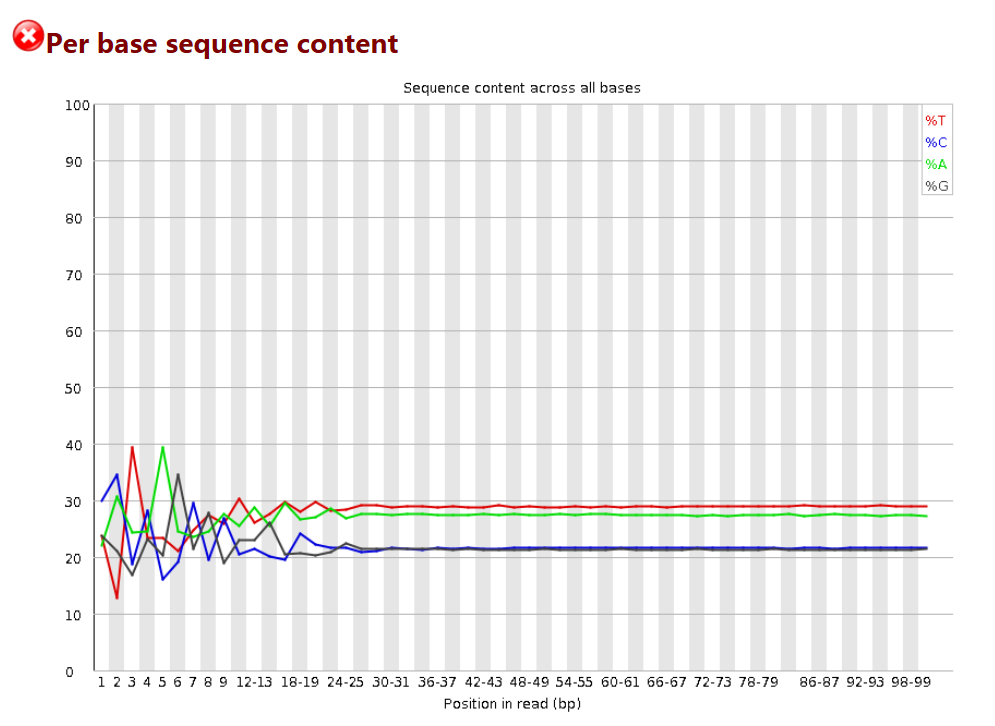 # 橫軸是1 - 101 bp;縱軸是百分比
# 圖中四條線代表A T C G在每個位置平均含量
# 理論上來說,A和T應該相等,G和C應該相等,但是一般測序的時候,剛開始測序儀狀態不穩定,很可能出現上圖的情況。像這種情況,即使測序的得分很高,也需要cut開始部分的序列信息,一般像我碰到這種情況,會cut前面5bp
序列平均GC含量分佈圖
# 橫軸是1 - 101 bp;縱軸是百分比
# 圖中四條線代表A T C G在每個位置平均含量
# 理論上來說,A和T應該相等,G和C應該相等,但是一般測序的時候,剛開始測序儀狀態不穩定,很可能出現上圖的情況。像這種情況,即使測序的得分很高,也需要cut開始部分的序列信息,一般像我碰到這種情況,會cut前面5bp
序列平均GC含量分佈圖
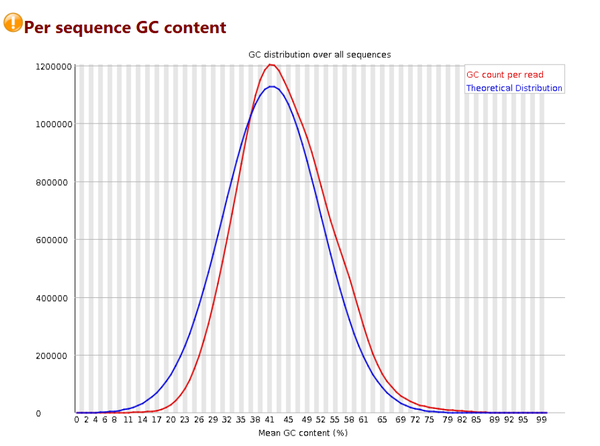 # 橫軸是0 - 100%; 縱軸是每條序列GC含量對應的數量
# 藍色的線是程式根據經驗分佈給出的理論值,紅色是真實值,兩個應該比較接近才比較好
# 當紅色的線出現雙峰,基本肯定是混入了其他物種的DNA序列
# 這張圖中的信息良好
序列測序長度統計
# 橫軸是0 - 100%; 縱軸是每條序列GC含量對應的數量
# 藍色的線是程式根據經驗分佈給出的理論值,紅色是真實值,兩個應該比較接近才比較好
# 當紅色的線出現雙峰,基本肯定是混入了其他物種的DNA序列
# 這張圖中的信息良好
序列測序長度統計
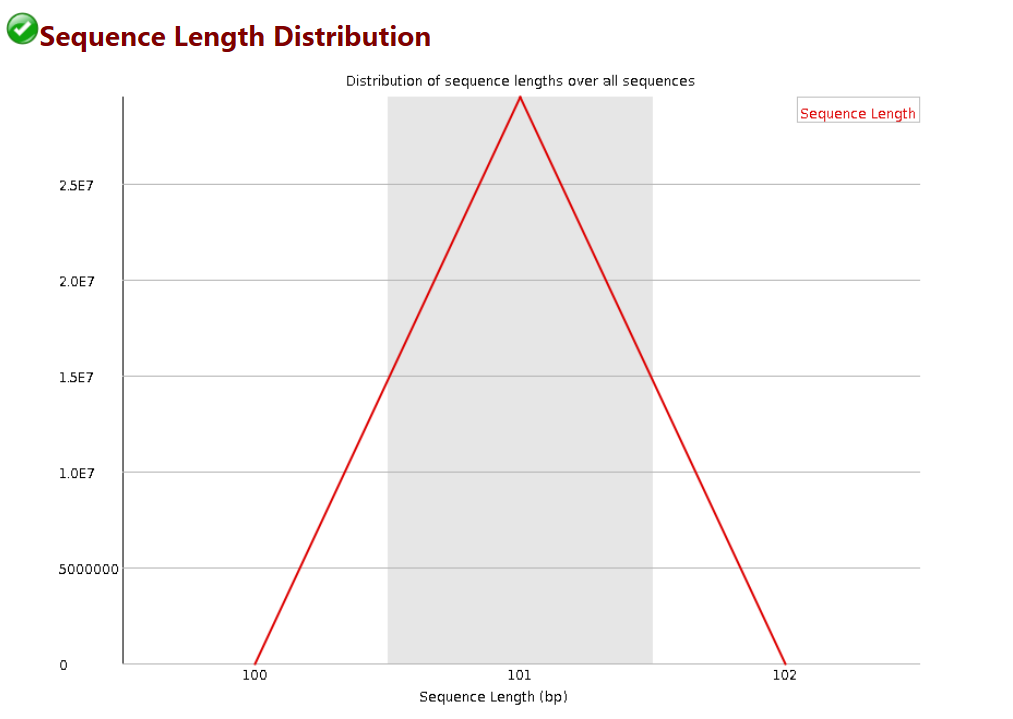 # 每次測序儀測出來的長度在理論上應該是完全相等的,但是總會有一些偏差
# 比如此圖中,101bp是主要的,但是還是有少量的100和102bp的長度,不過數量比較少,不影響後續分析
# 當測序的長度不同時,如果很嚴重,則表明測序儀在此次測序過程中產生的數據不可信
序列Adapter
# 每次測序儀測出來的長度在理論上應該是完全相等的,但是總會有一些偏差
# 比如此圖中,101bp是主要的,但是還是有少量的100和102bp的長度,不過數量比較少,不影響後續分析
# 當測序的長度不同時,如果很嚴重,則表明測序儀在此次測序過程中產生的數據不可信
序列Adapter
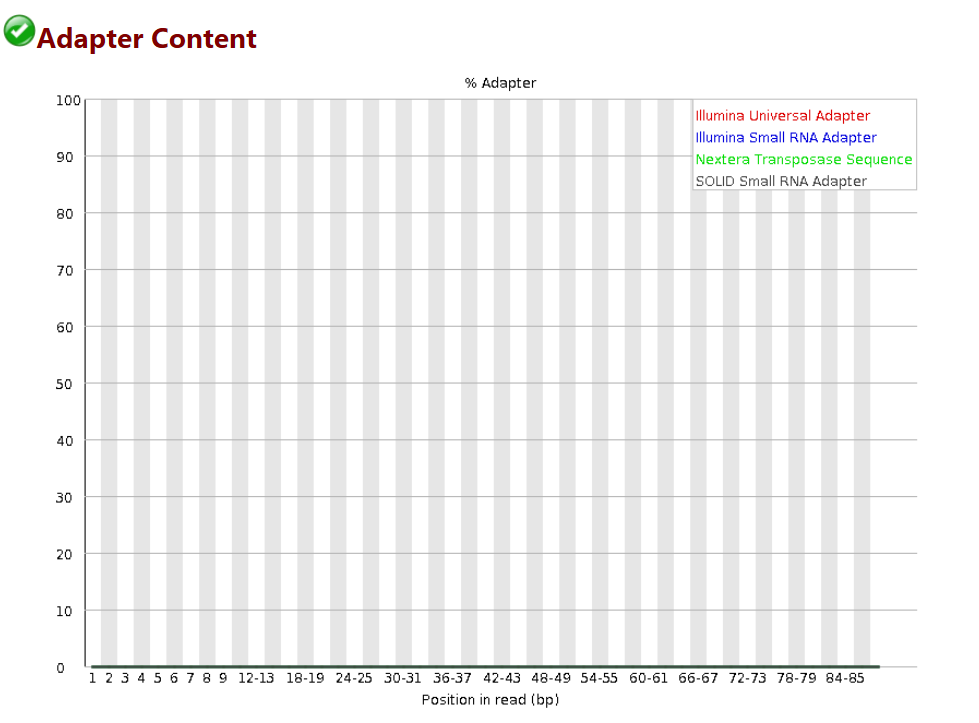 # 此圖衡量的是序列中兩端adapter的情況
# 如果在當時fastqc分析的時候-a選項沒有內容,則預設使用圖例中的四種通用adapter序列進行統計
# 本例中adapter都已經去除,如果有adapter序列沒有去除乾凈的情況,在後續分析的時候需要先使用cutadapt軟體進行去接頭
重覆短序列
# 此圖衡量的是序列中兩端adapter的情況
# 如果在當時fastqc分析的時候-a選項沒有內容,則預設使用圖例中的四種通用adapter序列進行統計
# 本例中adapter都已經去除,如果有adapter序列沒有去除乾凈的情況,在後續分析的時候需要先使用cutadapt軟體進行去接頭
重覆短序列
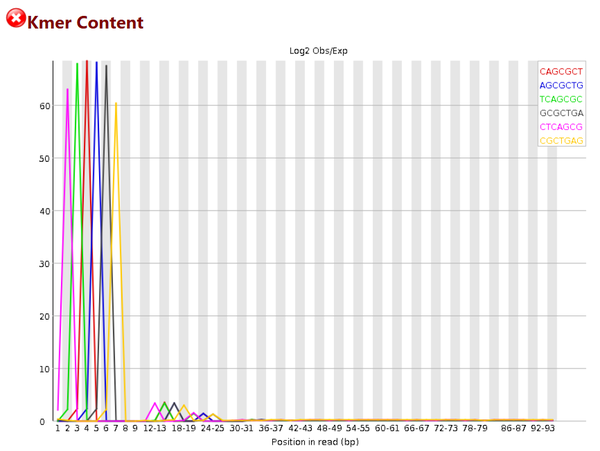 # 這個圖統計的是,在序列中某些特征的短序列重覆出現的次數
# 我們可以看到1-8bp的時候圖例中的幾種短序列都出現了非常多的次數,一般來說,出現這種情況,要麼是adapter沒有去除乾凈,而又沒有使用-a參數;要麼就是序列本身可能重覆度比較高,如建庫PCR的時候出現了bias
# 對於這種情況,我的辦法是可以cut掉前面的一些長度,可以試著cut 5~8bp
# 這個圖統計的是,在序列中某些特征的短序列重覆出現的次數
# 我們可以看到1-8bp的時候圖例中的幾種短序列都出現了非常多的次數,一般來說,出現這種情況,要麼是adapter沒有去除乾凈,而又沒有使用-a參數;要麼就是序列本身可能重覆度比較高,如建庫PCR的時候出現了bias
# 對於這種情況,我的辦法是可以cut掉前面的一些長度,可以試著cut 5~8bp


