分類:C#、Android、VS2015; 創建日期:2016-02-06 這一章主要介紹Android簡單控制項的基本用法。本章源程式共有9個示例,這些示例都在同一個項目中。 項目名:ch05demos,項目模板:Blank App(Android) 運行主界面截圖如下: 點擊每行的示例項,即進入對
分類:C#、Android、VS2015;
創建日期:2016-02-06
這一章主要介紹Android簡單控制項的基本用法。本章源程式共有9個示例,這些示例都在同一個項目中。
項目名:ch05demos,項目模板:Blank App(Android)
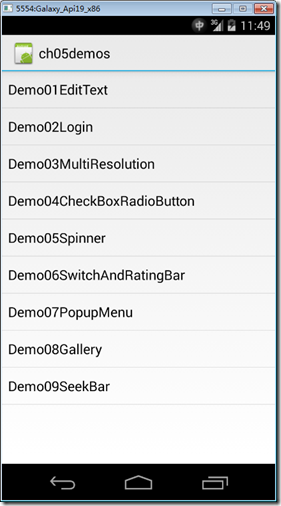
運行主界面截圖如下:
點擊每行的示例項,即進入對應示例的頁面。
1、在drawable文件夾下添加圖片
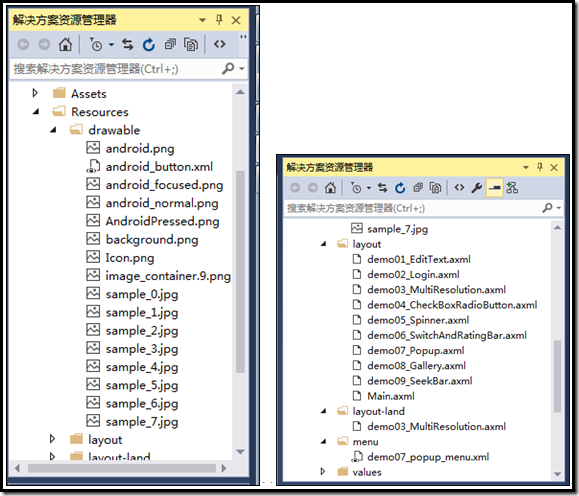
添加的圖片見下麵的左圖,也可以直接拖放圖片到drawable文件夾下。
右圖是各節例子實現後的縱向屏幕佈局文件(layout文件夾)、橫向屏幕佈局文件(layout-land文件夾)、彈出菜單佈局文件(menu文件夾)。這些都是在本章後續將要介紹的節中添加的。
2、主界面(Main.axml)
修改後的代碼如下:
<?xml version="1.0" encoding="utf-8"?>
<LinearLayout xmlns:android="http://schemas.android.com/apk/res/android"
    android:orientation="vertical"
    android:layout_width="fill_parent"
    android:layout_height="fill_parent">
    <ListView
        android:minWidth="25px"
        android:minHeight="25px"
        android:layout_width="match_parent"
        android:layout_height="match_parent"
        android:id="@+id/listView1" />
</LinearLayout>
3、主界面對應的活動文件(MainActivity.cs)
本章示例全部完成後MainActivity.cs的代碼如下:
using System;
using Android.App;
using Android.Widget;
using Android.OS;
using ch05demos.SrcActivity;

namespace ch05demos
{
    [Activity(Label = "ch05demos", MainLauncher = true, Icon = "@drawable/icon")]
    public class MainActivity : Activity
    {
        string[] items;

        protected override void OnCreate(Bundle bundle)
        {
            base.OnCreate(bundle);
            SetContentView(Resource.Layout.Main);
            items = new string[]
            {
                "Demo01EditText",
                "Demo02Login",
                "Demo03MultiResolution",
                "Demo04CheckBoxRadioButton",
                "Demo05Spinner",
                "Demo06SwitchAndRatingBar",
                "Demo07PopupMenu",
                "Demo08Gallery",
                "Demo09SeekBar"
            };
            ListView listView1 = FindViewById<ListView>(Resource.Id.listView1);
            listView1.Adapter = new ArrayAdapter<string>(this, Android.Resource.Layout.SimpleListItem1, items);
            listView1.ItemClick += (s, e) =>
            {
                int index = e.Position + 1;
                switch(index)
                {
                    case 1:
                        StartActivity(typeof(Demo01EditText));
                        break;
                    case 2:
                        StartActivity(typeof(Demo02Login));
                        break;
                    case 3:
                        StartActivity(typeof(Demo03MultiResolution));
                        break;
                    case 4:
                        StartActivity(typeof(Demo04CheckBoxRadioButton));
                        break;
                    case 5:
                        StartActivity(typeof(Demo05Spinner));
                        break;
                    case 6:
                        StartActivity(typeof(Demo06SwitchAndRatingBar));
                        break;
                    case 7:
                        StartActivity(typeof(Demo07PopupMenu));
                        break;
                    case 8:
                        StartActivity(typeof(Demo08Gallery));
                        break;
                    case 9:
                        StartActivity(typeof(Demo09SeekBar));
                        break;
                }
            };
        }
    }
}
4、清單文件(AndroidManifest.xml)
在這個文件中只添加了一條內容:設置應用到所有頁面的公用主題。
<?xml version="1.0" encoding="utf-8"?>
<manifest xmlns:android="http://schemas.android.com/apk/res/android" package="ch05demos.ch05demos" android:versionCode="1" android:versionName="1.0">
    <uses-sdk />
    <application android:label="ch05demos"
       android:theme="@android:style/Theme.DeviceDefault.Light">
</application>
</manifest>
從下一節開始,將分別介紹如何實現各個示例,以及這些示例涉及的相關概念。


