第7章 jQuery插件的使用和寫法 插件又稱擴展,是一種遵循一定規範的應用程式介面寫出來的程式。 插件的編寫思想基於面向對象。 獲取最新的插件可以查看jquery官網: 本章將從幾個基本的例子來介紹jquery插件的使用。 一\. 表單驗證插件Validation jquery最常用的場合就是表單 ...
第7章 jQuery插件的使用和寫法
插件又稱擴展,是一種遵循一定規範的應用程式介面寫出來的程式。
插件的編寫思想基於面向對象。
獲取最新的插件可以查看jquery官網:http://plugins.jquery.com/
本章將從幾個基本的例子來介紹jquery插件的使用。
一. 表單驗證插件Validation
jquery最常用的場合就是表單驗證。Validation則是歷史最悠久的jquery插件之一。分為內置驗證規則,和自定義驗證規則。信息提示明確——可以通過keyUp,focus等方式完成實時驗證。
本筆記跟隨原書採用Validation 1.9版
1.快速上手
Validation基本規則如下:(相關內容可通過ctrl+F查找源文件得到)
| # | 語句表述 | |
|---|---|---|
| 1 | required:true | |
| 2 | remote:"check.php" | |
| 3 | email:true | |
| 4 | url:true | |
| 5 | date:true | |
| 6 | dateISO:true | |
| 7 | number:true | |
| 8 | digits:true | |
| 9 | creditcard: | |
| 10 | equalTo:"#field" | |
| 11 | accept: | |
| 12 | maxlength:5 | |
| 13 | minlength:10 | |
| 14 | rangelength:[5,10] | |
| 15 | range:[5,10] | |
| 16 | max:5 | |
| 17 | min:10 |
【例7.1】
製作一個表單,包括用戶名,郵箱,網址(非必填),和評論。要求能夠輸入驗證。
思路:
(1)對於姓名一欄中長度至少為2位(minlength="2")
(2)電子郵件一欄需要加上.email類
(3)網址加上.url類
(4)對於必填欄位全部加上class="required";
html
<form class="cxmform" id="commentForm" method="get" action="#">
<fieldset>
<lengend>一個簡單帶驗證提示的評論</lengend>
<p>
<label for="cursername">Name</label><em>*</em>
<input type="text" id="cuesername" name="username" size="25" class="required" minlength="2">
</p>
<p>
<label for="cemail">Email</label><em>*</em>
<input type="text" id="cemail" name="email" size="25" class="required email">
</p>
<p>
<label for="curl">WebCite</label><em> </em>
<input type="text" id="curl" name="url" size="25" class="url">
</p>
<p>
<label for="ccomment">Comment</label><em>*</em>
<textarea id="ccomment" name="comment" cols="22" class="required"></textarea>
</p>
<p>
<input type="submit" value="Submit" class="submit">
</p>
</fieldset>
</form>補充css樣式(對功能無影響)
* { font-family: Verdana; font-size: 96%; }
label { width: 10em; float: left; }
label.error { float: none; color: red; padding-left: .5em; vertical-align: top; }
p { clear: both; }
.submit { margin-left: 12em; }
em { font-weight: bold; padding-right: 1em; vertical-align: top; }
最後還不要忘記對插件庫的調用,
<script type="text/javascript" src="js/jquery.validate.js"></script>jq調用
$(document).ready(function(){
    $("#commentForm").validate();
});
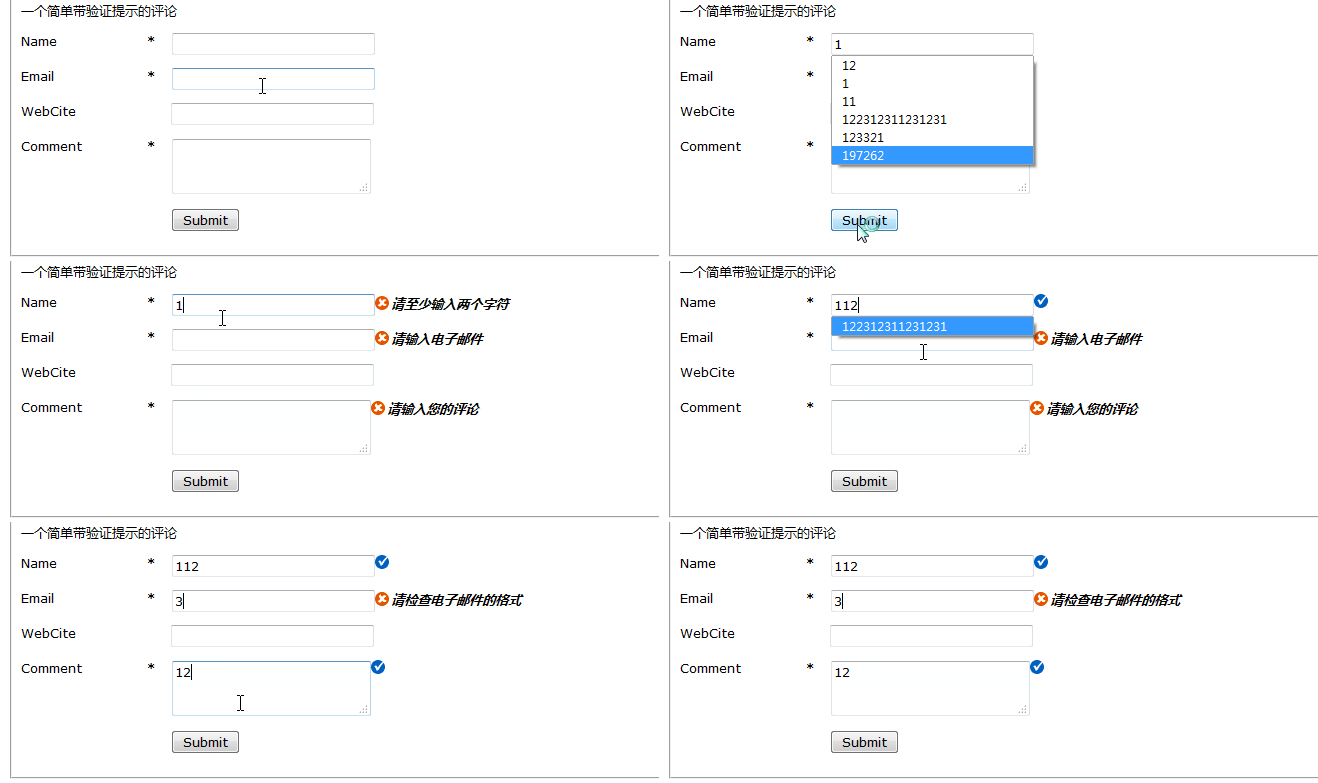
效果如下:

【初步小結插件的使用方法】
(1)引入插件
(2)確定需求:哪些需要用才加
(3)指定驗證規則。
(4)如果我們想漢化這個插件,只需要修改插件中的message消息(註意和驗證規則對應):
jQuery.extend(jQuery.validator.messages, {
  required: "必選欄位",
  remote: "請修正該欄位",
  email: "請輸入正確格式的電子郵件",
  url: "請輸入合法的網址",
  date: "請輸入合法的日期",
  dateISO: "請輸入合法的日期 (ISO).",
  number: "請輸入合法的數字",
  digits: "只能輸入整數",
  creditcard: "請輸入合法的信用卡號",
  equalTo: "請再次輸入相同的值",
  accept: "請輸入擁有合法尾碼名的字元串",
  maxlength: jQuery.validator.format("請輸入一個 長度最多是 {0} 的字元串"),
  minlength: jQuery.validator.format("請輸入一個 長度最少是 {0} 的字元串"),
  rangelength: jQuery.validator.format("請輸入 一個長度介於 {0} 和 {1} 之間的字元串"),
  range: jQuery.validator.format("請輸入一個介於 {0} 和 {1} 之間的值"),
  max: jQuery.validator.format("請輸入一個最大為{0} 的值"),
  min: jQuery.validator.format("請輸入一個最小為{0} 的值")
});
2.改進
上面的例子對於最短欄位採用了minlength="2"這樣的屬性方法。而對開發者來說最友好的事情,應該是把所有的驗證規則要麼全放class要麼全放屬性中。
(1)再引一個插件——jquery.metadata.js
(從這個插件能查到的資料來看,大多數都是和表單驗證一起用)
(2)改變jq的調用方法:
$(document).ready(function(){
    $("#commentForm").validate({meta:'validate'});
});
(3)驗證規則全部寫到class屬性里去!
比如說:
把class="required" minlength="2"寫成:class="{validate:{required:true,minlength:2}}".只要是插件相關的,全部改成複合對象的形式:
<form class="cxmform" id="commentForm" method="get" action="#">
<fieldset>
<lengend>一個簡單帶驗證提示的評論</lengend>
<p>
<label for="cursername">Name</label><em>*</em>
<input type="text" id="cuesername" name="username" size="25" class="{validate:{required:true,minlength:2}}">
</p>
<p>
<label for="cemail">Email</label><em>*</em>
<input type="text" id="cemail" name="email" size="25" class="{validate:{required:true, email:true}}">
</p>
<p>
<label for="curl">WebCite</label><em> </em>
<input type="text" id="curl" name="url" size="25" class="{validate:{url:true}}">
</p>
<p>
<label for="ccomment">Comment</label><em>*</em>
<textarea id="ccomment" name="comment" cols="22" class="{validate:{required:true}}"></textarea>
</p>
<p>
<input type="submit" value="Submit" class="submit">
</p>
</fieldset>
</form>效果和之前完全一致。
3.改進(第二種):通過name來驗證
鍵入繁瑣的class是多數人不喜歡的。下麵從js層面研究如何實現一樣的效果。把class都刪了:
$(function(){
    $('#commentForm).validate({
        rules:{//定義rules屬性
            username:{//通過name來匹配驗證屬性規則
                required:true;
                minlength:2;
            },email{
                required:true;
                email:true;
            },url:"url",
            comment:required;
        }
    })
})
4.自定義插件
(1)更推薦的方法
除了從源碼上漢化之外,更推薦在調用class時完成一整套規則。比如姓名驗證一欄中,class改寫為:
class="{validate:{required:true,minlength:2,messages:{required:'請輸入姓名',minlength:'請至少輸入兩個字元'}}}"(2)如果需要在驗證信息中添加圖片
在js文件中鍵入代碼:
  $(document).ready(function(){

    $("#commentForm").validate({
        rules: {
            username: {
                required: true,
                minlength: 2
            },
            email: {
                required: true,
                email: true
            },
            url:"url",
            comment: "required"
        },

        messages: {
            username: {
                required: '請輸入姓名',
                minlength: '請至少輸入兩個字元'
            },
            email: {
                required: '請輸入電子郵件',
                email: '請檢查電子郵件的格式'
            },
            url: '請檢查網址的格式',
            comment: '請輸入您的評論'
        },

        errorElement: "em", //可以用其他標簽,記住把樣式也對應修改
        success: function(label) {
            //label指向上面那個錯誤提示信息標簽em
            label.text(" ")             //清空錯誤提示消息
                .addClass("success");   //加上自定義的success類
        }

      });

  });
同時在css中追加樣式:
em.error {
  background:url("../images/unchecked.gif") no-repeat 0px 0px;
  padding-left: 16px;
}
em.success {
  background:url("../images/checked.gif") no-repeat 0px 0px;
  padding-left: 16px;
}
效果圖:

(3)規則的自定義
評論功能還有一個重要部分是驗證碼,驗證碼通常有後臺生成,在這裡直接模擬。
在html的表現是:
<p>
    <label for="cvalcode">驗證碼</label>
    <input id="cvalcode" name="valcode" size="25"  value="" />=1+1
</p>在$("#commentForm").validate()方法上面定義驗證規則:
使用$.validator.addMethod('方法名',function(值,對象,param))定義
    //自定義一個驗證方法
    $.validator.addMethod(
    "formula", //驗證方法名稱
    function(value, element, param) {//驗證規則
        return value == eval(param);
    },
    '請正確輸入數學公式計算後的結果'//不成功則出現驗證提示信息
    );
跟其他規則一樣,在rules裡面,根據name調用對象:
valcode: {
    formula: "1+1"
}
效果如下:

代碼清單
jq
  $(document).ready(function(){

    //自定義一個驗證方法
    $.validator.addMethod(
    "formula", //驗證方法名稱
    function(value, element, param) {//驗證規則
        return value == eval(param);
    },
    '請正確輸入數學公式計算後的結果'//驗證提示信息
    );

    $("#commentForm").validate({
        rules: {
            username: {
                required: true,
                minlength: 2
            },
            email: {
                required: true,
                email: true
            },
            url:"url",
            comment: "required",
            valcode: {
                formula: "1+1"
            }
        },

        messages: {
            username: {
                required: '請輸入姓名',
                minlength: '請至少輸入兩個字元'
            },
            email: {
                required: '請輸入電子郵件',
                email: '請檢查電子郵件的格式'
            },
            url: '請檢查網址的格式',
            comment: '請輸入您的評論'
        },

        errorElement: "em",             //用來創建錯誤提示信息標簽
        success: function(label) {          //驗證成功後的執行的回調函數
            //label指向上面那個錯誤提示信息標簽em
            label.text(" ")             //清空錯誤提示消息
                .addClass("success");   //加上自定義的success類
        }


      });

  });
二. jQuery表單插件——form
jQuery Form插件是一個優秀的Ajax表單插件,可以非常容易地、無侵入地升級HTML表單以支持Ajax。jQuery Form有兩個核心方法 -- ajaxForm() 和 ajaxSubmit(), 它們集合了從控製表單元素到決定如何管理提交進程的功能。另外,插件還包括其他的一些方法: formToArray()、formSerialize()、fieldSerialize()、fieldValue()、clearForm()、clearFields() 和 resetForm()等。
調試需要伺服器環境的支持。筆記跟隨原書使用2.95版
1.快速上手
【例7.2】
一個表單,包括名字,地址,自我介紹,被提交時傳送到demo.php中,如果返回成功則收到“提交成功!”的信息。
————準備工作
在頁面引入插件:
<script type="text/javascript" src="js/jquery.form.js"></script>
html結構為:
    <form id="myForm" action="demo.php" method="post">
        名稱:<input type="text" name="name"><br>
        地址:<input type="text" name="address"><br>
        自我介紹:<input type="text" name="introduction"><br>
        <div id="output1" style="display:none"></div>
    </form>
demo.php初始化內容為:
<?php
    header("Content-Type:text/html; charset=utf-8");
    echo "<h6>{$_REQUEST['name']}</h6>";
?>
在js文件中:
$(function(){
    //綁定一個id為myForm的表單並提供一個回調函數
    $('#myForm').ajaxForm(function(){
        $('#output1').html('提交成功!').show();
    });
    return false;//阻止表單預設提交
})
通過Form插件的兩個核心方法,都可以在不修改表單的HTML代碼結構的情況下,輕易地將表單的提交方式升級為Ajax提交方式。另一個核心方法ajaxSubmit()也能完成同樣的功能。
$(function(){
    //綁定一個id為myForm的表單並提供一個回調函數
    $('#myForm').ajaxSubmit(function(){
        $('#output1').html('提交成功!').show();
    });
    return false;//阻止表單預設提交
})
2.兩個核心方法的參數
ajaxForm() 和 ajaxSubmit() 都能接受0個或1個參數,當為單個參數時,該參數既可以是一個回調函數,也可以是一個options對象,上面的例子就是回調函數,下麵介紹options對象,使得它們對錶單擁有更多的控制權。
1.  var options = {
2.  target: '#output',          //把伺服器返回的內容放入id為output的元素中
3.  beforeSubmit: showRequest,  //提交前的回調函數
4.  success: showResponse,      //提交後的回調函數
5.  //url: url,                 //預設是form的action, 如果申明,則會覆蓋
6.  //type: type,               //預設是form的method(get or post),如果申明,則會覆蓋
7.  //dataType: null,           //html(預設), xml, script, json...接受服務端返回的類型
8.  //clearForm: true,          //成功提交後,清除所有表單元素的值
9.  //resetForm: true,          //成功提交後,重置所有表單元素的值
10.  timeout: 3000               //限制請求的時間,當請求大於3秒後,跳出請求
11.  }

13.  function showRequest(formData, jqForm, options){
14.  //formData: 數組對象,提交表單時,Form插件會以Ajax方式自動提交這些數據,格式如:[{name:user,value:val },{name:pwd,value:pwd}]
15.  //jqForm:   jQuery對象,封裝了表單的元素
16.  //options:  options對象
17.  var queryString = $.param(formData);   //name=1&address=2
18.  var formElement = jqForm[0];              //將jqForm轉換為DOM對象
19.  var address = formElement.address.value;  //訪問jqForm的DOM元素
20.  return true;  //只要不返回false,表單都會提交,在這裡可以對錶單元素進行驗證
21.  };

23.  function showResponse(responseText, statusText){
24.  //dataType=xml
25.  var name = $('name', responseXML).text();
26.  var address = $('address', responseXML).text();
27.  $("#xmlout").html(name + "  " + address);
28.  //dataType=json
29.  $("#jsonout").html(data.name + "  " + data.address);
30.  };

32.  $("#myForm").ajaxForm(options);

34.  $("#myForm2").submit(funtion(){
35.  $(this).ajaxSubmit(options);
36.  return false;   //阻止表單預設提交
37.  });
表單提交之前進行驗證: beforeSubmit會在表單提交前被調用,如果beforeSubmit返回false,則會阻止表單提交。
3.表單提交之前的驗證
利用beforeSubmit的特性,當返回為false時,阻止提交。可以定義一個validate函數,作為beforeSubmit的值:
1.  beforeSubmit: validate
2.  function validate(formData, jqForm, options) { //在這裡對錶單進行驗證,如果不符合規則,將返回false來阻止表單提交,直到符合規則為止
3.  //方式一:利用formData參數
4.  for (var i=0; i < formData.length; i++) {
5.  if (!formData[i].value) {
6.  alert('用戶名,地址和自我介紹都不能為空!');
7.  return false;
8.  }
9.  }

11.  //方式二:利用jqForm對象
12.  var form = jqForm[0]; //把表單轉化為dom對象
13.  if (!form.name.value || !form.address.value) {
14.  alert('用戶名和地址不能為空,自我介紹可以為空!');
15.  return false;
16.  }

18.  //方式三:利用fieldValue()方法,fieldValue 是表單插件的一個方法,它能找出表單中的元素的值,返回一個集合。
19.  var usernameValue = $('input[name=name]').fieldValue();
20.  var addressValue = $('input[name=address]').fieldValue();
21.  if (!usernameValue[0] || !addressValue[0]) {
22.  alert('用戶名和地址不能為空,自我介紹可以為空!');
23.  return false;
24.  }

26.  var queryString = $.param(formData); //組裝數據
27.  //alert(queryString); //類似 : name=1&add=2
28.  return true;
29.  }
三.模態視窗插件——SimpleModal
補白:
- 模態視窗就是在該視窗關閉之前,其父視窗不可能成為活動視窗的那種視窗。
例如:視窗A彈出視窗B,如果視窗B是模態的,在視窗B關閉前就不可能切換到視窗A;如果B是非模態的,那可以在這兩個視窗之間任意切換。
更簡單地說alert彈出框就是一個模態視窗。- 模態對話框 和 非模態對話框區別
模態對話框在顯示之後,就不能對同一個程式中的其它視窗進行操作。
非模態對話框在顯示之後,還可以對同一個程式的其它視窗進行操作
SimpleModal為模態視窗的開發提供了強有力的介面。
本筆記採用SimpleModal 1.4.4版
1.快速上手


彈出的內容是需要css規範化的,因此css文件不可少。可以根據規則自定義css。本例用的是box.css。直接複製來用就好。
.simplemodal-container .ico-ok, .simplemodal-container .ico-error, .simplemodal-container .ico-info, .simplemodal-container .ico-question, .simplemodal-container .ico-warn, .simplemodal-container .ico-wait,.simplemodal-container .modalCloseImg,.simplemodal-container .btn-close, .simplemodal-container .btn-close-b{background:url(../img/box.png) no-repeat;display:inline-block;width:32px;height:32px;}
.simplemodal-container .ico-ok{background-position:-66px 0;}
.simplemodal-container .ico-error{background-position:0 0;}
.simplemodal-container .ico-info{background-position:-33px 0;}
.simplemodal-container .ico-question{background-position:-99px 0;}
.simplemodal-container .ico-warn{background-position:-165px 0;}
.simplemodal-container .ico-wait{background-position:-132px 0;}

.simplemodal-container .tips{padding:34px 0 0;}
.simplemodal-container .tips-ico{float:left;position:relative;top:-9px;width:auto;padding-left:5%;margin-right:16px;_margin-right:13px;text-align:right;}
.simplemodal-container .tips-content{overflow:hidden;height:1%;padding-right:5%;}
.simplemodal-container .tips-title, .simplemodal-container .tips-line{padding:0 0 8px;}
.simplemodal-container .tips-title{font-weight:700;font-size:14px;}
.simplemodal-container .tips-line{line-height:20px;}
.simplemodal-container .font-red{color:#c00;}
.simplemodal-container .tips-buttons{margin-top:23px;text-align:right;}
.simplemodal-container .tips-buttons .btn-blue, .simplemodal-container .tips-buttons .btn-blue-s, .simplemodal-container .tips-buttons .btn-white, .simplemodal-container .tips-buttons .btn-white-s{margin-right:16px;}

.simplemodal-container{position:relative;height:100%;*width:100%;margin:-9px;padding:9px;font-size:12px;line-height:1.5;background-color:rgba(0,0,0,0.2);filter:progid:DXImageTransform.Microsoft.Gradient(startColorstr=#30000000, endColorstr=#30000000);}
.simplemodal-container .btn-close{background-position:-286px 0;position:absolute;z-index:1;right:13px;top:13px;width:16px;height:16px;overflow:hidden;text-indent:-99em;text-decoration:none;}
.simplemodal-container .btn-close:hover{background-position:-302px 0;}
.simplemodal-container .btn-close-b{background-position:-249px 0;position:absolute;z-index:1;right:17px;_right:19px;top:19px;width:18px;height:18px;overflow:hidden;text-indent:-99em;text-decoration:none;}
.simplemodal-container .btn-close-b:hover{background-position:-267px 0;}

.box-title{position:relative;border:1px solid #369;border-bottom:none;margin:-1px -1px 0;background-color:#EBF2FA;padding:1px 0;}
.box-title h2{height:2em;line-height:2em;color:#666;font-size:100%;text-indent:12px;}
.simplemodal-data{height:100%;overflow:hidden;}
.box-main{position:relative;background-color:#fff;border:1px solid #369;margin:0 -1px -1px;border-top:none;zoom:1;}
.box-buttons{margin-top:23px;padding:0 9px 9px 0;text-align:right;}
.box-buttons button{margin-left:8px;min-width:68px;min-width:52px\9;*min-width:auto;height:24px;padding:0 5px 1px;*padding:0 10px 1px;}
.simplemodal-container iframe.box-iframe{position:relative;height:100%;width:100%;margin:-1px;overflow:hidden;border:1px solid #6685A2;background-color:#fff;}

.simplemodal-container .modalCloseImg{
    background-position:-286px 0;
    position:absolute;
    right:13px;
    top:13px;
    width:16px;
    height:16px;
    overflow:hidden;
    text-indent:-99em;
    text-decoration:none;
    cursor:pointer;
    display:inline;
    z-index:3200;
}
.simplemodal-container .modalCloseImg:hover{background-position:-302px 0;}
有兩種調用方法。
(1)獲取一個jquery對象,然後對其使用Modal()方法。然後就可以用該元素的內容來顯示模態視窗。
$(elem).modal({options})(2)作為一個單獨的函數使用
通過傳遞一個jq對象,通過dom元素來創建一個模態視窗
$.modal('<div><h1>HELLO WORLD!</h1></div>'),({options});options參數為以上兩個方法提供了可能需要的css樣式信息。
(3)如何關閉——使用.simplemodal-close類
你可以在button按鈕或是a標記上使用此類。
【例7.3】製作一個模態提示框和模態的iframe。
註意:原書案例中,simpleModal版本是1.4.2。用的是jquery1.7.1,不支持筆者的jquery-1.11版。經過測試,最新的1.4.4版可以支持jquery1.9。jq1.11.3版運行demo沒問題,但是firebug會報錯。除了基礎版本之外,還有登陸窗,聯繫方式等其它的用法。可到作者官網http://www.ericmmartin.com/projects/下載更多demo。(需要FQ)
    <link rel="stylesheet" type="text/css" href="css/box.css"/>

    <link rel="stylesheet" type="text/css" href="css/css.css"/>
    <script type="text/javascript" src="js/jquery-1.9.js"></script>
    <script type="text/javascript" src="js/jquery.simplemodal-1.4.4.js"></script>
    <script type="text/javascript" src="js/js.js"></script>
    <div id='container'>

    <div id='content'>
        <div id='basic-modal'>
            <p>提示框-ok:<input type='button' name='basic' value='Demo' class='open-basic-dialog-ok'/></p>
            <p>警告框-warn:<input type='button' name='basic'


