
頁面設計需求,做了一個氣泡形狀的彈出框,效果如下: 設計思路如下: 1. 使用Path繪製氣泡的尖尖,將這個放到頂層; 2. 在用border繪製長方形框,將這個放到底層,並且設置Margin值,使得Path圖層和border看起來銜接在一起。 代碼如下: 後臺代碼,很簡單,就是控制pupup顯示或 ...
頁面設計需求,做了一個氣泡形狀的彈出框,效果如下:
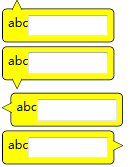
設計思路如下:
1. 使用Path繪製氣泡的尖尖,將這個放到頂層;
2. 在用border繪製長方形框,將這個放到底層,並且設置Margin值,使得Path圖層和border看起來銜接在一起。
代碼如下:
  1 <Window x:Class="BubblePanelTest.MainWindow"
  2         xmlns="http://schemas.microsoft.com/winfx/2006/xaml/presentation"
  3         xmlns:x="http://schemas.microsoft.com/winfx/2006/xaml"
  4         Title="MainWindow" Height="350" Width="525">
  5     <Window.Resources>
  6         <Style TargetType="Label" x:Key="TopBubblePanel">
  7             <Setter Property="Template">
  8                 <Setter.Value>
  9                     <ControlTemplate TargetType="{x:Type Label}">
 10                         <Grid>
 11                             <Border CornerRadius="4" BorderBrush="Black" BorderThickness="1" VerticalAlignment="Top"  Background="Yellow" HorizontalAlignment="Left" Margin="0,8.5,0,0" Padding="5">
 12                                 <ContentPresenter />
 13                             </Border>
 14                             <Canvas Width="10" Height="10" HorizontalAlignment="Left" VerticalAlignment="Top" Margin="10,0,0,0" Background="Transparent">
 15                                 <Path Stroke="Black" StrokeThickness="0.5" Fill="Yellow">
 16                                     <Path.Data>
 17                                         <PathGeometry Figures="M 0,10
 18                                   L 0,10,5,0
 19                                   L 5,0,10,10
 20                                   "/>
 21                                     </Path.Data>
 22                                 </Path>
 23                             </Canvas>
 24                         </Grid>
 25                     </ControlTemplate>
 26                 </Setter.Value>
 27             </Setter>
 28         </Style>
 29         <Style TargetType="Label" x:Key="BottomBubblePanel">
 30             <Setter Property="Template">
 31                 <Setter.Value>
 32                     <ControlTemplate TargetType="{x:Type Label}">
 33                         <Grid>
 34                             <Border CornerRadius="4" BorderBrush="Black" BorderThickness="1" VerticalAlignment="Bottom" Margin="0,0,0,8.5" Background="Yellow" HorizontalAlignment="Left" Padding="5">
 35                                 <ContentPresenter />
 36                             </Border>
 37                             <Canvas Width="10" Height="10" HorizontalAlignment="Left" VerticalAlignment="Bottom" Margin="10,0,0,0" Background="Transparent">
 38                                 <Path Stroke="Black" StrokeThickness="0.5" Fill="Yellow">
 39                                     <Path.Data>
 40                                         <PathGeometry Figures="M 0,0
 41                                   L 0,0,5,10
 42                                   L 5,10,10,0
 43                                   "/>
 44                                     </Path.Data>
 45                                 </Path>
 46                             </Canvas>
 47                         </Grid>
 48                     </ControlTemplate>
 49                 </Setter.Value>
 50             </Setter>
 51         </Style>
 52         <Style TargetType="Label" x:Key="LeftBubblePanel">
 53             <Setter Property="Template">
 54                 <Setter.Value>
 55                     <ControlTemplate TargetType="{x:Type Label}">
 56                         <Grid>
 57                             <Border CornerRadius="4" BorderBrush="Black" BorderThickness="1" VerticalAlignment="Top" Margin="8.5,0,0,0" Background="Yellow" HorizontalAlignment="Left" Padding="5">
 58                                 <ContentPresenter />
 59                             </Border>
 60                             <Canvas Width="10" Height="10" HorizontalAlignment="Left" VerticalAlignment="Top" Margin="0,10,0,0" Background="Transparent">
 61                                 <Path Stroke="Black" StrokeThickness="0.5" Fill="Yellow">
 62                                     <Path.Data>
 63                                         <PathGeometry Figures="M 10,0
 64                                   L 10,0,0,5
 65                                   L 0,5,10,10
 66                                   "/>
 67                                     </Path.Data>
 68                                 </Path>
 69                             </Canvas>
 70                         </Grid>
 71                     </ControlTemplate>
 72                 </Setter.Value>
 73             </Setter>
 74         </Style>
 75         <Style TargetType="Label" x:Key="RightBubblePanel">
 76             <Setter Property="Template">
 77                 <Setter.Value>
 78                     <ControlTemplate TargetType="{x:Type Label}">
 79                         <Grid HorizontalAlignment="Left">
 80                             <Border CornerRadius="4" BorderBrush="Black" BorderThickness="1" HorizontalAlignment="Right" VerticalAlignment="Top" Margin="0,0,8.5,0" Background="Yellow" Padding="5">
 81                                 <ContentPresenter />
 82                             </Border>
 83                             <Canvas Width="10" Height="10" HorizontalAlignment="Right" VerticalAlignment="Top" Margin="0,10,0,0" Background="Transparent">
 84                                 <Path Stroke="Black" StrokeThickness="0.5" Fill="Yellow">
 85                                     <Path.Data>
 86                                         <PathGeometry Figures="M 0,0
 87                                   L 0,0,10,5
 88                                   L 10,5,0,10
 89                                   "/>
 90                                     </Path.Data>
 91                                 </Path>
 92                             </Canvas>
 93                         </Grid>
 94                     </ControlTemplate>
 95                 </Setter.Value>
 96             </Setter>
 97         </Style>
 98     </Window.Resources>
 99     <StackPanel>
100         <Label Style="{StaticResource TopBubblePanel}" Tag="Top" Margin="2">
101             <StackPanel>
102                 <StackPanel Orientation="Horizontal">
103                     <TextBlock Text="abc" />
104                     <TextBox Width="80"/>
105                 </StackPanel>
106             </StackPanel>
107         </Label>
108         <Label Style="{StaticResource BottomBubblePanel}" Tag="Top" Margin="2">
109             <StackPanel>
110                 <StackPanel Orientation="Horizontal">
111                     <TextBlock Text="abc" />
112                     <TextBox Width="80"/>
113                 </StackPanel>
114             </StackPanel>
115         </Label>
116         <Label Style="{StaticResource LeftBubblePanel}" Tag="Top" Margin="2">
117             <StackPanel>
118                 <StackPanel Orientation="Horizontal">
119                     <TextBlock Text="abc" />
120                     <TextBox Width="80"/>
121                 </StackPanel>
122             </StackPanel>
123         </Label>
124         <Label Style="{StaticResource RightBubblePanel}" Tag="Top" Margin="2">
125             <StackPanel>
126                 <StackPanel Orientation="Horizontal">
127                     <TextBlock Text="abc" />
128                     <TextBox Width="80"/>
129                 </StackPanel>
130             </StackPanel>
131         </Label>
132         <StackPanel Orientation="Horizontal" Margin="0,30,0,0">
133             <Button Name="btnTestPopup1" Width="100" Height="30" Content="Bottom" Click="btnTestPopup1_Click" />
134             <Button Name="btnTestPopup2" Width="100" Height="30" Content="Top" Click="btnTestPopup2_Click" />
135             <Button Name="btnTestPopup3" Width="100" Height="30" Content="Right" Click="btnTestPopup3_Click" />
136             <Button Name="btnTestPopup4" Width="100" Height="30" Content="Left" Click="btnTestPopup4_Click" />
137         </StackPanel>
138         <Popup Name="pop1" AllowsTransparency="True" StaysOpen="False" PopupAnimation="Slide" PlacementTarget="{Binding ElementName=btnTestPopup1}" Placement="Bottom" >
139             <Label Style="{StaticResource TopBubblePanel}" Tag="Top">
140                 <StackPanel>
141                     <StackPanel Orientation="Horizontal">
142                         <TextBlock Text="abc" />
143                         <TextBox Width="80" Name="txtTest1" />
144                     </StackPanel>
145                     <StackPanel Orientation="Horizontal" HorizontalAlignment="Right">
146                         <Button Content="確定" Click="btnOK1_Click" Width="50" Height="25" Margin="5" />
147                         <Button Content="取消" Click="btnCancel1_Click"  Width="50" Height="25" Margin="5"/>
148                     </StackPanel>
149                 </StackPanel>
150             </Label>
151         </Popup>
152         <Popup Name="pop2" AllowsTransparency="True" StaysOpen="False" PopupAnimation="Fade"  PlacementTarget="{Binding ElementName=btnTestPopup2}" Placement="Top" >
153             <Label Style="{StaticResource BottomBubblePanel}" Tag="Top">
154                 <StackPanel>
155                     <StackPanel Orientation="Horizontal">
156                         <TextBlock Text="abc" />
157                         <TextBox Width="80" Name="txtTest2" />
158                     </StackPanel>
159                     <StackPanel Orientation="Horizontal" HorizontalAlignment="Right">
160                         <Button Content="確定" Click="btnOK2_Click"  Width="50" Height="25" Margin="5"/>
161                         <Button Content="取消" Click="btnCancel2_Click"  Width="50" Height="25" Margin="5"/>
162                     </StackPanel>
163                 </StackPanel>
164             </Label>
165         </Popup>
166         <Popup Name="pop3" AllowsTransparency="True" StaysOpen="False" PopupAnimation="Scroll"  PlacementTarget="{Binding ElementName=btnTestPopup3}" Placement="Right" >
167             <Label Style="{StaticResource LeftBubblePanel}" Tag="Top">
168                 <StackPanel>
169                     <StackPanel Orientation="Horizontal">
170                         <TextBlock Text="abc" />
171                         <TextBox Width="80" Name="txtTest3" />
172                     </StackPanel>
173                     <StackPanel Orientation="Horizontal" HorizontalAlignment="Right">
174                         <Button Content="確定" Click="btnOK2_Click"  Width="50" Height="25" Margin="5"/>
175                         <Button Content="取消" Click="btnCancel3_Click"  Width="50" Height="25" Margin="5"/>
176                     </StackPanel>
177                 </StackPanel>
178             </Label>
179         </Popup>
180         <Popup Name="pop4" AllowsTransparency="True" StaysOpen="False" PopupAnimation="None" PlacementTarget="{Binding ElementName=btnTestPopup4}" Placement="Left" >
181             <Label Style="{StaticResource RightBubblePanel}" Tag="Top">
182                 <StackPanel>
183                     <StackPanel Orientation="Horizontal">
184                         <TextBlock Text="abc" />
185                         <TextBox Width="80" Name="txtTest4" />
186                     </StackPanel>
187                     <StackPanel Orientation="Horizontal" HorizontalAlignment="Right">
188                         <Button Content="確定" Click="btnOK4_Click"  Width="50" Height="25" Margin="5"/>
189                         <Button Content="取消" Click="btnCancel4_Click"  Width="50" Height="25" Margin="5"/>
190                     </StackPanel>
191                 </StackPanel>
192             </Label>
193         </Popup>
194     </StackPanel>
195 </Window>
後臺代碼,很簡單,就是控制pupup顯示或隱藏
 1 private void btnTestPopup1_Click(object sender, RoutedEventArgs e)
 2         {
 3             pop1.IsOpen = true;
 4         }
 5         private void btnOK1_Click(object sender, RoutedEventArgs e)
 6         {
 7             pop1.IsOpen = false;
 8         }
 9         private void btnCancel1_Click(object sender, RoutedEventArgs e)
10         {
11             pop1.IsOpen = false;
12         }
13
14         private void btnTestPopup2_Click(object sender, RoutedEventArgs e)
15         {
16             pop2.IsOpen = true;
17         }
18         private void btnOK2_Click(object sender, RoutedEventArgs e)
19         {
20             pop2.IsOpen = false;
21         }
22         private void btnCancel2_Click(object sender, RoutedEventArgs e)
23         {
24             pop2.IsOpen = false;
25         }
26
27         private void btnTestPopup3_Click(object sender, RoutedEventArgs e)
28         {
29             pop3.IsOpen = true;
30         }
31         private void btnOK3_Click(object sender, RoutedEventArgs e)
32         {
33             pop3.IsOpen = false;
34         }
35         private void btnCancel3_Click(object sender, RoutedEventArgs e)
36         {
37             pop3.IsOpen = false;
38         }
39
40         private void btnTestPopup4_Click(object sender, RoutedEventArgs e)


