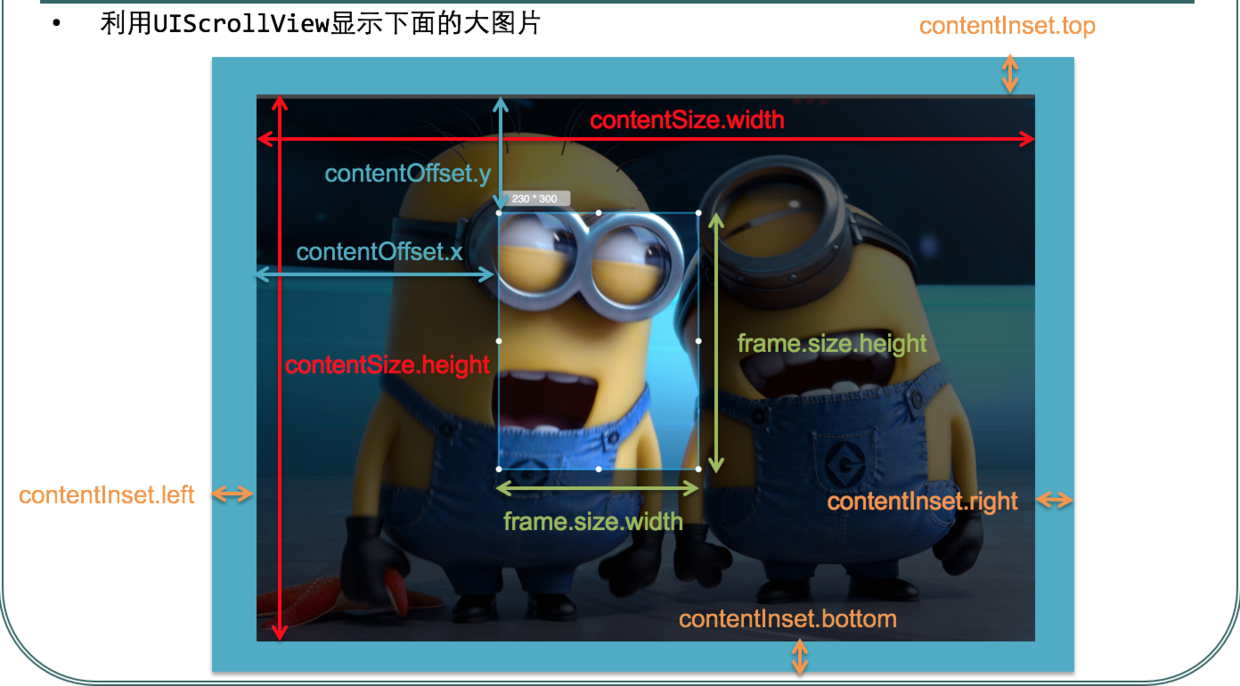
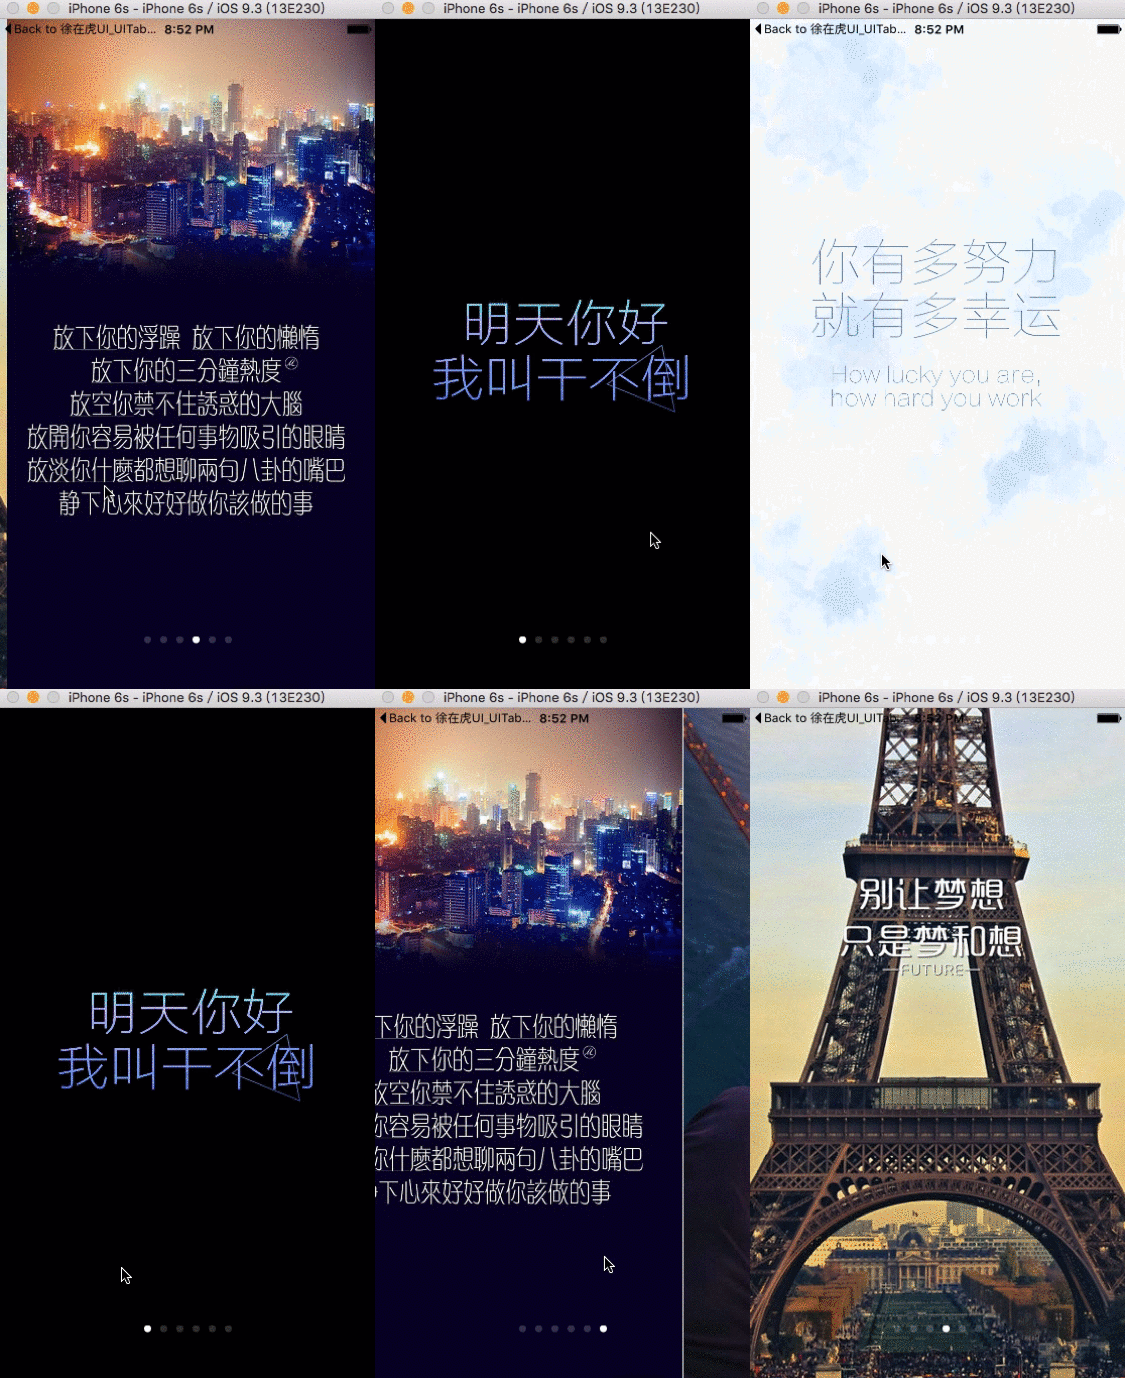
一:首先查看一下關於UIScrollView的定義 UIScrollView用於顯示超出屏幕大小內容,一般需要配合其他控制項來使用,如添加一個UIImageView子控制項,可以用來顯示更大的圖片; UITableView、UICollectionView以及UITextView這些可以滑動顯示更多內容 ...
一:首先查看一下關於UIScrollView的定義
NS_CLASS_AVAILABLE_IOS(2_0) @interface UIScrollView : UIView <NSCoding>

//表示UIScrollView滾動的位置(就是內容左上角與scrollView左上角的間距!!)
@property(nonatomic)         CGPoint                      contentOffset;                  // default CGPointZero
//表示UIScrollView內容的尺寸,滾動範圍
@property(nonatomic)         CGSize                       contentSize;                    // default CGSizeZero
//在UIScrollView的四周增加額外的滾動區域,一般用來避免scrollView的內容被其他控制項擋住
@property(nonatomic)         UIEdgeInsets                 contentInset;
//委托
@property(nullable,nonatomic,weak) id<UIScrollViewDelegate>        delegate;                       // default nil. weak reference
//設置當向一個方向滾動的時候,是否鎖住向另外一個方向的滾動
@property(nonatomic,getter=isDirectionalLockEnabled) BOOL directionalLockEnabled;         // 預設值為 NO
//設置UIScrollView是否需要彈簧效果
@property(nonatomic)         BOOL                         bounces;                        // 預設值YES

//是否一直有彈簧效果: 使用範圍 ContentSize.height < ScrollView.height 的情況下垂直方向預設情況下是沒有彈簧效果的, 但是設置了AlwaysBounceVertical = YES的時候就會讓在這種情況下仍然有彈簧效果
@property(nonatomic)         BOOL                         alwaysBounceVertical;           // 預設值 NO
@property(nonatomic)         BOOL                         alwaysBounceHorizontal;         // 預設值 NO

//控制控制項是否整頁翻動 預設值為NO
@property(nonatomic,getter=isPagingEnabled) BOOL          pagingEnabled;
//設置UIScrollView是否能滾動
@property(nonatomic,getter=isScrollEnabled) BOOL          scrollEnabled;                  //預設值 YES
//是否顯示水平滾動條
@property(nonatomic)         BOOL                         showsHorizontalScrollIndicator; // 預設值YES
//是否顯示垂直滾動條
@property(nonatomic)         BOOL                         showsVerticalScrollIndicator;   // 預設值YES

//設置滾動條到scrollView上左下右的邊距,只有下和右有效
// 參數1: 設置x值無效
// 參數2: 設置y值無效
// 參數3: 設置下麵的距離
// 參數4: 設置右邊的距離
@property(nonatomic)         UIEdgeInsets                 scrollIndicatorInsets;

// 設置滾動條的風格
// .Default  (預設)灰色
// .Black    黑色的滾動條
// .Whitr    白色的滾動條
@property(nonatomic)         UIScrollViewIndicatorStyle   indicatorStyle;                 // 預設值 UIScrollViewIndicatorStyleDefault

// // 設置手指放開後的減速率
@property(nonatomic)         CGFloat                      decelerationRate NS_AVAILABLE_IOS(3_0);

//意思是需要動畫 但是時間是蘋果自己定義的第一個參數是你要滾動到的位置 第二個參數是是否要動畫效果!
- (void)setContentOffset:(CGPoint)contentOffset animated:(BOOL)animated;

- (void)scrollRectToVisible:(CGRect)rect animated:(BOOL)animated;         // scroll so rect is just visible (nearest edges). nothing if rect completely visible

//短暫的顯示一下狀態條,當你將scrollView調整到最上面時,需要調用一下該方法
- (void)flashScrollIndicators;

//只讀,一旦用戶開始觸摸視圖(也許還沒有開始拖動),該屬性值為YES
@property(nonatomic,readonly,getter=isTracking)     BOOL tracking;
//只讀,當用戶開始拖動(手指已經在屏幕上滑動一段距離了),該屬性值為YES
@property(nonatomic,readonly,getter=isDragging)     BOOL dragging;
//只讀,當用戶鬆開手指,但視圖仍在滾動時,該值返回YES
@property(nonatomic,readonly,getter=isDecelerating) BOOL decelerating;

//是否推遲觸屏手勢處理,預設值為YES。設置為YES的時候,系統在確定是否發生scroll事件之後,才會處理觸屏手勢,否則,則會立即調用touchesShouldBegin:withEvent:inContentView:方法
@property(nonatomic) BOOL delaysContentTouches;

//假如你設置canCancelContentTouches為YES,那麼當你在UIScrollView上面放置任何子視圖的時候,當你在子視圖上移動手指的時候,UIScrollView會給子視圖發送touchCancel的消息。而如果該屬性設置為NO,ScrollView本身不處理這個消息,全部交給子視圖處理 預設值YES
@property(nonatomic) BOOL canCancelContentTouches;

//如果返回值為 yes , touch 事件傳給子視圖;如果為 no , touch 事件不傳給子視圖
- (BOOL)touchesShouldBegin:(NSSet<UITouch *> *)touches withEvent:(nullable UIEvent *)event inContentView:(UIView *)view;

- (BOOL)touchesShouldCancelInContentView:(UIView *)view;

// 設置最小的縮放倍數,預設值1.0
@property(nonatomic) CGFloat minimumZoomScale;
// 設置最大縮放倍數,預設值1.0
@property(nonatomic) CGFloat maximumZoomScale;

// 當前的縮放倍數
@property(nonatomic) CGFloat zoomScale NS_AVAILABLE_IOS(3_0);            // 預設值 1.0

//程式設置縮放大小
- (void)setZoomScale:(CGFloat)scale animated:(BOOL)animated NS_AVAILABLE_IOS(3_0);
//將內容視圖縮放到指定的Rect中
- (void)zoomToRect:(CGRect)rect animated:(BOOL)animated NS_AVAILABLE_IOS(3_0);

//控制縮放的時候是否會反彈 預設值YES
@property(nonatomic) BOOL  bouncesZoom;          // default is YES. if set, user can go past min/max zoom while gesturing and the zoom will animate to the min/max value at gesture end

//只讀,用戶是否正在進行縮放手勢
@property(nonatomic,readonly,getter=isZooming)       BOOL zooming;
//只讀,當縮放超過最大或者最小範圍的時候,回彈到最大最小範圍的過程中,該值返回YES。
@property(nonatomic,readonly,getter=isZoomBouncing)  BOOL zoomBouncing;

//設置是否可以自動滾動到頂部(點擊上面狀態欄的時候),預設為true
@property(nonatomic) BOOL  scrollsToTop;

//移動手勢   只讀
@property(nonatomic, readonly) UIPanGestureRecognizer *panGestureRecognizer NS_AVAILABLE_IOS(5_0);

// 縮放手勢   只讀
@property(nullable, nonatomic, readonly) UIPinchGestureRecognizer *pinchGestureRecognizer NS_AVAILABLE_IOS(5_0);

//當拖動發生時,鍵盤的消失模式,預設值是不消失UIScrollViewKeyboardDismissModeNone
@property(nonatomic) UIScrollViewKeyboardDismissMode keyboardDismissMode NS_AVAILABLE_IOS(7_0);

@end
UIScrollView用於顯示超出屏幕大小內容,一般需要配合其他控制項來使用,如添加一個UIImageView子控制項,可以用來顯示更大的圖片;
UITableView、UICollectionView以及UITextView這些可以滑動顯示更多內容的控制項,都是UIScrollView的子類;
知識點1:關於UIScrollView的各個大小說明

知識點2:如果UIScrollView無法滾動,可能是以下原因:
1:沒有設置contentSize
2:scrollEnabled = NO
3:沒有接收到觸摸事件:userInteractionEnabled = NO
知識點3:iOS7以後,導航控制器會為其中的scrollView的頂部自動添加64的內邊距,如果想去掉,可以通過下列屬性去掉
self.automaticallyAdjustsScrollViewInsets = NO;
知識點4:UIScrollView實現滑動視圖實例
//---導入代理
@interface RootViewController ()<UIScrollViewDelegate>

@end

@implementation RootViewController

//viewDidLoad只執行一次
- (void)viewDidLoad {

    [super viewDidLoad];
    self.view.backgroundColor = [UIColor yellowColor];

    //-創建滾動視圖  當我們需要顯示的內容超過一屏時,就需要用到滾動視圖
    UIScrollView *scrollView = [[UIScrollView alloc] initWithFrame:self.view.frame];
    [scrollView setBackgroundColor:[UIColor orangeColor]];
    [self.view addSubview:scrollView];

    //-Key:設置滾動區域(內容區域的大小)
    scrollView.contentSize = CGSizeMake(CGRectGetWidth(self.view.frame) * 4, CGRectGetHeight(self.view.frame));
    //-為scrollview添加子視圖
//    NSArray *colorArr = [NSArray arrayWithObjects:[UIColor cyanColor], [UIColor greenColor],  [UIColor redColor], [UIColor blueColor], nil];
    NSArray *imageArr = [NSArray arrayWithObjects:[UIImage imageNamed: @"woman1.jpg"], [UIImage imageNamed: @"woman2.jpg"], [UIImage imageNamed: @"woman3.jpg"], [UIImage imageNamed:@"woman4.jpg"],  nil];

    for (int i = 0; i < 4; i++) {

        UILabel *label = [[UILabel alloc] initWithFrame:CGRectMake(CGRectGetWidth(self.view.frame)*i, 0, CGRectGetWidth(self.view.frame), CGRectGetHeight(self.view.frame))];
        label.text = [NSString stringWithFormat:@"這是志南的第%d夫人", i+1];
        label.font = [UIFont systemFontOfSize:30];
        label.textAlignment = NSTextAlignmentCenter;
//        label.backgroundColor = colorArr[i];//

        UIImageView *imageView = [[UIImageView alloc] initWithImage:imageArr[i]];
        imageView.frame = CGRectMake(CGRectGetWidth(self.view.frame)*i, 0, CGRectGetWidth(self.view.frame), CGRectGetHeight(self.view.frame));

        [scrollView addSubview:imageView];
        [scrollView addSubview:label];
    }

    //--設置分頁效果
    scrollView.pagingEnabled = YES;
    //--設置橫向滾動條是否顯示 預設值為YES
    scrollView.showsHorizontalScrollIndicator = YES;
    //----------------------設置滾動條樣式

    //--設置邊界是否有反彈效果 預設值為YES
    scrollView.bounces = NO;

    //---設置代理
    scrollView.delegate = self;
}

#pragma mark -- 滾動視圖的代理方法
//將要開始拖拽(手指觸碰到屏幕,並且移動)
- (void)scrollViewWillBeginDragging:(UIScrollView *)scrollView{
    NSLog(@"---%s", __func__);
}

//已經開始滾動(只要scrollview是滾動狀態就會調用此方法)
- (void)scrollViewDidScroll:(UIScrollView *)scrollView{

    //------滾動視圖上面的子視圖可以移動,不是子視圖改變自身的frame值,而是,通過改變更改滾動視圖(也就是子視圖的父視圖)的bounds的origin(也就是x,y)來更改子視圖在父視圖(滾動視圖)上顯示的位置

    //scrollview的偏移量
    CGPoint offSet = scrollView.contentOffset;
    NSLog(@"----%s", __func__);
    //得到scrollView的bounds的x點,即水平方向偏移量
    NSLog(@"偏移量-----%f", offSet.x);
    float x = scrollView.bounds.origin.x;
    NSLog(@"bounds------%f", x);
    /*------【回顧】:bounds改變導致其子視圖位置改變!!!
     改變子視圖位置:scrollView滾動視圖通過改變自身bounds,子view左上角坐標原點發生移動*/
}

//停止拖動(當手指(觸摸對象)離開,正在滾動的視圖減速)
- (void)scrollViewWillBeginDecelerating:(UIScrollView *)scrollView{
    NSLog(@"--%s", __func__);
}

//視圖真正靜止(視圖不動了)
- (void)scrollViewDidEndDecelerating:(UIScrollView *)scrollView{
    NSLog(@"%s",__func__);
}


- (void)didReceiveMemoryWarning {
    [super didReceiveMemoryWarning];
    // Dispose of any resources that can be recreated.
}

@end
知識點5:UIScrollView和UIPageControl配合使用
- (void)viewDidLoad
{
    [super viewDidLoad];
// Do any additional setup after loading the view.

    // 設置背景色
    self.view.backgroundColor = [UIColor grayColor];

    // 添加UIScrollView
    self.userGuideScrollView = [[[UIScrollView alloc] initWithFrame:CGRectMake(0,0, self.view.frame.size.width, self.view.frame.size.height)] autorelease]; // 初始化位置和大小
    self.userGuideScrollView.contentSize = CGSizeMake(self.view.frame.size.width* 11, self.view.frame.size.height); // 設置存放的內容的大小
    _userGuideScrollView.pagingEnabled = YES; // 設置scrollView按一整頁滑動
    _userGuideScrollView.delegate = self; // 設置代理為當前
    _userGuideScrollView.userInteractionEnabled = YES; // 設置可以與用戶交互
    _userGuideScrollView.showsHorizontalScrollIndicator = YES; // 顯示滑動時候橫向的滾動條
    // 添加圖片到UIScrollView中
    for (int i = 1; i <= 11; i++) {
        UIImageView *imageView = [[UIImageView alloc] initWithImage:[UIImageimageNamed:[NSString stringWithFormat:@"image%d", i]]];
        imageView.frame = CGRectMake((i - 1) * self.view.frame.size.width, 0,self.view.frame.size.width, self.view.frame.size.height);
        [_userGuideScrollView addSubview:imageView];
        [imageView release], imageView = nil;
    }
    // 添加到當前的View
    [self.view addSubview:_userGuideScrollView];


    // 初始化UIPageController
    self.scrollPageControl = [[[UIPageControl alloc] init] autorelease];
    _scrollPageControl.frame = CGRectMake(0, self.view.frame.size.height - 60,self.view.frame.size.width, 30); // 設置位置
    _scrollPageControl.numberOfPages = 11; // 設置有多少個小點點
    _scrollPageControl.currentPage = 0; // 設置當前是哪個點點
    _scrollPageControl.pageIndicatorTintColor = [UIColor blueColor]; // 沒有選中的點點的顏色
    _scrollPageControl.currentPageIndicatorTintColor = [UIColor yellowColor]; //當前點點的顏色
    [_scrollPageControl addTarget:self action:@selector(scrollPageControlAction:)forControlEvents:UIControlEventValueChanged]; // 設置監聽事件
    _scrollPageControl.highlighted = YES;
    [self.view addSubview:_scrollPageControl];

}

- (void)didReceiveMemoryWarning
{
    [super didReceiveMemoryWarning];
    // Dispose of any resources that can be recreated.
}


#pragma mark - 實現---scrollPageControlAction:監聽事件
- (void)scrollPageControlAction:(UIPageControl *) sender {
    //令UIScrollView做出相應的滑動顯示
    CGSize viewSize = _userGuideScrollView.frame.size;
    CGRect rect = CGRectMake(sender.currentPage * viewSize.width, 0, viewSize.width, viewSize.height);
    [_userGuideScrollView scrollRectToVisible:rect animated:YES];
}


#pragma mark - 重寫----scrollViewDelegate中的代理方法 實現滑動
-(void)scrollViewDidEndDecelerating:(UIScrollView *)scrollView {
    // 計算偏移量
    int index = abs(scrollView.contentOffset.x / scrollView.frame.size.width);
    // 根據偏移量來設置pageControl
    _scrollPageControl.currentPage = index;
}


#pragma mark - 重寫----dealloc方法
- (void)dealloc {
    // 釋放屬性的記憶體
    _scrollPageControl = nil;
    _userGuideScrollView = nil;
}
二:UIScrollView的代理UIScrollViewDelegate
@protocol UIScrollViewDelegate<NSObject>

@optional

//只要滾動了就會觸發
- (void)scrollViewDidScroll:(UIScrollView *)scrollView;
//縮放過程中不斷調用該方法
- (void)scrollViewDidZoom:(UIScrollView *)scrollView NS_AVAILABLE_IOS(3_2);

//開始拖拽視圖 調用該方法
- (void)scrollViewWillBeginDragging:(UIScrollView *)scrollView;
//將要完成拖拽調用該方法
- (void)scrollViewWillEndDragging:(UIScrollView *)scrollView withVelocity:(CGPoint)velocity targetContentOffset:(inout CGPoint *)targetContentOffset NS_AVAILABLE_IOS(5_0);

//完成拖拽調用該方法
- (void)scrollViewDidEndDragging:(UIScrollView *)scrollView willDecelerate:(BOOL)decelerate;

//將開始降速時調用該方法
- (void)scrollViewWillBeginDecelerating:(UIScrollView *)scrollView;
//減速停止了時執行,手觸摸時執行
- (void)scrollViewDidEndDecelerating:(UIScrollView *)scrollView;

//滾動動畫停止時執行,代碼改變時出發,也就是setContentOffset改變時
- (void)scrollViewDidEndScrollingAnimation:(UIScrollView *)scrollView;

//設置放大縮小的視圖,要是uiscrollview的subview
- (nullable UIView *)viewForZoomingInScrollView:(UIScrollView *)scrollView;

// 即將開始縮放時調用
- (void)scrollViewWillBeginZooming:(UIScrollView *)scrollView withView:(nullable UIView *)view NS_AVAILABLE_IOS(3_2);

//完成放大縮小時調用
- (void)scrollViewDidEndZooming:(UIScrollView *)scrollView withView:(nullable UIView *)view atScale:(CGFloat)scale;

//如果你不是完全滾動到滾軸視圖的頂部,你可以輕點狀態欄,那個可視的滾軸視圖會一直滾動到頂部,那是預設行為,你可以通過該方法返回NO來關閉它
- (BOOL)scrollViewShouldScrollToTop:(UIScrollView *)scrollView;

//已滾動頂部調用此方法
- (void)scrollViewDidScrollToTop:(UIScrollView *)scrollView;

@end
知識點1:控制項懸停效果;當scrollView往上拖拽到某一個位置的時候,控制項(testView)懸停到某一個位置,當scrollView往下拉的時候,該控制項(testView)又隨著scrollView一起移動;
實現思路:當往上拖拽到一定位置的時候(通過計算偏移量來判斷),讓該控制項(testView)添加到self.view上,並設置該控制項(testView)的frame固定到該位置,當scrollView再次往回拖拽到該位置的時候,再讓該控制項(testView)再添加到scrollView上,成為scrollView的子控制項
知識點2:頂部圖片下拉放大效果;當scrollView往下拖拽的時候,讓頂部的imageView按比例放大
實現思路:當scrollView往下拖拽的時候,通過偏移量來修改頂部imageView的transform(縮放的transform)。
- (void)scrollViewDidScroll:(UIScrollView *)scrollView
{
    CGFloat imageH = self.imageView.frame.size.height;
    CGFloat offsetY = scrollView.contentOffset.y;
    // 該判斷是實現scrollView內部的子控制項懸停效果
    if (offsetY >= imageH) {
        // 將紅色控制項添加到控制器的view中,設置Y值為0
        CGRect redF = self.redView.frame;
        redF.origin.y = 0;
        self.redView.frame = redF;
        [self.view addSubview:self.redView];
    }else{
        // 將紅色控制項添加到scrollView中,設置Y值為圖片的高度
        CGRect redF = self.redView.frame;
        redF.origin.y = 140;
        self.redView.frame = redF;
        [self.scrollView addSubview:self.redView];
    }

    // 實現下拉放大頂部圖片效果
    CGFloat scale = 1 - (offsetY / 70);
    scale = (scale >= 1) ? scale : 1;
    self.imageView.transform = CGAffineTransformMakeScale(scale, scale);
}
知識點3:網上關於UIScrollView的迴圈播放及縮放功能的實例

//巨集定義屏幕的寬和高
#define ScreenWight [UIScreen mainScreen].bounds.size.width
#define ScreenHeight [UIScreen mainScreen].bounds.size.height
@interface ViewController ()<UIScrollViewDelegate>//簽滾動視圖協議,為了實現協議方法
/** 滾動視圖屬性 */
@property(nonatomic, retain)UIScrollView *scrollView;
/** 分頁控制項屬性 */
@property(nonatomic, retain)UIPageControl *pageControl;
/** 標記屬性 */
@property(nonatomic, assign)BOOL flag;
@end
- (void)loadView
{
    [super loadView];
    self.scrollView = [[UIScrollView alloc] initWithFrame:self.view.frame];
    //設置容量
    self.scrollView.contentSize = CGSizeMake(8 * ScreenWight, ScreenHeight);
    //添加滾動視圖
    [self.view addSubview:_scrollView];
    //設置整頁翻動
    self.scrollView.pagingEnabled = YES;
    //設置偏移量
    self.scrollView.contentOffset = CGPointMake(ScreenWight, 0);
    //設置代理人
    self.scrollView.delegate = self;
    for (NSInteger i = 1; i < 7; i++) {
        //創建小的滾動視圖
        /**
          為什麼要創建小的滾動視圖?
          因為在進行縮放之後發現,之前的滾動效果發生了變化,
          原因在於當我們進行縮放的時候,協議方法不但會改變視圖的尺存,同樣也可以改變scrollView的contenSize屬性。
          解決方法:大的scrollView上先鋪設小的scrollView ,然後把imageView放到小的scrollView上
          大的scrollView主要承擔水平或垂直滾動,小的scrollView承擔縮放的功能,
          並且每個都設置好縮放比例,這樣再進行縮放,只會改變小scrollView的contenSize, 不會改變scrollView的contentSize。
         */
        UIScrollView *tempScrollView = [[UIScrollView alloc] initWithFrame:CGRectMake(ScreenWight * i, 0, ScreenWight, ScreenHeight)];
        tempScrollView.contentSize = CGSizeMake(ScreenWight, ScreenHeight);
        //隱藏底部和右側滾動條
        tempScrollView.showsVerticalScrollIndicator = NO;
        tempScrollView.showsHorizontalScrollIndicator = NO;
        //設置縮放的比例
        tempScrollView.minimumZoomScale = 0.5f;
        tempScrollView.maximumZoomScale = 3.0f;
        //小滾動視圖設置代理,為的是實現縮放的代理方法
        tempScrollView.delegate = self;
        [self.scrollView addSubview:tempScrollView];

        //迴圈往小滾動視圖添加圖片
        UIImageView *imageView = [[UIImageView alloc] initWithFrame:CGRectMake(0, 0, ScreenWight, ScreenHeight)];
        NSString *imageName = [NSString stringWithFormat:@"%ld.JPG", i];
        imageView.image = [UIImage imageNamed:imageName];
        [tempScrollView addSubview:imageView];


        //設置輕拍手勢
        //首先打開imageView的用戶交互,預設是關閉
        imageView.userInteractionEnabled = YES;
        UITapGestureRecognizer *tapGesture = [[UITapGestureRecognizer alloc] initWithTarget:self action:@selector(didTapImageView:)];
        tapGesture.numberOfTapsRequired = 2;
        [imageView addGestureRecognizer:tapGesture];
    }

    //在最前面加上最後一張圖,障眼法,給人一種感覺從第一頁迴圈回最後一頁
    //在此刻改變滾動視圖的偏移量
    UIScrollView *frontScroll = [[UIScrollView alloc] initWithFrame:CGRectMake(0, 0, ScreenWight, ScreenHeight)];
    frontScroll.contentSize = CGSizeMake(ScreenWight, ScreenHeight);
    [self.scrollView addSubview:frontScroll];
    UIImageView *frontImageView = [[UIImageView alloc] initWithFrame:self.view.frame];
    frontImageView.image = [UIImage imageNamed:@"6.JPG"];
    [frontScroll addSubview:frontImageView];
    //在最後面加上第一張圖
    UIScrollView *lastScroll = [[UIScrollView alloc] initWithFrame:CGRectMake(7 * ScreenWight, 0, ScreenWight, ScreenHeight)];
    lastScroll.contentSize = CGSizeMake(ScreenWight, ScreenHeight);
    [self.scrollView addSubview:lastScroll];
    UIImageView *lastImageView = [[UIImageView alloc] initWithFrame:self.view.frame];
    lastImageView.image = [UIImage imageNamed:@"1.JPG"];
    [lastScroll addSubview:lastImageView];

    //分頁控制項
    self.pageControl = [[UIPageControl alloc] initWithFrame:CGRectMake(100, 600, 175, 30)];
    self.pageControl.numberOfPages = 6;
    [self.view addSubview:_pageControl];

    [self.pageControl addTarget:self action:@selector(didClickedPageControl:) forControlEvents:UIControlEventValueChanged];
}
#pragma mark 自定義方法,獲取放大後顯示的矩形區域
- (CGRect)zoomRectByScale:(CGFloat)scale Center:(CGPoint)center
{
    CGRect zoomRect;
    //求出新的長和寬
    zoomRect.size.width = ScreenWight / scale;
    zoomRect.size.height = ScreenHeight / scale;

    //找到新的原點
    zoomRect.origin.x = center.x * (1 - 1/scale);
    zoomRect.origin.y = center.y * (1 - 1/scale);

    return zoomRect;
}
#pragma mark 輕拍方法
- (void)didTapImageView:(UITapGestureRecognizer *)tap
{
    //這個是要獲取當前點擊的小滾動視圖,而小滾動視圖我們沒有設置屬性,無法在這兒獲取
    //當前點擊視圖的父視圖,其實就是當前點擊的小滾動視圖,就通過這種方法獲取滾動視圖對象
    UIScrollView *scroll = (UIScrollView *)tap.view.superview;
    if (_flag == NO) {
        CGRect newRect = [self zoomRectByScale:3.0 Center:[tap locationInView:tap.view]];
        //zoomToRect方法是UIScrollVie對象的方法,將圖片相對放大
        [scroll zoomToRect:newRect animated:YES];
        _flag = YES;
    }else {
        [scroll setZoomScale:1 animated:YES];
        _flag = NO;
    }
}
#pragma mark 縮放的代理方法
- (UIView *)viewForZoomingInScrollView:(UIScrollView *)scrollView
{
    //這個代理方法就是要返回一個view跟著scrollView縮放,
    //這個時候就會把scrollView的contentSize設置為imageView的大小
    //同時只能有一個view跟著scrollView縮放
    return scrollView.subviews.firstObject;
}
#pragma mark 滾動結束的代理方法
- (void)scrollViewDidEndDecelerating:(UIScrollView *)scrollView
{
    //滾動停止後,將每個小滾動視圖比例還原
    for (UIScrollView *tempScroll in scrollView.subviews) {
        if ([tempScroll isKindOfClass:[UIScrollView class]]) {
            tempScroll.zoomScale = 1.0;
        }
    }
    //判斷偏移量,並改變當前偏移量,實現迴圈播放功能
    if (scrollView.contentOffset.x == 0) {
        self.scrollView.contentOffset = CGPointMake(6 * ScreenWight, 0);
    }
    if (scrollView.contentOffset.x == ScreenWight * 7) {
        self.scrollView.contentOffset = CGPointMake(ScreenWight, 0);
    }
    //獲取當前的頁數,即滾動視圖控制分頁控制項
    NSInteger pageNum = (long)(scrollView.contentOffset.x -  ScreenWight) / ScreenWight;
    //改變當前分頁控制項的顯示頁數
    self.pageControl.currentPage = pageNum;
}
#pragma mark 分頁控制項的觸發方法
- (void)didClickedPageControl:(UIPageControl *)pageControl
{
    //根據當前點的下標,修改滾動視圖應該顯示的圖片,即分頁控制項控制滾動視圖
    CGPoint newPoint = CGPointMake((pageControl.currentPage + 1) * ScreenWight , 0);
    //修改滾動視圖偏移量
    [self.scrollView setContentOffset:newPoint animated:YES];
}
三:UIScrollView中的枚舉及常量
1:UIScrollViewIndicatorStyle
// 設置滾動條的風格
// .Default  (預設)灰色
// .Black    黑色的滾動條
// .Whitr    白色的滾動條
typedef NS_ENUM(NSInteger, UIScrollViewIndicatorStyle) {
    UIScrollViewIndicatorStyleDefault,
    UIScrollViewIndicatorStyleBlack,
    UIScrollViewIndicatorStyleWhite
};
2:UIScrollViewKeyboardDismissMode
//self.scrollView.keyboardDismissMode = UIScrollViewKeyboardDismissModeOnDrag;//剛拖動scrollView就隱藏鍵盤
//self.scrollView.keyboardDismissMode = UIScrollViewKeyboardDismissModeInteractive;//從鍵盤上面點(scrollView未遮擋部分)向下滑動,鍵盤會跟著滑動;又往上滑動鍵盤也會跟著向上滑動
//UIScrollViewKeyboardDismissModeNone//預設值,沒有任何影響

typedef NS_ENUM(NSInteger, UIScrollViewKeyboardDismissMode) {
    UIScrollViewKeyboardDismissModeNone,
    UIScrollViewKeyboardDismissModeOnDrag,      // dismisses the keyboard when a drag begins
    UIScrollViewKeyboardDismissModeInteractive, // the keyboard follows the dragging touch off screen, and may be pulled upward again to cancel the dismiss
} NS_ENUM_AVAILABLE_IOS(7_0);
3:decelerationRate屬性
//手指滑動後抬起,頁面的減速速率。可以使用UIScrollViewDecelerationRateNormal和UIScrollViewDecelerationRateFast常量值來設置合理的減速速率。
UIKIT_EXTERN const CGFloat UIScrollViewDecelerationRateNormal NS_AVAILABLE_IOS(3_0);
UIKIT_EXTERN const CGFloat UIScrollViewDecelerationRateFast NS_AVAILABLE_IOS(3_0);


