
受 LabelImg 啟發的基於 web 的圖像標註工具,基於 Vue 框架 喲,網友們好,年更鴿子終於想起了他的博客園密碼。如標題所述,今天給大家帶來的是一個基於 vue2 的圖像標註工具。至於它誕生的契機呢,應該是我導 pass 掉了我的提議(讓甲方使用 LabelImg 進行數據標註),說是要 ...
受 LabelImg 啟發的基於 web 的圖像標註工具,基於 Vue 框架
喲,網友們好,年更鴿子終於想起了他的博客園密碼。如標題所述,今天給大家帶來的是一個基於 vue2 的圖像標註工具。至於它誕生的契機呢,應該是我導 pass 掉了我的提議(讓甲方使用 LabelImg 進行數據標註),說是要把功能集成起來。截止到寫這篇文章時完成度應該有90%,至於剩下的10%嘛,問就是相信網友的智慧(其實就是不包括數據持久化),想必一定難不倒看文章的各位。那麼廢話不多說,下麵進入正文。
項目地址:https://github.com/xiao-qi-w/LabelVue.git
視頻演示:敬請期待...
首先我們對 LabelImg 進行一個簡單的介紹,這樣屏幕前的你會對我的設計思路有更準確地認知。
LabelImg 是一個開源的圖像標註工具,主要用於創建機器學習模型所需的訓練數據。它支持標註圖像中的對象,通過提供界面來創建矩形框(bounding boxes)並對其進行分類。主要特點包括:
- 圖形用戶界面:允許用戶通過拖拽來標註圖像中的目標。
- 支持多種格式:可以導出為 Pascal VOC XML、YOLO TXT 和 COCO JSON 格式。
- 支持圖像和視頻:可用於標註單張圖像或視頻幀。
- 易於使用:界面簡潔直觀,適合快速標註和管理數據集。
適合用於物體檢測任務的數據準備階段。
其工作界面及基本功能介紹如下:
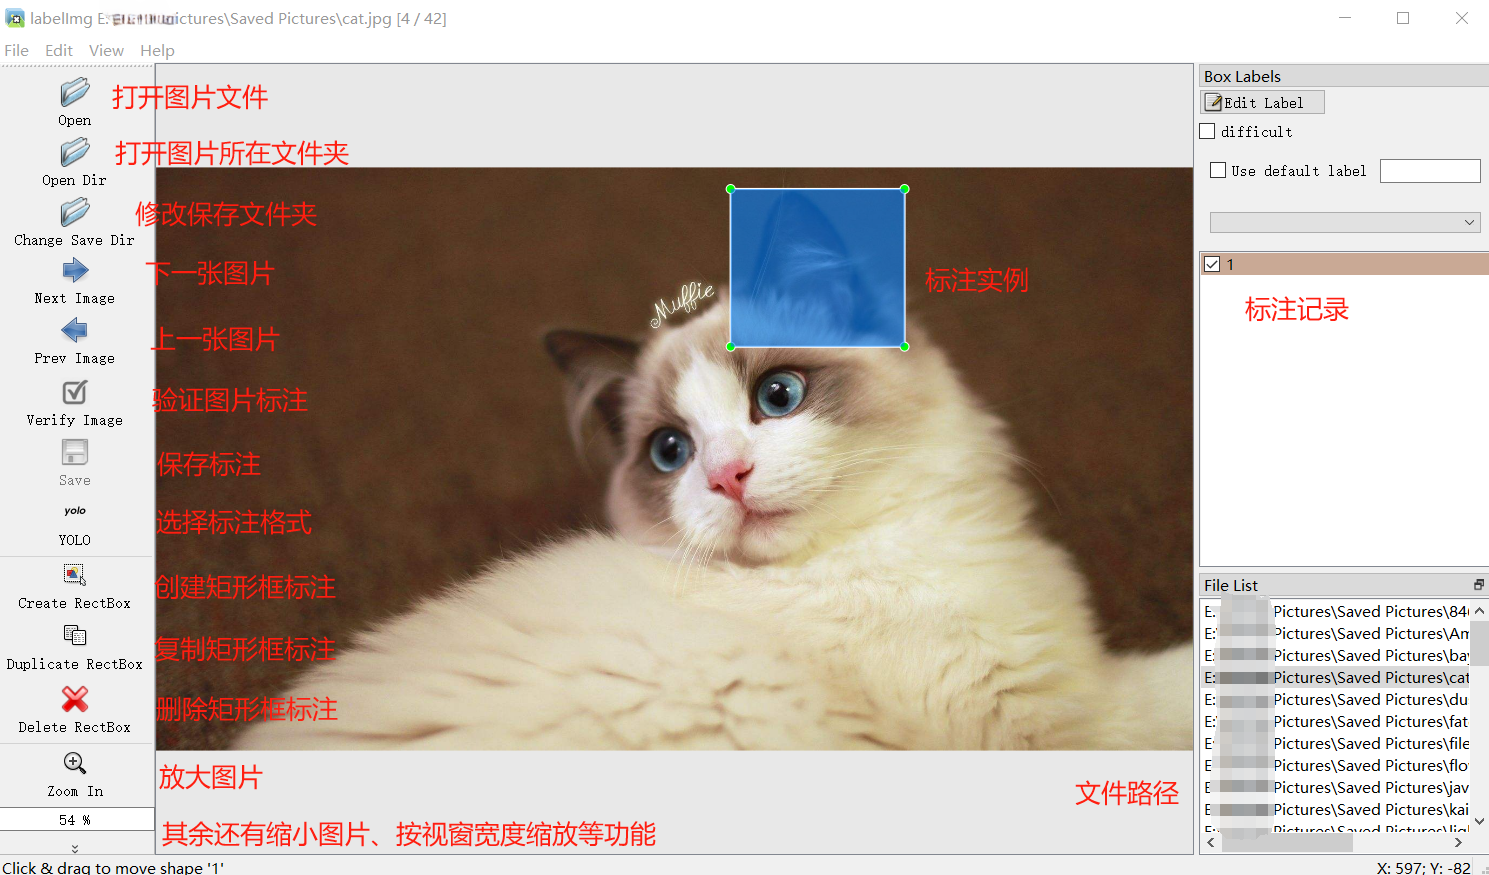
從圖中不難看出其實要實現的功能並不多,重點在於矩形框標註的繪製、拖動與縮放上面。而前端想要實現這些操作,當然是推薦使用 canvas。
canvas 是 HTML5 提供的一個元素,用於在網頁上繪製圖形和動畫。它允許在網頁中直接繪製和操作圖像、形狀和文本,主要通過 JavaScript 進行控制。主要特點包括:
- 繪圖 API:通過 CanvasRenderingContext2D 介面提供豐富的繪圖功能,如繪製線條、矩形、圓形和圖像。
- 動畫:可以用來創建平滑的動畫效果。
- 圖像處理:支持圖像數據的操作和處理。
- 交互:可以與用戶交互,實現例如圖形編輯和游戲等應用。
使用 <canvas> 元素可以創建動態、互動式的圖形和視覺效果。
在這裡鳴謝B站 up 主 渡一教育-提薪課 和 尚矽谷,我的 vue 和 canvas 功底全靠二位的視頻撐著。
介紹完了前置內容,下麵來看看核心代碼。
首先是頁面佈局,我是按照下麵的方式進行劃分的,代碼結構和 css如下:
代碼結構: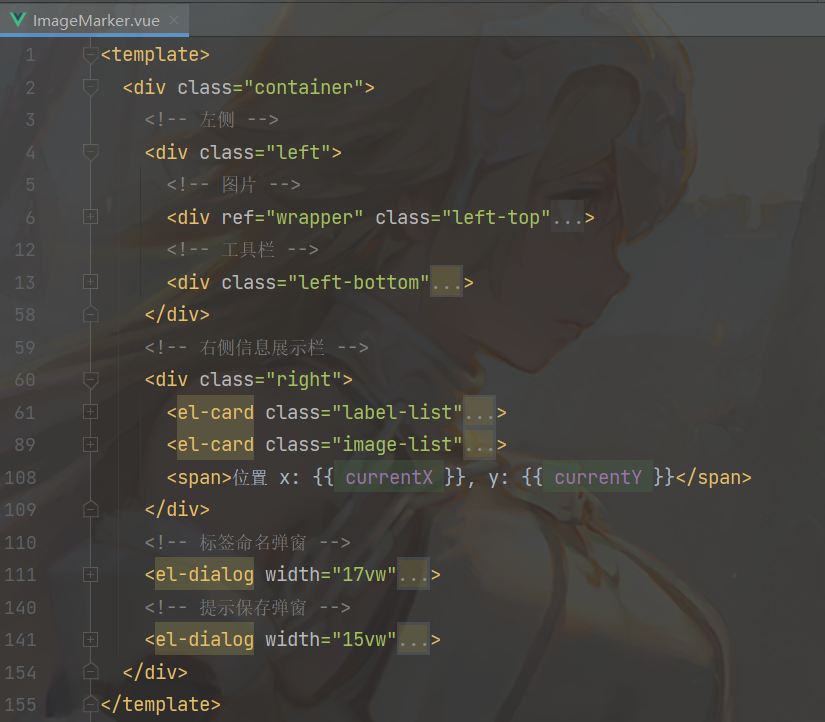
css:
佈局樣式
<style scoped>
.container {
  display: flex;
  height: 95vh;
}

.left,
.right {
  height: 100%;
  flex: 20%;
  padding: 1vw;
  overflow-y: auto;
  display: flex;
  flex-direction: column;
}

.left {
  flex: 80%;
}

.left-top {
  flex: 90%;
  height: 94vh;
  margin-top: 3vh;
  display: flex;
  flex-direction: column;
  overflow: auto;
  box-shadow: 0 2px 4px rgba(0, 0, 0, .12), 0 0 6px rgba(0, 0, 0, .04);
}

.left-bottom {
  margin-top: 1vh;
  padding: 1vh;
  display: flex;
  justify-content: center;
  justify-items: center;
  box-shadow: 0 2px 4px rgba(0, 0, 0, .12), 0 0 6px rgba(0, 0, 0, .04);
}

.right > .label-list,
.right > .image-list {
  flex: 50%; /* 平分高度 */
  overflow-y: auto; /* 內容溢出時顯示滾動條 */
  margin-bottom: 10px;
}

/deep/ .cell-clicked {
  background: #fdf5e6 !important;
}
</style>
介紹完佈局後,我們再來看看需要用到的各種響應式變數:
響應式狀態
data() {
    return {
        /* 圖片相關 */
        images: [ // 每個圖像可以是更複雜的對象結構,但要保證具備可訪問到的相對路徑(url)
            {
                id: 1,
                url: require('@/assets/cat.jpg'),
            },
            {
                id: 2,
                url: require('@/assets/bay.jpg'),
            },
        ],
        /* 狀態變數 */
        creating: false, // 是否正在創建
        canvasChanged: false, // 畫布狀態是否改變
        showNameInput: false, // 是否顯示標註命名彈窗
        showSaveAlert: false, // 是否顯示保存提示彈窗
        /* 縮放相關 */
        dpr: 1, // 設備像素比
        scale: 0, // 縮放倍率
        maxScale: 3.0, // 最大縮放倍率
        minScale: 0.1, // 最小縮放倍率
        adaptiveScale: 0, // 自適應縮放倍率
        scaleStep: 0.1, // 縮放變化幅度
        /* 滑鼠上一刻所在位置 */
        prevX: 0,
        prevY: 0,
        /* 滑鼠實時位置 */
        currentX: 0,
        currentY: 0,
        /* 緩存 */
        currentImage: null, // 當前圖像
        currentImageIndex: 0, // 當前圖像在圖像列表中的下標
        targetImageIndex: -1, // 目標圖像在圖像列表中的下標,切換圖片時使用
        wrapper: null, // canvas 父級元素 DOM
        canvas: null, // 當前 canvas
        bufferCanvas: null, // 離屏 canvas,緩存用
        currentRect: null, // 當前矩形
        selectedRect: null, // 選中矩形
        selectedRectIndex: -1, // 選中矩形在矩形列表中的下標
        labelName: "", // 矩形標簽
        rects: [], // 保存當前圖片的矩形
    };
},
然後是圖像部分,使用 canvas 繪製並展示,主要體現在以下方法中:
載入當前圖片
loadImage() {
    this.currentImage = new Image();
    this.currentImage.src = this.imagePath;
    this.currentImage.onload = () => {
        this.currentImage.width *= this.dpr;
        this.currentImage.height *= this.dpr;
        this.setSize();
        this.drawCanvas();
    };
}
設置畫布大小
setSize() {
    // 未設置縮放倍率
    if (this.scale === 0) {
        // 獲取所在容器寬高
        const width = this.wrapper.clientWidth * this.dpr;
        const height = this.wrapper.clientHeight * this.dpr;
        // 計算縮放比例
        const scaleX = width / this.currentImage.width;
        const scaleY = height / this.currentImage.height;
        this.scale = Math.min(scaleX, scaleY);
        this.adaptiveScale = this.scale;
    }
    // 計算縮放後的圖片尺寸
    const scaledWidth = this.currentImage.width * this.scale;
    const scaledHeight = this.currentImage.height * this.scale;
    // 設置畫布寬高
    this.canvas.width = scaledWidth;
    this.canvas.height = scaledHeight;
    this.canvas.style.width = `${scaledWidth / this.dpr}px`;
    this.canvas.style.height = `${scaledHeight / this.dpr}px`;
    // 設置離屏畫布寬高
    this.bufferCanvas.width = scaledWidth;
    this.bufferCanvas.height = scaledHeight;
    this.bufferCanvas.style.width = `${scaledWidth / this.dpr}px`;
    this.bufferCanvas.style.height = `${scaledHeight / this.dpr}px`;
    // 設置居中
    this.$nextTick(() => {
        // 設置垂直居中
        if (this.wrapper.clientHeight <= scaledHeight / this.dpr) {
            // 畫布高度超過父元素視窗高度時,取消居中設置
            this.wrapper.style.justifyContent = '';
        } else {
            // 畫布高度未超過父元素視窗高度時,重新居中設置
            this.wrapper.style.justifyContent = 'center';
        }
        // 設置水平居中
        if (this.wrapper.clientWidth <= scaledWidth / this.dpr) {
            // 畫布寬度超過父元素視窗寬度時,取消居中設置
            this.wrapper.style.alignItems = '';
        } else {
            // 畫布寬度未超過父元素視窗寬度時,重新居中設置
            this.wrapper.style.alignItems = 'center';
        }
    });
}
繪製畫布
drawCanvas() {
    const ctx = this.canvas.getContext('2d');
    const bufferCtx = this.bufferCanvas.getContext('2d');
    const width = this.canvas.width;
    const height = this.canvas.height;
    // 繪製縮放後的圖片到離屏畫布
    bufferCtx.clearRect(0, 0, width, height);
    bufferCtx.drawImage(this.currentImage, 0, 0, width, height);
    // 繪製已創建矩形
    if (this.currentRect) {
        this.currentRect.draw(this.scale);
    }
    for (const rect of this.rects) {
        if (rect === this.selectedRect) {
            rect.color = 'rgba(255, 0, 0, 0.3)';
        } else {
            rect.color = 'rgba(0, 0, 255, 0.3)';
        }
        rect.draw(this.scale);
    }
    // 將縮放後的圖片繪製到主畫布
    ctx.drawImage(this.bufferCanvas, 0, 0, width, height);
}
繪製方法中使用到了 bufferCanvas,一個隱藏的 canvas 元素作為緩存,主要是為了避免繪製矩形框標註時因重繪頻率過高產生的畫面閃爍現象。繪製效果如下:
有了圖片,接下來就是考慮如何繪製矩形框標註了,主要是滑鼠按下事件,滑鼠移動事件和滑鼠抬起事件。代碼如下:
滑鼠按下
handleMouseDown(e) {
    const mouseX = e.offsetX;
    const mouseY = e.offsetY;
    this.prevX = mouseX;
    this.prevY = mouseY;
    // 找出被選中的矩形
    this.selectedRect = null;
    this.selectedRectIndex = -1;
    for (let i = this.rects.length - 1; i > -1; i--) {
        const rect = this.rects[i];
        if (rect.isSelected(mouseX, mouseY)) {
            this.selectedRect = rect;
            this.selectedRectIndex = i;
            break;
        }
    }
    if (this.creating) {
        // 新建
        const bufferCtx = this.bufferCanvas.getContext('2d');
        this.currentRect = new Rect(bufferCtx, this.dpr, mouseX, mouseY, this.scale);
    } else if (this.selectedRect) {
        // 拖動或縮放
        this.selectedRect.mouseDown(mouseX, mouseY);
    }
}
滑鼠移動
handleMouseMove(e) {
    // 獲取滑鼠在Canvas中的坐標
    const mouseX = e.offsetX;
    const mouseY = e.offsetY;
    this.currentX = mouseX;
    this.currentY = mouseY;
    const ctx = this.canvas.getContext('2d');
    if (this.creating) {
        // 新建
        ctx.clearRect(0, 0, this.canvas.width, this.canvas.height);
        ctx.drawImage(this.bufferCanvas, 0, 0);
        // 繪製交叉輔助線
        ctx.beginPath();
        ctx.moveTo(mouseX * this.dpr, 0);
        ctx.lineTo(mouseX * this.dpr, this.canvas.height);
        ctx.moveTo(0, mouseY * this.dpr);
        ctx.lineTo(this.canvas.width, mouseY * this.dpr);
        ctx.strokeStyle = 'red'; // 設置線條顏色
        ctx.stroke();
        if (!this.currentRect) return;
        this.currentRect.maxX = mouseX;
        this.currentRect.maxY = mouseY;
    } else if (this.selectedRect) {
        // 拖動或縮放
        this.selectedRect.mouseMove(e, this);
    }
    // 畫布狀態發生變化重新渲染
    if (this.creating || this.selectedRect) {
        this.drawCanvas(); // 繪製背景和已有矩形
    }
}
滑鼠抬起
handleMouseUp(e) {
    if (this.creating) {
        // 新建
        this.currentRect.maxX = e.offsetX;
        this.currentRect.maxY = e.offsetY;
        this.creating = false;
        // 矩形形狀合法,加入到矩形集合
        if (this.currentRect.minX !== this.currentRect.maxX
            && this.currentRect.minY !== this.currentRect.maxY) {
            this.showNameInput = true;
        }
    } else if (this.selectedRect) {
        // 拖動或縮放
        this.selectedRect.mouseUp(this.currentImage.width, this.currentImage.height);
    }
    this.drawCanvas();
}
這三種滑鼠事件與實際矩形框標註的繪製離不開自定義矩形類提供的方法,矩形類定義如下:
自定義矩形類
export default class Rect {
constructor(ctx, dpr, startX, startY, scale) {
this.name = 'undefined';
this.timestamp = Date.now();
/* 繪製相關 */
this.ctx = ctx;
this.dpr = dpr;
this.color = 'rgba(0, 0, 255, 0.3)';
this.minX = startX;
this.minY = startY;
this.maxX = startX;
this.maxY = startY;
this.vertexSize = 8 * dpr;
/* 縮放相關 */
this.scale = scale;
this.realScale = scale;
/* 狀態相關 */
this.dragging = false;
this.resizing = false;
this.changed = true;
this.vertexIndex = -1;
}
/**
* 調整起止坐標
*/
adjustCoordinate() {
let temp = 0;
if (this.minX > this.maxX) {
temp = this.minX;
this.minX = this.maxX;
this.maxX = temp;
}
if (this.minY > this.maxY) {
temp = this.minY;
this.minY = this.maxY;
this.maxY = temp;
}
}
/**
* 繪製矩形
* @param scale 縮放倍率
*/
draw(scale) {
if (this.minX === this.maxX || this.minY === this.maxY) {
return;
}
this.realScale = 1 / this.scale * scale;
const factor = this.realScale * this.dpr;
const minX = this.minX * factor;
const minY = this.minY * factor;
const maxX = this.maxX * factor;
const maxY = this.maxY * factor;
this.ctx.beginPath();
this.ctx.moveTo(minX, minY);
this.ctx.lineTo(maxX, minY);
this.ctx.lineTo(maxX, maxY);
this.ctx.lineTo(minX, maxY);
this.ctx.lineTo(minX, minY);
this.ctx.fillStyle = this.color;
this.ctx.strokeStyle = "#fff";
this.ctx.lineWidth = 1;
this.ctx.lineCap = 'square';
this.ctx.fill();
this.ctx.stroke();
// 繪製四個頂點
this.drawVertex(minX, maxX, minY, maxY);
}
/**
* 繪製矩形四個頂點
* @param minX 縮放後的最小橫坐標
* @param maxX 縮放後的最大橫坐標
* @param minY 縮放後的最小縱坐標
* @param maxY 縮放後的最大縱坐標
*/
drawVertex(minX, maxX, minY, maxY) {
if (this.dragging || this.resizing) {
this.ctx.fillStyle = '#FF4500'; // 拖動或縮放狀態,紅色頂點
} else {
this.ctx.fillStyle = '#A7FC00'; // 正常狀態,青色頂點
}
const size = this.vertexSize;
this.ctx.fillRect(minX - size / 2, minY - size / 2, size, size);
this.ctx.fillRect(maxX - size / 2, minY - size / 2, size, size);
this.ctx.fillRect(maxX - size / 2, maxY - size / 2, size, size);
this.ctx.fillRect(minX - size / 2, maxY - size / 2, size, size);
}
/**
* 根據坐標(x, y)判斷矩形是否被選中
* @param x 橫坐標
* @param y 縱坐標
*/
isSelected(x, y) {
return this.isPointInside(x, y) || this.isPointInsideVertex(x, y) !== -1;
}
/**
* 判斷坐標(x, y)是否在矩形內部
* @param x 橫坐標
* @param y 縱坐標
*/
isPointInside(x, y) {
x = x / this.realScale;
y = y / this.realScale;
return x >= this.minX && x <= this.maxX && y >= this.minY && y <= this.maxY;
}
/**
* 判斷坐標(x, y)是否在矩形頂點內部
* @param x
* @param y
*/
isPointInsideVertex(x, y) {
x = x / this.realScale;
y = y / this.realScale;
const vertices = [
{x: this.minX, y: this.minY},
{x: this.maxX, y: this.minY},
{x: this.maxX, y: this.maxY},
{x: this.minX, y: this.maxY}
];
const size = this.vertexSize / 2;
let index = -1;
for (let i = 0; i < vertices.length; i++) {
const vx = vertices[i].x;
const vy = vertices[i].y;
if (x >= vx - size && x <= vx + size && y >= vy - size && y <= vy + size) {
// return i;
index = i; break;
}
}
return index;
}
/**
* 歸一化為 yolo 格式
* @param width 所在圖片寬度
* @param height 所在圖片高度
*/
normalize(width, height) {
const scaledWidth = width * this.scale / this.dpr;
const scaledHeight = height * this.scale / this.dpr;
const rectWidth = (this.maxX - this.minX) / scaledWidth;
const rectHeight = (this.maxY - this.minY) / scaledHeight;
const centerX = (this.maxX + this.minX) / 2 / scaledWidth;
const centerY = (this.maxY + this.minY) / 2 / scaledHeight;
return {
x: centerX,
y: centerY,
w: rectWidth,
h: rectHeight,
}
}
/**
* 滑鼠按下事件,按下坐標(x, y)
* @param x
* @param y
*/
mouseDown(x, y) {
this.vertexIndex = this.isPointInsideVertex(x, y);
if (this.vertexIndex !== -1) {
this.resizing = true;
} else if (this.isPointInside(x, y)) {
this.dragging = true;
}
}
/**
* 滑鼠移動事件
* @param e 滑鼠事件
* @param that vue組件
*/
mouseMove(e, that) {
const mouseX = e.offsetX;
const mouseY = e.offsetY;
if (this.dragging) {
this.changed = true;
// 拖動矩形
const deltaX = mouseX - that.prevX;
const deltaY = mouseY - that.prevY;
const scaledDeltaX = (mouseX - that.prevX) / this.realScale;
const scaledDeltaY = (mouseY - that.prevY) / this.realScale;
this.minX += scaledDeltaX;
this.minY += scaledDeltaY;
this.maxX += scaledDeltaX;
this.maxY += scaledDeltaY;
that.prevX += deltaX;
that.prevY += deltaY;
}
if (this.resizing) {
this.changed = true;
// 縮放矩形
const scaledX = mouseX / this.realScale;
const scaledY = mouseY / this.realScale;
switch (this.vertexIndex) {
case 0: // 左上角頂點
this.minX = scaledX;
this.minY = scaledY;
break;
case 1: // 右上角頂點
this.maxX = scaledX;
this.minY = scaledY;
break;
case 2: // 右下角頂點
this.maxX = scaledX;
this.maxY = scaledY;
break;
case 3: // 左下角頂點
this.minX = scaledX;
this.maxY = scaledY;
break;
}
}
this.draw();
}
/**
* 滑鼠抬起事件
* @param width 所在圖片寬度
* @param height 所在圖片高度
*/
mouseUp(width, height) {
this.dragging = false;
this.resizing = false;
this.adjustCoordinate();
// 避免縮放過程中把矩形縮成看不見的一點
if (this.minX === this.maxX) {
this.maxX += 1;
}
if(this.minY === this.maxY) {
this.maxY += 1;
}
}
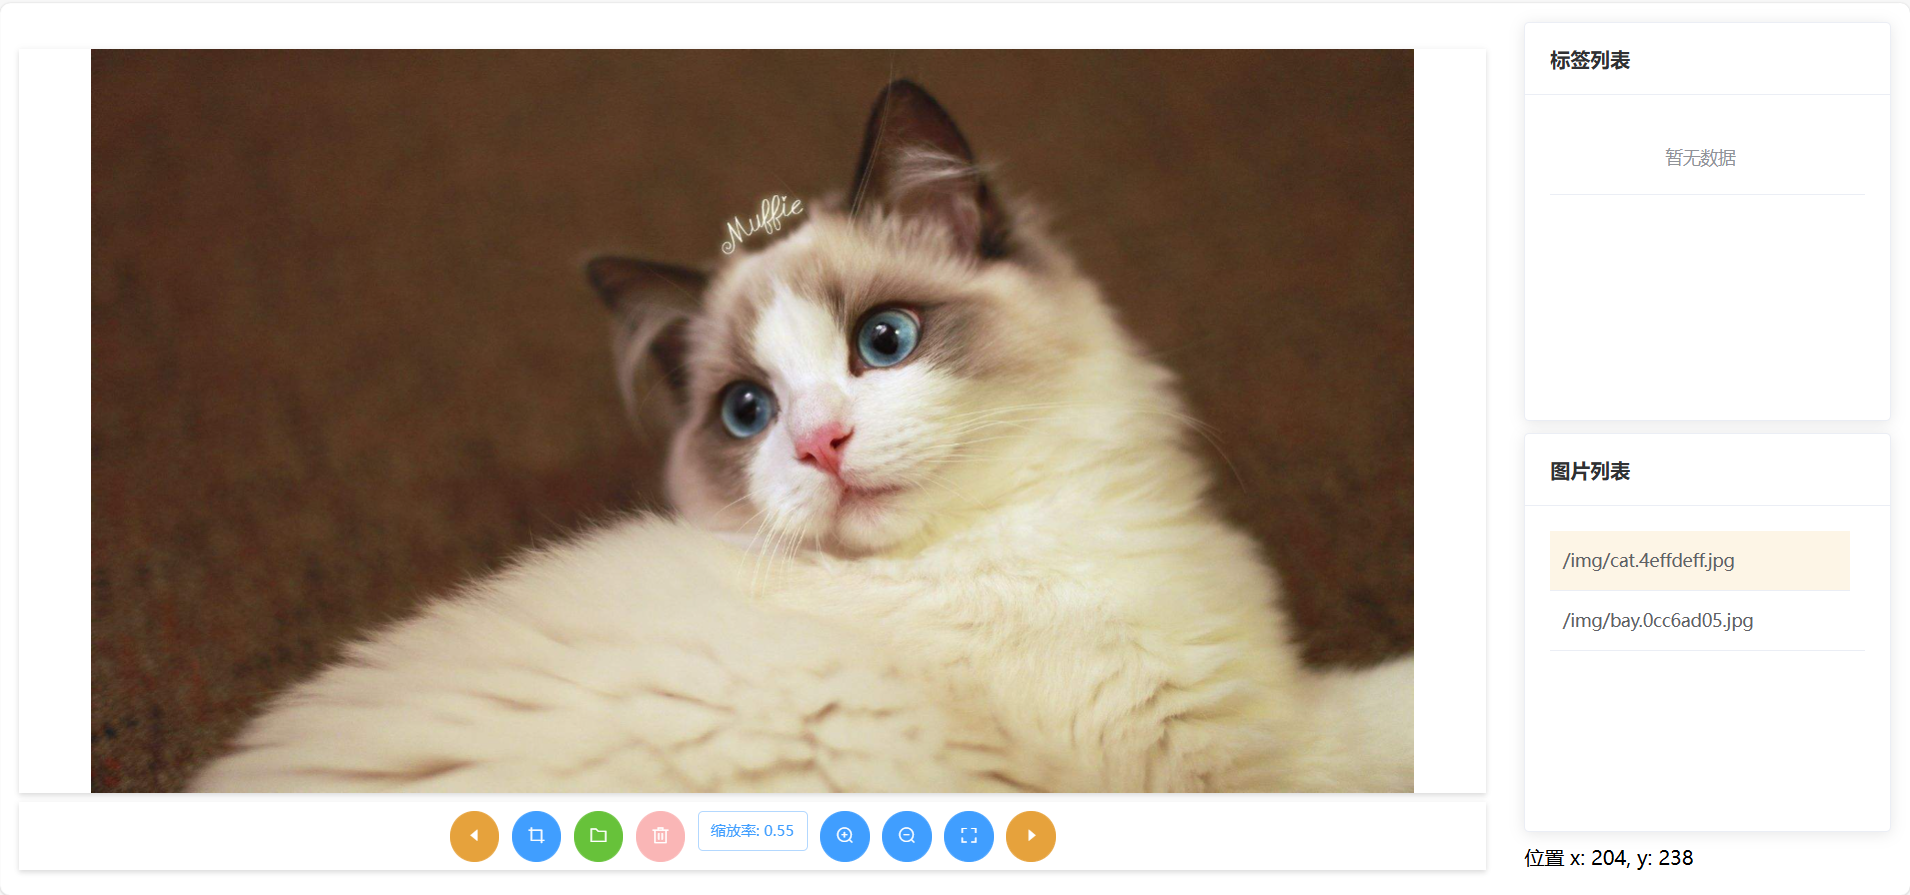
}至此,核心功能基本實現,至於對矩形框的命名、保存與刪除等操作,都比較簡單,演示視頻中已經提到了,這裡不做過多介紹。最終效果如下(完整功能演示請看文章開頭的視頻):
——————————————我———是———分———割———線—————————————
長大後的日子是一天快過一天,一年的時間就這麼一聲不吭地溜走了,對比去年這個時候的我,貌似還是沒有太大的長進,我這進步速度就算是按年算也過於遲緩了,望各位引以為戒。我們有緣明年再見ヾ(•ω•`)o


