不規則形狀的Mask動畫 效果 源碼 https://github.com/YouXianMing/Animations 細節 ...
不規則形狀的Mask動畫

效果

源碼
https://github.com/YouXianMing/Animations
//
//  MaskShapeViewController.m
//  Animations
//
//  Created by YouXianMing on 16/7/10.
//  Copyright © 2016年 YouXianMing. All rights reserved.
//

#import "MaskShapeViewController.h"
#import "AppleSystemService.h"
#import "JSAnimatedImagesView.h"
#import "CutOutClearView.h"
#import "UIView+SetRect.h"
#import "UIFont+Fonts.h"
#import "FBShimmeringView.h"

typedef enum : NSUInteger {

    kUpJsView = 1000,
    kDownJsView,

} EMaskShapeViewControllerValue;

@interface MaskShapeViewController () <JSAnimatedImagesViewDataSource>

@property (nonatomic, strong) JSAnimatedImagesView  *upJsView;
@property (nonatomic, strong) NSArray               *upDataSource;

@property (nonatomic, strong) JSAnimatedImagesView  *downJsView;
@property (nonatomic, strong) NSArray               *downDataSource;

@end

@implementation MaskShapeViewController

- (void)setup {

    [super setup];

    self.backgroundView.backgroundColor = [UIColor blackColor];

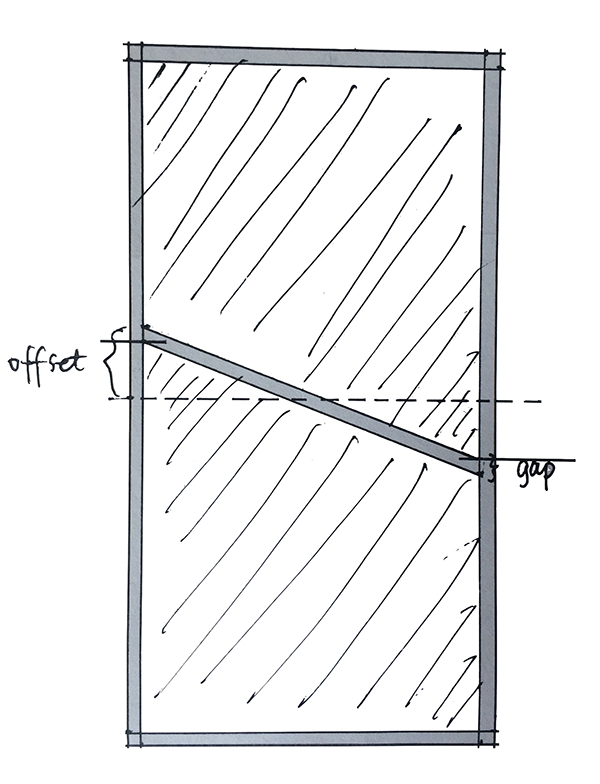
    CGFloat gap    = 4.f;
    CGFloat offset = 50.f;

    {
        CutOutClearView *areaView = [[CutOutClearView alloc] initWithFrame:CGRectMake(0, 0, Width, self.contentView.height / 2.f + offset - gap)];
        areaView.fillColor        = [UIColor clearColor];
        areaView.areaColor        = [UIColor blackColor];

        UIBezierPath *path = [UIBezierPath bezierPath];
        [path moveToPoint:CGPointMake(gap, gap)];
        [path addLineToPoint:CGPointMake(Width - gap, gap)];
        [path addLineToPoint:CGPointMake(Width - gap, areaView.height)];
        [path addLineToPoint:CGPointMake(gap, areaView.height - (offset - gap) * 2 - gap)];
        [path closePath];
        areaView.paths = @[path];

        self.upDataSource = @[[UIImage imageNamed:@"1"],
                              [UIImage imageNamed:@"2"],
                              [UIImage imageNamed:@"3"],
                              [UIImage imageNamed:@"4"],
                              [UIImage imageNamed:@"5"]];

        self.upJsView                     = [[JSAnimatedImagesView alloc] initWithFrame:CGRectMake(0, 0, Width, self.contentView.height / 2.f + offset - gap)];
        self.upJsView.transitionDuration  = 2.f;
        self.upJsView.tag                 = kUpJsView;
        self.upJsView.dataSource          = self;
        self.upJsView.layer.masksToBounds = YES;
        self.upJsView.maskView            = areaView;
        [self.contentView addSubview:self.upJsView];
    }

    {
        CutOutClearView *areaView = [[CutOutClearView alloc] initWithFrame:CGRectMake(0, 0, Width, self.contentView.height / 2.f + (offset - gap))];
        areaView.fillColor        = [UIColor clearColor];
        areaView.areaColor        = [UIColor blackColor];

        UIBezierPath *path = [UIBezierPath bezierPath];
        [path moveToPoint:CGPointMake(gap, 0)];
        [path addLineToPoint:CGPointMake(gap, areaView.height - gap)];
        [path addLineToPoint:CGPointMake(Width - gap, areaView.height - gap)];
        [path addLineToPoint:CGPointMake(Width - gap, (offset - gap) * 2 + gap)];
        [path closePath];
        areaView.paths = @[path];

        self.downDataSource = @[[UIImage imageNamed:@"pic_1"],
                                [UIImage imageNamed:@"pic_2"],
                                [UIImage imageNamed:@"pic_3"],
                                [UIImage imageNamed:@"pic_4"]];

        self.downJsView                     = [[JSAnimatedImagesView alloc] initWithFrame:CGRectMake(0, 0, Width, self.contentView.height / 2.f + offset - gap)];
        self.downJsView.transitionDuration  = 2.f;
        self.downJsView.tag                 = kDownJsView;
        self.downJsView.dataSource          = self;
        self.downJsView.layer.masksToBounds = YES;
        self.downJsView.maskView            = areaView;

        self.downJsView.bottom = self.contentView.height;
        [self.contentView addSubview:self.downJsView];
    }
}

#pragma mark - JSAnimatedImagesViewDataSource

- (NSUInteger)animatedImagesNumberOfImages:(JSAnimatedImagesView *)animatedImagesView {

    NSUInteger count = 0;
    animatedImagesView.tag == kUpJsView ? (count = self.upDataSource.count) : (count = self.downDataSource.count);

    return count;
}

- (UIImage *)animatedImagesView:(JSAnimatedImagesView *)animatedImagesView imageAtIndex:(NSUInteger)index {

    UIImage *image = nil;
    animatedImagesView.tag == kUpJsView ? (image = self.upDataSource[index]) : (image = self.downDataSource[index]);

    return image;
}

#pragma mark - Overwrite methods.

- (void)buildTitleView {

    [super buildTitleView];

    // Title label.
    UILabel *headlinelabel      = [UILabel new];
    headlinelabel.font          = [UIFont HeitiSCWithFontSize:20.f];
    headlinelabel.textAlignment = NSTextAlignmentCenter;
    headlinelabel.textColor     = [UIColor cyanColor];
    headlinelabel.text          = self.title;
    [headlinelabel sizeToFit];

    headlinelabel.center = self.titleView.middlePoint;

    FBShimmeringView *shimmeringView           = [[FBShimmeringView alloc] initWithFrame:self.titleView.bounds];
    shimmeringView.shimmering                  = YES;
    shimmeringView.shimmeringBeginFadeDuration = 0.3;
    shimmeringView.shimmeringOpacity           = 0.1f;
    shimmeringView.shimmeringAnimationOpacity  = 1.f;
    [self.titleView addSubview:shimmeringView];

    shimmeringView.contentView = headlinelabel;

    // Line.
    UIView *line         = [[UIView alloc] initWithFrame:CGRectMake(0, 63.5, self.view.width, 0.5f)];
    line.backgroundColor = [[UIColor grayColor] colorWithAlphaComponent:0.25f];
    [self.titleView addSubview:line];
    [self.titleView addSubview:headlinelabel];

    // Back button.
    UIImage  *image      = [UIImage imageNamed:@"backIconVer2"];
    UIButton *backButton = [[UIButton alloc] initWithFrame:CGRectMake(0, 0, 100, 64)];
    backButton.center    = CGPointMake(20, self.titleView.middleY);
    [backButton setImage:image forState:UIControlStateNormal];
    [backButton addTarget:self action:@selector(popSelf) forControlEvents:UIControlEventTouchUpInside];
    [backButton.imageView setContentMode:UIViewContentModeCenter];
    [self.titleView addSubview:backButton];
}

- (void)popSelf {

    [self popViewControllerAnimated:YES];
}

@end
細節

//
//  CutOutClearView.h
//  Animations
//
//  Created by YouXianMing on 16/7/10.
//  Copyright © 2016年 YouXianMing. All rights reserved.
//

#import <UIKit/UIKit.h>

@interface CutOutClearView : UIView

/**
 *  The total fill color, you can used it as the view's background color.
 */
@property (nonatomic, strong) UIColor  *fillColor;

/**
 *  The paths area color.
 */
@property (nonatomic, strong) UIColor  *areaColor;

/**
 *  Path array.
 */
@property (nonatomic, strong) NSArray  <UIBezierPath *>  *paths;

@end
//
//  CutOutClearView.m
//  Animations
//
//  Created by YouXianMing on 16/7/10.
//  Copyright © 2016年 YouXianMing. All rights reserved.
//

#import "CutOutClearView.h"

@implementation CutOutClearView

- (instancetype)initWithFrame:(CGRect)frame {

    if (self = [super initWithFrame:frame]) {

        self.fillColor       = [UIColor whiteColor];
        self.backgroundColor = [UIColor clearColor];
        self.opaque          = NO;
    }

    return self;
}

- (void)drawRect:(CGRect)rect {

    [super drawRect:rect];

    [self.fillColor setFill];
    UIRectFill(rect);

    CGContextRef context = UIGraphicsGetCurrentContext();

    if (self.areaColor && self.paths.count) {

        UIBezierPath *path = nil;

        for (int i = 0; i < self.paths.count; i++) {

            i == 0 ? path = self.paths[i] : [path appendPath:self.paths[i]];
        }

        CGFloat red   = 0;
        CGFloat green = 0;
        CGFloat blue  = 0;
        CGFloat alpha = 0;
        [self.areaColor getRed:&red green:&green blue:&blue alpha:&alpha];

        CGContextAddPath(context, path.CGPath);
        CGContextSetRGBFillColor(context, red, green, blue, alpha);
        CGContextFillPath(context);

    } else {

        for (UIBezierPath *path in self.paths) {

            CGContextAddPath(context, path.CGPath);
            CGContextSetBlendMode(context, kCGBlendModeClear);
            CGContextFillPath(context);
        }
    }
}

@end


