Pointer Events API 是Hmtl5的事件規範之一,它主要目的是用來將滑鼠(Mouse)、觸摸(touch)和觸控筆(pen)三種事件整合為統一的API。 Pointer Event Pointer指可以在屏幕上反饋一個指定坐標的輸入設備。Pointer Event事件和Touch E ...
Pointer Events API 是Hmtl5的事件規範之一,它主要目的是用來將滑鼠(Mouse)、觸摸(touch)和觸控筆(pen)三種事件整合為統一的API。
Pointer Event
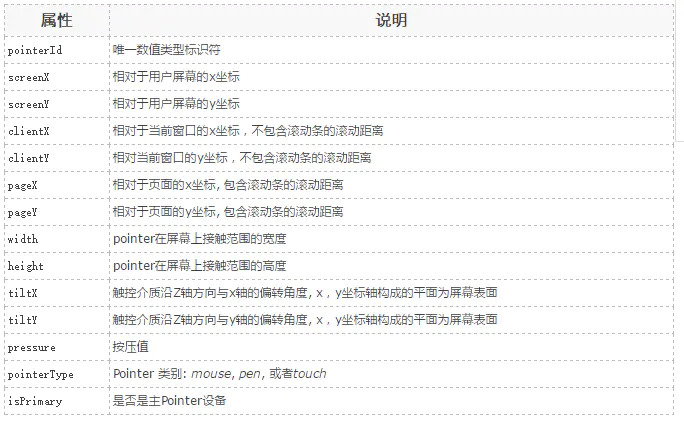
Pointer指可以在屏幕上反饋一個指定坐標的輸入設備。Pointer Event事件和Touch Event API對應的觸摸事件類似,它繼承擴展了Touch Event,因此擁有Touch Event的常用屬性。Pointer屬性如下圖:

說明:
pointerId:代表每一個獨立的Pointer。根據id,我們可以很輕鬆的實現多點觸控應用。
width/height:Mouse Event在屏幕上只能覆蓋一個點的位置,但是一個Pointer可能覆蓋一個更大的區域。
isPrimary:當有多個Pointer被檢測到的時候(比如多點觸摸),對每一種類型的Pointer會存在一個Primary Poiter。只有Primary Poiter會產生與之對應的Mouse Event。
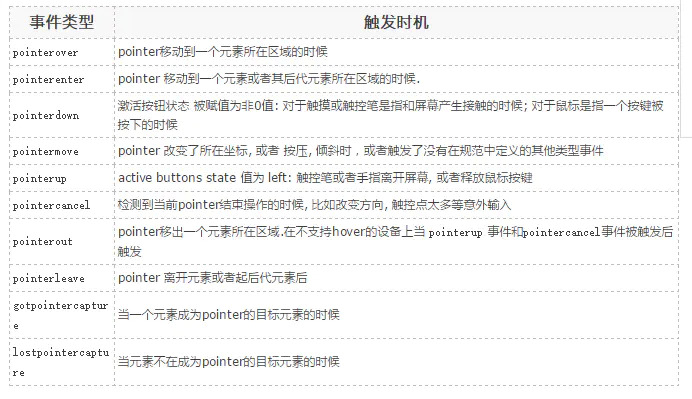
Pointer Event API核心事件:

Mouse events, pointer events和touch events 對照表

Pointer API 的好處
Poiter API 整合了滑鼠、觸摸和觸控筆的輸入,使得我們無需對各種類型的事件區分對待。
目前不論是web還是本地應用都被設計成跨終端(手機,平板,PC)應用,滑鼠多數應用在桌面應用,觸摸則出現在各種設備上。過去開發人員必須針對不同的輸入設備寫不同的代碼,或者寫一個polyfill 來封裝不同的邏輯。Pointer Events 改變了這種狀況。
Pointer API實例
使用canvas畫布來展示追蹤一個pointer移動軌跡:
<canvas id="mycanvas" width="400px" height="500px" style="border: 1px solid #000"></canvas>
<script type="text/javascript">
var DrawFigure = (function(){
    function DrawFigure(canvas,options) {
        var _this = this;
        this.canvas = canvas;
        this._ctx = this.canvas.getContext('2d');
        this.lastPt = null;
        if(options === void 0) {
            options = {};
        }
        this.options = options;
        this._handleMouseDown = function(event) {
            _this._mouseButtonDown = true;
        }
        this._handleMouseMove = function(event) {
            if(_this._mouseButtonDown) {
                var event = window.event || event;
                if(_this.lastPt !== null) {
                    _this._ctx.beginPath();
                    _this._ctx.moveTo(_this.lastPt.x,_this.lastPt.y);
                    _this._ctx.lineTo(event.pageX,event.pageY);
                    _this._ctx.strokeStyle = _this.options.strokeStyle || 'green';
                    _this._ctx.lineWidth = _this.options.lineWidth || 3;
                    _this._ctx.stroke();
                }
                _this.lastPt = {
                    x: event.pageX,
                    y: event.pageY
                }
            }
        }
        this._handleMouseUp = function(event) {
            _this._mouseButtonDown = false;
            _this.canvas.removeEventListener('pointermove',_this.__handleMouseMove,false);
            _this.canvas.removeEventListener('mousemove',_this.__handleMouseMove,false);
            _this.lastPt = null;
            console.log('移除事件');
        }

        DrawFigure.prototype.init = function() {
            this._mouseButtonDown = false;
            if(window.PointerEvent) {
                this.canvas.addEventListener('pointerdown',this._handleMouseDown,false);
                this.canvas.addEventListener('pointermove',this._handleMouseMove,false);
                this.canvas.addEventListener('pointerup',this._handleMouseUp,false);
            } else {
                this.canvas.addEventListener('mousedownn',this._handleMouseDown,false);
                this.canvas.addEventListener('mousemove',this._handleMouseMove,false);
                this.canvas.addEventListener('mouseup',this._handleMouseUp,false);
            }
        }

    }
    return DrawFigure;
}());
window.onload = function() {
    var canvas = document.getElementById('mycanvas');
    var drawFigure = new DrawFigure(canvas);
    drawFigure.init();
}
</script>
結果如圖所示:

多點觸控實例
首先初始一個多個顏色的數組,用來追蹤不同的pointer。
var colours = ['red', 'green', 'blue', 'yellow','black'];
畫線的時候通過pointer的id來取色。
 multitouchctx.strokeStyle = colours[id%5];
 multitouchctx.lineWidth = 3;
在這個demo中,我們要追蹤每一個pointer,所以需要分別保存每一個pointer的相關坐標點。這裡我們使用關聯數組來存儲數據,每個數據使用pointerId做key,我們使用一個Object對象作為關聯數組,用如下方法添加數據:
// This will be our associative array
var multiLastPt=new Object();
...
// Get the id of the pointer associated with the event
var id = e.pointerId;
...
// Store coords
multiLastPt[id] = {x:e.pageX, y:e.pageY};
完整代碼:
<!DOCTYPE html>
<html>
<head>
<title>test</title>
<meta charset="utf-8">
<meta name="viewport" content="width=device-width,initial-scale=1.0,minimum-scale=1.0,maximum-scale=1.0,user-scalable=no" />
<style>
    html,body{
        margin:0;
        padding:0;
        width: 100%;
        height: 100%;
        overflow: hidden;
    }
</style>
</head>
<body ontouchstart="return false;">
<canvas id="mycanvas"></canvas>
<script type="text/javascript">
var DrawFigure = (function(){
    function DrawFigure(canvas,options) {
        var _this = this;
        this.canvas = canvas;
        this.canvas.width = document.documentElement.clientWidth;
        this.canvas.height = document.documentElement.clientHeight;
        this._ctx = this.canvas.getContext('2d');
        this.lastPt = {};
        if(options === void 0) {
            options = {};
        }
        this.options = options;
        this.colours = ['red', 'green', 'blue', 'yellow', 'black']; // 初始一個多個顏色的數組,用來追蹤不同的pointer
        this._handleMouseDown = function(event) {
            _this._mouseButtonDown = true;
        }
        this._handleMouseMove = function(event) {
            var id = event.pointerId;
            if(_this._mouseButtonDown) {
                var event = window.event || event;
                if(_this.lastPt[id]) {
                    _this._ctx.beginPath();
                    _this._ctx.moveTo(_this.lastPt[id].x,_this.lastPt[id].y);
                    _this._ctx.lineTo(event.pageX,event.pageY);
                    _this._ctx.strokeStyle = _this.colours[id%5]; // 畫線的時候通過pointer的id來取色
                    _this._ctx.lineWidth = _this.options.lineWidth || 3;
                    _this._ctx.stroke();
                }
                _this.lastPt[id] = {
                    x: event.pageX,
                    y: event.pageY
                }
            }
        }
        this._handleMouseUp = function(event) {
            var id = event.pointerId;
            _this._mouseButtonDown = false;
            _this.canvas.removeEventListener('pointermove',_this.__handleMouseMove,false);
            _this.canvas.removeEventListener('mousemove',_this.__handleMouseMove,false);
             delete _this.lastPt[id];
        }

        DrawFigure.prototype.init = function() {
            this._mouseButtonDown = false;
            if(window.PointerEvent) {
                this.canvas.addEventListener('pointerdown',this._handleMouseDown,false);
                this.canvas.addEventListener('pointermove',this._handleMouseMove,false);
                this.canvas.addEventListener('pointerup',this._handleMouseUp,false);
            } else {
                this.canvas.addEventListener('mousedownn',this._handleMouseDown,false);
                this.canvas.addEventListener('mousemove',this._handleMouseMove,false);
                this.canvas.addEventListener('mouseup',this._handleMouseUp,false);
            }
        }

    }
    return DrawFigure;
}());
window.onload = function() {
    var canvas = document.getElementById('mycanvas');
    var drawFigure = new DrawFigure(canvas);
    drawFigure.init();
}
</script>
</body>
</html>
手機效果如圖所示:

參考地址:


