認識Spring boot 什麼是Spring boot Spring Boot makes it easy to create stand alone, production grade Spring based Applications that you can "just run". We t ...
認識Spring boot
什麼是Spring boot
Spring Boot makes it easy to create stand-alone, production-grade Spring based Applications that you can "just run".
We take an opinionated view of the Spring platform and third-party libraries so you can get started with minimum fuss. Most Spring Boot applications need minimal Spring configuration.
簡單的說Springboot 是一個用於加速構建基於Spring的應用程式的框架,你可以把他叫做Spring集成框架,Spring敏捷開發框架;
Spring boot,讓創建一個可用於生產級別的Spring應用程式變得非常簡單,大多數Springboot應用程式需要僅最少的Spring配置。
ok,可以看得出Springboot並不是提供了某種新功能而是,將原來繁瑣的框架整合變得更簡單了;這樣一來我們便可以專註於務邏輯的實現;
為什麼需要Spring?
原因很簡單了,以往在開發一個基於Spring的web項目時我們需要編寫大量的配置文件,非常的耗時和低效,且容易出錯,但是我們也會發現大多數應用程式的配置信息都是一樣的,在這個敏捷開發大行其道的時代,Java也需要有一個能夠大幅加快開發速度的框架,Spring boot應運而生, 我相信即使沒有Spring boot 也會出現這樣一個框架;
創建Spring-web項目過程對比
回顧一下我們以往在開發一個ssm項目時我們要做什麼事情:
- 安裝tomcat,用於部署最後產生的war
- 創建一個Maven項目,添加各個框架所需要的依賴包,這是還需要考慮依賴的版本相容問題
- 創建,編寫一堆看起來複雜,但又重覆的配置文件,整合各個框架到Spring中
- 業務開發
- 測試-打包,發佈到tomcat
Spring boot:
- 預設將tomcat打包到項目中作為預設伺服器,(應用程式自己包含了tomcat)
- 創建一個Maven項目,當然你可以不創建直接去官網下載一個空項目
- 在pom中添加需要集成的框架的starter(啟動器),starter會自動完成框架與Spring的整合和配置
- 一個簡單的spring boot配置文件,僅需要提供少數必需的配置如jdbc參數
- 業務開發
- 直接運行main方法,或者使用maven運行,或者打包為jar 通過java -jar命令行運行
需要註意的是Spring boot 是需要依賴構建工具的,可以是maven和gradle;
Spring boot的核心功能
起步依賴(starter)
起步依賴本質上就是一個pom,(項目對象模型),其中包含了某個框架/功能運行所需的基礎依賴信息,當我們需要某個框架/功能時加入該框架/功能的依賴即可
自動配置
Spring Boot會在啟動時完成對各個框架的自動配置,考慮了眾多因素,最終決定Spring配置應該用哪個,不該用哪個, 該過程是Spring自動完成的;
內置tomcat 或jetty等servlet容器
沒有代碼生成,不需要XML配置
儘可能自動配置Spring容器中的bean;
入門程式
案例
創建基礎的maven過程
在pom中繼承SpringBoot的starter,這決定了該工程是一個Spring boot工程
註意這不是依賴,而是繼承關係,就像一個class一樣,通過繼承擁有父類的功能
<parent>
    <groupId>org.springframework.boot</groupId>
    <artifactId>spring-boot-starter-parent</artifactId>
    <version>2.2.4.RELEASE</version>
</parent>
在pom中添加web的starter依賴,告訴maven,web應用需要用到的依賴有哪些,只需要加進來就可以,Spring boot 將會自動完成響應的配置
<dependencies>
    <dependency>
        <groupId>org.springframework.boot</groupId>
        <artifactId>spring-boot-starter-web</artifactId>
    </dependency>
</dependencies>
編寫Spring boot引導類,為spring boot提供一個啟動入口
//引導類不允許放在根目錄下
@SpringBootApplication
public class Application {
    public static void main(String[] args) {
        //啟動Spring boot 需要指定引導類
        SpringApplication.run(Application.class);
    }
}
創建一個用於測試的controller
@RestController
public class HelloController {
    @RequestMapping("/hello/{name}")
    public String helloTest(@PathVariable String name){
        return "hello spring : "+name;
    }
}
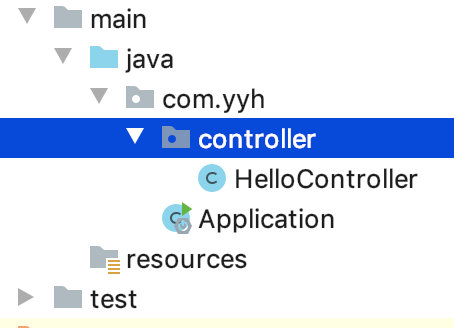
此時工程目錄如下:

運行主函數,啟動應用

瀏覽器訪問
http://localhost:8080/hello/aaa,tomcat預設運行在808埠,可通過控制台查看

註意:引導類不能放在根目錄下;
通過maven插件來運行
maven可以幫助我們在運行前檢查依賴關係
添加插件
<plugins>
    <plugin>
        <groupId>org.springframework.boot</groupId>
        <artifactId>spring-boot-maven-plugin</artifactId>
    </plugin>
</plugins>
maven命令
spring-boot:run
整合mybatis
添加了starter-web起步依賴後,工程就完成了Spring 和SpringMVC相關依賴和整合配置,我們已經可以處理客戶端的請求並返迴響應了,但是我們的數據是存儲在資料庫的,需要整合mybatis到項目中
添加starter和JDBC驅動
<dependency>
    <groupId>org.mybatis.spring.boot</groupId>
    <artifactId>mybatis-spring-boot-starter</artifactId>
    <version>2.1.1</version>
</dependency>
<!--mybatis不能確定我們要鏈接的資料庫類型 所有需要手動導入MySQL驅動-->
<dependency>
    <groupId>mysql</groupId>
    <artifactId>mysql-connector-java</artifactId>
</dependency>
準備數據
CREATE TABLE `user` (
  `id` int(11) NOT NULL AUTO_INCREMENT,
  `username` char(10) DEFAULT NULL,
  `password` char(12) DEFAULT NULL,
  PRIMARY KEY (`id`)
) ENGINE=InnoDB AUTO_INCREMENT=4 DEFAULT CHARSET=utf8;
INSERT INTO `user` VALUES (1,'admin','123321'),(2,'jerry','123'),(3,'22','222');
創建實體Bean
public class User {
    private Integer id;
    private String username;
    private String password;
    set/get
}
創建Mapper介面
package com.yyh.mapper;
import com.yyh.pojo.User;
import java.util.List;
@Mapper //mybatis 能識別帶有該註解的mapper
public interface UserMapper {
    public List<User> selectAllUser();
}
創建Mapper映射文件
<?xml version="1.0" encoding="utf-8" ?>
<!DOCTYPE mapper PUBLIC "-//mybatis.org//DTD Mapper 3.0//EN"
        "http://mybatis.org/dtd/mybatis-3-mapper.dtd" >
<mapper namespace="com.yyh.mapper.UserMapper">
    <select id="selectAllUser" resultType="user">
        select * from user
    </select>
</mapper>
測試控制器
@RestController
public class UserController {

    @Autowired
    private UserMapper userMapper;

    @GetMapping("/user/list")
    @ResponseBody
    public List<User> getAllUsers(){
        return userMapper.selectAllUser();
    }
}
創建配置文件
在resources下創建名稱為application.properties的文件,內容如下,另外spring還支持yml格式的配置文件
#DB Configuration:
spring.datasource.driverClassName=com.mysql.cj.jdbc.Driver
spring.datasource.url=jdbc:mysql://127.0.0.1:3306/boot?
serverTimezone=Asia/Shanghai
spring.datasource.username=root
spring.datasource.password=admin
#spring集成Mybatis環境
#pojo別名掃描包 mybatis.type-aliases-package=com.yyh.pojo
指定掃描mapper所在的包
若沒有使用@Mapper註解需要在啟動類中添加掃描包信息
@SpringBootApplication
@MapperScan("com.yyh.mapper")
public class Application {
    public static void main(String[] args) {
        SpringApplication.run(Application.class,args);
    }
}
maven編譯設置
預設情況下,maven在打包時會將java目下的*.java 以及resource下的配置文件諸如(*.xml,*.properties)等編譯到target中,這個兩個文件夾都屬於classpath,一些人為了方便查找可能會將mapper文件和介面文件一起放在java目錄下,但是maven並不會將java目錄下的xml進行編譯的,這時可以在pom中指定要編譯的目錄信息
 <resources>
            <resource>
                <directory>src/main/java</directory>
                <includes>
                    <include>**/*.properties</include>
                    <include>**/*.xml</include>
                </includes>
                <filtering>false</filtering>
            </resource>
            <resource>
                <directory>src/main/resources</directory>
                <includes>
                    <include>**/*.*</include>
                </includes>
                <filtering>false</filtering>
            </resource>
        </resources>
使用thymeleaf模板引擎
在這之前我們一直在使用jsp來作為視圖層,但是jsp必須依賴servlet容器,瀏覽器無法直接渲染jsp文件每次開發調試想要看到最新的效果都必須重新編譯jsp,所以Spring boot 並不推薦我們使用jsp,視圖層可以使用模板引擎,目前主流的有thymeleaf,和freemaker,官方推薦thymeleaf;
Spring boot 提供了thymeleaf的預設配置,所以在spring boot 中使用thymeleaf非常方便,Spring boot 還設置了thymeleaf的預設視圖解析器,可以像操作jsp一樣來操作Thymeleaf。Controller層幾乎沒有任何區別,就是在模板語法上有區別。
需要強調的是:模板依然是在後端完成渲染(前後端不分離),運行流程和jsp是一樣的,關於thymeleaf詳細用法不是本章的重點,參見官網
添加Thymeleaf的依賴
<dependency>
    <groupId>org.springframework.boot</groupId>
    <artifactId>spring-boot-starter-thymeleaf</artifactId>
</dependency>
編寫Thymeleaf模板
註意:模板必須放到src/main/resources/templates目錄下。
<!DOCTYPE html>
<!--添加名稱空間後idea可以提示補全-->
<html lang="en" xmlns:th="http://www.thymeleaf.org">
<head>
    <title>user list</title>
</head>
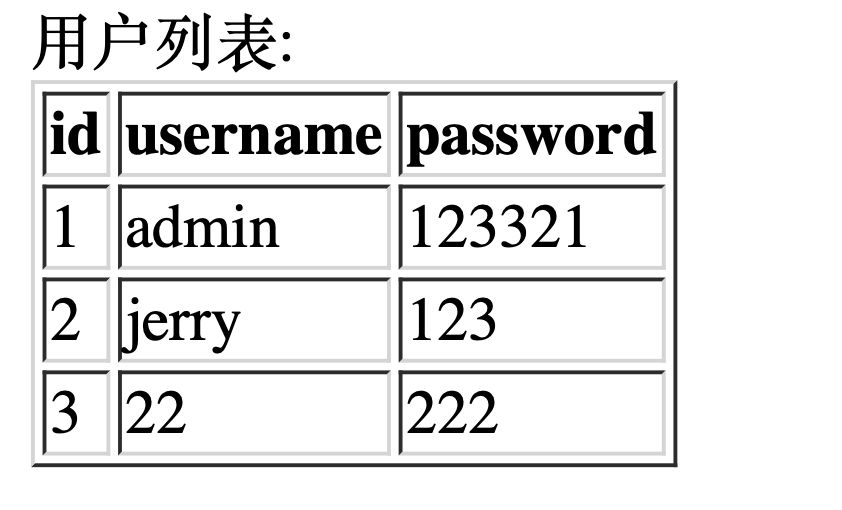
<body> 用戶列表:<br>
<table border="1">
    <tr>
        <th>id</th>
        <th>username</th>
        <th>password</th>
    </tr>
    <tr th:each="user:${userList}">
        <td th:text="${user.id}"></td>
        <td th:text="${user.username}"></td>
        <td th:text="${user.password}"></td>
    </tr>
</table>
</body>
</html>
Service
@Service
public class UserServiceImpl  implements UserService {
    @Autowired
    private UserMapper mapper;

    public List<User> getAall(){
        return mapper.selectAllUser();
    }

}
Controller
@RestController
public class UserController {

    @Autowired
    private UserService userService;

    @GetMapping("/user/list")
    @ResponseBody
    public List<User> getAllUsers(){
        return userService.getAall();
    }
}
訪問測試:
url:http://localhost:8080/user/show

熱部署插件
當我們controller和service開發完畢調試視圖時,熱部署可以在檢測到頁面修改後自動重新載入,方便調試
1.添加插件依賴:
<dependency>
    <groupId>org.springframework.boot</groupId>
    <artifactId>spring-boot-devtools</artifactId>
    <scope>runtime</scope>
</dependency>

<!--若不生效可以在build中配置fork 表示插件在獨立的進程中運行-->
<plugin>
  <groupId>org.springframework.boot</groupId>
  <artifactId>spring-boot-maven-plugin</artifactId>
  <configuration>
    <fork>true</fork>
  </configuration>
</plugin>
2.打開IDEA自動編譯
File-Settings-Compiler-Build Project automatically
3.允許運行過程中自動生成
ctrl + shift + alt + /,選擇Registry,勾上 Compiler autoMake allow when app running
靜態資源訪問
在SpringMVC中需要手動配置靜態資源的映射關係,而Spring boot 預設以及添加了靜態資源的配置,可以將靜態資源請求映射到resources下的static目錄
在static下放置一張圖片:
|--resources
|--static
yelloman.jpg
瀏覽器直接訪問:http://localhost:8080/yellowman.jpg
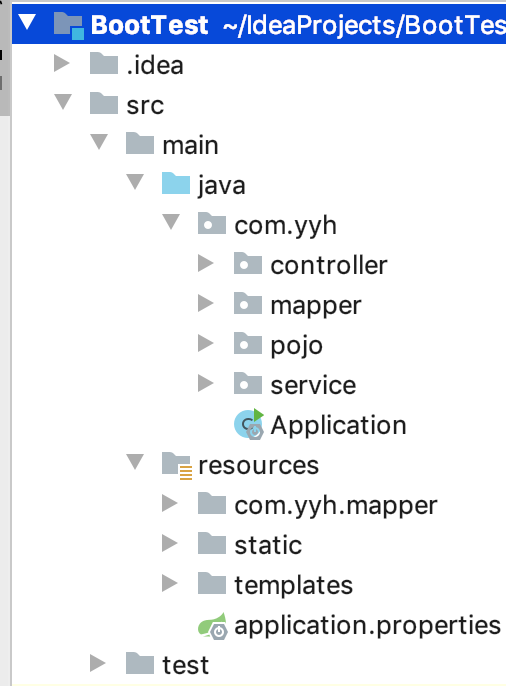
我們來看一下目前的目錄結構:

這也是一個Spring boot過程基本的目錄結構
Junit測試
當我們需要單獨測試容器中某個bean時,從頭到尾的執行一遍業務邏輯是非常耗時的,這時就可以Junit來進行單元測
添加起步依賴:
<dependency>
        <groupId>org.springframework.boot</groupId>
    <artifactId>spring-boot-starter-test</artifactId>
    <scope>test</scope>
</dependency>
import java.util.List;
@RunWith(SpringRunner.class)
@SpringBootTest(classes = Application.class)//啟動類
public class BootTest {
//註入需要測試的bean
@Autowired
UserService userService;
@Test
public void test1() {
List<User> aall = userService.getAall();
System.out.println(aall);
}
}也可以使用SpringJUnit4ClassRunner來作為測試引擎@RunWith(SpringJUnit4ClassRunner.class)


