
Spring Cloud Config為分散式系統提供了配置伺服器和配置客戶端,可以管理集群中的配置文件。 使用Git、SVN等版本管理系統存放配置文件,配置伺服器會到版本管理系統獲取配置,集群中的配置客戶端再到配置伺服器中獲取配置。 ...
Spring Cloud Config為分散式系統提供了配置伺服器和配置客戶端,可以管理集群中的配置文件。
使用Git、SVN等版本管理系統存放配置文件,配置伺服器會到版本管理系統獲取配置,集群中的配置客戶端再到配置伺服器中獲取配置。
開發工具:IntelliJ IDEA 2019.2.2
一、創建配置伺服器
1、SVN伺服器添加項目和配置文件
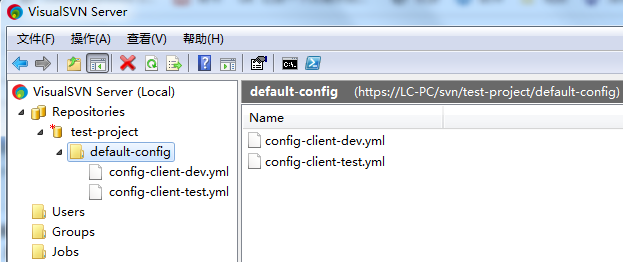
config-client-dev.yml內容:
server:
  port: 8092
test:
  user:
    name: aa
config-client-test.yml
server:
  port: 8093
test:
  user:
    name: bb
2、創建項目
IDEA中創建一個新的SpringBoot項目,名稱為“spring-config-server”,SpringBoot版本選擇2.1.10,在選擇Dependencies(依賴)的界面勾選Spring Cloud Config -> Config Server。
pom.xml會引入spring-cloud-config-server依賴項,再在pom.xml中加入org.tmatesoft.svnkit依賴項,pom.xml完整內容如下:


<?xml version="1.0" encoding="UTF-8"?>
<project xmlns="http://maven.apache.org/POM/4.0.0" xmlns:xsi="http://www.w3.org/2001/XMLSchema-instance"
         xsi:schemaLocation="http://maven.apache.org/POM/4.0.0 https://maven.apache.org/xsd/maven-4.0.0.xsd">
    <modelVersion>4.0.0</modelVersion>
    <parent>
        <groupId>org.springframework.boot</groupId>
        <artifactId>spring-boot-starter-parent</artifactId>
        <version>2.1.10.RELEASE</version>
        <relativePath/> <!-- lookup parent from repository -->
    </parent>
    <groupId>com.example</groupId>
    <artifactId>spring-config-server</artifactId>
    <version>0.0.1-SNAPSHOT</version>
    <name>spring-config-server</name>
    <description>Demo project for Spring Boot</description>

    <properties>
        <java.version>1.8</java.version>
        <spring-cloud.version>Greenwich.SR4</spring-cloud.version>
    </properties>

    <dependencies>
        <dependency>
            <groupId>org.springframework.cloud</groupId>
            <artifactId>spring-cloud-config-server</artifactId>
        </dependency>

        <dependency>
            <groupId>org.tmatesoft.svnkit</groupId>
            <artifactId>svnkit</artifactId>
            <version>1.10.1</version>
        </dependency>

        <dependency>
            <groupId>org.springframework.boot</groupId>
            <artifactId>spring-boot-starter-test</artifactId>
            <scope>test</scope>
        </dependency>
    </dependencies>

    <dependencyManagement>
        <dependencies>
            <dependency>
                <groupId>org.springframework.cloud</groupId>
                <artifactId>spring-cloud-dependencies</artifactId>
                <version>${spring-cloud.version}</version>
                <type>pom</type>
                <scope>import</scope>
            </dependency>
        </dependencies>
    </dependencyManagement>

    <build>
        <plugins>
            <plugin>
                <groupId>org.springframework.boot</groupId>
                <artifactId>spring-boot-maven-plugin</artifactId>
            </plugin>
        </plugins>
    </build>

</project>
View Code
3、修改配置application.yml
spring-cloud-config-server提供了4種配置,可以通過不同名字來激活:
(1)git:預設值,表示去Git倉庫讀取配置文件;
(2)subversion:表示去SVN倉庫讀取配置文件;
(3)native:表示去本地文件系統讀取配置文件;
(4)vault:表示去Vault(一種資源控制工具)中讀取配置文件;
server:
  port: 8091
spring:
  application:
    name: config-server
  profiles:
    active: subversion
  cloud:
    config:
      server:
        svn:
          uri: https://localhost/svn/test-project
          username: abc
          password: 123456
        default-label: default-config
4、修改啟動類代碼
增加註解@EnableConfigServer
package com.example.springconfigserver;

import org.springframework.boot.SpringApplication;
import org.springframework.boot.autoconfigure.SpringBootApplication;
import org.springframework.cloud.config.server.EnableConfigServer;

@SpringBootApplication
@EnableConfigServer
public class SpringConfigServerApplication {

    public static void main(String[] args) {
        SpringApplication.run(SpringConfigServerApplication.class, args);
    }

}
View Code
可以使用Config Server的端點獲取配置文件的內容,端點與配置文件的映射規則如下:
/{application}/{profile}[/{label}]
/{application}-{profile}.yml
/{label}/{application}-{profile}.yml
/{application}-{profile}.properties
/{label}/{application}-{profile}.properties
{application} 是應用名稱,對應配置文件的名稱部分,本例是config-client。
{profile} 是配置文件的版本,本例是dev和test。
{label} 表示分支,如果是git則預設是master分支。
啟動服務,瀏覽器訪問(把下麵test換為dev,結果類似)下麵地址,分別輸出如下:
http://localhost:8091/config-client/test
{"name":"config-client","profiles":["test"],"label":null,"version":"6","state":null,"propertySources":[{"name":"https://localhost/svn/test-project/default-config/config-client-test.yml","source":{"server.port":8093,"test.user.name":"bb"}}]}
http://localhost:8091/config-client/test/default-config
{"name":"config-client","profiles":["test"],"label":"default-config","version":"6","state":null,"propertySources":[{"name":"https://localhost/svn/test-project/default-config/config-client-test.yml","source":{"server.port":8093,"test.user.name":"bb"}}]}
http://localhost:8091/config-client-test.yml
server:
  port: 8093
test:
  user:
    name: bb
http://localhost:8091/default-config/config-client-test.yml
server:
  port: 8093
test:
  user:
    name: bb
二、配置客戶端讀取SVN配置
1、創建項目
IDEA中創建一個新的SpringBoot項目,名稱為“spring-config-client”,SpringBoot版本選擇2.1.10,在選擇Dependencies(依賴)的界面勾選Web -> Spring Web,Spring Cloud Config -> Config Client。
pom.xml會引入spring-boot-starter-web和spring-cloud-starter-config依賴項,pom.xml完整內容如下:
<?xml version="1.0" encoding="UTF-8"?>
<project xmlns="http://maven.apache.org/POM/4.0.0" xmlns:xsi="http://www.w3.org/2001/XMLSchema-instance"
         xsi:schemaLocation="http://maven.apache.org/POM/4.0.0 https://maven.apache.org/xsd/maven-4.0.0.xsd">
    <modelVersion>4.0.0</modelVersion>
    <parent>
        <groupId>org.springframework.boot</groupId>
        <artifactId>spring-boot-starter-parent</artifactId>
        <version>2.1.10.RELEASE</version>
        <relativePath/> <!-- lookup parent from repository -->
    </parent>
    <groupId>com.example</groupId>
    <artifactId>spring-config-client</artifactId>
    <version>0.0.1-SNAPSHOT</version>
    <name>spring-config-client</name>
    <description>Demo project for Spring Boot</description>

    <properties>
        <java.version>1.8</java.version>
        <spring-cloud.version>Greenwich.SR4</spring-cloud.version>
    </properties>

    <dependencies>
        <dependency>
            <groupId>org.springframework.boot</groupId>
            <artifactId>spring-boot-starter-web</artifactId>
        </dependency>
        <dependency>
            <groupId>org.springframework.cloud</groupId>
            <artifactId>spring-cloud-starter-config</artifactId>
        </dependency>

        <dependency>
            <groupId>org.springframework.boot</groupId>
            <artifactId>spring-boot-starter-test</artifactId>
            <scope>test</scope>
        </dependency>
    </dependencies>

    <dependencyManagement>
        <dependencies>
            <dependency>
                <groupId>org.springframework.cloud</groupId>
                <artifactId>spring-cloud-dependencies</artifactId>
                <version>${spring-cloud.version}</version>
                <type>pom</type>
                <scope>import</scope>
            </dependency>
        </dependencies>
    </dependencyManagement>

    <build>
        <plugins>
            <plugin>
                <groupId>org.springframework.boot</groupId>
                <artifactId>spring-boot-maven-plugin</artifactId>
            </plugin>
        </plugins>
    </build>

</project>
View Code
2、修改啟動類代碼
增加測試方法
package com.example.springconfigclient;

import org.springframework.beans.factory.annotation.Autowired;
import org.springframework.boot.SpringApplication;
import org.springframework.boot.autoconfigure.SpringBootApplication;
import org.springframework.core.env.Environment;
import org.springframework.web.bind.annotation.RequestMapping;
import org.springframework.web.bind.annotation.RestController;

@SpringBootApplication
@RestController
public class SpringConfigClientApplication {

    @Autowired
    private Environment env;

    public static void main(String[] args) {
        SpringApplication.run(SpringConfigClientApplication.class, args);
    }

    @RequestMapping("/")
    public String home(){
        return env.getProperty("test.user.name");
    }
}
3、添加配置bootstrap.yml
spring:
  application:
    name: config-client
  cloud:
    config:
      uri: http://localhost:8091
      profile: dev
設置了應用名稱config-client,使用spring.cloud.config.uri來設置配置伺服器的地址,使用spring.cloud.config.profile來讀取指定的配置。最終,配置客戶端會到SVN伺服器的test-project/default-config目錄下讀取config-client-dev.yml(.properties)。
啟動服務,瀏覽器訪問:http://localhost:8092/(這裡埠8092在config-client-dev.yml中已指定),頁面輸出:aa
也可以使用spring.cloud.config.name代替spring.application.name,結果一樣。
spring:
  cloud:
    config:
      uri: http://localhost:8091
      profile: dev
      name: config-client
如果spring.cloud.config.name和spring.application.name都不提供,則預設讀取application-dev.yml。
在SVN的test-project/default-config目錄下新增文件application-dev.yml,內容
server:
  port: 8092
test:
  user:
    name: cc
啟動服務,瀏覽器訪問:http://localhost:8092/,頁面輸出:cc
可以設置spring.client.config.label來覆蓋伺服器的default-lable屬性,另外上面profile也可改為下麵寫法。
spring:
  application:
    name: config-client
  cloud:
    config:
      uri: http://localhost:8091
      lable: default-config
      name: config-client
  profiles:
    active: dev
三、使用/refresh端點手動刷新配置
1、在上面配置客戶端的pom.xml中添加依賴
        <dependency>
            <groupId>org.springframework.boot</groupId>
            <artifactId>spring-boot-starter-actuator</artifactId>
        </dependency>
2、application.yml添加配置
management:
  endpoints:
    web:
      exposure:
        include: "*"
3、在Controller上添加註解@RefreshScope
package com.example.springconfigclient;

import org.springframework.beans.factory.annotation.Autowired;
import org.springframework.boot.SpringApplication;
import org.springframework.boot.autoconfigure.SpringBootApplication;
import org.springframework.cloud.context.config.annotation.RefreshScope;
import org.springframework.core.env.Environment;
import org.springframework.web.bind.annotation.RequestMapping;
import org.springframework.web.bind.annotation.RestController;

@SpringBootApplication
@RestController
@RefreshScope
public class SpringConfigClientApplication {

   @Autowired
    private Environment env;

    public static void main(String[] args) {
        SpringApplication.run(SpringConfigClientApplication.class, args);
    }

    @RequestMapping("/")
    public String home(){
        return env.getProperty("test.user.name");
    }
}
View Code
4、修改SVN伺服器上config-client-dev.yml內容
把name的值由aa修改為aa11,提交SVN修改。
5、/refresh只支持POST請求,發送POST請求到http://localhost:8092/actuator/refresh
使用Postman發送POST請求,如果SVN沒有修改,返回[],如果有修改,返回結果如下:

刷新瀏覽器地址:http://localhost:8092/,結果已由aa,變成了aa11。


