一、小案例(評論區) 1、流程 (1)分析靜態頁面。(vue項目創建參考https://www.cnblogs.com/l-y-h/p/11241503.html)(2)拆分靜態頁面,變成一個個組件。(3)對組件編碼,生成動態頁面。 2、靜態頁面 參考來源:https://www.bilibili. ...
一、小案例(評論區)
1、流程
(1)分析靜態頁面。(vue項目創建參考https://www.cnblogs.com/l-y-h/p/11241503.html)
(2)拆分靜態頁面,變成一個個組件。
(3)對組件編碼,生成動態頁面。
2、靜態頁面
參考來源:https://www.bilibili.com/video/av49099807/?p=22&t=1223
【舉例:】
<!DOCTYPE html>
<html>

    <head>
        <meta charset="utf-8">
        <meta name="viewport" content="width=device-width,initial-scale=1.0">
        <!--此處如果bootstrap選用 4.3.1的版本,樣式會無效(沒去研究)-->
        <link href="https://cdn.bootcss.com/twitter-bootstrap/3.3.7/css/bootstrap.css" rel="stylesheet">
        <script src="https://cdn.bootcss.com/twitter-bootstrap/3.3.7/js/bootstrap.js"></script>
        <title>vue_demo</title>
    </head>

    <body>
        <div id="app">
            <div>
                <!--頭部-->
                <header class="site-header jumbotron">
                    <div class="container">
                        <div class="row">
                            <div class="col-xs-12">
                                <h1>歡迎來到吐槽大廳</h1>
                            </div>
                        </div>
                    </div>
                </header>

                <!--主體部分-->
                <!--bootstrap將頁面分為12格,此處拆分為左4格,右8格-->
                <div class="container">
                    <div class="col-md-4">
                        <form action="form-horizontal">
                            <div class="form-group">
                                <label>用戶名</label>
                                <input type="text" class="form-control" placeholder="用戶名">
                            </div>
                            <div class="form-group">
                                <label>吐槽內容</label>
                                <textarea type="text" class="form-control" placeholder="吐槽內容"></textarea>
                            </div>
                            <div class="form-group">
                                <div class="col-sm-offset-2 col-sm-10">
                                    <button type="button" class="btn btn-default pull-right">提交</button>
                                </div>
                            </div>
                        </form>
                    </div>
                    <!--md4 for Add end    -->

                    <div class="col-md-8">
                        <h3 class="reply">吐槽回覆:</h3>
                        <h2>暫無吐槽,點擊左側添加吐槽吧!</h2>
                        <ul class="list-group">
                            <li class="list-group-item">
                                <div class="handle col-sm-offset-2 col-sm-10">
                                    <a class="pull-right">刪除</a>
                                </div>
                                <p class="user"><span>Tom</span><span>說:</span></p>
                            </li>
                            <li class="list-group-item">
                                <div class="handle col-sm-offset-2 col-sm-10">
                                    <a class="pull-right">刪除</a>
                                </div>
                                <p class="user"><span>Tom</span><span>說:</span></p>
                            </li>
                        </ul>
                    </div>
                    <!--md8 for List end -->
                </div>
            </div>
        </div>
        <!--app -->
    </body>

</html>
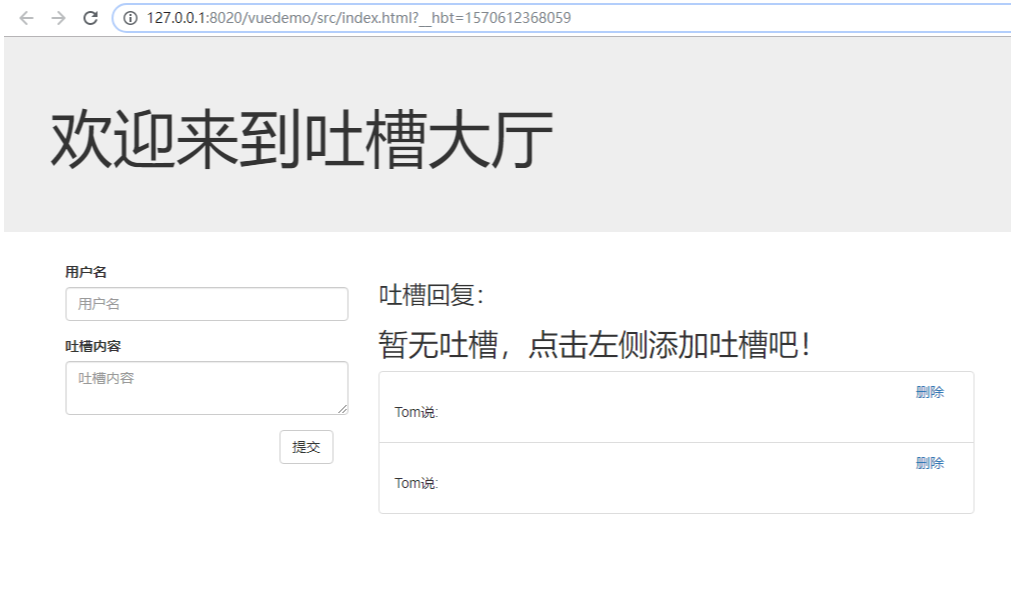
頁面截圖:
3、拆分靜態頁面,
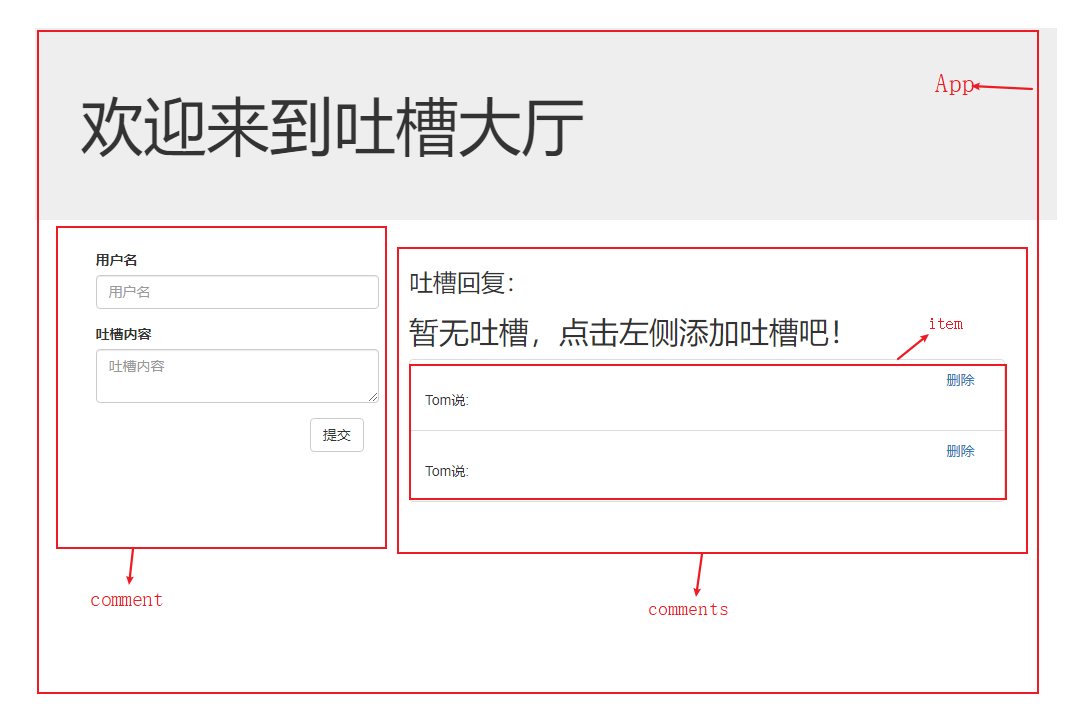
拆分靜態頁面,使其變成一個個靜態組件。
Step1:是一個大的組件(App),裡面包含各種組件。
Step2:頁面內容可以拆分成 提交吐槽組件(Comment),吐槽回覆組件(Comments)。
Step3:吐槽回覆組件裡面 可以對 每一條吐槽進行拆分,即每個吐槽為一個組件(Item)。
文件結構如下:
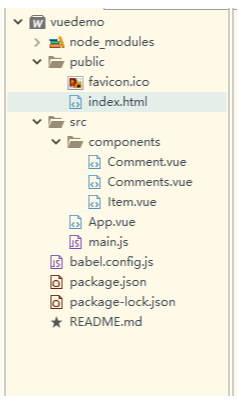
【主要文件與文件夾:】
index.html    主頁面,所有組件操作均為其服務,在此處引入css、js文件
main.js       vue入口文件,從此處啟動vue
App.vue       App.vue組件,項目的入口組件
components      裡面保存各個小組件


【index.html】
<!DOCTYPE html>
<html lang="en">
  <head>
    <meta charset="utf-8">
    <meta http-equiv="X-UA-Compatible" content="IE=edge">
    <meta name="viewport" content="width=device-width,initial-scale=1.0">
    <link rel="icon" href="<%= BASE_URL %>favicon.ico">
    <!--所有組件都是為index.html服務的,所以在此處引入css、js文件-->
    <link href="https://cdn.bootcss.com/twitter-bootstrap/3.3.7/css/bootstrap.css" rel="stylesheet">
    <title>vuedemo</title>
  </head>
  <body>
    <noscript>
      <strong>We're sorry but vuedemo doesn't work properly without JavaScript enabled. Please enable it to continue.</strong>
    </noscript>
    <div id="app"></div>
    <!-- built files will be auto injected -->
  </body>
</html>


【main.js】
import Vue from 'vue'
import App from './App.vue'

Vue.config.productionTip = false

new Vue({
  render: h => h(App),
}).$mount('#app')


【App.vue】
<template>
    <div>
        <!--頭部-->
        <header class="site-header jumbotron">
            <div class="container">
                <div class="row">
                    <div class="col-xs-12">
                        <h1>歡迎來到吐槽大廳</h1>
                    </div>
                </div>
            </div>
        </header>

        <!--主體部分-->
        <!--bootstrap將頁面分為12格,此處拆分為左4格,右8格-->
        <div class="container">
            <!--使用各組件-->
            <Comment></Comment>
            <Comments></Comments>
        </div>
    </div>
    <!--App -->
</template>

<script>
    // 引入各組件
    import Comment from './components/Comment.vue'
    import Comments from './components/Comments.vue'

    export default {
        name: 'app',
        // 註冊各組件
        components: {
            Comment,
            Comments
        }
    }
</script>

<style>
</style>


【Comment.vue】
<template>
    <div class="col-md-4">
        <form action="form-horizontal">
            <div class="form-group">
                <label>用戶名</label>
                <input type="text" class="form-control" placeholder="用戶名">
            </div>
            <div class="form-group">
                <label>吐槽內容</label>
                <textarea type="text" class="form-control" placeholder="吐槽內容"></textarea>
            </div>
            <div class="form-group">
                <div class="col-sm-offset-2 col-sm-10">
                    <button type="button" class="btn btn-default pull-right">提交</button>
                </div>
            </div>
        </form>
    </div>
    <!--Comment -->
</template>

<script>
    export default{
        name: 'comment'
    }
</script>

<style>

</style>


【Comments.vue】
<template>
    <div class="col-md-8">
        <h3 class="reply">吐槽回覆:</h3>
        <h2>暫無吐槽,點擊左側添加吐槽吧!</h2>
        <ul class="list-group">
            <Item></Item>
        </ul>
    </div>
    <!--md8 for List end -->
</template>

<script>
    import Item from './Item.vue'

    export default{
        name: 'comments',
        components: {
            Item
        }
    }
</script>

<style>

</style>


【Item.vue】
<template>
    <!--註意,需要使用div包裹,否則會報錯-->
    <div>
        <li class="list-group-item">
            <div class="handle col-sm-offset-2 col-sm-10">
                <a class="pull-right">刪除</a>
            </div>
            <p class="user"><span>Tom</span><span>說:</span></p>
        </li>
        <li class="list-group-item">
            <div class="handle col-sm-offset-2 col-sm-10">
                <a class="pull-right">刪除</a>
            </div>
            <p class="user"><span>Tom</span><span>說:</span></p>
        </li>
    </div>
</template>

<script>
    export default{
        name: 'item'
    }
</script>

<style>

</style>
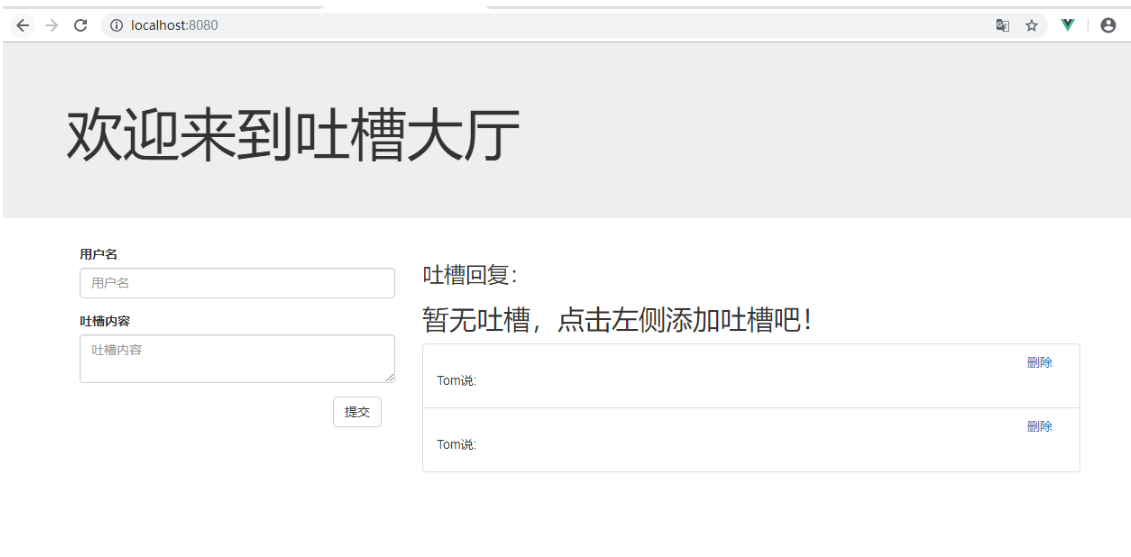
拆分後效果與原靜態頁面一致。
4、組件間值的傳遞(組件間通信)
靜態頁面上吐槽區的內容不會是寫好的,是動態生成的,那麼如何生成,就涉及到組件間的值的傳遞。通過props 來聲明屬性,使用data來傳遞數據(屬性值),使用 v-bind 綁定屬性。
【對上面代碼進行修改】
App.vue              獲取數據,將數據往吐槽區(Comments.vue)傳
Comments.vue         接收App.vue傳來的數據,將每條數據往Item.vue傳
Item.vue             接收Comments.vue傳來的數據並顯示

要是一眼看不出來,可以下載個Bcompare軟體,自行比較一下代碼間的區別。

【App.vue】
<template>
    <div>
        <!--頭部-->
        <header class="site-header jumbotron">
            <div class="container">
                <div class="row">
                    <div class="col-xs-12">
                        <h1>歡迎來到吐槽大廳</h1>
                    </div>
                </div>
            </div>
        </header>

        <!--主體部分-->
        <!--bootstrap將頁面分為12格,此處拆分為左4格,右8格-->
        <div class="container">
            <!--使用各組件-->
            <Comment></Comment>
                   <!--需使用v-bind綁定屬性-->
            <Comments :contents="contents"></Comments>
        </div>
    </div>
    <!--App -->
</template>

<script>
    // 引入各組件
    import Comment from './components/Comment.vue'
    import Comments from './components/Comments.vue'

    export default {
        name: 'app',
        // 註冊各組件
        components: {
            Comment,
            Comments
        },

        // 傳遞數據
        data(){
            return {
                contents:[
                    {name: 'tom', content: '媽媽,我想吃烤山藥'},
                    {name: 'jarry', content: '吃,吃大塊的'},
                    {name: 'jarry', content: '兩塊夠不'},
                    {name: 'tom', content: '夠了,媽媽真好,謝謝媽媽'},
                ]
            }
        }
    }
</script>

<style>
</style>


【Comments.vue】
<template>
    <div class="col-md-8">
        <h3 class="reply">吐槽回覆:</h3>
        <ul class="list-group">
            <Item v-for="(content, index) in contents" :key="index" :content="content"></Item>
        </ul>
    </div>
    <!--md8 for List end -->
</template>

<script>
    import Item from './Item.vue'

    export default{
        name: 'comments',
        // 聲明接收屬性,此屬性可以在該組件中使用
        props: ['contents'],  // 只指定屬性名

        // 註冊組件
        components: {
            Item
        }
    }
</script>

<style>

</style>


【Item.vue】
<template>
    <!--註意,需要使用div包裹,否則會報錯-->
    <div>
        <li class="list-group-item">
            <div class="handle col-sm-offset-2 col-sm-10">
                <a class="pull-right">刪除</a>
            </div>
            <p class="user"><span style="font-size: 18px;">{{content.name}}</span><span style="font-size: 18px;">說:</span>{{content.content}}</p>
        </li>
    </div>
</template>

<script>
    export default{
        name: 'item',
        props: {
            // 指定屬性名以及屬性值的類型
            content : Object
         }
    }
</script>

<style>

</style>
效果如下圖:
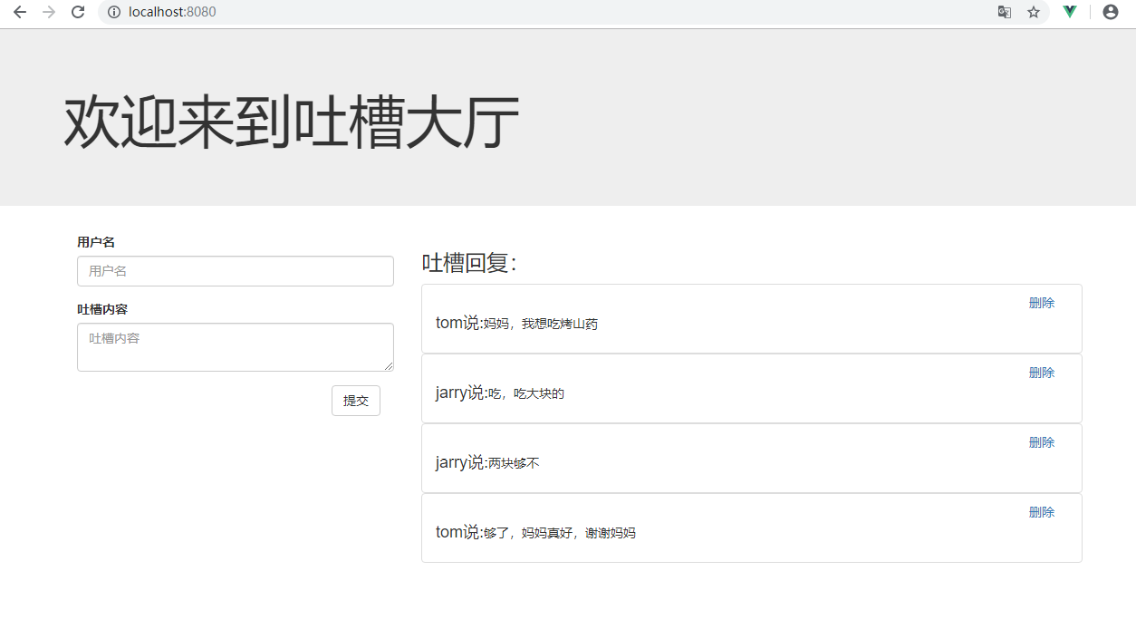
5、動態交互--添加
實現添加吐槽操作。
使用v-on 綁定事件,使用v-model 實現數據的雙向綁定,方法也可以使用 v-bind 綁定 併進行組件通信。
【對上面代碼進行修改】
App.vue            定義增加吐槽的方法,並作為屬性傳遞給Comment.vue組件
Comment.vue        接收屬性,並定義添加數據的事件

【App.vue】
<template>
    <div>
        <!--頭部-->
        <header class="site-header jumbotron">
            <div class="container">
                <div class="row">
                    <div class="col-xs-12">
                        <h1>歡迎來到吐槽大廳</h1>
                    </div>
                </div>
            </div>
        </header>

        <!--主體部分-->
        <!--bootstrap將頁面分為12格,此處拆分為左4格,右8格-->
        <div class="container">
            <!--使用各組件-->
            <Comment :addComment="addComment"></Comment>


