相信很多小伙伴們在項目實戰中,經常會用到界面的 、`載入更多`等功能。需要針對具體功能做針對性開發和調試,耗時耗力。 Paging組件的使用將這部分的工作簡化,從而讓開發者更專註於業務的具體實現。下麵我們一起來學習下Paging組件的使用方法。 首先來看下使用Paging組件實現的分頁載入和刷新效果 ...
相信很多小伙伴們在項目實戰中,經常會用到界面的分頁顯示、載入更多等功能。需要針對具體功能做針對性開發和調試,耗時耗力。
Paging組件的使用將這部分的工作簡化,從而讓開發者更專註於業務的具體實現。下麵我們一起來學習下Paging組件的使用方法。
首先來看下使用Paging組件實現的分頁載入和刷新效果:


下麵我們針對這兩個使用Paging組件的例子進行分析。
- 資料庫讀取分頁載入示例中,數據一次性獲取完成,界面分頁顯示,按需載入數據,減少了記憶體資源的使用
- 網路端分頁請求數據,每次請求固定長度的數據信息進行顯示,減少網路帶寬的使用
Paging功能的實現用到了Room組件,Room也是Jetpack庫的一部分,在SQLite上提供了一個抽象層,為開發者提供了流暢的SQLite資料庫訪問體驗。
Room簡介
Room組件包含三個主要組成部分:
資料庫
其應該滿足四個條件:
- 含有@Database註解
- 是一個繼承自RoomDatabase的抽象類
- 註解內包含實體的列表信息
- 包含一個返回帶@Dao註解類的無參方法
數據實體
表示資料庫中表
DAO
包含用於訪問資料庫的方法
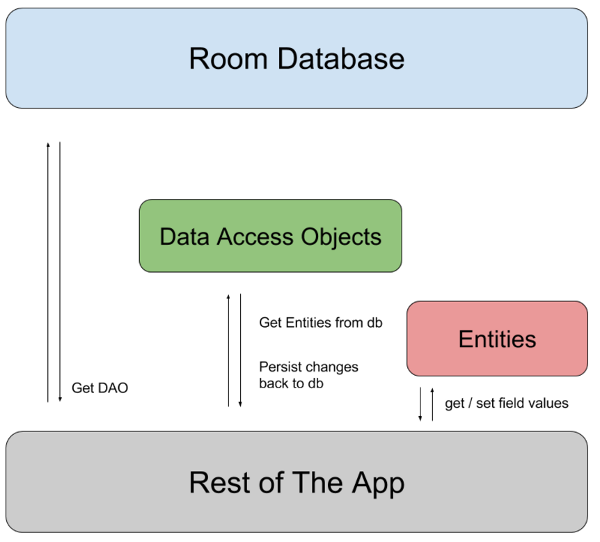
應用程式使用Room組件獲取與資料庫關聯的數據訪問對象或DAO,然後獲取實體,將實體的所有更改同步到資料庫。Room三個部分之間的關係如下圖:

Paging的基本使用方法
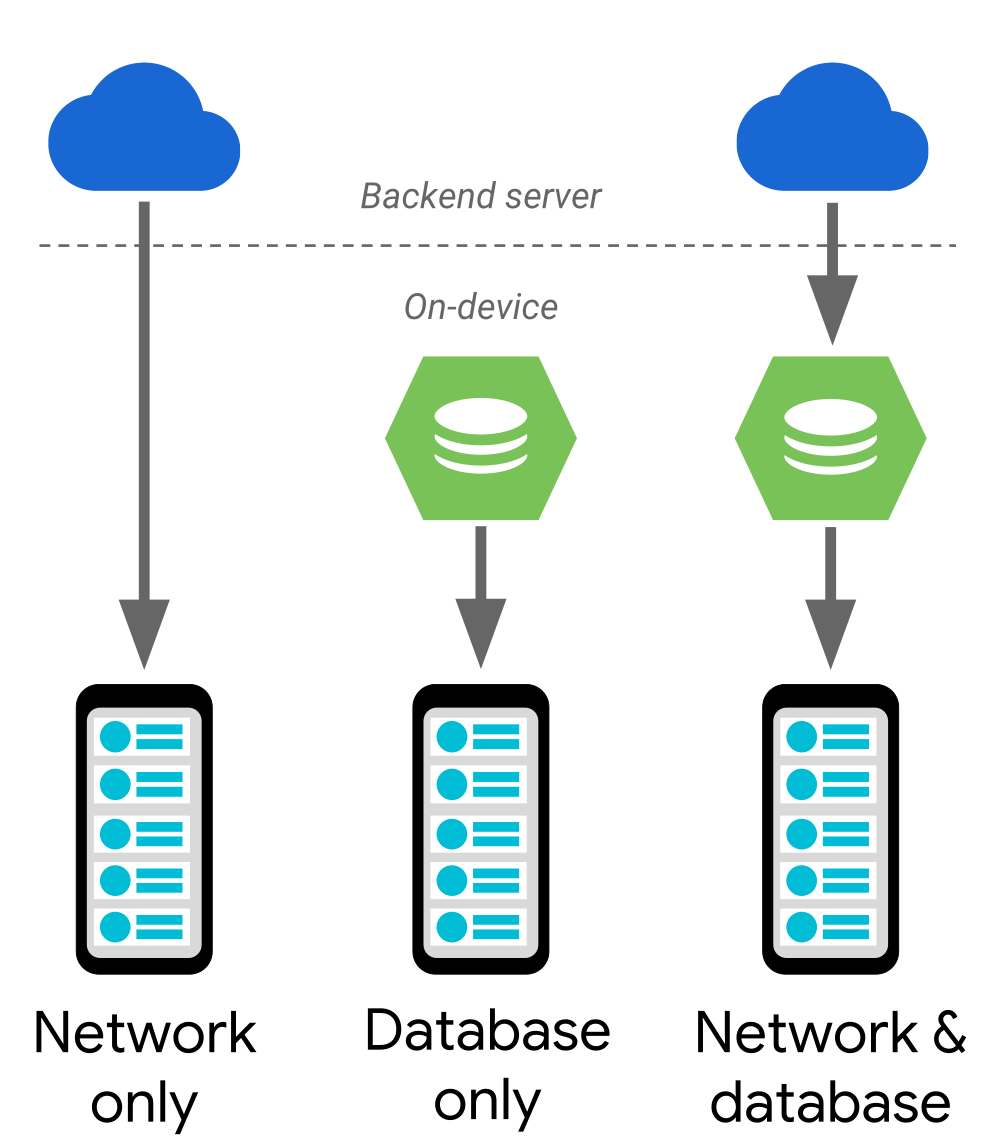
Paging組件支持三種不同數據結構:
- 僅從網路獲取
- 僅從設備資料庫獲取
- 兩種數據來源的組合,使用設備資料庫作為緩存

下麵我們以僅從設備資料庫獲取的方式來瞭解下Paging分頁的基本使用方法。
環境配置
首先需要在模塊build.gradle中添加對應庫支持。
dependencies {
    versions.room = "2.1.0-alpha06"
    versions.lifecycle = "2.2.0-alpha03"
    versions.paging = "2.1.0-rc01"
    //room資料庫訪問依賴
    implementation "androidx.room:room-runtime:$versions.room"
    //lifecycle組件依賴,ViewModel
    implementation "androidx.lifecycle:lifecycle-runtime:$versions.lifecycle"
    //paging組件依賴
    implementation "androidx.paging:paging-runtime-ktx:$versions.paging"

    kapt "androidx.room:room-compiler:$versions.room"
}
佈局文件
界面的佈局比較簡單,主界麵包含一個輸入框,一個按鈕和一個RecyclerView,列表每一項的顯示採用卡片式佈局,顯示文本。
<androidx.cardview.widget.CardView ...>
    <TextView android:id="@+id/name" .../>
</androidx.cardview.widget.CardView>
數據準備
在主Activity進行數據獲取和顯示前,需要做幾點準備工作:
- 創建數據實體類Cheese
- 創建資料庫方法DAO
- 創建資料庫CheeseDb
- 創建自定義CheeseViewModel
1. 創建實體Cheese
實體代表了資料庫每條數據對象,需要註意必須加@Entity註解
@Entity
data class Cheese(@PrimaryKey(autoGenerate = true) val id: Int, val name: String)
此聲明創建了一個資料庫實體,欄位有ID和Name,主鍵為ID
2. 創建資料庫操作方法DAO
資料庫方法提供了對資料庫的基本操作,必須加@Dao註解
@Dao
interface CheeseDao {
    @Query("SELECT * FROM Cheese ORDER BY name COLLATE NOCASE ASC")
    fun allCheesesByName(): DataSource.Factory<Int, Cheese>
    @Insert
    fun insert(cheeses: List<Cheese>)
    @Insert
    fun insert(cheese: Cheese)
    @Delete
    fun delete(cheese: Cheese)
}
此處提供了針對資料庫的查詢,插入和刪除方法,可以看到在查詢方法裡面會指定數據源類型,當前使用預設類型。Paging還支持如下三種數據源:
PageKeyedDataSource
實現按上下頁載入顯示
ItemKeyedDataSource
根據上一條數據獲取下一條數據
PositionalDataSource
從指定位置開始載入
3. 創建資料庫
資料庫為界面顯示提供了數據支持,當前示常式序中,資料庫創建時,插入了預置數據。
必須加@Database註解
必須聲明數據列表信息
必須含有無參抽象方法,返回帶@Dao註解的類
必須為抽象類,且繼承RoomDatabase
@Database(entities = arrayOf(Cheese::class), version = 1)
abstract class CheeseDb : RoomDatabase() {
    abstract fun cheeseDao(): CheeseDao//返回DAO
    ...
    //獲取資料庫實例,同步且單例
    @Synchronized
    fun get(context: Context): CheeseDb {
        if (instance == null) {
            instance = Room.databaseBuilder(context.applicationContext,
                    CheeseDb::class.java, "CheeseDatabase")
                    .addCallback(object : RoomDatabase.Callback() {
                        override fun onCreate(db: SupportSQLiteDatabase) {
                            //資料庫創建時插入預置數據
                            fillInDb(context.applicationContext)
                        }
                    }).build()
        }
        return instance!!
    }

    private fun fillInDb(context: Context) {
        // inserts in Room are executed on the current thread, so we insert in the background
        // CHEESE_DATA為預設數據列表
        ioThread {
            get(context).cheeseDao().insert(
                    CHEESE_DATA.map { Cheese(id = 0, name = it) })
        }
    }
}
4. 創建ViewModel
創建自定義ViewModel為界面和數據提供處理支持。其包含了DAO,數據列表信息等。
class CheeseViewModel(app: Application) : AndroidViewModel(app) {
    val dao = CheeseDb.get(app).cheeseDao()
    val allCheeses = dao.allCheesesByName().toLiveData(Config(
        pageSize = 30,//指定頁面顯示的數據項數量
        enablePlaceholders = true,//是否允許使用占位符
        maxSize = 200 //一次性載入數據的最大數量
      ),
      fetchExecutor = Executor {  }//自定義Executor更好地控制paging庫何時從應用程式的資料庫中載入列表
    )

    fun insert(text: CharSequence) = ioThread {
        dao.insert(Cheese(id = 0, name = text.toString()))
    }

    fun remove(cheese: Cheese) = ioThread {
        dao.delete(cheese)
    }
}小提示:自定義ViewModel直接繼承AndroidViewModel,可以在其中做一些依賴於Context的資源獲取等功能。
public class AndroidViewModel extends ViewModel {
    ...
    public <T extends Application> T getApplication() {
        return (T) mApplication;
    }
}
ViewModel的創建,包含了數據的獲取和更新:
- 通過DAO獲取資料庫的數據列表
- 使用LiveData組件管理數據
- 增加分頁支持(pageSize,enablePlaceholders,maxSize)功能
- 增加自定義Executor
Paging組件是依賴頁面長度、占位符、最大長度三個屬性來進行小塊數據載入顯示的。
頁面大小:每頁顯示的實體數量
最大長度:也稱預取長度,此值應為pageSize的幾倍大小(具體項目可根據實際情況調試)
占位符:如果設置為true,則為尚未完成載入的列表項顯示占位符
占位符的使用需要有可數的數據集合,預設顯示效果,數據項有相同大小的視圖顯示,有以下優點:
- 提供完整滾動條支持
- 無需顯示載入更多項
界面綁定
數據已經準備好了,下麵開始和界面進行綁定顯示。
界面顯示時,需要提供與RecyclerView綁定的adapter,需要註意使用Paging進行分頁載入,adapter需要繼承自PagedListAdapter。
class CheeseAdapter : PagedListAdapter<Cheese, CheeseViewHolder>(diffCallback) {
    override fun onBindViewHolder(holder: CheeseViewHolder, position: Int) {
        holder.bindTo(getItem(position))
    }

    override fun onCreateViewHolder(parent: ViewGroup, viewType: Int): CheeseViewHolder =
            CheeseViewHolder(parent)
    companion object {
        //根據diffCallback來確認新載入的數據是否與舊數據有差異,確定是否更新顯示
        private val diffCallback = object : DiffUtil.ItemCallback<Cheese>() {
            override fun areItemsTheSame(oldItem: Cheese, newItem: Cheese): Boolean =
                    oldItem.id == newItem.id
            //kotlin使用==會將對象的內容進行對比,使用java需要重寫equals方法並替換
            override fun areContentsTheSame(oldItem: Cheese, newItem: Cheese): Boolean =
                    oldItem == newItem
        }
    }
}

//ViewHolder的實現比較簡單,將Cheese數據更新到TextView
class CheeseViewHolder(parent :ViewGroup) : RecyclerView.ViewHolder(
        LayoutInflater.from(parent.context).inflate(R.layout.cheese_item, parent, false)) {

    private val nameView = itemView.findViewById<TextView>(R.id.name)
    var cheese : Cheese? = null

    //未綁定數據,或者打開占位符後快速滑動會出現cheese為null,實際項目中需要
    //處理此種情況,數據載入時會重新rebind
    fun bindTo(cheese : Cheese?) {
        this.cheese = cheese
        nameView.text = cheese?.name
    }
}
class MainActivity : AppCompatActivity() {
private val viewModel by viewModels<CheeseViewModel>()//創建viewModel
override fun onCreate(savedInstanceState: Bundle?) {
    ...
    val adapter = CheeseAdapter()//繼承PagedListAdapter的類對象
    cheeseList.adapter = adapter //為RecyclerView添加適配器
    //viewmodel數據與adapter綁定,在數據變化時通知adapter更新UI
    viewModel.allCheeses.observe(this, Observer(adapter::submitList))
    initSwipeToDelete()//設置左滑/右滑刪除數據項
    initAddButtonListener()//設置點擊添加Cheese功能
    ...
}
好了,大功告成!

你也可以嘗試使用僅網路或網路+資料庫的方式進行功能開發。
源碼在此:


