1.企業微信登錄步驟 1.獲取企業微信Token 官方文檔:https://work.weixin.qq.com/api/doc#90000/90135/91039 2.通過Token 與前端傳的Code 參數 調用微信API獲取 訪問用戶身份 官方文檔https://work.weixin.qq. ...
1.企業微信登錄步驟
1.獲取企業微信Token
官方文檔:https://work.weixin.qq.com/api/doc#90000/90135/91039
2.通過Token 與前端傳的Code 參數 調用微信API獲取 訪問用戶身份
官方文檔https://work.weixin.qq.com/api/doc#90000/90135/91023
3.通過獲取的企業用戶信息到自己的伺服器進行查詢,存在就登錄成功,不存在則登錄失敗,前提是我們先要把企業微信的用戶同步到自己的伺服器。
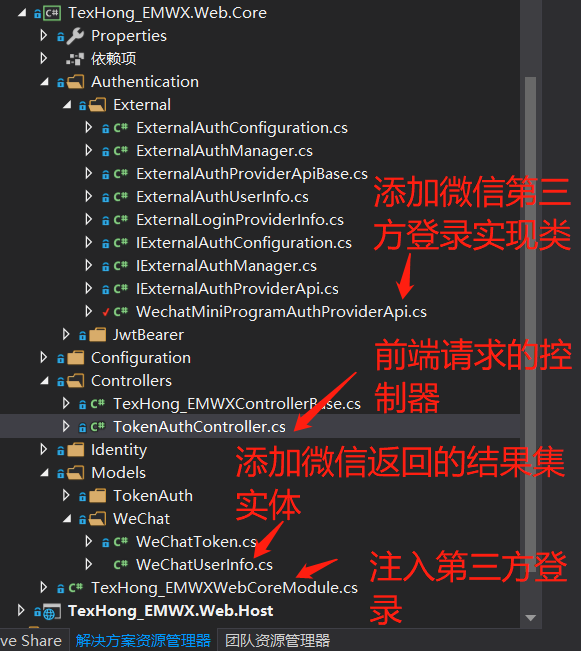
2.下圖是我們需要添加或修改的文件

3下麵開始我們的代碼:
1.先聲明微信介面返回的實體
// 獲取Token返回的實體
public class WeChatToken
{
        public int errcode { get; set; }
        public string errmsg { get; set; }
        public string access_token { get; set; }
        public int expires_in { get; set; }
 }
public class WeChatUserInfo
 {
        public int errcode { get; set; }
        public string errmsg { get; set; }
        // 企業用戶ID
        public string UserId { get; set; }
        // 非企業用戶ID
        public string OpenId { get; set; }
        public string DeviceId { get; set; }
}
2.添加企業微信第三方登錄
using Abp.UI;
using Newtonsoft.Json;
using System;
using System.Linq;
using System.Net.Http;
using System.Threading.Tasks;
using TexHong_EMWX.Authentication.JwtBearer;
using TexHong_EMWX.Authorization;
using TexHong_EMWX.Authorization.Users;
using TexHong_EMWX.Models.WeChat;
using TexHong_EMWX.WXUsers;

namespace TexHong_EMWX.Authentication.External
{
    public class WechatMiniProgramAuthProviderApi : ExternalAuthProviderApiBase
    {
        ///  第三方登錄名稱需要與前端配置的一致
        public const string ProviderName = "EnterpriseWechat";
        private readonly UserManager _userManager;
     ///  本地微信用戶的服務。 這個需要自己添加。用於判斷當前微信用戶是否有許可權
        private readonly WXUserManager _wXUserManager;
        private readonly LogInManager _logInManager;
        private readonly TokenAuthConfiguration _configuration;
        private readonly IExternalAuthConfiguration _externalAuthConfiguration;
        public WechatMiniProgramAuthProviderApi(
            UserManager _userManager,
            WXUserManager _wXUserManager,
            LogInManager _logInManager,
            TokenAuthConfiguration _configuration,
            IExternalAuthConfiguration _externalAuthConfiguration) {
            this._userManager = _userManager;
            this._wXUserManager = _wXUserManager;
            this._logInManager = _logInManager;
            this._configuration = _configuration;
            this._externalAuthConfiguration = _externalAuthConfiguration;
        }
        public override  async Task<ExternalAuthUserInfo> GetUserInfo(string Code)
        {
       // 1. 獲取企業微信ToKen
            WeChatToken weChatToken = await this.GetWechatToKen();
            // 2. 獲取用戶信息
            WeChatUserInfo weChatUserInfo = await this.GetWechatUserId(Code, weChatToken.access_token);
            // 3. 通過獲取的的微信用戶UserId並判斷是否存在自己的伺服器中。
            WXUser wXUser = await _wXUserManager.FindByUserId(weChatUserInfo.UserId);
            var t = wXUser == null ? new ExternalAuthUserInfo() : new ExternalAuthUserInfo
            {
                EmailAddress = wXUser.Email,
                Surname = wXUser.AbpUser.Surname,
                ProviderKey = weChatUserInfo.UserId,
                Provider = ProviderName,
                Name = wXUser.AbpUser.Name
            };
            return t;
        }

        public async Task<WeChatToken> GetWechatToKen() {
            var Provider = _externalAuthConfiguration.Providers.FirstOrDefault(P => P.Name == ProviderName);
            var appid = Provider.ClientId;
            var secret = Provider.ClientSecret;
            try
            {
                var httpClient = new HttpClient();
                httpClient.DefaultRequestHeaders.Add("User-Agent", "Mozilla/4.0 (compatible; MSIE 6.0; Windows NT 5.1)");
                httpClient.Timeout = TimeSpan.FromMinutes(3);
                var urlToken = $"https://qyapi.weixin.qq.com/cgi-bin/gettoken?corpid={appid}&corpsecret={secret}";
                string ResultToken = await httpClient.GetStringAsync(urlToken);
                WeChatToken wX_Token = JsonConvert.DeserializeObject<WeChatToken>(ResultToken);
                return wX_Token;
            }
            catch (Exception ex)
            {
                throw new UserFriendlyException("獲取微信access_token失敗" + ex.Message);
            }
        }

        public async Task<WeChatUserInfo> GetWechatUserId(string code,string token) {
            try
            {
                var httpClient = new HttpClient();
                httpClient.DefaultRequestHeaders.Add("User-Agent", "Mozilla/4.0 (compatible; MSIE 6.0; Windows NT 5.1)");
                httpClient.Timeout = TimeSpan.FromMinutes(3);
                var urlGetUserInfo = $"https://qyapi.weixin.qq.com/cgi-bin/user/getuserinfo?access_token={token}&code={code}";
                var ResultUserInfo = await httpClient.GetStringAsync(urlGetUserInfo);
                WeChatUserInfo wXUserInfo = JsonConvert.DeserializeObject<WeChatUserInfo>(ResultUserInfo);
                return wXUserInfo;
            }
            catch (Exception ex)
            {
                throw new UserFriendlyException("獲取微信UserInfo失敗" + ex.Message);
       }
     }
  }
}
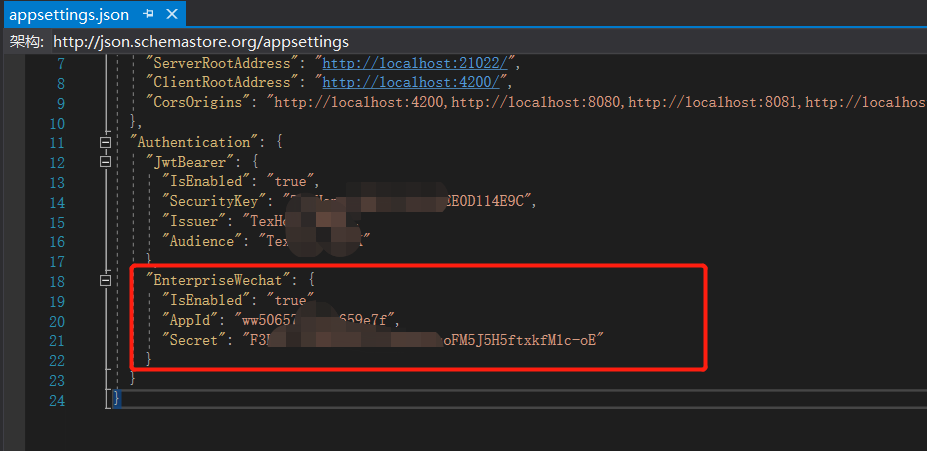
3.修改配置文件 appsetttings.json

 "EnterpriseWechat": {
      "IsEnabled": "true",
      "AppId": "",
      "Secret": ""
 }
4.註入第三方登錄 在WebCoreModule.cs 中添加註入代碼
public override void PreInitialize()
{
ConfigureExternalAuthProviders();
}
 public void ConfigureExternalAuthProviders() {
     IocManager.Register<ExternalLoginProviderInfo>();
     IocManager.Register<IExternalAuthConfiguration,ExternalAuthConfiguration>();
     var externalAuthConfiguration = IocManager.Resolve<ExternalAuthConfiguration>();
     if (bool.Parse(_appConfiguration["Authentication:EnterpriseWechat:IsEnabled"]))
     {
       externalAuthConfiguration.Providers.Add(
           new ExternalLoginProviderInfo(
              WechatMiniProgramAuthProviderApi.ProviderName,
              _appConfiguration["Authentication:EnterpriseWechat:AppId"],
              _appConfiguration["Authentication:EnterpriseWechat:Secret"],
              typeof(WechatMiniProgramAuthProviderApi)
           )
       );
    }
}
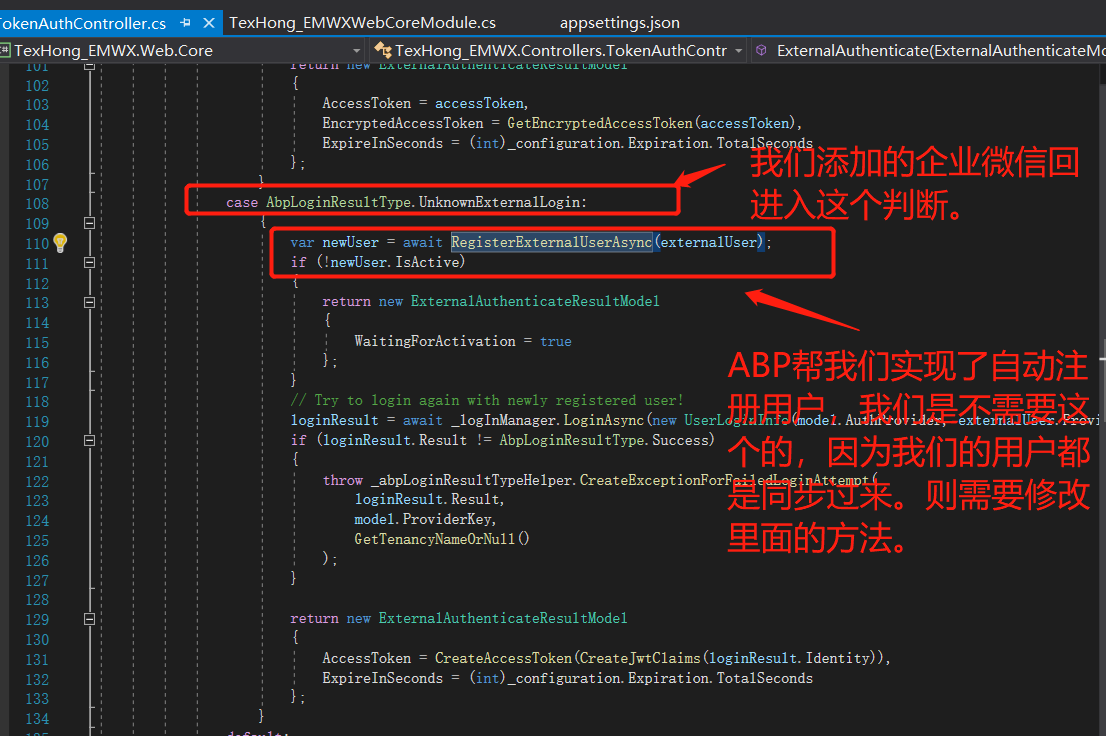
5.接下來最後一步就是修改 ExternalAuthenticate 方法,因為裡面的代碼ABP預設就已經我們實現了一些東西,需要根據自己實際的需要進行修改。

發佈下項目測試下自動登錄吧。


