
恢復內容開始 //需要的效果 1.設置window的根視圖控制器為一個UITableViewController #import "AppDelegate.h"#import "YCTableViewController.h"@interface AppDelegate ()@end@impleme ...
---恢復內容開始---
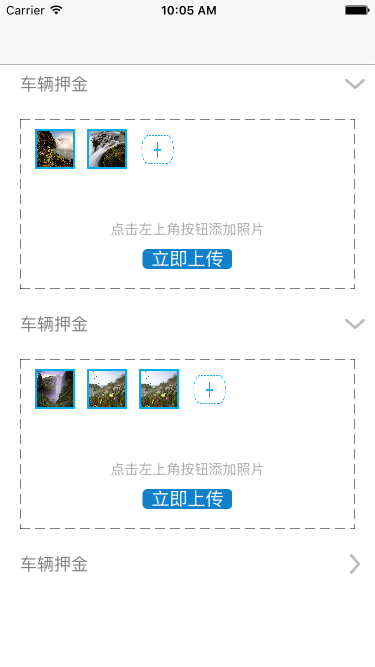
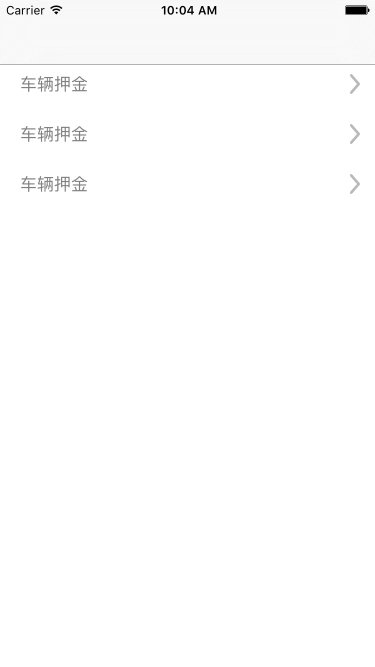
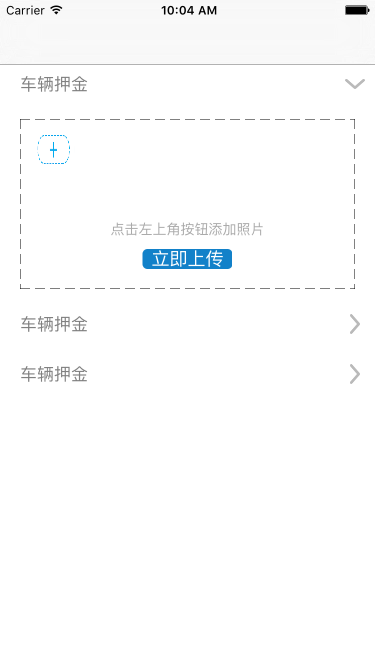
//需要的效果
1.設置window的根視圖控制器為一個UITableViewController
#import "AppDelegate.h"
#import "YCTableViewController.h"
@interface AppDelegate ()
@end
@implementation AppDelegate
- (BOOL)application:(UIApplication *)application didFinishLaunchingWithOptions:(NSDictionary *)launchOptions {
self.window = [[UIWindow alloc] initWithFrame:[UIScreen mainScreen].bounds];
self.window.backgroundColor = [UIColor whiteColor];
self.window.rootViewController = [[UINavigationController alloc] initWithRootViewController:[[YCTableViewController alloc] init]];
[self.window makeKeyAndVisible];
return YES;
}
2.UITableViewController
// Copyright © 2016年 Chason. All rights reserved.
//
#import <UIKit/UIKit.h>
#import "DepositFeeHeader.h"
#import "DepositFeeWithApplyTableViewCell.h"
#import "AppModel.h"
#import "MyCollectionViewCell.h"
#import "SectionHeaderViewCollectionReusableView.h"
@interface YCTableViewController : UITableViewController<UICollectionViewDataSource, UICollectionViewDelegate, UICollectionViewDelegateFlowLayout, UIImagePickerControllerDelegate, UIActionSheetDelegate, UINavigationControllerDelegate>
@property (nonatomic, strong) NSMutableArray *dataArray;
@property (nonatomic, strong) NSMutableArray *ownHobby;//上傳圖片數組1
@property (nonatomic, strong) NSMutableArray *imageArray;//上傳圖片數組2
@property (nonatomic, strong) UICollectionView *collection;
@property (nonatomic, strong) UIActionSheet *actionSheet;
@property (nonatomic, strong) AppModel *model;
@property (nonatomic, assign) NSInteger reUpdate;
@property (nonatomic, strong) NSString *imageString;
@property (nonatomic, assign) NSInteger number;
@end
// Copyright © 2016年 Chason. All rights reserved.
//
#import "YCTableViewController.h"
//手機屏幕的寬和高
#define kScreenWidth [UIScreen mainScreen].bounds.size.width
#define KScreenHeight [UIScreen mainScreen].bounds.size.height
@interface YCTableViewController ()
@end
@implementation YCTableViewController
- (void)viewDidLoad {
[super viewDidLoad];
_dataArray = [[NSMutableArray alloc] initWithCapacity:1];
for (int i = 0; i < 3; i++) {
AppModel *model = [[AppModel alloc] init];
[_dataArray addObject:model];
}
_ownHobby = [NSMutableArray array];
_reUpdate = 10000;//賦初值
}
- (NSInteger)tableView:(UITableView *)tableView numberOfRowsInSection:(NSInteger)section
{
AppModel *model = _dataArray[section];
if ([model Is_Open]) {
return 1;
}else
{
return 0;
}
}
- (NSInteger)numberOfSectionsInTableView:(UITableView *)tableView
{
[_ownHobby removeAllObjects];
for (int i = 0; i < _dataArray.count; i++) {
_imageArray= [NSMutableArray array];
[_ownHobby addObject:_imageArray];
}
return _dataArray.count;
}
- (CGFloat)tableView:(UITableView *)tableView heightForFooterInSection:(NSInteger)section
{
AppModel *model = _dataArray[section];
if (model.Is_Open == YES || section == _dataArray.count - 1) {
return 0.01;
}else {
return 10;
}
}
-(UIView *)tableView:(UITableView *)tableView viewForFooterInSection:(NSInteger)section
{
UIView *backView = [[UIView alloc] init];
backView.backgroundColor = [UIColor whiteColor];
return backView;
}
- (CGFloat)tableView:(UITableView *)tableView heightForHeaderInSection:(NSInteger)section
{
return 40;
}
- (CGFloat)tableView:(UITableView *)tableView heightForRowAtIndexPath:(NSIndexPath *)indexPath
{
return 200;
}
- (UIView *)tableView:(UITableView *)tableView viewForHeaderInSection:(NSInteger)section
{
DepositFeeHeader *depositHeader = [tableView dequeueReusableHeaderFooterViewWithIdentifier:@"deposit"];
if (depositHeader == nil) {
depositHeader = [[DepositFeeHeader alloc] initWithReuseIdentifier:@"deposit"];
}
depositHeader.tag = 1000 + section;
[depositHeader.tap addTarget:self action:@selector(showDetail:)];
CGFloat rota;
AppModel *model = _dataArray[section];
if ([model Is_Open] == NO) {
rota=0;
}
else{
rota=M_PI_2;
}
[UIView animateWithDuration:0.1 animations:^{
depositHeader.listImage.transform = CGAffineTransformMakeRotation(rota);
}];
return depositHeader;
}
- (UITableViewCell *)tableView:(UITableView *)tableView cellForRowAtIndexPath:(NSIndexPath *)indexPath
{
if (indexPath.section != _reUpdate) {
AppModel *model = _dataArray[indexPath.section];
DepositFeeWithApplyTableViewCell *cell = [[DepositFeeWithApplyTableViewCell alloc] initWithStyle:UITableViewCellStyleDefault reuseIdentifier:@"applyCell"];
UICollectionViewFlowLayout *flowLayout = [[UICollectionViewFlowLayout alloc]init];
flowLayout.minimumInteritemSpacing = 5;
flowLayout.minimumLineSpacing = 5;
flowLayout.sectionInset = UIEdgeInsetsMake(0 , 5 , 0 , 10 );
flowLayout.itemSize = CGSizeMake(40 , 40);
_collection = [[UICollectionView alloc]initWithFrame:CGRectMake(10, 10, cell.backView.frame.size.width - 20, 90) collectionViewLayout:flowLayout];
[_collection registerClass:[SectionHeaderViewCollectionReusableView class] forSupplementaryViewOfKind:UICollectionElementKindSectionHeader withReuseIdentifier:@"head"];
_collection.tag = indexPath.section;
_collection.bounces = NO;
_collection.delegate = self;
_collection.dataSource = self;
_collection.backgroundColor = [UIColor whiteColor];
[_collection registerClass:[MyCollectionViewCell class] forCellWithReuseIdentifier:@"identifier"];
[cell.backView addSubview:_collection];
[cell.shouldBtn addTarget:self action:@selector(upImage:) forControlEvents:UIControlEventTouchUpInside];
cell.shouldBtn.tag = indexPath.row + 2000;
cell.selectionStyle = UITableViewCellSelectionStyleNone;
return cell;
}else
{
return nil;
}
}
//對照片進行處理
- (void)upImage:(UIButton *)btn
{
}
-(void)textfiledShow
{
if ([_ownHobby[_number] count] == 9) {
UIAlertController *alert1 = [UIAlertController alertControllerWithTitle:@"上傳照片不能超過9張, 點擊圖片可以刪除" message:@"" preferredStyle:UIAlertControllerStyleAlert];
UIAlertAction *action = [UIAlertAction actionWithTitle:@"確定" style:UIAlertActionStyleDefault handler:^(UIAlertAction * _Nonnull action) {
}];
[alert1 addAction:action];
[self.navigationController presentViewController:alert1 animated:YES completion:nil];
}
else
{
[self callActionSheet];
}
}
//彈框提示相片來源
- (void)callActionSheet
{
if ([UIImagePickerController isSourceTypeAvailable:UIImagePickerControllerSourceTypeCamera]) {
self.actionSheet = [[UIActionSheet alloc] initWithTitle:@"選擇照片" delegate:self cancelButtonTitle:@"取消" destructiveButtonTitle:nil otherButtonTitles:@"拍照", @"從相冊選擇", nil];
}else
{
self.actionSheet = [[UIActionSheet alloc] initWithTitle:@"選擇照片" delegate:self cancelButtonTitle:@"取消" destructiveButtonTitle:nil otherButtonTitles:@"從相冊選擇", nil];
}
[self.actionSheet showInView:self.tableView];
}
- (void)actionSheet:(UIActionSheet *)actionSheet clickedButtonAtIndex:(NSInteger)buttonIndex
{
NSUInteger sourceType = UIImagePickerControllerSourceTypePhotoLibrary;
//pand是否支持相機
if ([UIImagePickerController isSourceTypeAvailable:UIImagePickerControllerSourceTypeCamera]) {
switch (buttonIndex) {
case 0:
sourceType = UIImagePickerControllerSourceTypeCamera;
break;
case 1:
sourceType = UIImagePickerControllerSourceTypePhotoLibrary;
break;
default:
return;
}
}else
{
if (buttonIndex == 1) {
return;
}else
{
sourceType = UIImagePickerControllerSourceTypeSavedPhotosAlbum;
}
}
UIImagePickerController *imagePicker = [[UIImagePickerController alloc] init];
imagePicker.delegate = self;
imagePicker.allowsEditing = YES;
imagePicker.sourceType = sourceType;
[self.navigationController presentViewController:imagePicker animated:YES completion:^{
}];
}
-(void)imagePickerController:(UIImagePickerController *)picker didFinishPickingMediaWithInfo:(NSDictionary<NSString *,id> *)info
{
[picker dismissViewControllerAnimated:YES completion:^{
}];
[_ownHobby[_number] addObject:[info objectForKey:UIImagePickerControllerOriginalImage]];
[_collection reloadData];
}
-(UICollectionViewCell *)collectionView:(UICollectionView *)collectionView cellForItemAtIndexPath:(NSIndexPath *)indexPath
{
_number = collectionView.tag;
if ([_ownHobby[_number] count] == indexPath.row) {
MyCollectionViewCell *cell = [collectionView dequeueReusableCellWithReuseIdentifier:@"identifier" forIndexPath:indexPath];
UITapGestureRecognizer *tap = [[UITapGestureRecognizer alloc]initWithTarget:self action:@selector(textfiledShow)];
[cell.imageView addGestureRecognizer:tap];
cell.imageView.userInteractionEnabled = YES;
cell.cellStyle = cellStyleAdd;
cell.layer.masksToBounds = NO;
cell.layer.borderWidth = 0;
cell.layer.cornerRadius = 0;
[cell layoutSubviews];
return cell;
}
else
{
MyCollectionViewCell *cell = [collectionView dequeueReusableCellWithReuseIdentifier:@"identifier" forIndexPath:indexPath];
cell.photo.image = _ownHobby[_number][indexPath.row];
cell.cellStyle = 1;
[cell layoutSubviews];
[cell.imageView removeFromSuperview];
return cell;
}
}
-(NSInteger)numberOfSectionsInCollectionView:(UICollectionView *)collectionView
{
return 1;
}
-(NSInteger)collectionView:(UICollectionView *)collectionView numberOfItemsInSection:(NSInteger)section
{
return [_ownHobby[_number] count] + 1;
}
#pragma mark 頭視圖size
-(CGSize)collectionView:(UICollectionView *)collectionView layout:(UICollectionViewLayout *)collectionViewLayout referenceSizeForHeaderInSection:(NSInteger)section
{
CGSize size = {0.01, 0.01};
return size;
}
#pragma mark 每個Item大小
-(CGSize)collectionView:(UICollectionView *)collectionView layout:(UICollectionViewLayout *)collectionViewLayout sizeForItemAtIndexPath:(NSIndexPath *)indexPath
{
return CGSizeMake(40, 40);
}
-(CGFloat)lengthWithString:(NSString *)string
{
return [string length];
}
-(void)collectionView:(UICollectionView *)collectionView didSelectItemAtIndexPath:(NSIndexPath *)indexPath
{
if ([_ownHobby[_number] count]) {
[_ownHobby[_number] removeObjectAtIndex:indexPath.row];
[_collection reloadData];
}
}
- (void)showDetail:(UITapGestureRecognizer *)tap
{
AppModel *model = _dataArray[tap.view.tag - 1000];
if ([model Is_Open]) {
model.Is_Open = NO;
}else
{
model.Is_Open = YES;
}
[self.tableView reloadSections:[NSIndexSet indexSetWithIndex:tap.view.tag - 1000] withRowAnimation:UITableViewRowAnimationNone];
}
@end
3.自定義tableview的header和cell
//header
// Copyright © 2016年 Chason. All rights reserved.
//
#import <UIKit/UIKit.h>
@interface DepositFeeHeader : UITableViewHeaderFooterView
@property (nonatomic, strong) UILabel *titleLabel;
@property (nonatomic, strong) UIImageView *listImage;//尾按鈕
@property (nonatomic, strong) UIGestureRecognizer *tap;
@end
// Copyright © 2016年 Chason. All rights reserved.
//
#import "DepositFeeHeader.h"
//手機屏幕的寬和高
#define kScreenWidth [UIScreen mainScreen].bounds.size.width
#define KScreenHeight [UIScreen mainScreen].bounds.size.height
@implementation DepositFeeHeader
- (instancetype)initWithReuseIdentifier:(NSString *)reuseIdentifier
{
self = [super initWithReuseIdentifier:reuseIdentifier];
if (self) {
UIView *backView = [[UIView alloc] initWithFrame:CGRectMake(0, 0, kScreenWidth, 40)];
backView.backgroundColor = [UIColor whiteColor];
[self addSubview:backView];
self.titleLabel = [[UILabel alloc] initWithFrame:CGRectMake(20, 10, kScreenWidth - 45, 20)];
self.titleLabel.text = @"車輛押金";
self.titleLabel.userInteractionEnabled = YES;
self.titleLabel.textColor = [UIColor grayColor];
[backView addSubview:self.titleLabel];
self.listImage = [[UIImageView alloc] initWithFrame:CGRectMake(kScreenWidth - 25, 10, 10, 20)];
self.listImage.image = [UIImage imageNamed:@"jiantou.png"];
[backView addSubview:self.listImage];
UIImageView *headerLine = [[UIImageView alloc] initWithFrame:CGRectMake(0, 0, kScreenWidth, 1)];
headerLine.image = [UIImage imageNamed:@"line"];
[backView addSubview:headerLine];
UIImageView *footerLine = [[UIImageView alloc] initWithFrame:CGRectMake(0, 39, kScreenWidth, 1)];
footerLine.image = [UIImage imageNamed:@"line"];
[backView addSubview:footerLine];
self.tap = [[UITapGestureRecognizer alloc] init];
[self addGestureRecognizer:self.tap];
}
return self;
}
@end
//cell
// Copyright © 2016年 Chason. All rights reserved.
//
#import <UIKit/UIKit.h>
@interface DepositFeeWithApplyTableViewCell : UITableViewCell
@property (nonatomic, strong) UIView *backView;
@property (nonatomic, strong) UIButton *cameraBtn;
@property (nonatomic, strong) UIImageView *photoImg;
@property (nonatomic, strong) UILabel *updatePresent;
@property (nonatomic, strong) UIButton *shouldBtn;
@end
// Copyright © 2016年 Chason. All rights reserved.
//
#import "DepositFeeWithApplyTableViewCell.h"
//手機屏幕的寬和高
#define kScreenWidth [UIScreen mainScreen].bounds.size.width
#define KScreenHeight [UIScreen mainScreen].bounds.size.height
@implementation DepositFeeWithApplyTableViewCell
- (instancetype)initWithStyle:(UITableViewCellStyle)style reuseIdentifier:(NSString *)reuseIdentifier
{
self = [super initWithStyle:style reuseIdentifier:reuseIdentifier];
if (self) {
_backView = [[UIView alloc] initWithFrame:CGRectMake(20, 15, kScreenWidth - 40, 170)];
[self addSubview:_backView];
[self addDottedLineFromImageView:_backView];
self.updatePresent = [[UILabel alloc] initWithFrame:CGRectMake(0, 0, kScreenWidth - 40, 20)];
self.updatePresent.center = CGPointMake((kScreenWidth - 40) / 2, 110);
self.updatePresent.text = @"點擊左上角按鈕添加照片";
self.updatePresent.textColor = [UIColor lightGrayColor];
self.updatePresent.textAlignment = NSTextAlignmentCenter;
self.updatePresent.font = [UIFont systemFontOfSize:14];
[_backView addSubview:self.updatePresent];
self.shouldBtn = [UIButton buttonWithType:UIButtonTypeCustom];
self.shouldBtn.frame = CGRectMake((kScreenWidth - 40) / 2 - 45, 130, 90, 20);
[self.shouldBtn setTitleColor:[UIColor whiteColor] forState:UIControlStateNormal];
[self.shouldBtn setTitle:@"立即上傳" forState:UIControlStateNormal];
self.shouldBtn.layer.cornerRadius = 5;
self.shouldBtn.backgroundColor = [UIColor colorWithRed:18/255.0 green:129/255.0 blue:201/255.0 alpha:1];
[_backView addSubview:self.shouldBtn];
}
return self;
}
//添加虛線框
- (void)addDottedLineFromImageView:(UIView *)superView{
CGFloat w = superView.frame.size.width;
CGFloat h = superView.frame.size.height;
CGFloat padding = 20;
//創建四個imageView作邊框
for (NSInteger i = 0; i<4; i++) {
UIImageView *imageView = [[UIImageView alloc] init];
imageView.backgroundColor = [UIColor clearColor];
if (i == 0) {
imageView.frame = CGRectMake(0, 0, w, padding);
}else if (i == 1){
imageView.frame = CGRectMake(0, 0, padding, h);
}else if (i == 2){
imageView.frame = CGRectMake(0, h - padding, w, padding);
}else if (i == 3){
imageView.frame = CGRectMake(w - padding, 0, padding, h);
}
[superView addSubview:imageView];
UIGraphicsBeginImageContext(imageView.frame.size); //開始畫線
[imageView.image drawInRect:CGRectMake(0, 0, imageView.frame.size.width, imageView.frame.size.height)];
CGContextSetLineCap(UIGraphicsGetCurrentContext(), kCGLineCapRound); //設置線條終點形狀
CGFloat lengths[] = {10,5};
CGContextRef line = UIGraphicsGetCurrentContext();
CGContextSetStrokeColorWithColor(line, [UIColor blackColor].CGColor);
CGContextSetLineDash(line, 0, lengths, 2); //畫虛線
CGContextMoveToPoint(line, 0, 0); //開始畫線
if (i == 0) {
CGContextAddLineToPoint(line, w, 0);
}else if (i == 1){
CGContextAddLineToPoint(line, 0, w);
}else if (i == 2){
CGContextMoveToPoint(line, 0, padding);
CGContextAddLineToPoint(line, w, padding);
}else if (i == 3){
CGContextMoveToPoint(line, padding, 0);
CGContextAddLineToPoint(line, padding, w);
}
CGContextStrokePath(line);
imageView.image = UIGraphicsGetImageFromCurrentImageContext();
}
}
@end
4.collectionView佈局和自定義item
#import <UIKit/UIKit.h>
@interface SectionHeaderViewCollectionReusableView : UICollectionReusableView
@property(nonatomic, strong)UILabel *titleLabel;
@end
#import "SectionHeaderViewCollectionReusableView.h"
@implementation SectionHeaderViewCollectionReusableView
-(instancetype)initWithFrame:(CGRect)frame
{
self = [super initWithFrame:frame];
if (self) {
[self createViews];
}
return self;
}
-(void)createViews
{
_titleLabel = [[UILabel alloc]init];
[self addSubview:_titleLabel];
}
-(void)layoutSubviews
{
[super layoutSubviews];
_titleLabel.frame = CGRectMake(20, 30, 375, 50);
_titleLabel.font = [UIFont systemFontOfSize:20];
}
@end
collectionView的item
#import <UIKit/UIKit.h>
@interface MyCollectionViewCell : UICollectionViewCell
typedef enum : NSInteger
{
cellStyleDefault = 0,
cellStyleSelected = 1,
cellStyleAdd = 2,
}CollectionViewCellStyle;
@property(nonatomic, assign)CollectionViewCellStyle cellStyle;
@property(nonatomic, strong)UIImageView *photo;
@property(nonatomic, strong)UIImageView *imageView;
@property(nonatomic, strong)NSArray *array;
@property(nonatomic, strong)NSMutableArray *dataArray;
-(void)layoutSubviews;
@end
#import "MyCollectionViewCell.h"
@implementation MyCollectionViewCell
-(instancetype)initWithFrame:(CGRect)frame
{
self = [super initWithFrame:frame];
if (self) {
_photo = [[UIImageView alloc]init];
_imageView = [[UIImageView alloc]init];
}
return self;
}
-(void)layoutSubviews
{
[super layoutSubviews];
[_photo setFrame:self.bounds];
_imageView.frame = self.bounds;
switch (_cellStyle) {
case cellStyleDefault:
self.layer.borderColor = [UIColor colorWithRed:0 green:0.68 blue:0.94 alpha:1].CGColor;
self.layer.masksToBounds = YES;
self.layer.borderWidth = 1.8;
//self.layer.cornerRadius = 20;
self.backgroundColor = [UIColor whiteColor];
[self.contentView addSubview:_photo];
break;
case cellStyleSelected:
self.layer.borderColor = [UIColor colorWithRed:0 green:0.68 blue:0.94 alpha:1].CGColor;
self.layer.masksToBounds = YES;
self.layer.borderWidth = 1.8;
//self.layer.cornerRadius = 20;
self.backgroundColor = [UIColor colorWithRed:0 green:0.68 blue:0.94 alpha:1];
[self.contentView addSubview:_photo];
break;
case cellStyleAdd:
[self.imageView setImage:[UIImage imageNamed:@"addPhoto.png"]];
self.backgroundColor = [UIColor whiteColor];
[self.contentView addSubview:_imageView];
break;
default:
break;
}
}
@end
5.model
#import <Foundation/Foundation.h>
#import <UIKit/UIKit.h>
@interface AppModel : NSObject
@property (nonatomic, assign) BOOL Is_Open;
@end
#import "AppModel.h"
@implementation AppModel
@end
//設置model是為了設置一個bool類型的變數,用來記錄tableview的cell是否展開,從而進行reloadSection操作,進行動畫展開或收縮.
---恢復內容結束---

