版權聲明:本文為HaiyuKing原創文章,轉載請註明出處! 前言 這個Demo只是記錄極光推送的集成,不能運行。 使用步驟 一、項目組織結構圖 註意事項: 1、 導入類文件後需要change包名以及重新import R文件路徑 2、 Values目錄下的文件(strings.xml、dimens. ...
版權聲明:本文為HaiyuKing原創文章,轉載請註明出處!
前言
這個Demo只是記錄極光推送的集成,不能運行。
使用步驟
一、項目組織結構圖
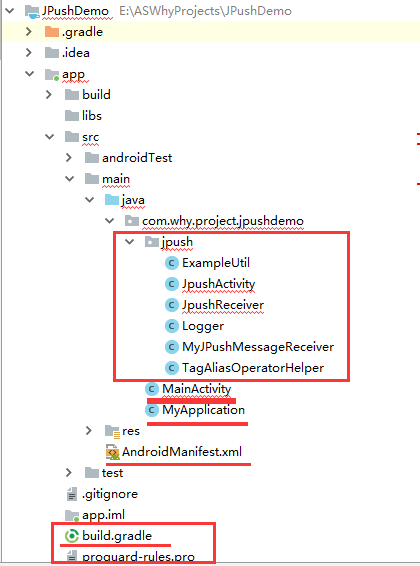
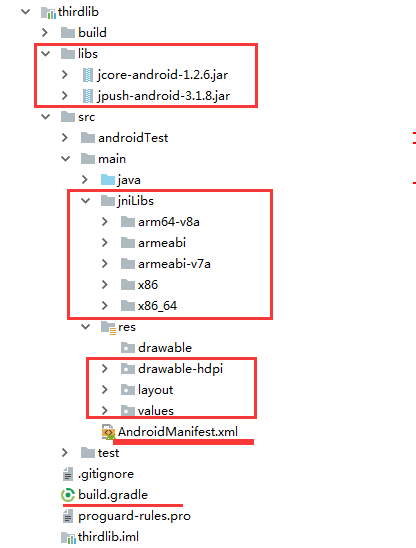
註意事項:
1、 導入類文件後需要change包名以及重新import R文件路徑
2、 Values目錄下的文件(strings.xml、dimens.xml、colors.xml等),如果項目中存在,則複製裡面的內容,不要整個覆蓋
二、導入步驟
2.1、接入準備
參考官網《3 分鐘快速使用 JPush Android Demo》
創建極光推送開發者帳號——》創建應用——》獲取APPkey
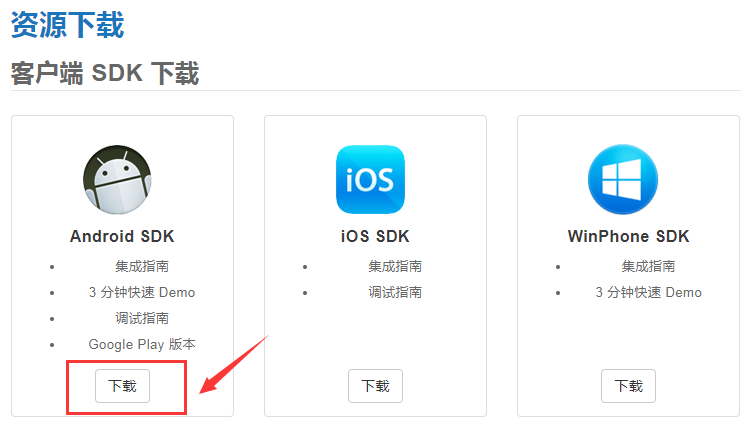
2.2、下載SDK
如果使用自動集成的話,不需要下載SDK,不過我個人傾向於手動集成,所以需要下載SDK。
下載地址:https://docs.jiguang.cn/jpush/resources/
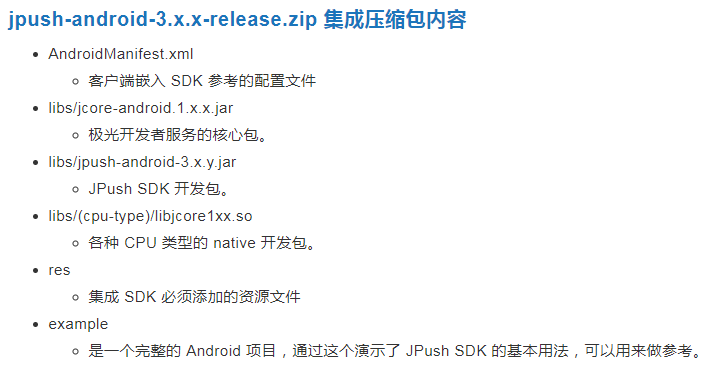
下載後的壓縮包解壓後的目錄:
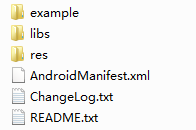
說明:
2.3、集成SDK
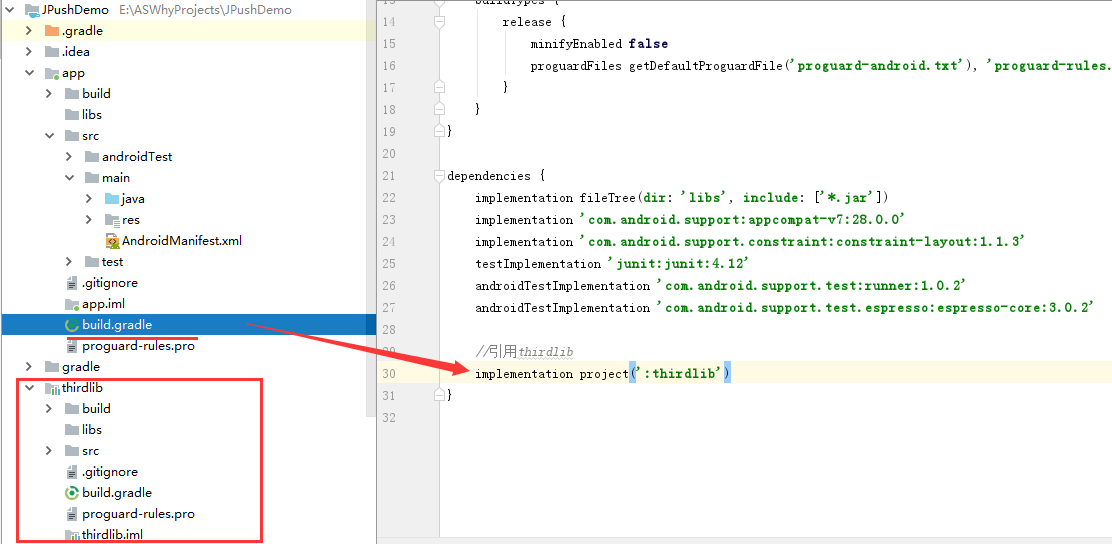
為了便於管理,我在Demo中新建了一個ThirdLib的module,用於集成SDK。
(1)新建ThirdLib的module,併在app的build.gradle中引用
    //引用thirdlib
    implementation project(':thirdlib')
(2)在ThirdLib這個module中集成SDK
- 複製 libs/jcore-android-1.x.x.jar 到工程 libs/ 目錄下。
- 複製 libs/jpush-android-3.x.x.jar 到工程 libs/ 目錄下。
- 複製 libs/(cpu-type)/libjcore1xy.so 到你的工程中存放對應 cpu 類型的目錄下(使用 jniLibs 文件夾導入 so 文件,則僅需將所有 cpu 類型的文件夾拷進去)。
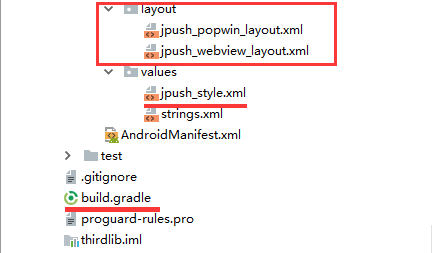
- 複製 res/ 中 drawable-hdpi, layout, values 文件夾中的資源文件到你的工程中 res/ 對應同名的目錄下。
- 定義沒有陰影和漸變色的 jpush_notification_icon 資源文件並添加到drawable-hdpi目錄下(若沒有 res/drawable-xxxx/jpush_notification_icon 這個資源預設使用應用圖標作為通知 icon,在 5.0 以上系統將應用圖標作為 statusbar icon 可能顯示不正常)。
因為是在thirdlib這個module中集成jar包,所以還需要在thirdlib這個module的build.gradle文件中引用libs目錄下的jar包。

apply plugin: 'com.android.library'

android {
    compileSdkVersion 28


    defaultConfig {
        minSdkVersion 16
        targetSdkVersion 28
        versionCode 1
        versionName "1.0"

        testInstrumentationRunner "android.support.test.runner.AndroidJUnitRunner"

    }

    buildTypes {
        release {
            minifyEnabled false
            proguardFiles getDefaultProguardFile('proguard-android.txt'), 'proguard-rules.pro'
        }
    }

}

dependencies {
    implementation fileTree(dir: 'libs', include: ['*.jar'])

    implementation 'com.android.support:appcompat-v7:28.0.0'
    testImplementation 'junit:junit:4.12'
    androidTestImplementation 'com.android.support.test:runner:1.0.2'
    androidTestImplementation 'com.android.support.test.espresso:espresso-core:3.0.2'

    //極光推送SDK
    api files('libs/jcore-android-1.2.6.jar')
    api files('libs/jpush-android-3.1.8.jar')
}
(3)配置 AndroidManifest.xml【註意是app這個module中的,不是thirdlib這個module中的】

註意下麵標記橙色代碼:
<?xml version="1.0" encoding="utf-8"?>
<manifest xmlns:android="http://schemas.android.com/apk/res/android"
          package="com.why.project.jpushdemo">

    <!-- ======================極光推送SDK====================== -->
    <!-- Required -->
    <permission
        android:name="${applicationId}.permission.JPUSH_MESSAGE"
        android:protectionLevel="signature" />

    <!-- Required  一些系統要求的許可權,如訪問網路等-->
    <uses-permission android:name="${applicationId}.permission.JPUSH_MESSAGE" />
    <uses-permission android:name="android.permission.RECEIVE_USER_PRESENT" />
    <uses-permission android:name="android.permission.INTERNET" />
    <uses-permission android:name="android.permission.READ_PHONE_STATE" />
    <uses-permission android:name="android.permission.WRITE_EXTERNAL_STORAGE" />
    <uses-permission android:name="android.permission.READ_EXTERNAL_STORAGE" />
    <!--(必須需要,否則設置別名失敗)-->
    <uses-permission android:name="android.permission.WRITE_SETTINGS" />
    <!--(必須需要,否則設置別名失敗)-->
    <uses-permission android:name="android.permission.MOUNT_UNMOUNT_FILESYSTEMS" />
    <uses-permission android:name="android.permission.ACCESS_NETWORK_STATE" />
    <uses-permission android:name="android.permission.ACCESS_WIFI_STATE" />

    <!-- Optional for location -->
    <uses-permission android:name="android.permission.VIBRATE" />
    <uses-permission android:name="android.permission.SYSTEM_ALERT_WINDOW" /> <!-- 用於開啟 debug 版本的應用在6.0 系統上 層疊視窗許可權 -->
    <uses-permission android:name="android.permission.ACCESS_COARSE_LOCATION" />
    <uses-permission android:name="android.permission.CHANGE_WIFI_STATE" />
    <uses-permission android:name="android.permission.ACCESS_FINE_LOCATION" />
    <uses-permission android:name="android.permission.ACCESS_LOCATION_EXTRA_COMMANDS" />
    <uses-permission android:name="android.permission.CHANGE_NETWORK_STATE" />
    <uses-permission android:name="android.permission.GET_TASKS" />


    <application
        android:allowBackup="true"
        android:icon="@mipmap/ic_launcher"
        android:label="@string/app_name"
        android:roundIcon="@mipmap/ic_launcher_round"
        android:supportsRtl="true"
        android:theme="@style/AppTheme">
        <activity android:name=".MainActivity">
            <intent-filter>
                <action android:name="android.intent.action.MAIN"/>

                <category android:name="android.intent.category.LAUNCHER"/>
            </intent-filter>
        </activity>

        <!-- ======================極光推送SDK========================== -->
        <!-- 狀態通知欄需要打開的Activity -->
        <activity android:name="com.why.project.jpushdemo.jpush.JpushActivity"
                  android:exported="false">
            <intent-filter>
                <action android:name="jpush.testAction" />
                <category android:name="jpush.testCategory" />
            </intent-filter>
        </activity>

        <!-- Rich push 核心功能 since 2.0.6-->
        <activity
            android:name="cn.jpush.android.ui.PopWinActivity"
            android:theme="@style/MyDialogStyle"
            android:exported="false">
        </activity>

        <!-- Required SDK核心功能-->
        <activity
            android:name="cn.jpush.android.ui.PushActivity"
            android:configChanges="orientation|keyboardHidden"
            android:theme="@android:style/Theme.NoTitleBar"
            android:exported="false">
            <intent-filter>
                <action android:name="cn.jpush.android.ui.PushActivity" />
                <category android:name="android.intent.category.DEFAULT" />
                <category android:name="${applicationId}" />
            </intent-filter>
        </activity>

        <!-- Required SDK 核心功能-->
        <!-- 可配置android:process參數將PushService放在其他進程中 -->
        <service
            android:name="cn.jpush.android.service.PushService"
            android:process=":pushcore"
            android:exported="false">
            <intent-filter>
                <action android:name="cn.jpush.android.intent.REGISTER" />
                <action android:name="cn.jpush.android.intent.REPORT" />
                <action android:name="cn.jpush.android.intent.PushService" />
                <action android:name="cn.jpush.android.intent.PUSH_TIME" />
            </intent-filter>
        </service>
        <!-- since 3.0.9 Required SDK 核心功能-->
        <provider
            android:authorities="${applicationId}.DataProvider"
            android:name="cn.jpush.android.service.DataProvider"
            android:process=":pushcore"
            android:exported="false"
            />

        <!-- since 1.8.0 option 可選項。用於同一設備中不同應用的JPush服務相互拉起的功能。 -->
        <!-- 若不啟用該功能可刪除該組件,將不拉起其他應用也不能被其他應用拉起 -->
        <service
            android:name="cn.jpush.android.service.DaemonService"
            android:enabled="true"
            android:exported="true">
            <intent-filter>
                <action android:name="cn.jpush.android.intent.DaemonService" />
                <category android:name="${applicationId}" />
            </intent-filter>

        </service>
        <!-- since 3.1.0 Required SDK 核心功能-->
        <provider
            android:authorities="${applicationId}.DownloadProvider"
            android:name="cn.jpush.android.service.DownloadProvider"
            android:exported="true"
            />
        <!-- Required SDK核心功能-->
        <receiver
            android:name="cn.jpush.android.service.PushReceiver"
            android:enabled="true"
            android:exported="false">
            <intent-filter android:priority="1000">
                <action android:name="cn.jpush.android.intent.NOTIFICATION_RECEIVED_PROXY" />   <!--Required  顯示通知欄 -->
                <category android:name="${applicationId}" />
            </intent-filter>
            <intent-filter>
                <action android:name="android.intent.action.USER_PRESENT" />
                <action android:name="android.net.conn.CONNECTIVITY_CHANGE" />
            </intent-filter>
            <!-- Optional -->
            <intent-filter>
                <action android:name="android.intent.action.PACKAGE_ADDED" />
                <action android:name="android.intent.action.PACKAGE_REMOVED" />

                <data android:scheme="package" />
            </intent-filter>
        </receiver>

        <!-- Required SDK核心功能-->
        <receiver android:name="cn.jpush.android.service.AlarmReceiver" android:exported="false"/>

        <!-- User defined.  For test only  用戶自定義的廣播接收器-->
        <receiver
            android:name="com.why.project.jpushdemo.jpush.JpushReceiver"
            android:exported="false"
            android:enabled="true">
            <intent-filter>
                <action android:name="cn.jpush.android.intent.REGISTRATION" /> <!--Required  用戶註冊SDK的intent-->
                <action android:name="cn.jpush.android.intent.MESSAGE_RECEIVED" /> <!--Required  用戶接收SDK消息的intent-->
                <action android:name="cn.jpush.android.intent.NOTIFICATION_RECEIVED" /> <!--Required  用戶接收SDK通知欄信息的intent-->
                <action android:name="cn.jpush.android.intent.NOTIFICATION_OPENED" /> <!--Required  用戶打開自定義通知欄的intent-->
                <action android:name="cn.jpush.android.intent.CONNECTION" /><!-- 接收網路變化 連接/斷開 since 1.6.3 -->
                <category android:name="${applicationId}" />
            </intent-filter>
        </receiver>

        <!-- User defined.  For test only  用戶自定義接收消息器,3.0.7開始支持,目前新tag/alias介面設置結果會在該廣播接收器對應的方法中回調-->
        <receiver android:name="com.why.project.jpushdemo.jpush.MyJPushMessageReceiver">
            <intent-filter>
                <action android:name="cn.jpush.android.intent.RECEIVE_MESSAGE" />
                <category android:name="${applicationId}"></category>
            </intent-filter>
        </receiver>
        <!-- Required  . Enable it you can get statistics data with channel -->
        <meta-data android:name="JPUSH_CHANNEL" android:value="developer-default"/>
        <meta-data android:name="JPUSH_APPKEY" android:value="9fed5bcb7b9b87413678c407" /> <!--  </>值來自開發者平臺取得的AppKey-->

    </application>

</manifest>
(4)在項目中添加jpush包中的文件
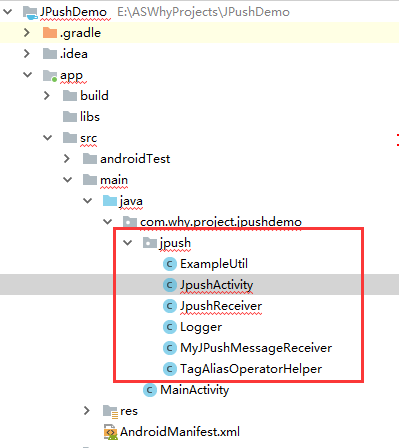
其中,關鍵的是JpushActivity和JpushReceiver這兩個文件。
JpushReceiver:主要用於點開通知欄,判斷跳轉打開的界面

JpushActivity:主要用於展現點擊通知打開的界面;
package com.why.project.jpushdemo.jpush;

import android.content.Context;
import android.content.Intent;
import android.content.res.Resources;
import android.os.Bundle;
import android.support.v7.app.AppCompatActivity;
import android.support.v7.widget.Toolbar;
import android.view.KeyEvent;
import android.view.View;
import android.widget.TextView;

import com.why.project.jpushdemo.R;

import org.json.JSONException;
import org.json.JSONObject;

import cn.jpush.android.api.JPushInterface;

/**
 * Used 極光推送點開通知後打開的界面
 * 和WebViewPreviewActivity共用一個佈局文件
 * 需要先檢查是否已經登錄,如果沒有登錄,直接登錄即可,不需要返回到登錄界面了
 * 極光推送SDK
 */
public class JpushActivity extends AppCompatActivity {
    private static final String TAG = JpushActivity.class.getSimpleName();

    /**從登錄界面打開的標記(傳遞參數用)*/
    public static final String EXTRA_ONLOGIN = "onlogin";

    /*Jpush傳遞過來的參數*/
    private Bundle jPushBundle;
    /**通知標題*/
    private String jPushTitle;
    /**通知內容*/
    private String jPushContent;
    /**通知附加欄位*/
    private String jPushExtraJson;
    /**通知id值*/
    private int jPushId;

    //展現在導航欄上的標題
    private String bundle_title;
    //網頁url地址
    private String bundle_url;

    /**標記是否從登錄界面打開的狀態值*/
    private boolean bundle_onlogin = false;

    private Context mContext;

    private Toolbar mToolbar;

    private MyWebView myWebView;

    @Override
    protected void onCreate(Bundle savedInstanceState) {
        super.onCreate(savedInstanceState);
        setContentView(R.layout.activity_webviewpreview);

        mContext = this;

        //初始化控制項
        initViews();
        //初始化數據
        initData();
        initToolBar();//初始化toolbar
    }

    @Override
    public void onDestroy()
    {
        //銷毀webview控制項
        myWebView.removeAllViews();
        myWebView.destroy();
        super.onDestroy();
    }

    /**
     * 初始化view
     */
    private void initViews() {
        myWebView = (MyWebView)findViewById(R.id.id_webView);
        myWebView.setCanBackPreviousPage(true,JpushActivity.this);//可以返回上一頁
    }

    /**
     * 初始化數據【接收點擊通知欄傳過來的數據:通知、自定義消息兩種(這裡只需要處理通知的即可)】
     */
    private void initData() {
        Intent intent = getIntent();
        if (null != intent) {
            jPushBundle = getIntent().getExtras();
            jPushTitle = jPushBundle.getString(JPushInterface.EXTRA_NOTIFICATION_TITLE);//保存伺服器推送下來的通知的標題
            jPushContent = jPushBundle.getString(JPushInterface.EXTRA_ALERT);//保存伺服器推送下來的通知內容
            jPushExtraJson = jPushBundle.getString(JPushInterface.EXTRA_EXTRA);//保存伺服器推送下來的附加欄位。這是個 JSON 字元串
            jPushId = jPushBundle.getInt(JPushInterface.EXTRA_NOTIFICATION_ID);//SDK 1.3.5 以上版本支持,通知欄的Notification ID,可以用於清除Notification

            bundle_onlogin = jPushBundle.getBoolean(EXTRA_ONLOGIN);
        }

        if(!jPushExtraJson.equals("")){
            try {
                JSONObject extraJsonObj = new JSONObject(jPushExtraJson);
                if(extraJsonObj.has("from")){
                    extraJsonObj = new JSONObject(extraJsonObj.getString("from"));
                }
                if(!extraJsonObj.getString("exTraTitle").equals("")){
                    //獲取標題
                    bundle_title = extraJsonObj.getString("exTraTitle");
                }
                if(!extraJsonObj.getString("url").equals("")){
                    //獲取網頁地址
                    bundle_url = extraJsonObj.getString("url");
                }
            } catch (Resources.NotFoundException e) {
                // TODO Auto-generated catch block
                e.printStackTrace();
            } catch (JSONException e) {
                // TODO Auto-generated catch block
                e.printStackTrace();
            }
        }

        if(! bundle_onlogin){//如果是從登錄界面打開的話,那麼不用驗證了
            initCheckLoginState();//驗證是否需要重新登錄
        }else{
            loadWebUrl();//打開網頁
        }

    }

    private void initToolBar() {
        mToolbar = findViewById(R.id.toolbar_base);
        mToolbar.setTitle("");//這樣設置的話,自帶的標題就不會顯示
        //設置自定義的標題(居中)
        TextView toolBarTitle = mToolbar.findViewById(R.id.toolbarTitle);
        toolBarTitle.setText(bundle_title);
        setSupportActionBar(mToolbar);//由於toolbar只是一個普通控制項,我們將ToolBar設置為ActionBar
        //設置導航圖標要在setSupportActionBar方法之後
        mToolbar.setNavigationIcon(R.drawable.nav_back);//設置為空的話,就會不顯示左側的圖標
        //對NavigationIcon添加點擊
        mToolbar.setNavigationOnClickListener(new View.OnClickListener() {
            @Override
            public void onClick(View v) {
                //返回到首頁界面(重新登錄的情況下)或者直接關閉自己(不需要重新登錄的情況下)
                backHomeOrFinish();
            }
        });
    }

    /**
     * 點擊返回鍵
     * event.getRepeatCount() == 0:點後退鍵的時候,為了防止點得過快,觸發兩次後退事件,故做此設置。
     */
    @Override
    public boolean onKeyDown(int keyCode, KeyEvent event) {
        // TODO Auto-generated method stub
        if (keyCode == KeyEvent.KEYCODE_BACK && event.getRepeatCount() == 0) {
            //返回到首頁界面(如果是從登錄界面打開的)或者關閉自己(從通知打開的)
            backHomeOrFinish();
        }
        return super.onKeyDown(keyCode, event);
    }


    //返回功能
    private void backHomeOrFinish() {
        if (bundle_onlogin) {
            ActivityJump.NormalJumpAndFinish(JpushActivity.this, HomeActivity.class);
        } else {
            ActivityJump.Back(this);
        }
    }


    /**
     * 網路請求檢查登錄狀態,主要判斷是否線上
     */
    private void initCheckLoginState() {
        if(result.indexOf("alert(") != -1){
            //登陸身份失效,請重新登陸
            ActivityJump.BundleJumpAndFinish(JpushActivity.this, LoginActivity.class,jPushBundle);
        }
        else{
            loadWebUrl();//載入網頁
        }
    }

    /**
     * 載入URL地址
     */
    private void loadWebUrl() {
        syncCookie(JpushActivity.this, ServerApi.SERVER_URL);

        if (!bundle_url.equals("")) {
            myWebView.loadWebUrl(ServerApi.SERVER_URL + bundle_url);
        } else {
            myWebView.loadUrl("about:blank");//載入一個空白頁
        }
    }

    /**
     * Sync Cookie
     */
    public static void syncCookie(Context context, String url){
        //參考本博客的《okhttputils【 Android 一個改善的okHttp封裝庫】使用(二)》
    }
}
(5)初始化SDK
在MyApplication中執行
package com.why.project.jpushdemo;

import android.app.Application;

import cn.jpush.android.api.JPushInterface;

/**
 * Created by HaiyuKing
 * Used
 */
public class MyApplication extends Application {

    @Override
    public void onCreate() {
        super.onCreate();

        initJpush();//極光推送SDK初始化
    }

    //極光推送SDK
    private void initJpush() {
        JPushInterface.setDebugMode(true);// 設置開啟日誌,發佈時請關閉日誌
        JPushInterface.init(this);// 初始化 JPush
    }
}
三、使用方法【僅供參考】
package com.why.project.jpushdemo;

import android.content.Context;
import android.os.Bundle;
import android.support.v7.app.AppCompatActivity;
import android.text.TextUtils;

import com.why.project.jpushdemo.jpush.ExampleUtil;
import com.why.project.jpushdemo.jpush.TagAliasOperatorHelper;

import cn.jpush.android.api.JPushInterface;

public class MainActivity extends AppCompatActivity {
    private static final String TAG = MainActivity.class.getSimpleName();

    private Context mContext;

    @Override
    protected void onCreate(Bundle savedInstanceState) {
        super.onCreate(savedInstanceState);
        setContentView(R.layout.activity_main);

        mContext = this;

        /*=======================================極光推送SDK相關=============================================*/
        //請求伺服器刪除alias,然後再重新註冊alias,這樣實現一個別名只能綁定一臺設備
        updateJpushDeviceId();
    }

    /*=======================================極光推送SDK相關=============================================*/

    /**
     * 更新設備id介面
     */
    private void updateJpushDeviceId() {
        String regId = JPushInterface.getRegistrationID(mContext);//可能不會那麼快就能獲得resId值,所以如果極光推送沒有初始化好,那麼這裡獲取到的是null
        requestDeviceId(regId);//判斷是請求介面還是彈出對話框
    }

    //請求介面存儲設備id或者token的方法
    private void requestDeviceId(String regId) {

        //首要條件是設備id值或者token值不為空,否則下麵的判斷沒有意義了
        //如果沒有設置過別名,或者則需要設置別名
        //如果伺服器上的deviceID值是空值,表明當前用戶還沒有綁定任何設備,則直接請求介面,不需要彈出對話框;
        //如果伺服器上的deviceID值不為空,並且客戶端獲取的設備id值和伺服器上的deviceID值相同,則不需要彈出對話框,直接請求介面(這個是卸載重新安裝的情況)
        //如果伺服器上的deviceid值不為空,並且客戶端獲取的設備id值和伺服器上的deviceID值不同,則需要彈出對話框(這個是換設備的情況)
        if (!TextUtils.isEmpty(regId)) {
            //如果已經設置過別名(存儲過了設備id值)了,但是當前的別名(設備id值)和伺服器上的不一致,則需要重新設置別名(存儲設備id值)(這個是其他設備上登錄的情況)
        }

        //設置極光推送別名
        setAlias(PreferencesUtils.getString(mContext,Globals.USERNAME_KEY));
    }


    // 這是來自 JPush Example 的設置別名的 Activity 里的代碼。一般 App 的設置的調用入口,在任何方便的地方調用都可以。
    private void setAlias(String alias) {
        if (TextUtils.isEmpty(alias)) {
            ToastUtil.showShortToast(getResources().getString(R.string.error_alias_empty));//alias別名不能為空
            return;
        }
        if (!ExampleUtil.isValidTagAndAlias(alias)) {
            ToastUtil.showShortToast(getResources().getString(R.string.error_tag_gs_empty));//格式不對
            return;
        }

        // 調用 JPush 介面來設置別名。
        TagAliasOperatorHelper.TagAliasBean tagAliasBean = new TagAliasOperatorHelper.TagAliasBean();
        tagAliasBean.action = TagAliasOperatorHelper.ACTION_SET;
        tagAliasBean.alias = alias;
        tagAliasBean.isAliasAction = true;
        TagAliasOperatorHelper.getInstance().handleAction(MyApplication.getAppContext(), TagAliasOperatorHelper.sequence++, tagAliasBean);
        //已經設置了別名
        String aliasKey = Globals.UPDATEJPUSHRESID_KEY;
        PreferencesUtils.putBoolean(mContext,aliasKey,true);
    }
}
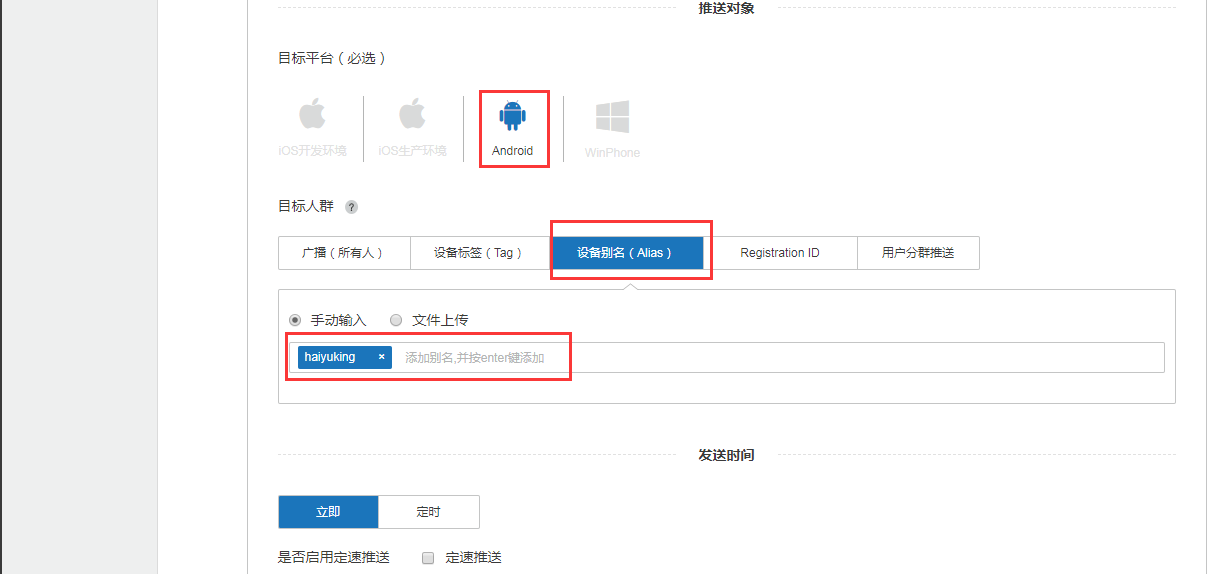
四、發送消息



混淆配置
#====極光推送SDK====
-dontoptimize
-dontpreverify

-dontwarn cn


