
Rsync + sersync 實時同步備份 一 Rsync + Sersync 實時同步介紹 1.Rsync 服務搭建介紹 雲機上搭建Rsync server,在本地搭建Rsync Clinet. 2. Sersync 服務搭建介紹 在本地伺服器上搭建 Sersync Server 檢測本地的ft ...
Rsync + sersync 實時同步備份
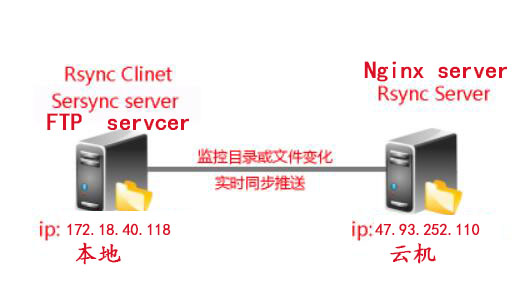
一 Rsync + Sersync 實時同步介紹
1.Rsync 服務搭建介紹
雲機上搭建Rsync server,在本地搭建Rsync Clinet.
2. Sersync 服務搭建介紹
在本地伺服器上搭建 Sersync Server 檢測本地的ftp目錄變化,實時同步到雲機上
二、Rsync編譯安裝
1.檢查本機是否存在
[root@雲機 ~]# rpm -qa rsync
rsync-3.0.6-12.el6.x86_64
2.卸載
[root@雲機 ~]# yum remove rsync
說明:需要安裝最新的版本就需要卸載老版本。
3.下載rsync軟體
[root@雲機 ~]# cd /usr/local/src/
[root@雲機 src]# wget https://download.samba.org/pub/rsync/rsync-3.1.2.tar.gz
4.解壓包
[root@雲機 src]# tar zxvf rsync-3.1.2.tar.gz
5.創建程式安裝目錄,並編譯安裝
[root@雲機 src]# cd rsync-3.1.2
[root@雲機 rsync-3.1.2]# mkdir /usr/local/rsync
[root@雲機 rsync-3.1.2]# ./configure --prefix=/usr/local/rsync
[root@雲機 rsync-3.1.2]# make && make install
6.配置環境變數
[root@雲機 ~]# vim /etc/profile.d/rsync.sh
|
#!/bin/sh |
7.建立軟連接
[root@雲機 ~]# ln -s /usr/local/rsync/bin/rsync /usr/bin/rsync
8.查看當前版本
[root@雲機 ~]# rsync --version
rsync version 3.1.2 protocol version 31
三、 Rsync server配置
1.編輯配置文件
[root@雲機 ~]# vim /etc/ rsyncd.conf
|
uid = rsync |
2.創建密碼文件
[root@雲機 ~]# vim /etc/rsyncd.password
|
rsync_bakup:4297f44b13955235245b2497399d7a93 |
說明:定義格式 用戶:密碼
3.修改密碼文件許可權
[root@雲機 ~]# chmod 600 /etc/rsyncd.password
4.創建Rsync server服務啟動的系統賬戶
[root@雲機 ~]# useradd rsync -M -s /bin/nologin
5.創建數據存放目錄
[root@雲機 ~]# mkdir -p /data/bakup
6.修改目錄許可權
[root@雲機 ~]# chown rsync.rsync /data/bakup
7.啟動服務
[root@雲機 ~]# rsync --daemon
說明:如果配置文件路徑不是/etc/rsyncd.conf,啟動是需要使用“–config” 參數指定配置文件。
8.查看服務是否啟動
[root@雲機 ~]# ps axu |grep rsync
root 9198 0.0 0.0 107652 672 ? Ss 19:41 0:00 rsync --daemon --config /etc/rsync/rsyncd.conf
root 9205 0.0 0.0 103308 848 pts/0 S+ 19:44 0:00 grep rsync
[root@雲機 ~]# netstat -nlp |grep 873
tcp 0 0 0.0.0.0:873 0.0.0.0:* LISTEN 9198/rsync
tcp 0 0 :::873 :::* LISTEN 9198/rsync
9.配置rsync開機啟動:
$ vi /etc/rc.local
# 在 rc.local 文件的底部,新加一行代碼,代碼如下
/usr/local/rsync/bin/rsync --daemon
# chmod +x /etc/rc.d/rc.local #否則重啟不執行
四、客戶端配置
1.創建密碼文件
[root@本地 ~]# vim /etc/rsyncd.password
|
4297f44b13955235245b2497399d7a93 |
2.修改文件許可權
[root@本地 ~]# chmod 600 /etc/rsyncd.password
3.安裝客戶端
[root@本地 ~]# yum -y install rsync
說明:如果客戶端存在,跳過該步驟。
五、測試
1.客戶端上推送數據
[root@本地 ~]# ll test.txt
-rw-r--r--. 1 kry kry 13 Mar 24 15:55 test.txt
[root@本地 ~]# rsync -avzP test.txt [email protected]::bakup --password-file=/etc/rsyncd.password
sending incremental file list
test.txt
11 100% 0.00kB/s 0:00:00 (xfer#1, to-check=0/1)
sent 91 bytes received 27 bytes 236.00 bytes/sec
total size is 11 speedup is 0.09
2.服務端查看文件是否推送成功
[root@雲機 bakup]# ll
total 4
-rw-r--r--. 1 rsync rsync 13 Mar 24 15:55 test.txt
3.從服務端拉取數據
[root@本地 ~]# ll /tmp/
total 0
[root@本地 ~]# rsync -avzP [email protected]::bakup /tmp --password-file=/etc/rsyncd.password
receiving incremental file list
./
test.txt
13 100% 12.70kB/s 0:00:00 (xfer#1, to-check=7/17)
sent 64 bytes received 419 bytes 966.00 bytes/sec
total size is 13981 speedup is 28.95
4.查看拉取的文件
[root@本地 ~]# ll /tmp/
total 4
-rw-r--r--. 1 kry kry 13 Mar 24 15:55 test.txt
說明:文件的屬主組跟推送時保持一直。
六、安裝配置sersync
1.下載地址
[root@本地 ~]# cd /usr/local/src/
[root@本地 src]# wget https://storage.googleapis.com/google-code-archive-downloads/v2/code.google.com/sersync/sersync2.5.4_64bit_binary_stable_final.tar.gz
2.解壓軟體包
[root@本地 src]# tar zxvf sersync2.5.4_64bit_binary_stable_final.tar.gz
3.創建目錄結構
[root@本地 src]# mkdir /usr/local/sersync
[root@本地 src]# mkdir /usr/local/sersync/conf
[root@本地 src]# mkdir /usr/local/sersync/logs
[root@本地 src]# mkdir /usr/local/sersync/bin
4.移動文件
[root@本地 src]# mv GNU-Linux-x86/sersync2 /usr/local/sersync/bin/
[root@本地 src]# mv GNU-Linux-x86/confxml.xml /usr/local/sersync/conf
5.配置環境變數
[root@本地 conf]# vim /etc/profile.d/sersync.sh
#!/bin/bash
export PATH=$PATH:/usr/local/sersync/bin
[root@本地 conf]# source /etc/profile.d/sersync.sh
6.配置
[root@本地 src]# cd /usr/local/sersync/conf
[root@本地 conf]# cp confxml.xml confxml.xml.bak
[root@本地 conf]# vim confxml.xml
|
<?xml
version="1.0" encoding="ISO-8859-1"?> |
7.啟動Sersync
[root@本地 conf]# sersync2 -d -r -o /usr/local/sersync/conf/confxml.xml
說明:還有些其他參數,使用“-h”選項查看。
8.設置sersync監控開機自動執行
#vi /etc/rc.d/rc.local #編輯,在最後添加一行
/usr/local/sersync/bin/sersync2 -d -r -o /usr/local/sersync/conf/confxml.xml #設置開機自動運行腳本
# chmod +x /etc/rc.d/rc.local #否則重啟不執行
七、測試
1.創建測試文件
[root@本地 ~]# cd /data/bakup/
[root@本地 bakup]# for f in `seq 10`;do touch $f;done
2.檢查數據是否同步Rsync server
[root@雲機 ~]# cd /data/bakup/
[root@雲機 ~]# ll
八、Rsync服務常見問題彙總講解:
1 客戶端的錯誤現象:No route to host
rsync服務端開啟的iptables防火牆
[root@nfs01 tmp]# rsync -avz /etc/hosts [email protected]::backup
rsync: failed to connect to 172.16.1.41: No route to host (113)
rsync error: error in socket IO (code 10) at clientserver.c(124) [sender=3.0.6]
異常問題解決:
關閉rsync服務端的防火牆服務(iptables)
[root@backup mnt]# /etc/init.d/iptables stop
iptables: Setting chains to policy ACCEPT: filter [ OK ]
iptables: Flushing firewall rules: [ OK ]
iptables: Unloading modules: [ OK ]
[root@backup mnt]# /etc/init.d/iptables status
iptables: Firewall is not running.
==============================================================================================
2 ERROR: The remote path must start with a module name not a /
rsync客戶端執行rsync命令錯誤:
客戶端的錯誤現象:
[root@nfs01 tmp]# rsync -avz /etc/hosts [email protected]::/backup
ERROR: The remote path must start with a module name not a /
rsync error: error starting client-server protocol (code 5) at main.c(1503) [sender=3.0.6]
異常問題解決:
rsync命令語法理解錯誤,::/backup是錯誤的語法,應該為::backup(rsync模塊)
==============================================================================================
3 @ERROR: auth failed on module backup
3. @ERROR: auth failed on module oldboy
客戶端的錯誤現象:
[root@nfs01 tmp]# rsync -avz /etc/hosts [email protected]::backup
Password:
@ERROR: auth failed on module backup
rsync error: error starting client-server protocol (code 5) at main.c(1503) [sender=3.0.6]
異常問題解決:
1. 密碼輸入錯誤,用戶名錯誤 #這裡的密碼是你設置的rsync的密碼,千萬別輸錯了!!
2. secrets file = /etc/rsync.password指定的密碼文件和實際密碼文件名稱不一致
3. /etc/rsync.password文件許可權不是600
4. rsync_backup:123456密碼配置文件後面註意不要有空格
5. rsync客戶端密碼文件中只輸入密碼信息即可,不要輸入虛擬認證用戶名稱
==============================================================================================
4 @ERROR: Unknown module 'backup'
4. Unknown module 'backup'
[root@nfs01 tmp]# rsync -avz /etc/hosts [email protected]::backup
@ERROR: Unknown module 'backup'
rsync error: error starting client-server protocol (code 5) at main.c(1503) [sender=3.0.6]
異常問題解決:
1、 /etc/rsyncd.conf配置文件模塊名稱書寫錯誤
2、配置文件中網段限制不對
==============================================================================================
5 Permission denied
[root@nfs01 tmp]# rsync -avz /etc/hosts [email protected]::backup
Password:
sending incremental file list
hosts
rsync: mkstemp ".hosts.5z3AOA" (in backup) failed: Permission denied (13)
sent 196 bytes received 27 bytes 63.71 bytes/sec
total size is 349 speedup is 1.57
rsync error: some files/attrs were not transferred (see previous errors) (code 23) at main.c(1039) [sender=3.0.6]
異常問題解決:
1. 共用目錄的屬主和屬組不正確,不是rsync
2. 共用目錄的許可權不正確,不是755
==============================================================================================
6 chdir failed
[root@nfs01 tmp]# rsync -avz /etc/hosts [email protected]::backup
Password:
@ERROR: chdir failed
rsync error: error starting client-server protocol (code 5) at main.c(1503) [sender=3.0.6]
異常問題解決:
1. 備份存儲目錄沒有建立
2. 建立的備份存儲目錄和配置文件定義不一致
[root@backup backup]# /etc/init.d/xinetd restart
shell-init: error retrieving current directory: getcwd: cannot access parent directories: No such file or directory
Stopping xinetd: [ OK ]
Starting xinetd: shell-init: error retrieving current directory: getcwd: cannot access parent directories: No such file or directory
[ OK ]
說明:如果沒有備份存儲目錄,xinetd服務都不能正確啟動
==============================================================================================
7 invalid uid rsync
[root@nfs01 tmp]# rsync -avz /etc/hosts [email protected]::backup
Password:
@ERROR: invalid uid rsync
rsync error: error starting client-server protocol (code 5) at main.c(1503) [sender=3.0.6]
異常問題解決:
rsync服務對應rsync虛擬用戶不存在了
==============================================================================================
8 客戶端已經配置了密碼文件,但免秘鑰登錄方式,依舊需要輸入密碼
password file must not be other-accessible
[root@nfs01 tmp]# rsync -avz /etc/hosts [email protected]::backup --password-file=/etc/rsync.password
password file must not be other-accessible
continuing without password file
Password:
sending incremental file list
sent 26 bytes received 8 bytes 5.23 bytes/sec
total size is 349 speedup is 10.26
異常問題解決:
rsync客戶端的秘鑰文件也必須是600許可權
==============================================================================================
9 rsync客戶端連接慢問題
錯誤日誌輸出
2017/03/08 20:14:43 [3422] params.c:Parameter() - Ignoring badly formed line in configuration file: ignore errors
2017/03/08 20:14:43 [3422] name lookup failed for 172.16.1.31: Name or service not known
2017/03/08 20:14:43 [3422] connect from UNKNOWN (172.16.1.31)
2017/03/08 20:14:43 [3422] rsync to backup/ from rsync_backup@unknown (172.16.1.31)
2017/03/08 20:14:43 [3422] receiving file list
2017/03/08 20:14:43 [3422] sent 76 bytes received 83 bytes total size 349
正確日誌輸出
2017/03/08 20:16:45 [3443] params.c:Parameter() - Ignoring badly formed line in configuration file: ignore errors
2017/03/08 20:16:45 [3443] connect from nfs02 (172.16.1.31)
2017/03/08 20:16:45 [3443] rsync to backup/ from rsync_backup@nfs02 (172.16.1.31)
2017/03/08 20:16:45 [3443] receiving file list
2017/03/08 20:16:45 [3443] sent 76 bytes received 83 bytes total size 349
異常問題解決:
查看日誌進行分析
==============================================================================================
10 rsync服務沒有正確啟動Connection refused (111)
[root@oldboy-muban ~]# rsync -avz /etc/hosts [email protected]::backup
rsync: failed to connect to 172.16.1.41: Connection refused (111)
rsync error: error in socket IO (code 10) at clientserver.c(124) [sender=3.0.6]
解決 rsync服務沒開啟
[root@oldboy-muban ~]# rsync --daemon
[root@oldboy-muban ~]# ss -lntup |grep rsync
tcp LISTEN 0 5 :::873 :::* users:(("rsync",1434,5))
tcp LISTEN 0 5 *:873 *:* users:(("rsync",1434,4))
[root@oldboy-muban ~]# rsync -avz /etc/hosts [email protected]::backup
Password:
sending incremental file list
hosts
sent 196 bytes received 27 bytes 49.56 bytes/sec
total size is 349 speedup is 1.57
==============================================================================================
11 port 22: Connection refused
環境:本地伺服器集群內部傳輸利用遠程ssh 報錯
利用(telnet 172.16.1.31 22) 排查服務監聽狀態後採取的解決方法
[root@oldboy-muban ~]# rsync /etc/hosts 172.16.1.31:/tmp
ssh: connect to host 172.16.1.31 port 22: Connection refused
rsync: connection unexpectedly closed (0 bytes received so far) [sender]
rsync error: error in rsync protocol data stream (code 12) at io.c(600) [sender=3.0.6]
排錯思路:
[root@oldboy-muban ~]# ping 172.16.1.31
PING 172.16.1.31 (172.16.1.31) 56(84) bytes of data.
64 bytes from 172.16.1.31: icmp_seq=1 ttl=64 time=0.628 ms
64 bytes from 172.16.1.31: icmp_seq=2 ttl=64 time=0.393 ms
64 bytes from 172.16.1.31: icmp_seq=3 ttl=64 time=1.06 ms
64 bytes from 172.16.1.31: icmp_seq=4 ttl=64 time=0.745 ms
[root@oldboy-muban ~]# traceroute 172.16.1.31
traceroute to 172.16.1.31 (172.16.1.31), 30 hops max, 60 byte packets
1 nfs01 (172.16.1.31) 0.597 ms 0.189 ms 0.965 ms
/etc/init.d/iptables status
iptables: Firewall is not running.
[root@backup ~]#
[root@backup ~]# netstat -lntup|grep 22
p 0 0 10.0.0.31:22 0.0.0.0:* LISTEN 1187/sshd
故障原因:無法連接
telnet 172.16.1.31 22
解決方法:
[root@oldboy-backup-41]# vim /etc/ssh/sshd_config
#Port 22
#AddressFamily any
#ListenAddress 10.0.0.31 改為 0.0.0.0
#ListenAddress ::
總結:內網傳輸通過SSH pro 22 表明22埠鏈接不上
==============================================================================================
Rsync服務端排錯思路
m 查看rsync服務配置文件路徑是否正確 /etc/rsyncd.conf
m 查看配置文件例的host allow,host deny,允許的ip網段是否是允許客戶端訪問的ip網段
m 查看配置文件中path參數里的路徑是否存在,許可權是否正確(正常應為配置文件中的UUID參數對應的屬主和組)
m 查看rsync服務是否啟動,埠是否存在 ps -ef netstat -lntup
m 查看iptables防火牆和SELinux是否開啟允許rsync服務通過,也可以關閉
m 查看服務端rsync配置文件里的密碼許可權是否為600 密碼文件格式是否正確,正確格式(用戶名:密碼)文件路徑和配置文件里的secrect files 參數對應
m 如果是推送數據,要查看,配置rsyncd.conf 文件中用戶是否對模塊下目錄有可讀的許可權
==============================================================================================
客戶端排錯思路
m 查看客戶端rsync配置的密碼文件是否為600的許可權,密碼文件格式是否正確,註意:僅需要有密碼,並且和服務端的密碼一致
m 用telnet鏈接rsync伺服器ip地址873埠,查看服務是否啟動(可測試服務端防火牆是否阻擋telnet10.0.0.100 873)
m 客戶端執行命令是 rsync -avzP [email protected]::backup/test/test/ --password-file=/etc/rsync.password
m 此命令要記清楚尤其10.0.0.100::backup/test/處的雙引號及隨後的backup為模塊名稱


