
1、安裝Elasticsearch資料庫 PS:在此之前需首先安裝Java SE環境 下載elasticsearch-6.5.2版本,進入/elasticsearch-6.5.2/bin目錄,雙擊執行elasticsearch.bat 打開瀏覽器輸入http://localhost:9200 顯示以 ...
1、安裝Elasticsearch資料庫
PS:在此之前需首先安裝Java SE環境
下載elasticsearch-6.5.2版本,進入/elasticsearch-6.5.2/bin目錄,雙擊執行elasticsearch.bat 打開瀏覽器輸入http://localhost:9200 顯示以下內容則說明安裝成功

安裝head插件,便於查看管理(還可以用kibana)
首先安裝Nodejs(下載地址https://nodejs.org/en/)
再下載 elasticsearch-head-master包解壓到/elasticsearch-6.5.2/下(鏈接:https://pan.baidu.com/s/1oX9wKuAYrvY2ZRBT0cos6A
提取碼:5ik4)
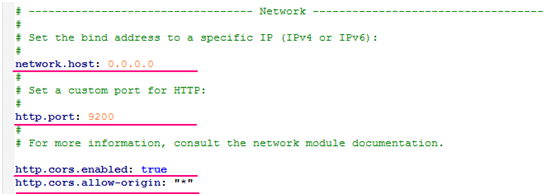
修改配置文件elasticsearch-6.5.2\config\elasticsearch.yml如下:
進入elasticsearch-head-master目錄下執行 npm install -g grunt-cli,再執行npm install 安裝依賴
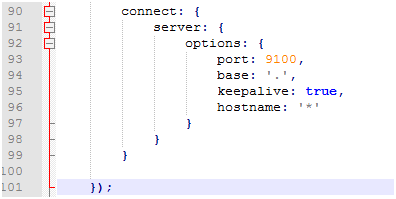
在elasticsearch-head-master目錄下找到Gruntfile.js文件修改伺服器監聽地址如下:
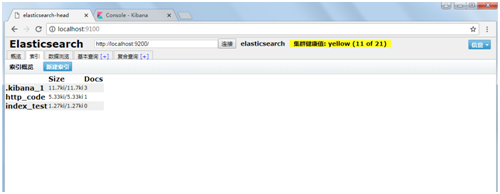
執行grunt server命令啟動head服務

訪問地址http://localhost:9100/即可訪問head管理頁面
2、將json文件寫入ES資料庫(py腳本如下)
# -*- coding: UTF-8 -*-

from itertools import islice
import json , sys
from elasticsearch import Elasticsearch , helpers
import threading

_index = 'indextest'   #修改為索引名
_type = 'string'     #修改為類型名
es_url = 'http://192.168.116.1:9200/'  #修改為elasticsearch伺服器

reload(sys)
sys.setdefaultencoding('utf-8')
es = Elasticsearch(es_url)
es.indices.create(index=_index, ignore=400)
chunk_len = 10
num = 0

def bulk_es(chunk_data):
    bulks=[]
    try:
        for i in xrange(chunk_len):
            bulks.append({
                    "_index": _index,
                    "_type": _type,
                    "_source": chunk_data[i]
                })
        helpers.bulk(es, bulks)
    except:
        pass

with open(sys.argv[1]) as f:
    while True:
        lines = list(islice(f, chunk_len))
        num =num +chunk_len
        sys.stdout.write('\r' + 'num:'+'%d' % num)
        sys.stdout.flush()
        bulk_es(lines)
        if not lines:
            print "\n"
            print "task has finished"
            break


