從0到1:使用Caliburn.Micro(WPF和MVVM)開發簡單的計算器 之前時間一直在使用Caliburn.Micro這種應用了MVVM模式的WPF框架做開發,是時候總結一下了。 Caliburn.Micro(Caliburn.Micro框架概述 https://blog.csdn.net/ ...
從0到1:使用Caliburn.Micro(WPF和MVVM)開發簡單的計算器
之前時間一直在使用Caliburn.Micro這種應用了MVVM模式的WPF框架做開發,是時候總結一下了。
Caliburn.Micro(Caliburn.Micro框架概述 - https://blog.csdn.net/lzuacm/article/details/78886436) 是一個輕量級的WPF框架,簡化了WPF中的不少用法,推薦做WPF開發時優先使用。
真正快速而熟練地掌握一門技術就可以嘗試著用最快的速度去構建一個玩具項目(Toy project),然後不斷地優化、重構之。比如本文將介紹如何使用Caliburn.Micro v3.2開發出一個簡單的計算器,裡面用到了C#中的async非同步技術,Caliburn.Micro中的Conductor等等~
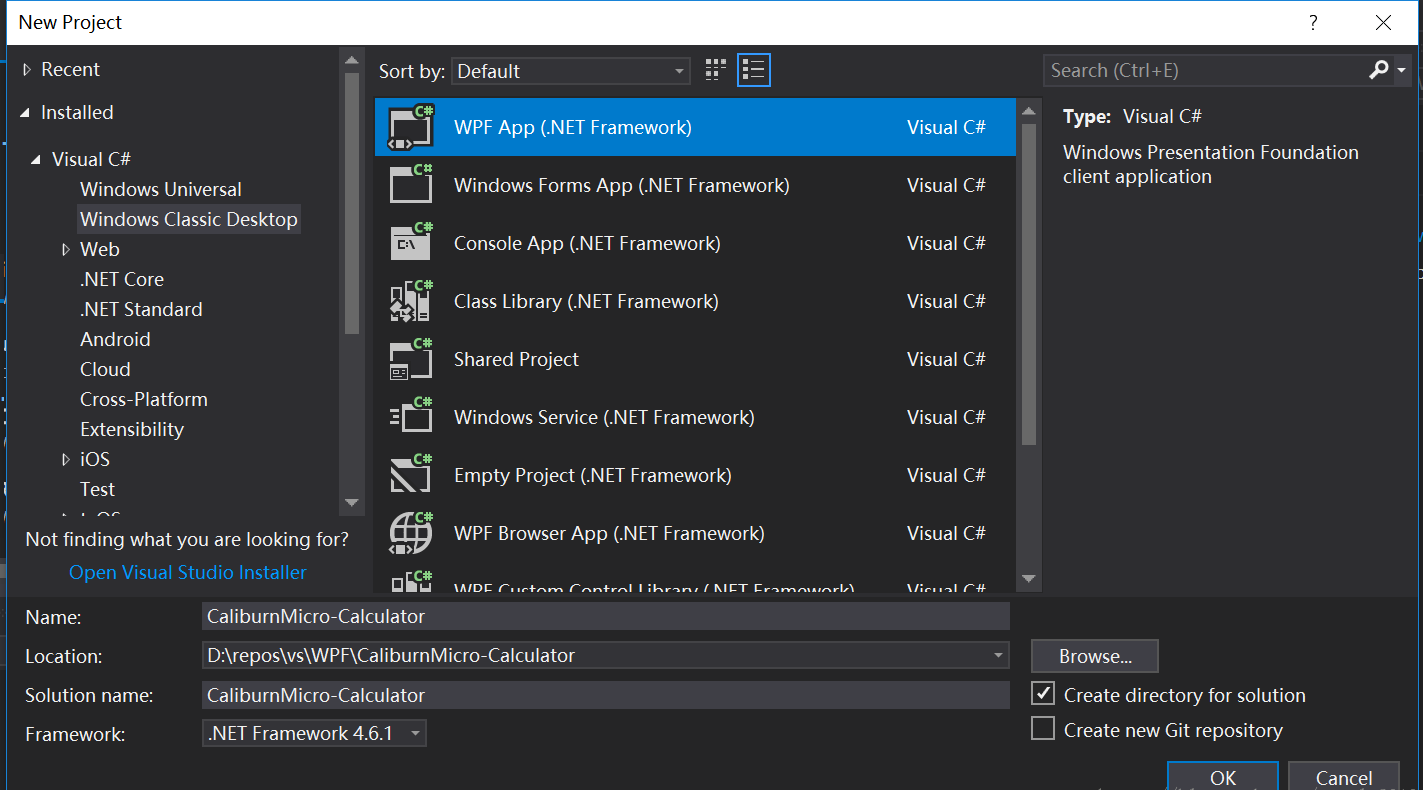
Step 1: 在VS中創建WPF項目

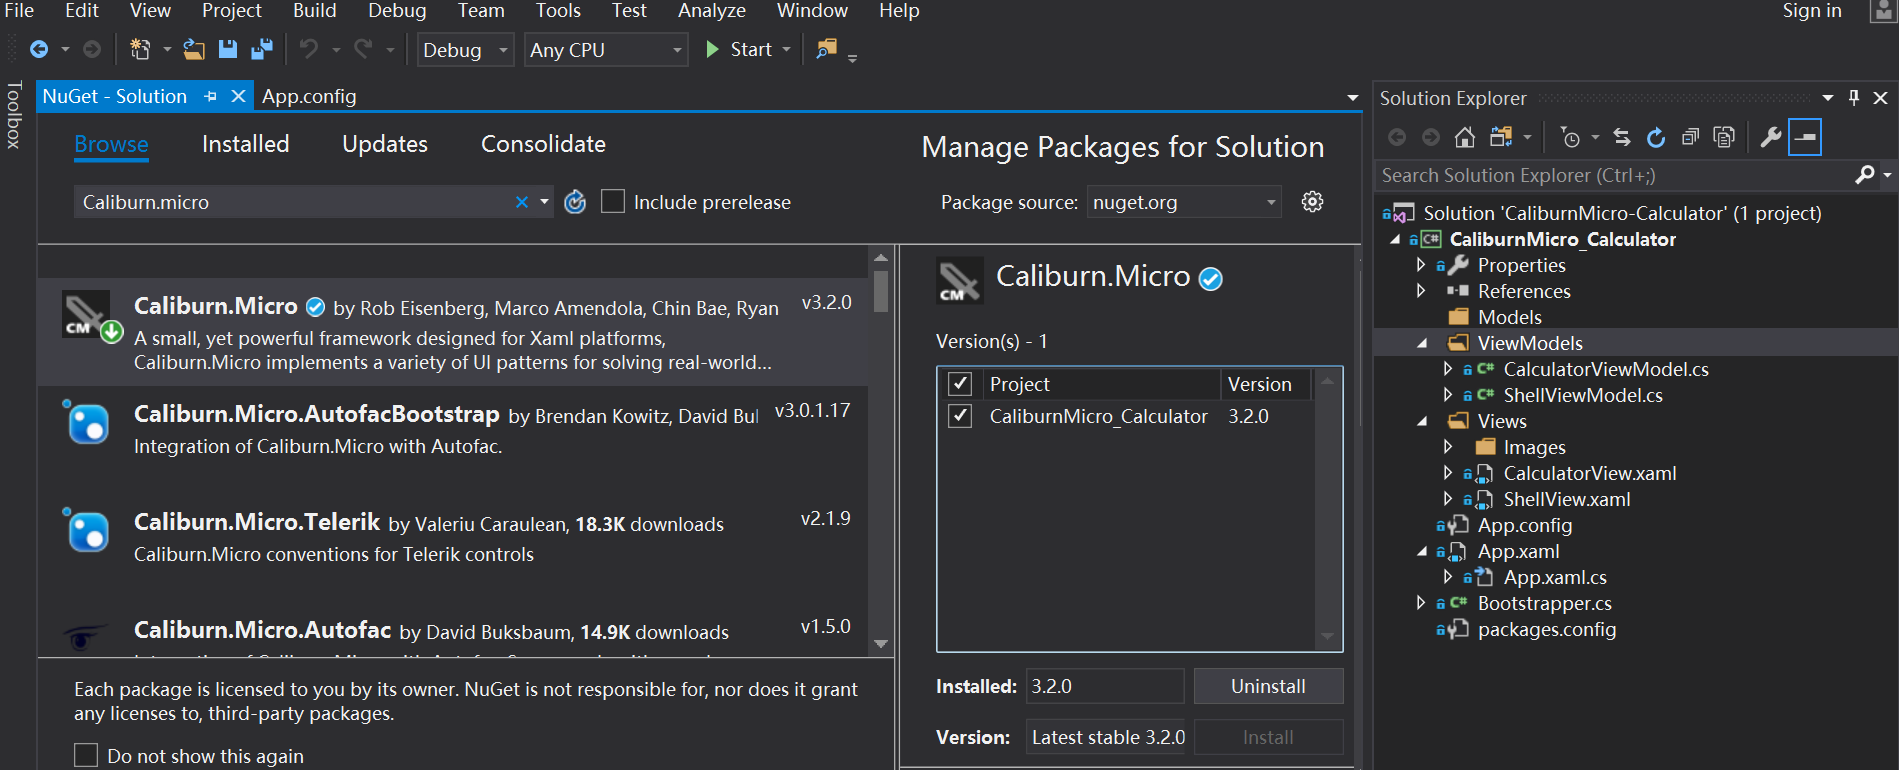
Step 2: 使用NuGet包管理工具為當前項目安裝Caliburn.Micro
對於Caliburn.Micro 1.x和2.x版,只能使用.dll,需手動給項目加Reference。而3.0以後的版本可使用NuGet包管理工具來管理,安裝和卸載既方便又徹底,推薦使用。(ps: NuGet之於Visual Studio(C++, C#等), 猶pip之於Python, npm之於node, maven之於Java, gem之於Ruby等等)

Step 3: 框架搭建
- 刪除項目根目錄下的MainWindow.xaml
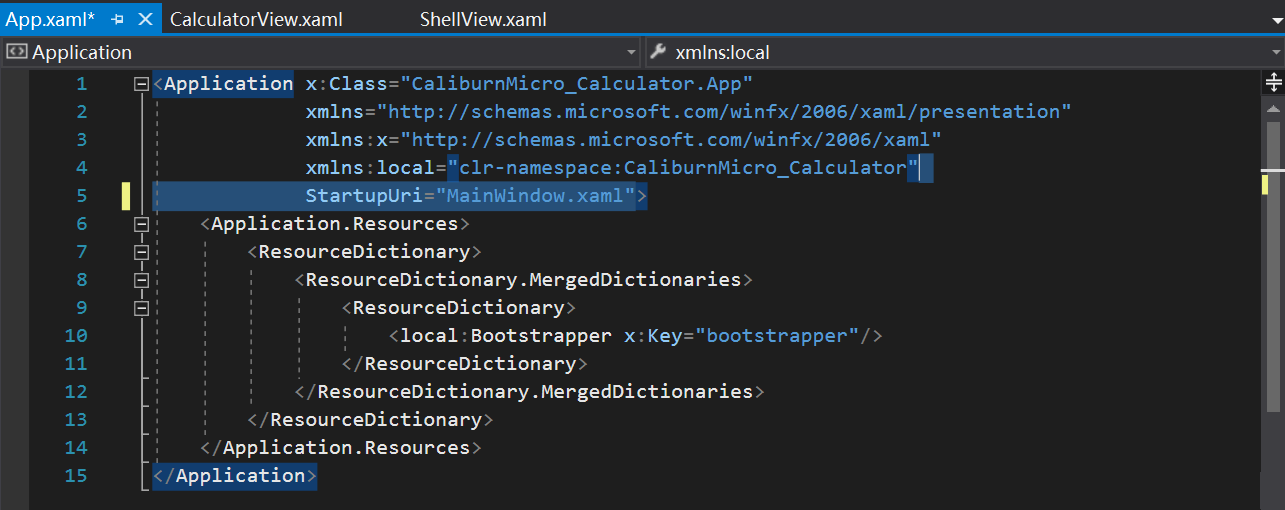
按下圖調整App.xaml
刪除語句StartupUri="MainWindow.xmal"。

- 填充Application.Resources
    <Application.Resources>
         <ResourceDictionary>
             <ResourceDictionary.MergedDictionaries>
                 <ResourceDictionary>
                     <local:Bootstrapper x:Key="bootstrapper"/>
                 </ResourceDictionary>
             </ResourceDictionary.MergedDictionaries>
         </ResourceDictionary>
    </Application.Resources>
4 . 創建Bootstrapper類
然後讓其繼承自BootstrapperBase類,並加上構造函數,另外再重寫函數OnStartup即可。
using System.Windows;
using Caliburn.Micro;
using CaliburnMicro_Calculator.ViewModels;

namespace CaliburnMicro_Calculator
{
    public class Bootstrapper : BootstrapperBase
    {
        public Bootstrapper()
        {
            Initialize();
        }

        protected override void OnStartup(object obj, StartupEventArgs e)
        {
            DisplayRootViewFor<ShellViewModel>();
        }
    }
}
5 . 在項目目錄下新建Models, ViewModels, Views這3個文件夾
在ViewModel文件夾中添加ShellViewModel.cs,並創建Left, Right和Result這3個屬性。
需要註意的是 ShellViewModel.cs需要繼承類 Screen 和 INotifyPropertyChanged (用於感知並同步所綁定屬性的變化),ShellViewModel具體代碼為:
using System.ComponentModel;
using System.Threading;
using System.Windows;
using System.Windows.Controls;
using Caliburn.Micro;

namespace CaliburnMicro_Calculator.ViewModels
{
    public class ShellViewModel : Screen, INotifyPropertyChanged
    {
        private double _left;
        private double _right;
        private double _result;

        public double Left
        {
            get { return _left; }
            set
            {
                _left = value;
                NotifyOfPropertyChange();
            }
        }

        public double Right
        {
            get { return _right; }
            set
            {
                _right = value;
                NotifyOfPropertyChange();
            }
        }

        public double Result
        {
            get { return _result; }
            set
            {
                _result = value;
                NotifyOfPropertyChange();
            }
        }
}
說明: 最開始佈局xaml時,設計位置時採用的是左(operand 1), 中(operand 2), 右(result),於是屬性值使用了Left, Right和Result。
Step 4: 設計XAML並綁定屬性
在Views文件夾中創建Window,命名為ShellView.xaml,在Views文件夾下創建子文件夾Images,用於存放+,-,*,/這4種操作對應的小圖標,其具體代碼如下:
<Window x:Class="CaliburnMicro_Calculator.Views.ShellView"
        xmlns="http://schemas.microsoft.com/winfx/2006/xaml/presentation"
        xmlns:x="http://schemas.microsoft.com/winfx/2006/xaml"
        xmlns:d="http://schemas.microsoft.com/expression/blend/2008"
        xmlns:mc="http://schemas.openxmlformats.org/markup-compatibility/2006"
        xmlns:local="clr-namespace:CaliburnMicro_Calculator.Views"
        xmlns:cal="http://www.caliburnproject.org"
        mc:Ignorable="d"
        Title="Calculator" SizeToContent="Height" Width="240">

    <StackPanel Background="Beige">
        <StackPanel Orientation="Horizontal">
            <Label Margin="10"
                   Target="{Binding ElementName=left}">
                Operand _1:
            </Label>
            <TextBox Margin="10"
                     Width="72"
                     x:Name="left"/>
        </StackPanel>
        <StackPanel Orientation="Horizontal">
            <Label Margin="10"
                   Target="{Binding ElementName=right}">
                Operand _2:
            </Label>
            <TextBox Margin="10"
                     Width="72"
                     x:Name="right"/>
        </StackPanel>
        <StackPanel Orientation="Horizontal">
            <Button Margin="10"
                    x:Name="btnPlus"
                    cal:Message.Attach="[Event Click]=[Action Plus(left.Text, right.Text):result.Text]">
                <Image Source="Images/op1.ICO"/>
            </Button>

            <Button Margin="10"
                    x:Name="btnMinus"
                    cal:Message.Attach="[Event Click]=[Action Minus(left.Text, right.Text):result.Text]">
                <Image Source="Images/op2.ICO"/>
            </Button>

            <Button Margin="10"
                    x:Name="btnMultiply"
                    cal:Message.Attach="[Event Click]=[Action Multipy(left.Text, right.Text):result.Text]">
                <Image Source="Images/op3.ICO"/>
            </Button>

            <Button Margin="10"
                    x:Name="btnDivide" IsEnabled="{Binding Path=CanDivide}"
                    cal:Message.Attach="[Event Click]=[Action Divide(left.Text, right.Text):result.Text]">
                <Image Source="Images/op4.ICO"/>
            </Button>

        </StackPanel>
        <StackPanel Orientation="Horizontal">
            <Label Margin="10">
                Answer:
            </Label>
            <TextBox Margin="10"
                     Width="72"
                     Text ="{Binding Path=Result, StringFormat={}{0:F4}}" IsReadOnly="True" />
        </StackPanel>
    </StackPanel>
</Window>說明:對操作數Operand _1和Operand _2,按Alt鍵+數字可以選中該處,這是WPF的一個特殊用法。由於計算結果不希望被修改,於是加上了屬性IsReadOnly="True"。
Step 5: 設計並綁定事件
由於暫時只打算實現+, -, *, /四種操作,於是我們只需創建相應的4個函數即可,由於除數是0這個操作不允許,於是需再加個判斷函數CanDivide。
Caliburn.Micro中綁定事件的寫法是:
cal:Message.Attach="[Event E]=[Action A]"(E是操作,比如Click, MouseDown, KeyDown等等,A是ViewModel中具體的函數。)
向ShellViewModel中加入事件中要做的事,此時ShellViewModel為:
using System.ComponentModel;
using System.Threading;
using System.Windows;
using System.Windows.Controls;
using Caliburn.Micro;

namespace CaliburnMicro_Calculator.ViewModels
{
    public class ShellViewModel : Screen, INotifyPropertyChanged
    {
        private double _left;
        private double _right;
        private double _result;

        public double Left
        {
            get { return _left; }
            set
            {
                _left = value;
                NotifyOfPropertyChange();
            }
        }

        public double Right
        {
            get { return _right; }
            set
            {
                _right = value;
                NotifyOfPropertyChange();
            }
        }

        public double Result
        {
            get { return _result; }
            set
            {
                _result = value;
                NotifyOfPropertyChange();
            }
        }
                public bool CanDivide(double left, double right)
        {
            return right != 0;
        }

        public async void Divide(double left, double right)
        {
            Thread.Sleep(600);
            if (CanDivide(left, right) == true)
                Result = left / right;
            else MessageBox.Show("Divider cannot be zero.", "Warning", MessageBoxButton.OK, MessageBoxImage.Warning);
        }

        public async void Plus(double left, double right)
        {
            Result = left + right;
        }

        public async void Minus(double left, double right)
        {
            Result = left - right;
        }

        public async void Multipy(double left, double right)
        {
            Result = left * right;
        }
    }
}
此時計算器的功能已基本完成,但我們可以對ViewModel進行適當的調整:
1.創建新的ViewModel - CalculatorViewModel,將原來的ShellViewModel中具體的計算邏輯移入到CalculatorViewModel中;
2.此時讓ShellViewModel繼承Conductor<Object>,於是ShellViewModel擁有了管理Screen實例的功能(ViewModel中使用ActivateItem函數,而View中使用X:Name="ActivateItem"標簽),其具體代碼為:
using System.ComponentModel;
using System.Threading;
using System.Windows;
using System.Windows.Controls;
using Caliburn.Micro;

namespace CaliburnMicro_Calculator.ViewModels
{
    public class ShellViewModel : Conductor<object>
    {
        public ShellViewModel()
        {
        }
        public void ShowCalculator()
        {
            ActivateItem(new CalculatorViewModel());
        }
    }
}
此時,CalculatorViewModel的具體代碼為:
using System.ComponentModel;
using System.Threading;
using System.Windows;
using Caliburn.Micro;

namespace CaliburnMicro_Calculator.ViewModels
{
    public class CalculatorViewModel: Screen, INotifyPropertyChanged
    {
        private double _left;
        private double _right;
        private double _result;

        public double Left
        {
            get { return _left; }
            set
            {
                _left = value;
                NotifyOfPropertyChange();
            }
        }

        public double Right
        {
            get { return _right; }
            set
            {
                _right = value;
                NotifyOfPropertyChange();
            }
        }

        public double Result
        {
            get { return _result; }
            set
            {
                _result = value;
                NotifyOfPropertyChange();
            }
        }

        public CalculatorViewModel()
        {
        }

        public bool CanDivide(double left, double right)
        {
            return right != 0;
        }

        public async void Divide(double left, double right)
        {
            Thread.Sleep(600);
            if (CanDivide(left, right) == true)
                Result = left / right;
            else MessageBox.Show("Divider cannot be zero.", "Warning", MessageBoxButton.OK, MessageBoxImage.Warning);
        }

        public async void Plus(double left, double right)
        {
            Result = left + right;
        }

        public async void Minus(double left, double right)
        {
            Result = left - right;
        }

        public async void Multipy(double left, double right)
        {
            Result = left * right;
        }
    }
}
3 . 對於View,只需把CalculatorViewModel對應的CalculatorView作為ContentControl控制項嵌入ShellView即可。此時ShellView的代碼調整為:
<Window x:Class="CaliburnMicro_Calculator.Views.ShellView"
        xmlns="http://schemas.microsoft.com/winfx/2006/xaml/presentation"
        xmlns:x="http://schemas.microsoft.com/winfx/2006/xaml"
        xmlns:d="http://schemas.microsoft.com/expression/blend/2008"
        xmlns:mc="http://schemas.openxmlformats.org/markup-compatibility/2006"
        xmlns:local="clr-namespace:CaliburnMicro_Calculator.Views"
        xmlns:cal="http://www.caliburnproject.org"
        mc:Ignorable="d"
        Title="Calculator" SizeToContent="Height" Width="240">

    <Grid MinHeight="200">
        <Button Content="Show Calculator" x:Name="ShowCalculator" Grid.Row="0"></Button>
        <ContentControl x:Name="ActiveItem"></ContentControl>
    </Grid>
</Window>另外提一點,向ViewModel A中嵌入ViewModel B,一般來說需要做的操作是:
在A的view中使用ContentControl,綁定B的ViewModel只需使用語句cal:View.Model="{Binding BViewModel}"即可,而B的view是UserControl就可以啦。
此時CalculatorView是一個UserControl,其代碼為:
<UserControl x:Class="CaliburnMicro_Calculator.Views.CalculatorView"
             xmlns="http://schemas.microsoft.com/winfx/2006/xaml/presentation"
             xmlns:x="http://schemas.microsoft.com/winfx/2006/xaml"
             xmlns:mc="http://schemas.openxmlformats.org/markup-compatibility/2006"
             xmlns:d="http://schemas.microsoft.com/expression/blend/2008"
             xmlns:local="clr-namespace:CaliburnMicro_Calculator.Views"
             xmlns:cal="http://www.caliburnproject.org"
             mc:Ignorable="d"
             Width="240">

    <StackPanel Background="Beige">
        <StackPanel Orientation="Horizontal">
            <Label Margin="10"
                   Target="{Binding ElementName=left}">
                Operand _1:
            </Label>
            <TextBox Margin="10"
                     Width="72"
                     x:Name="left"/>
        </StackPanel>
        <StackPanel Orientation="Horizontal">
            <Label Margin="10"
                   Target="{Binding ElementName=right}">
                Operand _2:
            </Label>
            <TextBox Margin="10"
                     Width="72"
                     x:Name="right"/>
        </StackPanel>
        <StackPanel Orientation="Horizontal" HorizontalAlignment="Center">
            <Button Margin="10"
                    x:Name="btnPlus"
                    cal:Message.Attach="[Event Click]=[Action Plus(left.Text, right.Text):result.Text]">
                <Image Source="Images/op1.ICO"/>
            </Button>

            <Button Margin="10"
                    x:Name="btnMinus"
                    cal:Message.Attach="[Event Click]=[Action Minus(left.Text, right.Text):result.Text]">
                <Image Source="Images/op2.ICO"/>
            </Button>

            <Button Margin="10"
                    x:Name="btnMultiply"
                    cal:Message.Attach="[Event Click]=[Action Multipy(left.Text, right.Text):result.Text]">
                <Image Source="Images/op3.ICO"/>
            </Button>

            <Button Margin="10"
                    x:Name="btnDivide" IsEnabled="{Binding Path=CanDivide}"
                    cal:Message.Attach="[Event Click]=[Action Divide(left.Text, right.Text):result.Text]">
                <Image Source="Images/op4.ICO"/>
            </Button>

        </StackPanel>
        <StackPanel Orientation="Horizontal">
            <Label Margin="10">
                Answer:
            </Label>
            <TextBox Margin="10"
                     Width="72"
                     Text ="{Binding Path=Result, StringFormat={}{0:F4}, UpdateSourceTrigger=PropertyChanged}" IsReadOnly="True" />
        </StackPanel>
    </StackPanel>
</UserControl>
好啦,就醬,由於本例中邏輯並不複雜,Model暫時用不上,對於複雜一點的項目,Model主要負責數據的讀取,如文件操作、資料庫操作、service調用等,以後有機會舉例具體來說。
如果需要持久化(persistent),則還需給給每對M-VM(Model和ViewModel)加入State,這個實際工程中也用得特別多。
Part 6: 功能舉例
Calculator主頁:

點擊按鈕“ShowCalculator”即可看到具體的計算器~
乘法舉例:

除法舉例:

最後附上代碼:
CaliburnMicro-Calculator: A simple Calculator using Caliburn.Micro
https://github.com/yanglr/CaliburnMicro-Calculator,
歡迎fork和star,如有改進意見歡迎提交pull request~


