
前端小白也能快速學會的博客園博客美化全攻略 [TOC] 美化方法論簡介 一般而言,需要選一個預設的skin,然後在該基礎上調整。 官方介紹: 博客皮膚模板 官方文檔 【博客園skin開發文檔 】: 寬屏模版: SimpleMemory Minyx2_Lite lessIsMore BlueSky 博 ...
目錄
- 前端小白也能快速學會的博客園博客美化全攻略
- 美化方法論簡介
- 準備工作
- 如何模仿一個博客園的自定義風格(樣式css+動態效果js)?
- markdown樣式自定義
- 在頁面頂部添加"自定義搜索"功能
- 在頁面頂部添加"音樂播放器"(Flash)播放背景音樂
- 在頁面頂部添加"Fork me on Github"圖標
- 為導航欄設置漸變背景色
- 在公告欄添加滾動文字
- 在公告欄加入自己的社交網路賬號 - 圖片鏈接
- 在公告欄添加一個能旋轉的rss圖標
- 在公共欄添加"小人時鐘"(Flash)
- 在公共欄添加"站點統計"功能
- 在公告欄中加入"自定義搜索"(PopUp彈窗)
- 頁面底部添加"回到頂部" + "收藏" + "快速評論"功能
- "自動移動的目錄"功能
- 改進評論的顯示樣式
- 在公告欄添加"友情鏈接"
- "博客簽名"功能
- 禁用頁面的"選中複製"功能
- 不顯示底部廣告
- 修改導航欄(修改部分鏈接的文字 + 增加下拉菜單)
- 微博秀的嵌入(支持http/https訪問)
- 分享組件的嵌入(支持http/https訪問)
- 打賞功能
- 複製文字 自動加版權
前端小白也能快速學會的博客園博客美化全攻略
美化方法論簡介
一般而言,需要選一個預設的skin,然後在該基礎上調整。
官方介紹:
博客皮膚模板 http://skintemplate.cnblogs.com/
官方文檔 - 【博客園skin開發文檔 】:
https://docs.qq.com/sheet/DZFJDeGVuRW5QRmJa
寬屏模版:
SimpleMemory
Minyx2_Lite
lessIsMore
BlueSky
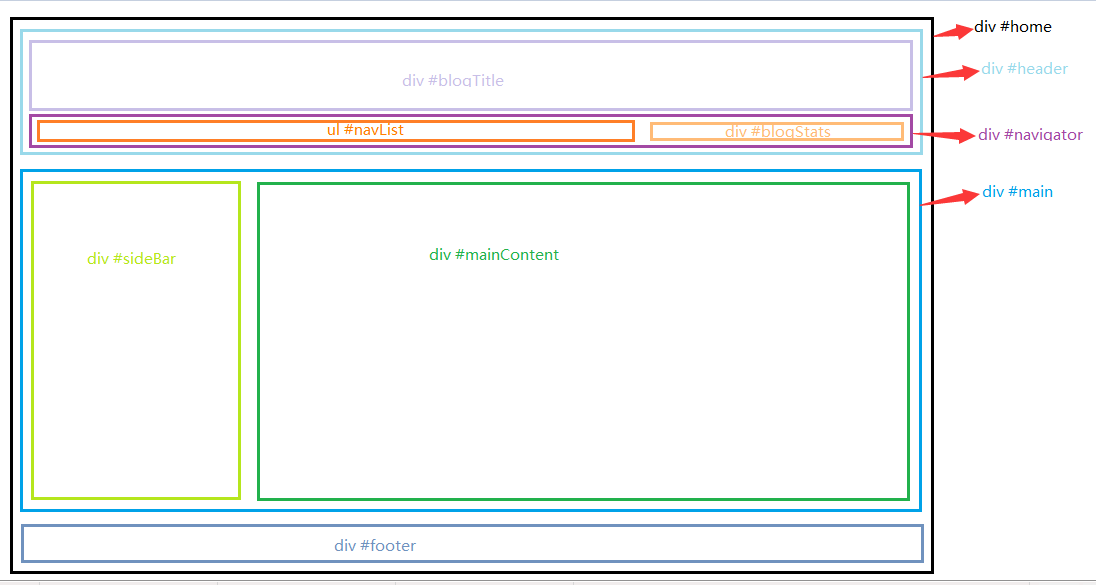
博客園佈局的組成及其對應關係:
準備工作
- 首先你得有個cnblogs博客
- 打開 博客後臺管理
- 申請js許可權
- 在博客皮膚選項卡中將博客皮膚設置為:
LessIsMore - 將 頁面定製.css 複製到 頁面定製CSS代碼 代碼框內
- 將 頁首.html 複製到 頁首Html代碼 代碼框內
- 將 頁尾.html 複製到 頁腳Html代碼 代碼框內
- 保存,即可用
附源碼:
yanglr/Beautify-cnblogs: Beautify-cnblogs
https://github.com/yanglr/Beautify-cnblogs
歡迎fork或star~
js許可權申請
登陸後點擊“我的博客”——“管理”——“設置”———在下拉後找到“博客側邊欄公告”,後方有一個“申請js許可權”。
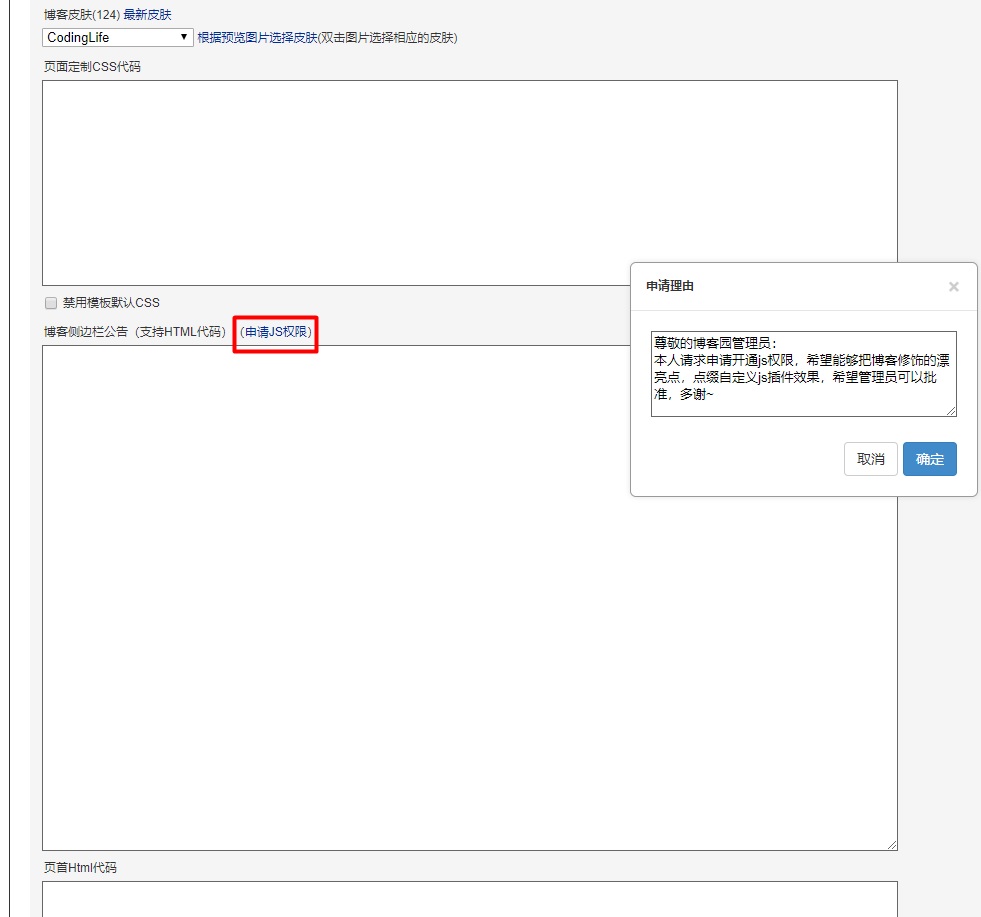
或者也可進博客園園子頁面(https://home.cnblogs.com/feed/all/),髮狀態@博客園團隊,申請開通js許可權。
也可發個郵件到[email protected]申請js許可權。
申請時內容模板已為你備好:
尊敬的博客園管理員: 本人請求申請開通js許可權,希望能夠把博客修飾的漂亮點,點綴自定義js插件效果,希望管理員可以批准,多謝~
提交完申請,會彈出提示:
JS許可權申請已提交,待審核。
如何模仿一個博客園的自定義風格(樣式css+動態效果js)?
模仿一個cnblogs的全局css,只需打開Chrome瀏覽器,按下F12,找裡面的skin css和custom css,例如:
<link id="MainCss" type="text/css" rel="stylesheet" href="/skins/LessIsMore/bundle-LessIsMore.css?...">

<link type="text/css" rel="stylesheet" href="/blog/customcss/198996.css?v=...">
補充完整首碼:http://www.cnblogs.com,使用ref將該兩個css引用到自己的博客中,即可進行大概樣子的模仿,其他部分需要細調。
markdown樣式自定義
預設markdown狀態下,代碼中的字比較小。
/* 文章標題樣式(這個不是markdown里的標題) */
#topics .postTitle a {
/* color: #169fe6; */
font-family: Georgia,Times New Roman,Times,sans-serif, monospace;
font-weight: bold;
}
/* 普通文字樣式 */
#cnblogs_post_body p {
margin: 18px auto;
color: #000;
font-family: Georgia,Times New Roman,Times,sans-serif, monospace;
font-size: 16px;
text-indent: 0;
}
/* 標題樣式 */
#cnblogs_post_body h1 {
font-family: Georgia,Times New Roman,Times,sans-serif, monospace;
font-size: 32px;
font-weight: bold;
line-height: 1.5;
margin: 10px 0;
}
#cnblogs_post_body h2 {
font-family: Consolas, "Microsoft YaHei", monospace;
font-size: 26px;
font-weight: bold;
line-height: 1.5;
margin: 20px 0;
}
#cnblogs_post_body h3 {
font-family: Georgia,Times New Roman,Times,sans-serif, monospace;
font-size: 20px;
font-weight: bold;
line-height: 1.5;
margin: 10px 0;
}
#cnblogs_post_body h4 {
font-family: Georgia,Times New Roman,Times,sans-serif, monospace;
font-size: 18px;
font-weight: bold;
margin: 10px 0;
}
/* 標題樣式設置結束 */
/* 去除雙下劃線斜體樣式 */
em {
font-style: normal;
color: #000;
}
/* 無序列表 */
#cnblogs_post_body ul li {
font-family: Georgia,Times New Roman,Times,sans-serif, monospace;
color: #000;
font-size: 16px;
list-style-type: disc;
}
/* 有序列表 */
#cnblogs_post_body ol li {
font-family: Georgia,Times New Roman,Times,sans-serif, monospace;
color: #000;
font-size: 16px;
list-style-type: decimal;
}
/* 超鏈接 */
#cnblogs_post_body a:link {
text-decoration: none;
color: #002C99;
}
/* 引用背景 */
#topics .postBody blockquote {
background: #fff3d4;
border: none;
border-left: 5px solid #f6b73c;
margin: 0;
padding-left: 10px;
}
/* 單行代碼 */
.cnblogs-markdown code {
font-family: Consolas, "Microsoft YaHei", monospace !important;
font-size: 16px !important;
line-height: 20px;
background-color: #f5f5f5 !important;
border: 1px solid #ccc !important;
padding: 0 5px !important;
border-radius: 3px !important;
line-height: 1.8;
margin: 1px 5px;
vertical-align: middle;
display: inline-block;
}
/* 多行代碼, 引用 */
.cnblogs-markdown .hljs {
font-family: Consolas, "Microsoft YaHei", monospace !important;
font-size: 16px !important;
line-height: 1.5 !important;
padding: 5px !important;
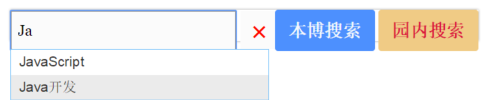
}在頁面頂部添加"自定義搜索"功能
css部分:
<style type="text/css">
    #auto_div {
        display: none;
        width: 257px;
        border: 1px #74c0f9 solid;
        background: #FFF;
        position: absolute;
        top: 24px;
        left: 0;
        margin-top: 15px;
        color: #323232;
        /*設置顯示在當前頁面的上一層*/
        z-index: 1;
    }

    .side_search {
        float: left;
        position: relative;
        height: 31px;
        margin-left: 25px;
        display: inline-block;
    }

        .side_search:hover {
            -webkit-box-shadow: 0 0 3px #999;
            -moz-box-shadow: 0 0 3px #999
        }

    .search_input {
        width: 210px;
        vertical-align: middle;
        height: 30px;
        line-height: 30px;
        border: 1px solid #999;
        border-radius: 2px 0 0 2px;
        padding: 4px 7px;
        background-color: #fbfbfb;
    }

    .delete_btn {
        background: #fbfbfb;
        margin-left: -6px;
        border: 1px solid #fbfbfb;
        border-radius: 0 3px 3px 0;
        cursor: pointer;
        display: inline-block;
        vertical-align: middle;
        color: red;
        font-weight: bold;
        width: 38px;
        font-size: 25px;
        height: 38px;
        padding-bottom: inherit;
    }

    .search_btn {
        border-radius: 3px 3px 3px 3px;
        background: #4d90fe;
        margin-left: -7px;
        border: 1px solid #4d90fe;
        cursor: pointer;
        display: inline-block;
        vertical-align: middle;
        color: #f3f7fc;
        font-weight: bold;
        width: 100px;
        font-size: 18px;
        height: 41px;
    }

        .search_btn:hover {
            background: #1874CD
        }

    .search_btn2 {
        border-radius: 3px 3px 3px 3px;
        background: #F0CB85;
        border: 1px solid #F0CB85;
        cursor: pointer;
        display: inline-block;
        vertical-align: middle;
        color: #DC143C;
        font-weight: bold;
        width: 100px;
        font-size: 18px;
        height: 41px;
    }

        .search_btn2:hover {
            background: #DEB887
        }

    input, button, textarea, select, optgroup, option {
        font-family: inherit;
        font-size: inherit;
        font-style: inherit;
        font-weight: inherit;
    }
</style>
js部分:
html部分:
<h1 style="margin-left: 570px;padding-top:15px;padding-bottom: 15px; color: #337ab7;font-size: 3em;font-weight: bold;font-style: italic;text-shadow: 1px 0px 0px #1E90FF;"> </h1>
<div class="side_search">
<input type="text" id="zzk_q" class="search_input" onkeydown="return zzk_go_enter(event);" placeholder="輸入 回車搜索" tabindex="1" autofocus x-webkit-speech>
<div id="auto_div">
</div>
<input onclick="quickdelete()" type="button" class="delete_btn" value="×" title="清空">
<input onclick="zzk_go()" type="button" class="search_btn" value="本博搜索">
<input onclick="zzk_go2()" type="button" class="search_btn2" value="園內搜索">
</div>效果圖:
在頁面頂部添加"音樂播放器"(Flash)播放背景音樂
<div style="display: table; text-align: center; width: 40%; height: 100%;">
<embed src="https://music.163.com/style/swf/widget.swf?sid=26237342&type=2&auto=0&width=320&height=66" width="340" height="86"  allowNetworking="all" ></embed>
</div>
效果圖:

在頁面頂部添加"Fork me on Github"圖標
頁首html需要添加
<div>
<a href="http://github.com/yanglr" target="_blank" style="position: absolute;right: 0;  top: 0; z-index: 100;">
    <img src="http://www.cnblogs.com/images/cnblogs_com/enjoy233/1389971/o_git-right-link.gif" alt="Fork me on github">
</a>
</div>
效果圖見本博客右上角。
為導航欄設置漸變背景色
/* 頭部 */
#header {
    position: relative;
    height: 280px;
    margin: 0;
    background: #020031;
    background: -moz-linear-gradient(45deg,#020031 0,#6d3353 100%);
    background: -webkit-gradient(linear,left bottom,right top,color-stop(0%,#020031),color-stop(100%,#6d3353));
    background: -webkit-linear-gradient(45deg,#020031 0,#6d3353 100%);
    background: -o-linear-gradient(45deg,#020031 0,#6d3353 100%);
    background: -ms-linear-gradient(45deg,#020031 0,#6d3353 100%);
    background: linear-gradient(45deg,#020031 0,#6d3353 100%);
    filter: progid:DXImageTransform.Microsoft.gradient(startColorstr='#020031', endColorstr='#6d3353', GradientType=1);
    -webkit-box-shadow: inset 0 3px 7px rgba(0,0,0,.2),inset 0 -3px 7px rgba(0,0,0,.2);
    -moz-box-shadow: inset 0 3px 7px rgba(0,0,0,.2),inset 0 -3px 7px rgba(0,0,0,.2);
    box-shadow: inset 0 3px 7px rgba(0,0,0,.2),inset 0 -3px 7px rgba(0,0,0,.2);
}
在公告欄添加滾動文字
使用marquee標簽即能實現文字的滾動
<marquee><a href="#"><font color="blue" size="4">You will make it!
</marquee>
效果圖:

在公告欄加入自己的社交網路賬號 - 圖片鏈接
    <div nowrap align=center>
        <img src="http://images.cnblogs.com/cnblogs_com/enjoy233/1389971/o_gzh.png" width=150 height=150>
    </div>
<br>
<div align="center">
     <a href="http://stackoverflow.com/users/6075331/bravo-young" target="_blank" class="mr5 "><strong>StackOverflow</strong></a><font  style="color:#BF7158">(</font>
    <img src="http://images.cnblogs.com/cnblogs_com/enjoy233/1389971/o_reputation-rp.png" class="mr5">
    <span style="color:#BF7158" class="mr10">406 <font size=4 color=black>⬆</font>)</span>
</div>

<br>

<div class="c-social" align="center">
<span>
    <a href="https://github.com/yanglr" target="_blank">
      <img src="https://www.cnblogs.com/images/cnblogs_com/enjoy233/1389971/o_github.png" class="mr5" width = 40 height=40>
    </a>
    <a href="http://blog.csdn.net/lzuacm" target="_blank">
      <img src="http://images.cnblogs.com/cnblogs_com/enjoy233/1389971/o_csdn.png" class="mr5" width = 40 height=40>
    </a>
    <a href="https://www.zhihu.com/people/legege007" target="_blank">
      <img src="https://www.cnblogs.com/images/cnblogs_com/enjoy233/1389971/o_zhihu.png" class="mr5" width = 40 height=40>
    </a>
    <a href="http://weibo.com/546671991" target="_blank">
      <img src="https://www.cnblogs.com/images/cnblogs_com/enjoy233/1389971/o_weibo.png" class="mr5" width = 40 height=40>
    </a>

</span>
效果圖:

在公告欄添加一個能旋轉的rss圖標
先將相應的css放入頁面定製css或公告欄的css中,然後在後面使用。
#feed_icon {
    border: #000 solid 2px;
    display: block;
    margin: 50px auto;
    border-radius: 50%;
    transition: all 2.0s;
}

#feed_icon:hover {
    transform: rotate(360deg);
}
<div id="feed">
<a href="https://www.cnblogs.com/enjoy233/rss" title="訂閱Feed" target="_blank">
<img id="feed_icon" src="https://www.cnblogs.com/images/cnblogs_com/enjoy233/1389971/o_rss.png" alt="" style="border: 0pt none;" width = 60 height=60>
</a>
</div>效果圖:

在公共欄添加"小人時鐘"(Flash)
<embed wmode="transparent" src="https://files.cnblogs.com/files/enjoy233/honehone_clock_tr.swf" quality="high" bgcolor="#FDF6E3" width="200" height="120" name="honehoneclock" align="middle" allowscriptaccess="always"type="application/x-shockwave-flash" pluginspage="http://www.macromedia.com/go/getflashplayer">效果圖:

在公共欄添加"站點統計"功能
打開網站:http://www.flagcounter.com/ ,無需註冊,點擊黃色按鈕"Get Your Flag Counter",即可生成嵌入該插件的html代碼。
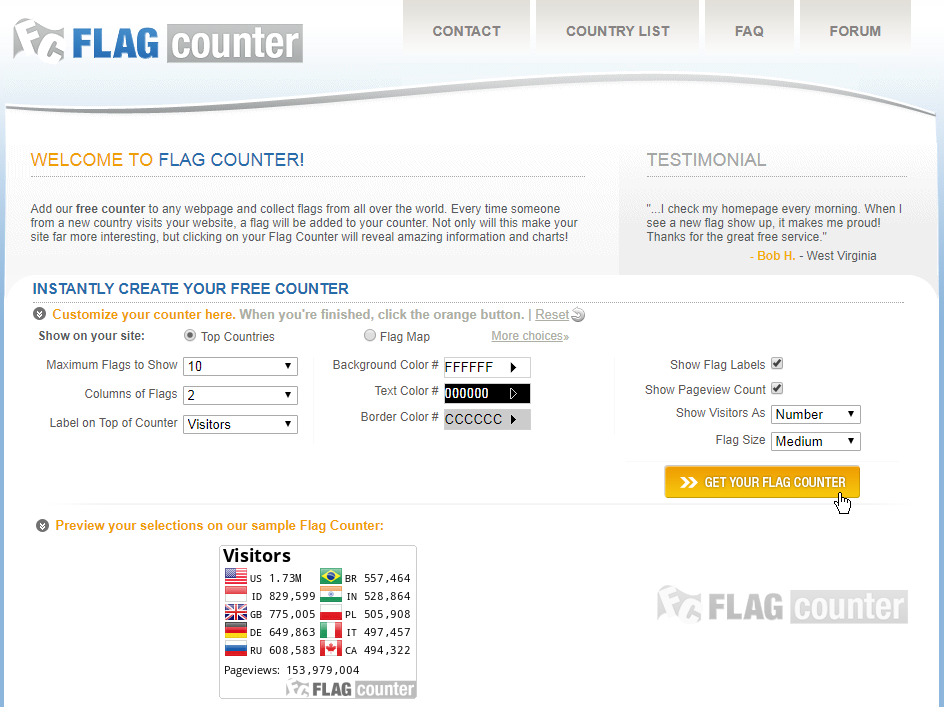
生成的html代碼如下:
<div>
<a href="https://info.flagcounter.com/LCgi"><img src="https://s04.flagcounter.com/count2/LCgi/bg_FFFFFF/txt_000000/border_CCCCCC/columns_2/maxflags_10/viewers_0/labels_1/pageviews_1/flags_0/percent_0/" alt="Flag Counter" border="0"></a>
<div>
最後將該代碼加入到公告欄的html代碼中即能生效。
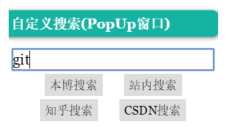
在公告欄中加入"自定義搜索"(PopUp彈窗)
實現的基本原理:
onclick = "window.open()", target = newWindow
代碼:
效果圖:
頁面底部添加"回到頂部" + "收藏" + "快速評論"功能
js部分:
<script language="javascript" type="text/javascript">
//生成目錄索引列表
function GenerateContentList()
{
    var jquery_h3_list = $('#cnblogs_post_body h4');//如果你的章節標題不是h4,只需要將這裡的h4換掉即可
    if(jquery_h3_list.length>0)
    {
        var content = '<a name="_labelTop"></a>';
        content    += '<div id="navCategory">';
        content    += '<p style="font-size:18px"><b>閱讀目錄</b></p>';
        content    += '<ul>';
        for(var i =0;i<jquery_h3_list.length;i++)
        {
            var go_to_top = '<div style="text-align: right"><a href="#_labelTop">回到頂部</a><a name="_label' + i + '"></a></div>';
            $(jquery_h3_list[i]).before(go_to_top);
            var li_content = '<li><a href="#_label' + i + '">' + $(jquery_h3_list[i]).text() + '</a></li>';
            content += li_content;
        }
        content    += '</ul>';
        content    += '</div>';
        if($('#cnblogs_post_body').length != 0 )
        {
            $($('#cnblogs_post_body')[0]).prepend(content);
        }
    }
}
GenerateContentList();
</script>
html部分:
<div class="scrollBtn" id="scrollBtn">
    <ul class="clearfix">
        <li class="sB-home">
            <a href="http://www.cnblogs.com/enjoy233" class="ff-t" title="首頁"></a>
        </li>
        <li class="sB-comment">
            <a href="#blog-comments-placeholder" onclick="$('#tbCommentBody').focus();" class="ff-t" title="添加評論"></a>
        </li>
        <li class="sB-share"><a onclick="if(cb_entryId !=undefined){AddToWz(cb_entryId)}" href="javascript:void(0);" title="收藏"></a></li>
        <li class="sB-goTop" id="goTop" style="display: list-item;">
            <a href="#top" title="回頂部"></a>
        </li>
    </ul>
</div>
效果圖:

"自動移動的目錄"功能
代碼:
ref
nav.my.css
JavaScript
generate contents
效果圖:

改進評論的顯示樣式
改成了微信聊天的樣式。
純css實現:
.blog_comment_body {
background: #B2E866;
float: left;
border-radius: 5px;
position: relative;
overflow: visible;
margin-left: 33px;
max-width: 700px;
}
.feedbackListSubtitle a.layer {
background: #B2E866;
color: #414141 !important;
padding: 2px 4px;
border-radius: 2px;
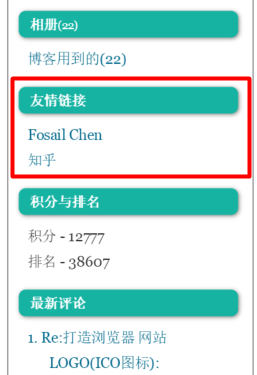
}在公告欄添加"友情鏈接"
cnblogs博客後臺提供了"鏈接"功能,這個就是用來添加友情鏈接的。
設置方法:
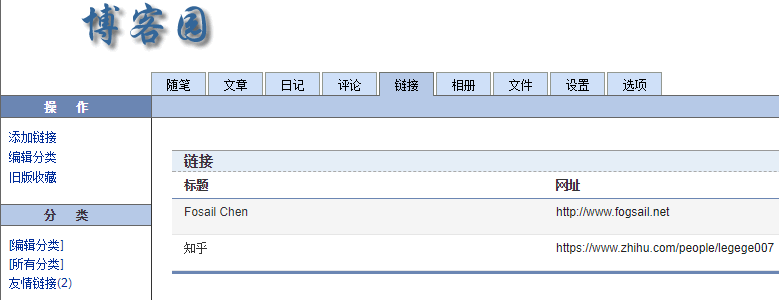
效果圖:
"博客簽名"功能
雖然cnblogs博客後臺提供了"博客簽名"功能,測試發現IE下不能用,只好改為用JQuery來實現了。
<script type="text/javascript">
$(document).ready(function(){
    $("#cnblogs_post_body").append('<br/><hr/><div style="border: 2px dotted #4d90fe; padding: 2px; background-color: lightgray">    作者:<a href="http://www.cnblogs.com/enjoy233/" target="_blank" title="Enjoy233的博客" style="color: brown">Bravo Yeung</a><br>    出處:<a href="http://www.cnblogs.com/Enjoy233/" target="_blank" title="http://www.cnblogs.com/Enjoy233/" style="color: blue">http://www.cnblogs.com/Enjoy233/</a>    <br>如果您覺得閱讀本文對您有幫助,請點擊一下右下方的<b style="color: blue; font-size: 16px">推薦</b>按鈕,您的<b style="color: blue; font-size: 16px">推薦</b>將是我寫作的最大動力!    <br>版權聲明:本文為博主原創或轉載文章,歡迎轉載,<b>但轉載文章之後必須在文章頁面明顯位置註明出處</b>,否則保留追究法律責任的權利。</div>');
});
</script>
禁用頁面的"選中複製"功能
在css中進行相應的設置即可。
/* 禁止頁面,選中 複製 */
html,body {
    moz-user-select: -moz-none;
    -moz-user-select: none;
    -o-user-select: none;
    -khtml-user-select: none;
    -webkit-user-select: none;
    -ms-user-select: none;
    user-select: none;
}
不顯示底部廣告
在css中進行相應的設置即可。
#ad_t2,#cnblogs_c1,#under_post_news,#cnblogs_c2,#under_post_kb {
display:none; !important
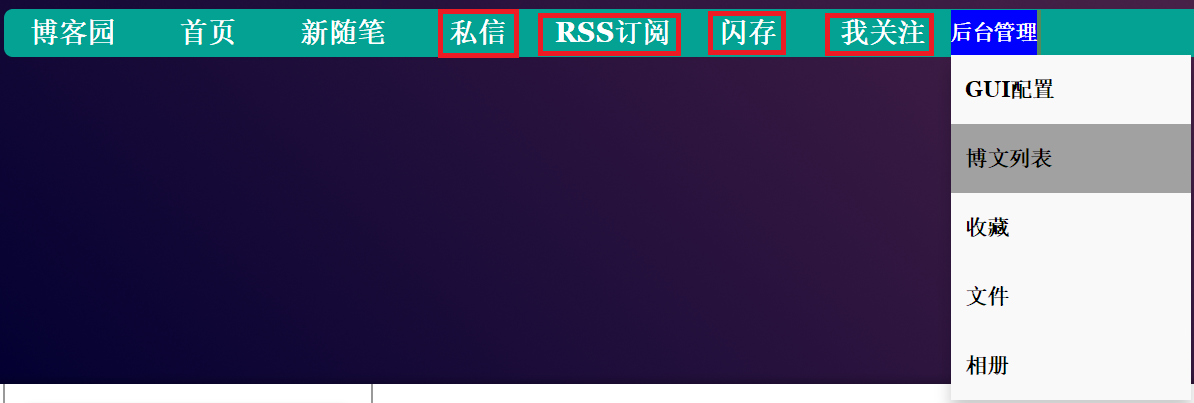
}修改導航欄(修改部分鏈接的文字 + 增加下拉菜單)
css部分:
/* 定製自己導航欄的樣式 */
#shwtop ul {
    margin: 0;
    padding: 0;
    list-style-type: none; /*去除li前的標註*/
    background-color: #333;
    overflow: hidden; /*隱藏溢出的部分,保持一行*/
}
#shwtop li {
    float: left; /*左浮動*/
}
#shwtop li a, .dropbtn {
    display: inline-block; /*設置成塊*/
    color: white;
    text-align: center;
    text-decoration: none;
    padding: 14px 16px;
}
/*滑鼠移上去,改變背景顏色*/
#shwtop li a:hover, .dropdown:hover .dropbtn {
    /* 當然顏色你可以自己改成自己喜歡的,我還是挺喜歡藍色的 */
    background-color: blue;
}
#shwtop .dropdown {
    /*
    display:inline-block將對象呈遞為內聯對象,
    但是對象的內容作為塊對象呈遞。
    旁邊的內聯對象會被呈遞在同一行內,允許空格。
    */
    display: inline-block;
}
#shwtop .dropdown-content {
    display: none;
    position: absolute;
    background-color: #f9f9f9;
    min-width: 160px;
    box-shadow: 0px 8px 16px 0px rgba(0,0,0,0.2);
}
#shwtop .dropdown-content a {
    display: block;
    color: black;
    padding: 8px 10px;
    text-decoration:none;
}
#shwtop .dropdown-content a:hover {
    background-color: #a1a1a1;
}
#shwtop .dropdown:hover .dropdown-content{
    display: block;
}
頁腳html部分:
<!-- 更新導航欄的菜單-->
<script>
    $(function(){
            $("#navigator").append('<div id="shwtop" >    <ul style="margin-left:5px;margin-right: 5px;">       <div class="dropdown">            <a href="#" class="dropbtn">後臺管理</a>            <div class="dropdown-content">                <!-- <a class="menu" href="這裡是你文章或隨筆分類的鏈接地址,自己修改下麵同理"> 這裡更改下拉具體內容 </a> -->                <a class="menu" href="http://i.cnblogs.com/Configure.aspx"  target="_blank">GUI配置</a>                <a class="menu" href="http://i.cnblogs.com/posts" target="_blank">博文列表</a>                <a class="menu" href="http://wz.cnblogs.com/" target="_blank">收藏</a>                               <a class="menu" href="http://i.cnblogs.com/Files.aspx" target="_blank">文件</a>   <a class="menu" href="https://i.cnblogs.com/EditGalleries.aspx" target="_blank">相冊</a>          </div>        </div>    </ul></div>');

        $("#navList").append('<li id="nav_home"><a id="enjoy233" rel="nofollow" href="https://ing.cnblogs.com/" target="_blank" title="進入我的快閃記憶體">快閃記憶體</a></li>');
        $("#navList").append('<li id="nav_follow"><a id="enjoy233" rel="nofollow" href="http://home.cnblogs.com/followees/" target="_blank" title="進入我的關註">我關註</a></li>');

        $('#navList')[0].children["nav_contact"].innerHTML='<a id="nav_contact" class="menu" rel="nofollow" href="https://msg.cnblogs.com/send/Enjoy233">私信</a>';
        $('#navList')[0].children["nav_rss"].innerHTML='<a id="nav_rss" class="menu" rel="nofollow" href="https://www.cnblogs.com/enjoy233/rss">RSS訂閱</a>';

            //載入圖片
            var ponum1 = $(".postTitle").length;
            var ponum2 = $(".entrylistPosttitle").length;
            if(ponum1!=0)
                articleimg(ponum1);
            if(ponum2!=0)
                entrylistarticleimg(ponum2);
        });
</script>
效果圖:
微博秀的嵌入(支持http/https訪問)
參看本人的另一篇文章 當今最全面可用的微博分享組件嵌入方法(親測2019年2月仍有效) - Enjoy233 即可。
效果圖(見本博客左側公告欄):

分享組件的嵌入(支持http/https訪問)
在頁腳.html中加入如下代碼:
<!-- Baidu Share BEGIN -->
<div id="bdshare" class="bdshare_t bds_tools get-codes-bdshare">
<span class="bds_more">分享到:</span>
<a href="#" class="bds_tsina" data-cmd="tsina" title="分享到新浪微博"></a>
<a href="#" class="bds_qzone" data-cmd="qzone" title="分享到QQ空間"></a>
<a href="#" class="bds_sqq" data-cmd="sqq" title="分享到QQ好友"></a>
<a href="#" class="bds_douban" data-cmd="douban" title="分享到豆瓣網"></a>
<a href="#" class="bds_youdao" data-cmd="youdao" title="分享到有道雲筆記"></a>
<a href="#" class="bds_renren" data-cmd="renren" title="分享到人人網"></a>
<a href="#" class="bds_kaixin001" data-cmd="kaixin001" title="分享到開心網"></a>
<a href="#" class="bds_mail" data-cmd="mail" title="分享到郵件分享"></a>
</div>
<script type="text/javascript" id="bdshare_js" data="type=tools&uid=2883522" ></script>
<script type="text/javascript" id="bdshell_js"></script>
<script type="text/javascript">
document.getElementById("bdshell_js").src = "//static.dmzj.com/baidushare/static/js/shell_v2.js?cdnversion=" + Math.ceil(new Date()/3600000)
</script>
<!-- Baidu Share END -->效果圖:

打賞功能
基於開源插件 tctip-v1.0.3 來實現~
在頁腳.html中插入如下代碼即可:
<!-- tctip 支付贊賞/打賞 -->
<script type="text/javascript" src="https://files.cnblogs.com/files/enjoy233/tctip-1.0.3.min.js"></script> <!-- js文件引入 -->
<script>
    new tctip({
        top: '20%',
        button: {
            id: 1,
            type: 'zanzhu',
        },
        list: [
            {
                type: 'alipay',
                qrImg: 'https://files.cnblogs.com/files/enjoy233/Reward_Alipay_Charge.bmp' //替換成自己的支付寶
            }, {
                type: 'wechat',
                qrImg: 'https://files.cnblogs.com/files/enjoy233/Reward_WX_Charge.bmp' //替換成自己的微信
            }
        ]
    }).init()
</script>
效果圖:

複製文字 自動加版權
頁首html中加入如下代碼:
<script language="javascript" type="text/javascript">
jQuery(document).on('copy', function(e)
{
  var selected = window.getSelection();
  var copyFooter = '<br>---------------------<br>著作權歸作者所有。<br>'
                        + '商業轉載請聯繫作者獲得授權,非商業轉載請註明出處。<br>'
                        + '作者:Bravo Yeung<br> 源地址:' + document.location.href
                        + '<br>來源:博客園cnblogs<br>© 版權聲明:本文為博主原創文章,轉載請附上博文鏈接!';
  var copyHolder = $('<div>', {html: selected + copyFooter, style: {position: 'absolute', left: '-99999px'}});

  $('body').append(copyHolder);
  selected.selectAllChildren( copyHolder[0] );
  window.setTimeout(function() {
      copyHolder.remove();
  },0);
});
</script>
效果圖:


